
Affiliate link disclosure – The BMW Repair Guide uses affiliate links in their site. For more information on affiliate links, please click here.
Repair Summary
This following article gives detailed instructions on replacing the timing chain in a MINI R56 Generation 2 vehicle. Even though we used a 2007 MINI Cooper to perform this repair, this article can be applied to any 2006-2013 Generation 2 MINI R56/R57 vehicle with minor modifications to the repair steps.
A MINI R56 timing chain replacement is most likely needed if your vehicle exhibits any of the common warning signs including the infamous "death rattle" from the right side of the motor.
If you own a second generation MINI R56, you are probably already aware that you are driving a ticking time bomb. The internet is inundated with forum threads, blog posts, and repair articles on the Achilles heel of the 2006-2013 MINI Cooper...chain tensioner failure that can lead to catastrophic engine damage.
As early as 2010, reports starting filtering in through repair shops and dealerships that MINI R56 owners were complaining of a rattling noise emanating from the right side of the engine...especially when the engine was cold and during short distance driving. Further investigation found that the rattle was being caused by "insufficient tension of the timing chain [sic]" in vehicles as early as 20,000 miles. This "insufficient tension" was being caused by a failed tensioner that allowed the timing chain to "slap" against the sides of the engine block. Other symptoms reported were fault codes related to timing issues (check engine light), misfires, the vehicle entering "limp mode" (won't shift out of a higher gear when driving), and loss of power.
The engine sound caused by a failing timing chain tensioner was quickly nicknamed the "death rattle" by MINI R56 owners. It earned this moniker due to the many engines that were destroyed when unsuspecting owners failed to have the sound quickly diagnosed. Continuing to drive the vehicle with a failed tensioner caused the timing chain to skip on the teeth of the camshaft gears (VANOS), precipitating the bolts to shear off and cause catastrophic engine failure.
What should I do if I think my chain tensioner is failing? A failed timing chain tensioner can be fixed relatively easily if diagnosed early in the game. On the MINI Cooper R56 N12 engine it requires removing the throttle body on the back of the engine, unscrewing the chain tensioner from the engine block, inserting a timing chain pre-tensioner test tool, confirming the timing chain is still in good condition, then installing a new chain tensioner unit.
The problem with all of this is quite simple...very few people catch it in time. Driving even an abbreviated amount of time with a failed tensioner causes timing chain elongation. Just replacing the tensioner and not the worn timing chain is like like replacing the tires on your car but forgetting to tighten the lug nuts; everything will be fine for a while before all hell breaks loose.
If you think your chain tensioner has failed, it is best practice to go ahead and perform an entire MINI R56 timing chain replacement. There are too many variables (and unknowns) involved with the MINI R56 Prince engine to take the chance that your timing chain is ok. The 2007 MINI Cooper we have used for this article is a good example of these unknowns. The owner brought it to us for diagnosis of an oil filter leak. There were no signs of the "death rattle" and operationally the car ran perfectly. After diagnosing the leak we tried to start the vehicle, only to be greeted with a morbid sound from the right side of the car and a spinning "no start" engine. Removing the valve cover quickly revealed our issue...the exhaust camshaft gear bolt had sheared off causing complete failure of the timing system. All of this at 70,000 miles and never leaving the garage.
We understand that the above example is not characteristic for all MINI R56s on the road, and is simply an illustration of the potential problems the BMW/Peugeot Prince engine may encounter. That being said, the BMW Repair Guide strongly recommends a complete MINI R56 timing chain system service when possible. This service should include replacing the timing chain, chain tensioners, bearing bolts, VANOS bolts, crankshaft pulley bolt and crankshaft seal. All of these are contained in a kit, so there is no need to purchase each part separately. We have listed below all of the parts required for this repair for your convenience.
A quick note on special tools needed for a MINI R56 timing chain replacement There is a lot of information online concerning what tools you need to perform a complete overhaul on you MINI R56 timing chain system. It can be very confusing as to what you need to purchase prior to starting this repair, and what you can get by without. The following is a guide on what is required to complete this repair, what is optional, and what you can completely skip altogether.
- Camshaft locking tool (required). You must have a camshaft locking tool to do a MINI R56 timing chain replacement. The reason is because the two camshafts must be locked into the correct position (90 degree crankshaft) or else you can throw the timing off while working on the timing chain. It sounds complicated....but really isn't. It will make perfect sense once you start the repair.
- Flywheel locking tool (required). Once again this is a required tool. You must lock the flywheel in the 90 degree crankshaft position to avoid throwing the engine out of time. There are inexpensive generic tools on the market that work fine with a simple 5 minute modification...we show you how in the repair steps below.
- Crankshaft seal installation tool (optional) - If you have one (or can afford one) that's great, but its completely optional. You can install your new crankshaft seal with a piece of PVC pipe from your local home improvement store for just a couple bucks. That's the way we did it in this article (if that helps you with your decision making).
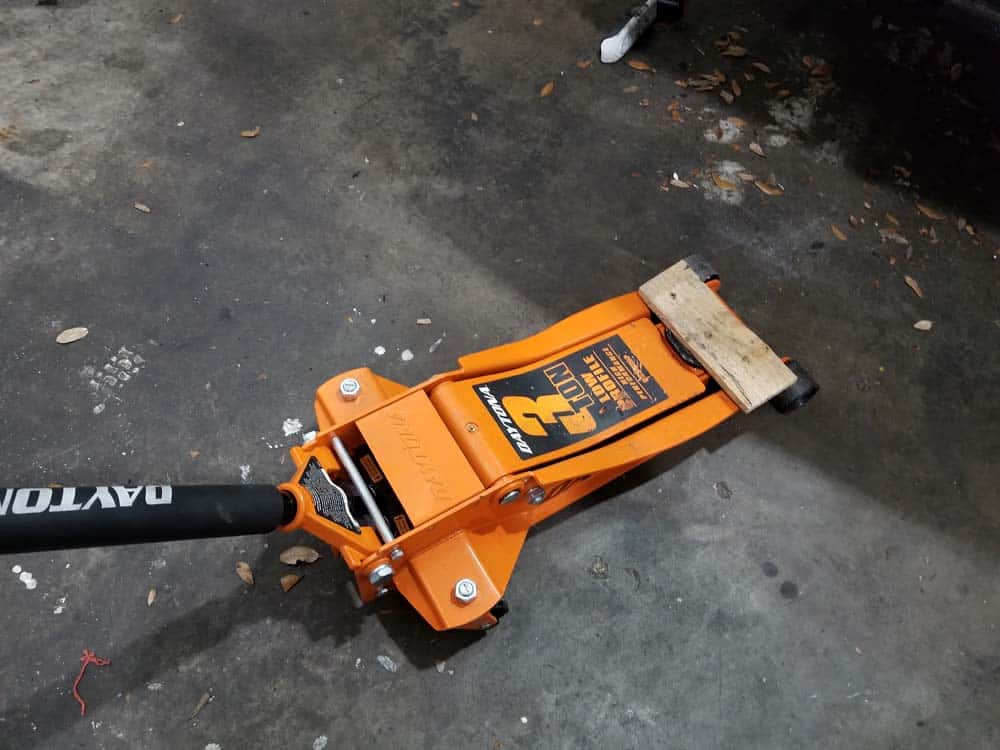
- Engine support tool (optional) - Since the right side engine support brackets must be removed during this repair to gain access to several critical parts, many mechanics use the engine support tool as a temporary brace. This is great if your car is up on a professional lift, but for home mechanics using a floor jack and jack stands, its completely unnecessary. In fact, since the engine needs to be temporarily raised during the repair to remove the belt friction wheel, the engine support tool is more of a hindrance than a help. Use a floor jack and a piece of wood to support your engine when the support bracket is removed.
- Timing chain pre-tensioning tool (not-required) - The timing chain pre-tensioning tool is used to measure the condition of your timing chain. Since you will be replacing your timing chain in this repair it is completely unnecessary and serves no purpose.
- Crankshaft (counter-hold) tool (not required) - Once again, completely unnecessary for this repair. The crankshaft tool holds the crankshaft pulley hub so you can remove and install its bolt. The flywheel locking tool accomplishes the exact same thing, so using the crankshaft tool is completely redundant and unnecessary.


View the detailed parts diagram for this repair.
Includes detailed part diagrams, part numbers and links to purchase all of the required components needed to complete this repair.
Section 1 - Putting the Vehicle in the "Service Position"
Before you can start a MINI R56 timing chain replacement, you must put the vehicle in its "service position". This is a special procedure where the front end of the car is actually unbolted and slid out and away from the vehicle. We highly discourage our readers from attempting this repair without putting the vehicle in its service position...there is just not enough room to efficiently maneuver around the engine compartment if you don't.- To put the MINI R56 in its service position, please refer to our article MINI R56 Service Position - 2006-2013 Cooper - All Models.
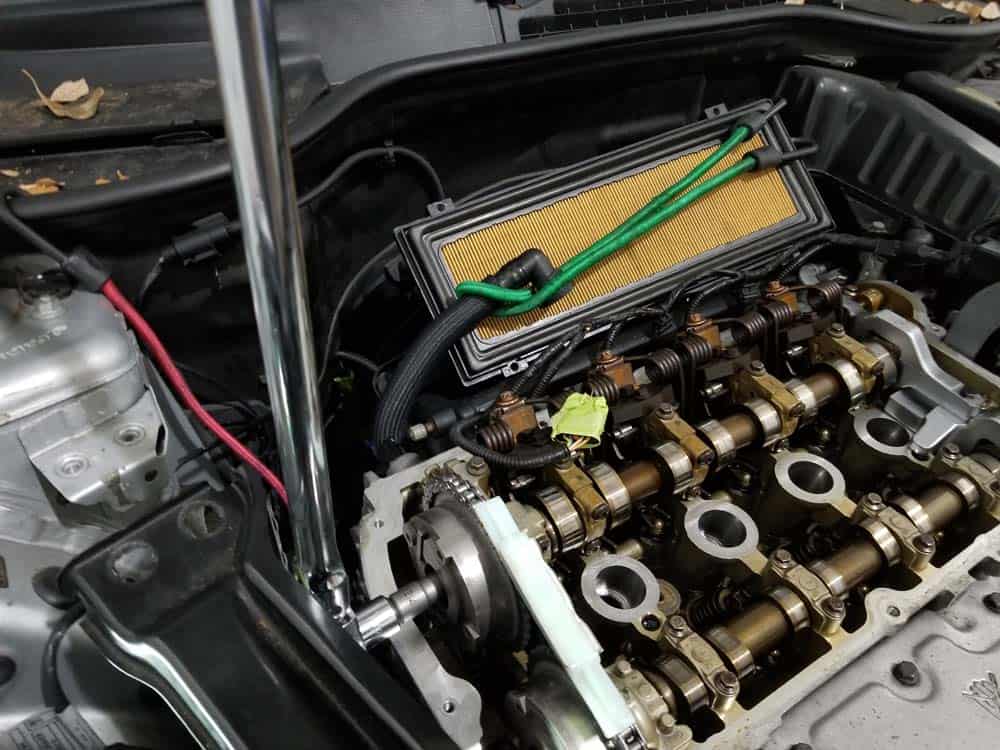
Section 2 - Removing the Valve Cover
The next step to a MINI R56 timing chain replacement is to remove the valve cover from the top of the engine. The valve cover must be removed so you can gain access to the camshafts and the timing chain.- To remove the MINI R56 valve cover, please refer to our article MINI R56 Valve Cover Gasket Replacement - 2006-2013 Cooper - N12 Engine.
Section 3 - Removing the Accessory Belt
Since the camshaft pulley and friction wheel will be removed to do a MINI R56 timing chain replacement, the accessory (serpentine) belt must be removed from the engine.- To remove the accessory belt from your MINI R56, please refer to our article MINI R56 Belt Replacement - 2006-2013 Cooper - N12 4 Cylinder.
Section 4 - Locking the Flywheel and the Camshafts
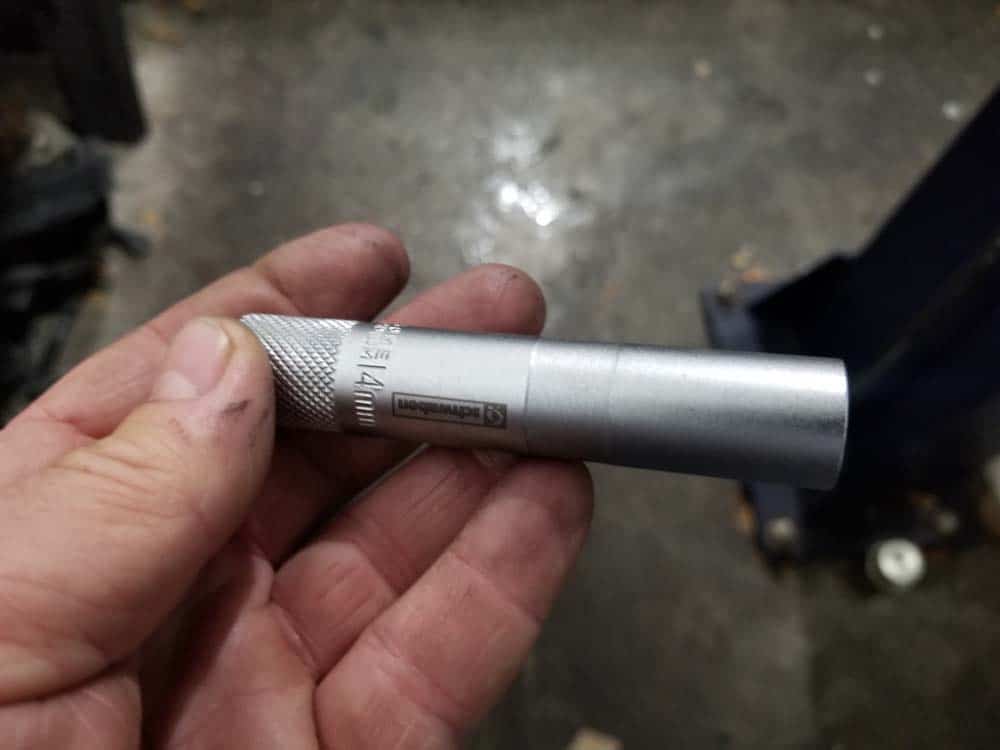
Before removing the timing chain, you will need to lock both the crankshaft and the camshafts to keep them from moving. As discussed at the beginning of this article, this must be done before servicing the timing chain to keep the correct engine timing. If the timing is incorrect, you will most likely destroy the engine when you go to start it after the repair.- The first step is to remove the four spark plugs using a 14mm thin wall spark plug socket. The spark plugs must be removed so you can manually turn the crankshaft in step 8 below. If you do not have one...you need to purchase one if you are planning on doing any future work on your MINI. If you forgot to order one from our tool list above, you can purchase one by clicking here.
- Your vehicle should still be up on jack stands (from putting it in the service position) and the right wheel should be off (from removing the accessory belt) (sections 1 and 3 above).
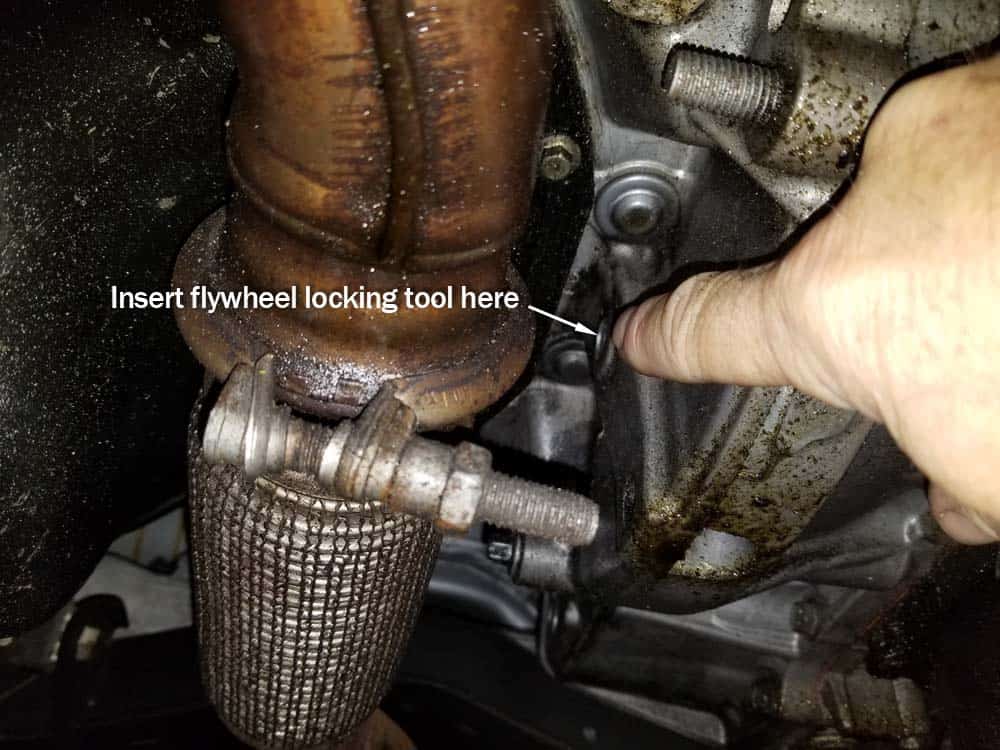
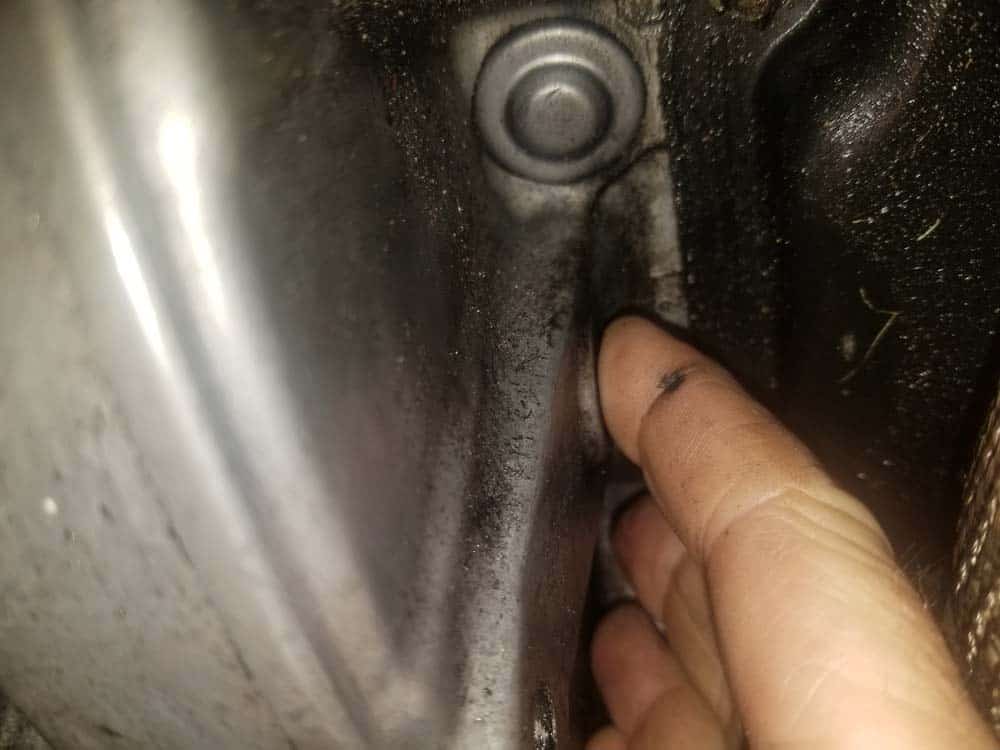
- Take a moment to locate the flywheel cover and the hole that the locking tool will be inserted in (see images below). Note that there are two holes on the flywheel cover...you will be inserting the tool in the top hole.
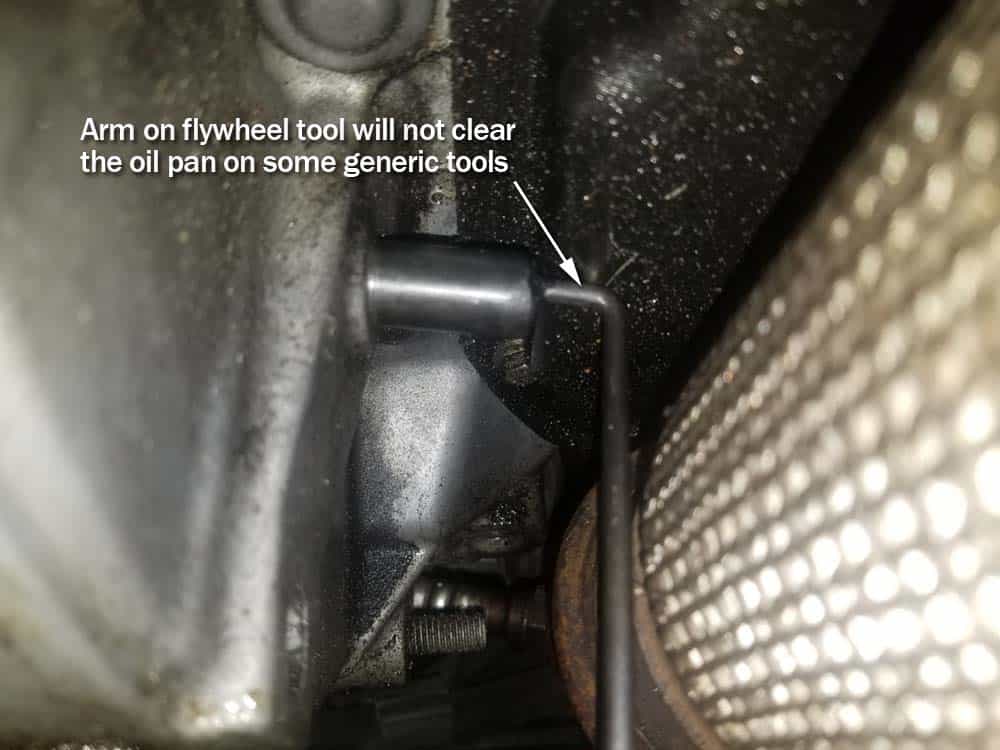
- Before going any further, test to see if your your flywheel locking tool will fit into the hole in the flywheel cover. The more expensive OEM locking tools should easily slide in. Unfortunately the inexpensive generic locking tools usually won’t fit into the hole because the metal arm is welded in the wrong spot (see images below) causing it to press against the oil pan. When the metal arm presses against the oil pan, the locking tool will become cocked at an angle not allowing it to be pressed into the flywheel cover hole (we know this is a mouth full...see the following images for more detail).
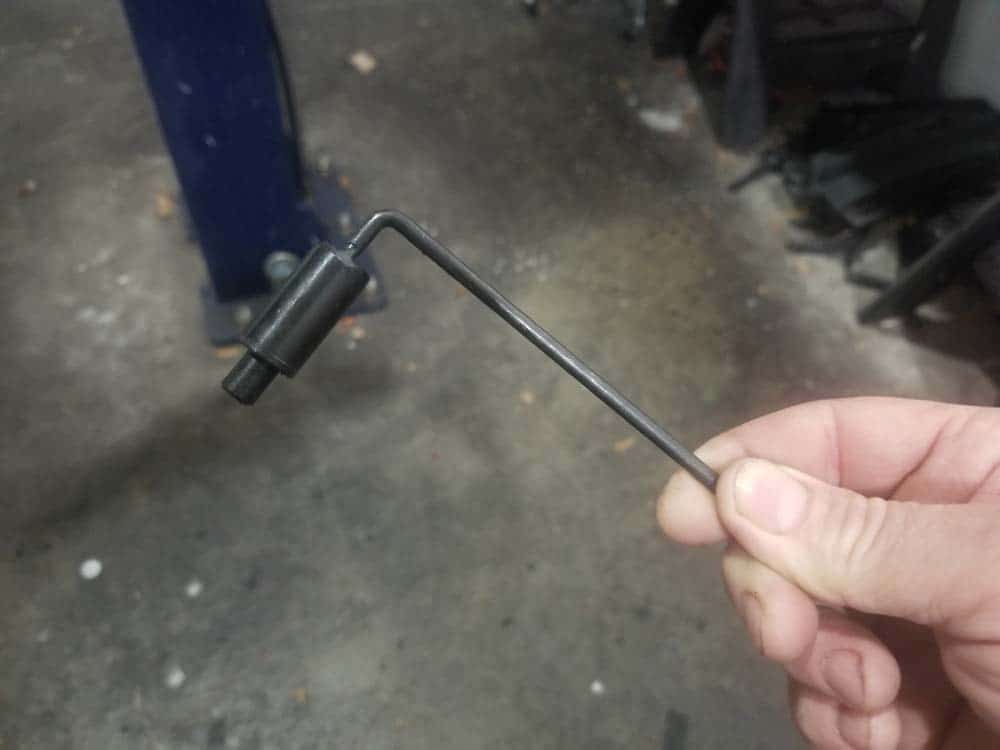
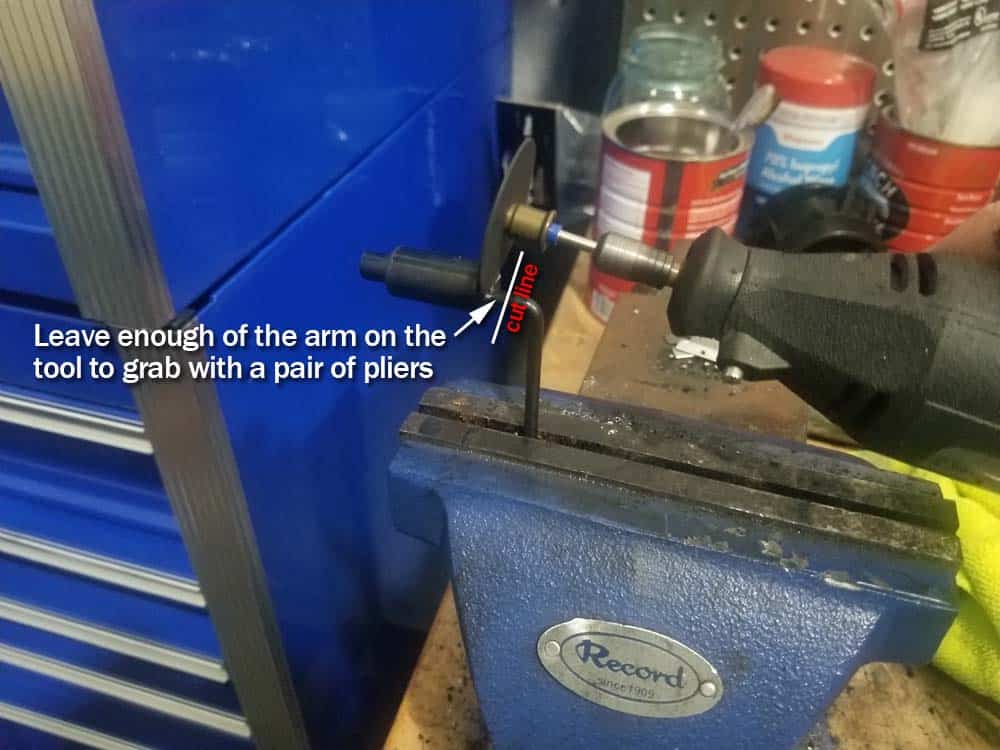
- If your locking tool cannot be inserted into the flywheel cover, you will need to cut a portion of the metal arm off. Put the locking tool in a vise and cut the metal arm off using a Dremel tool. MAKE SURE to leave a small amount of the metal arm attached to the tool! You will need a small piece left on the tool so you can remove it from the flywheel cover with a pair of pliers. You should now be able to easily insert it into the flywheel cover.
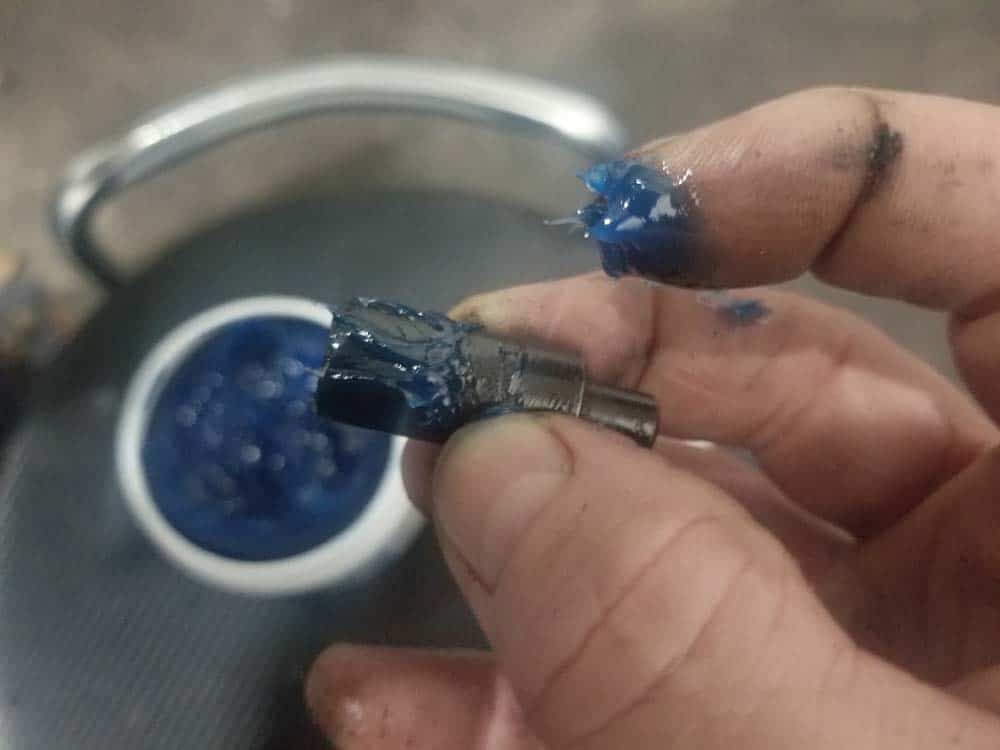
- Coat the flywheel tool with a thin layer of multipurpose grease and insert the flywheel tool into the cover as far as it will go.
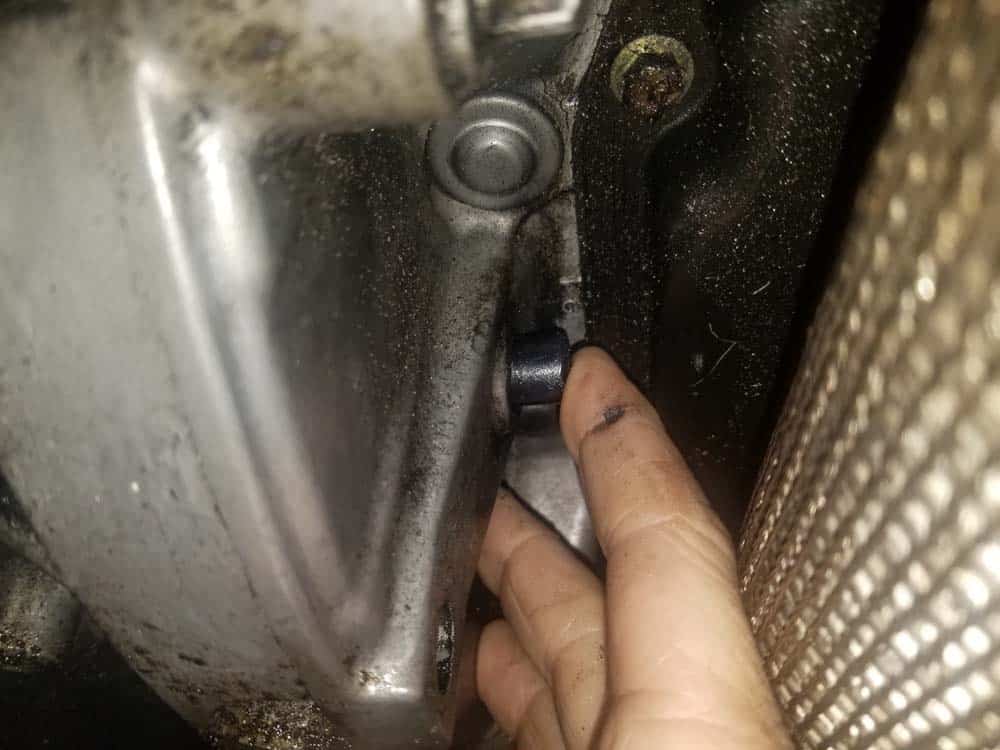
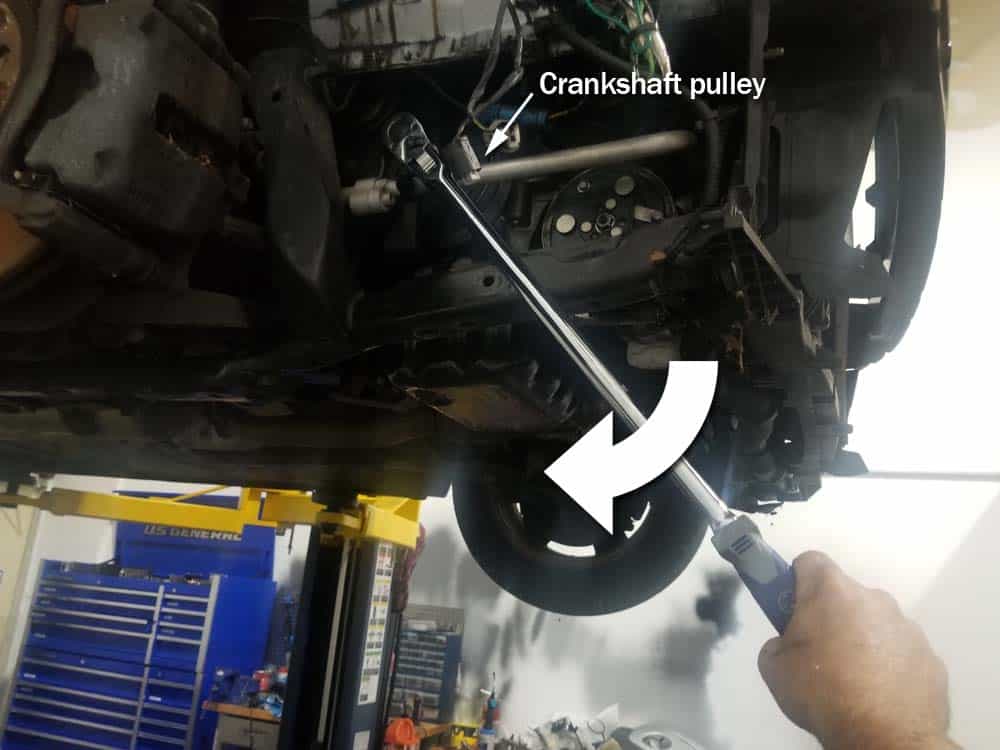
- You will now need to to lock the tool into the hole in the flywheel. This is an extremely easy procedure that many home mechanics (and online forums) way over think! All you have to do is push on the flywheel locking tool with your finger while rotating the engine at the crankshaft pulley nut with an 18mm socket wrench. When the hole in the flywheel lines up with the locking tool, it will slip right in. If you have a long enough socket wrench (we use a 24”) you can easily do this procedure yourself while lying on your back under the car. If not, enlist the help of a friend to turn the crankshaft.
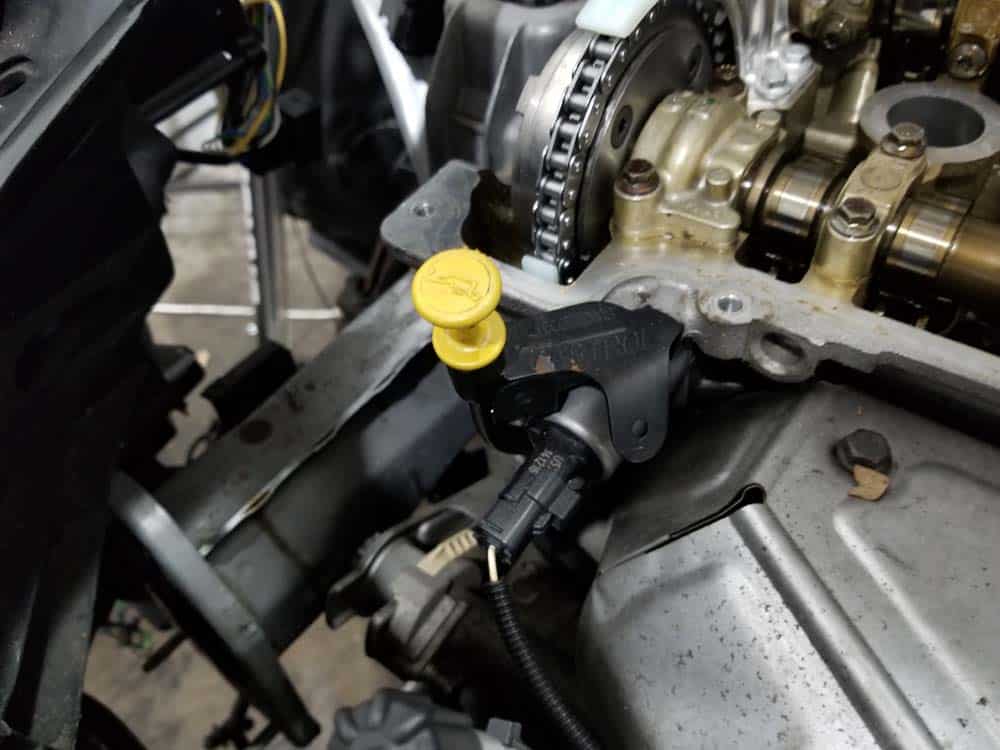
- Once the flywheel is locked, you will need to move back to the engine compartment to lock the camshafts in place. YOU MUST lock the camshafts in place before removing the timing chain to prevent ruining the engine timing. Just a small amount of movement in either camshaft while the timing chain is off will throw the engine out of time and could cause catastrophic damage to your motor.
- There are several different types of camshaft tools on the market for the R56 MINI Cooper. The following shows how to install the inexpensive generic brand version commonly found on Amazon. Please be aware that other brand tools may differ slightly in their installation.
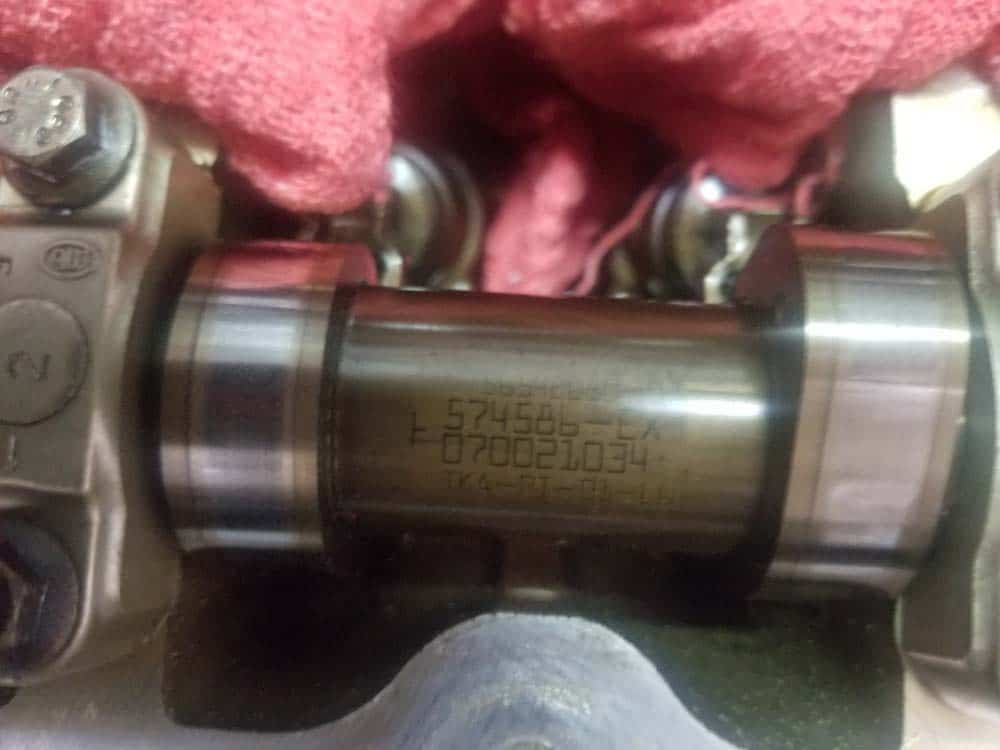
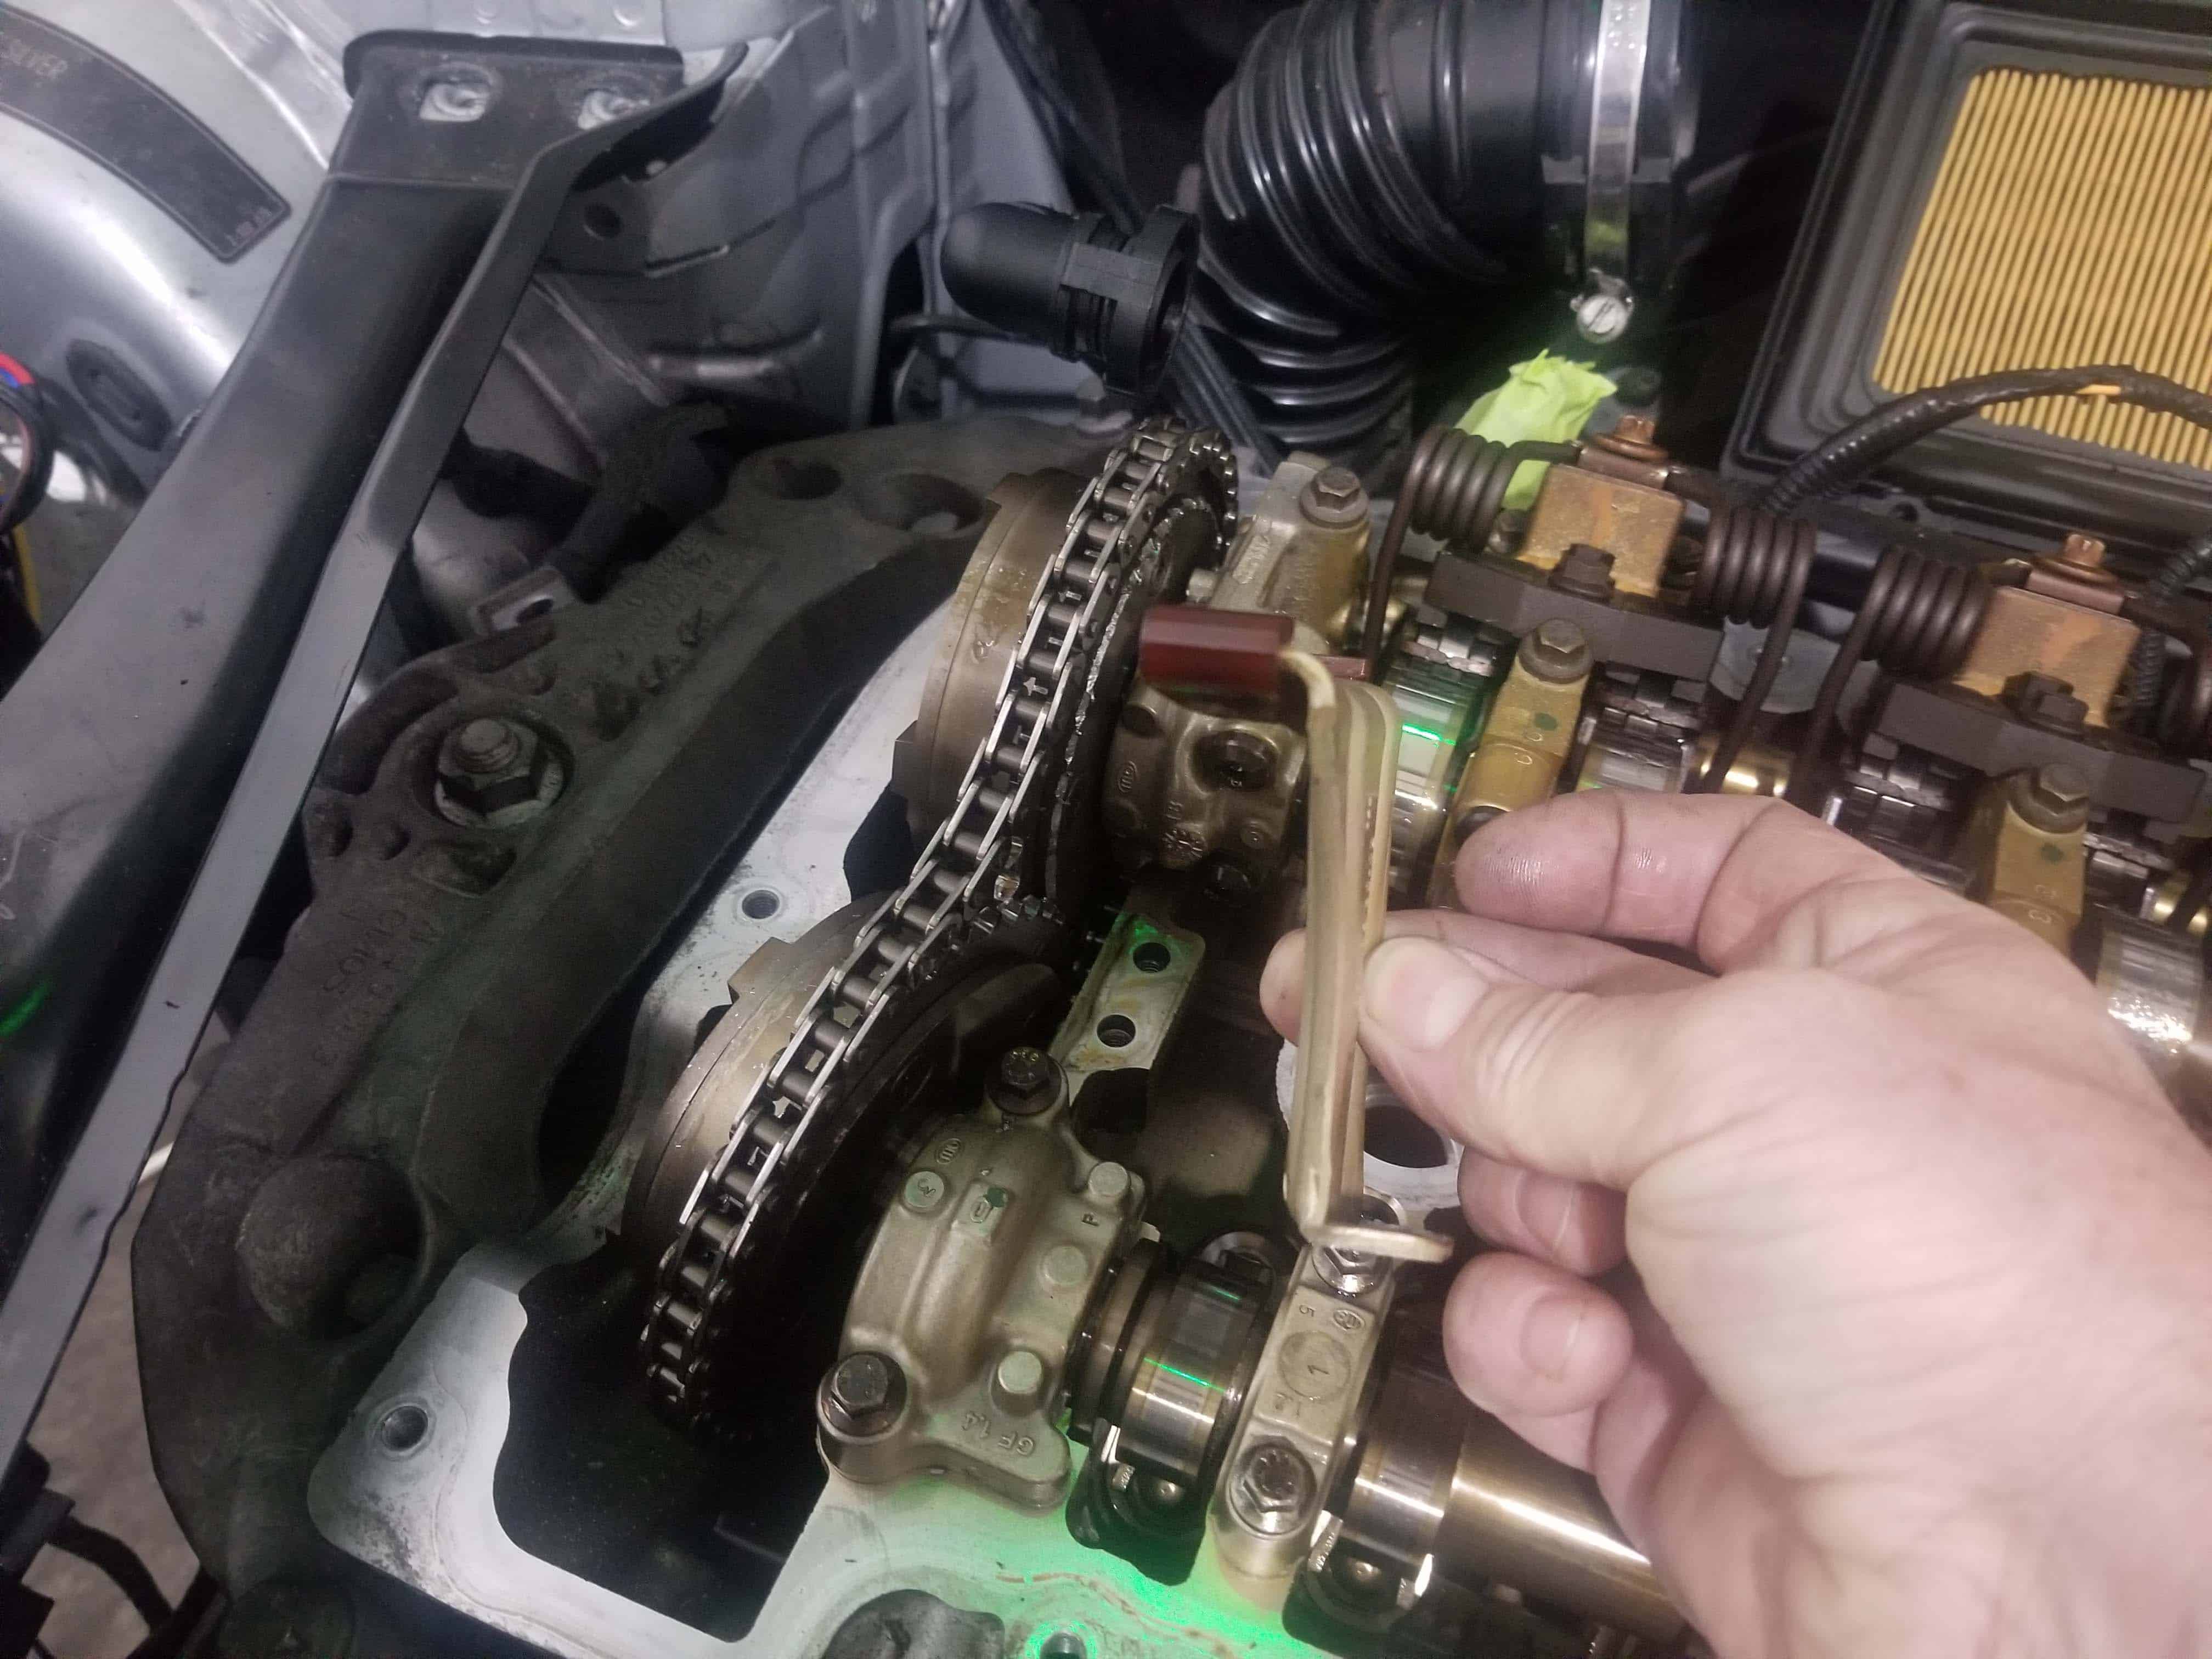
- First, locate and verify the embossed part labels are facing up on both camshafts. The embossed labels are located in the center of each camshaft, and contain part numbers and other important information. These labels must be facing directly up before installing your camshaft tool. If the labels are not facing up with the flywheel lock properly installed, then your camshaft timing is not correct. You need to stop immediately and see our article on proper camshaft timing.
- Now install the intake camshaft locking tool. Make sure the hole where it overlaps the exhaust locking tool lines up correctly.
- Install the three bolts anchoring the tool to the engine head. Make sure bolts are snug BUT DO NOT over tighten. You can strip the threads in the engine head.
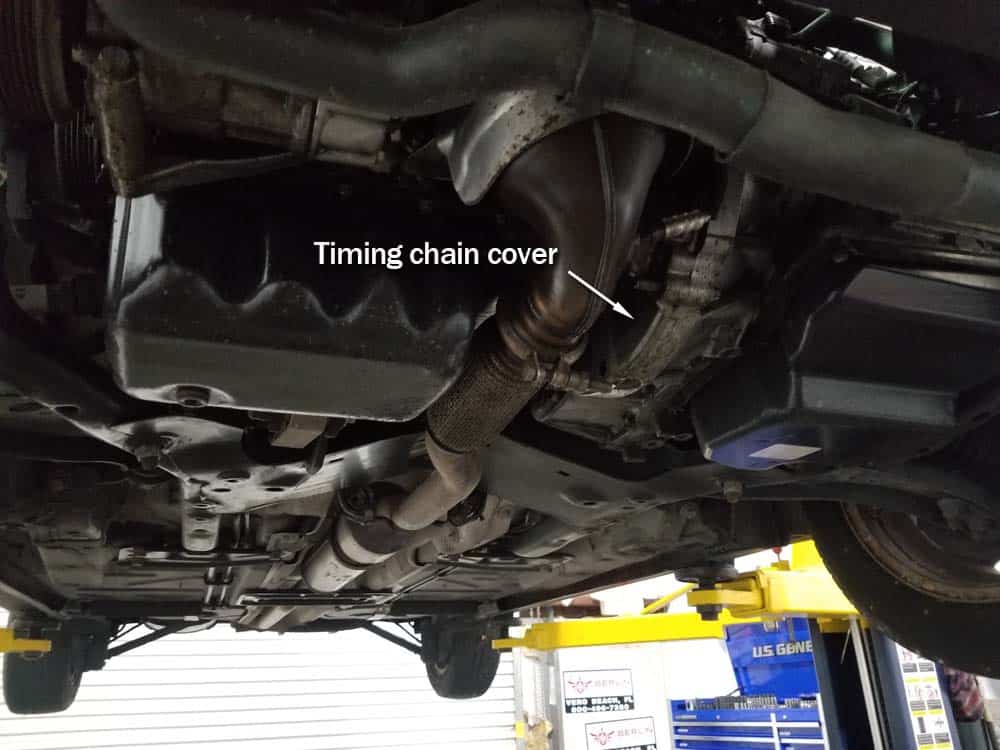
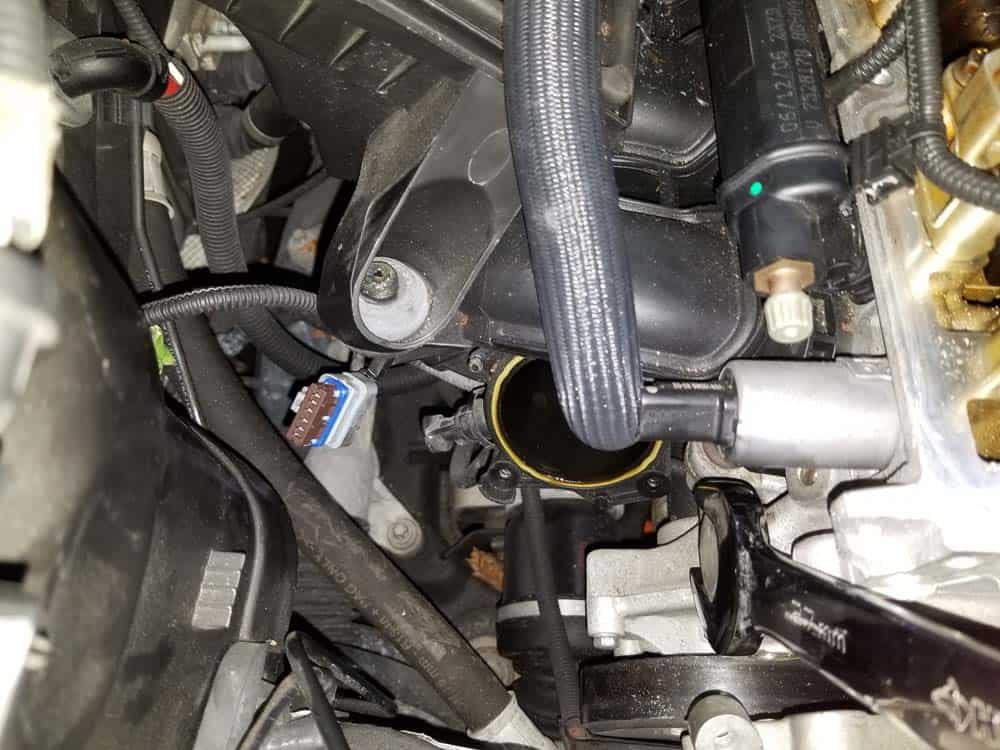
Section 5 - Removing the Chain Tensioner and Camshaft Sprockets (VANOS)
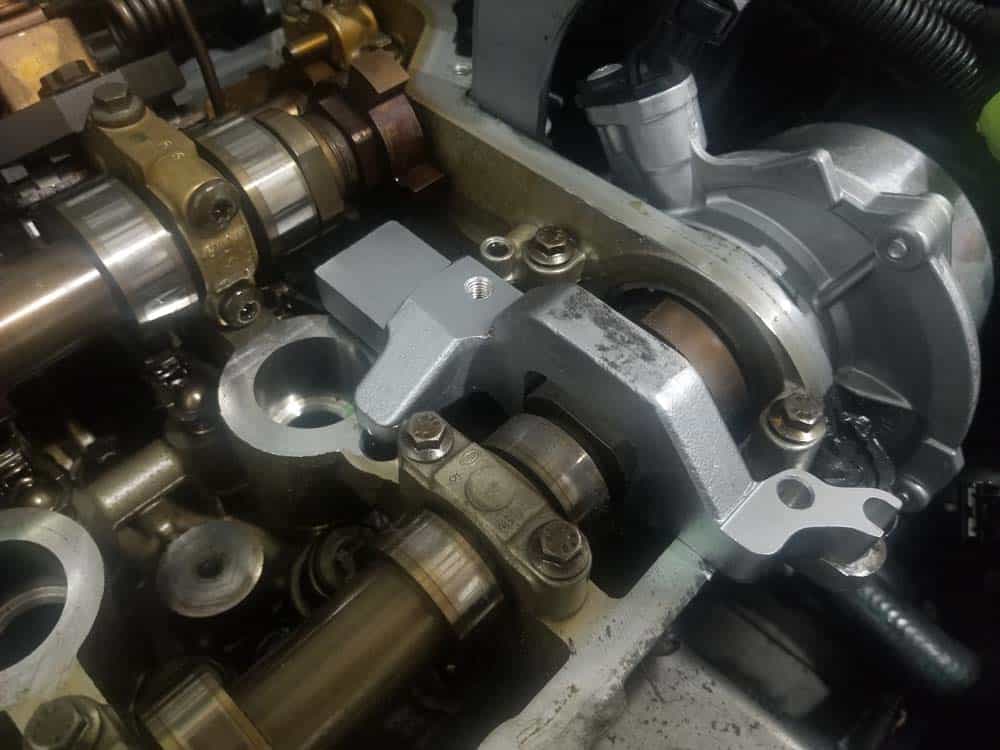
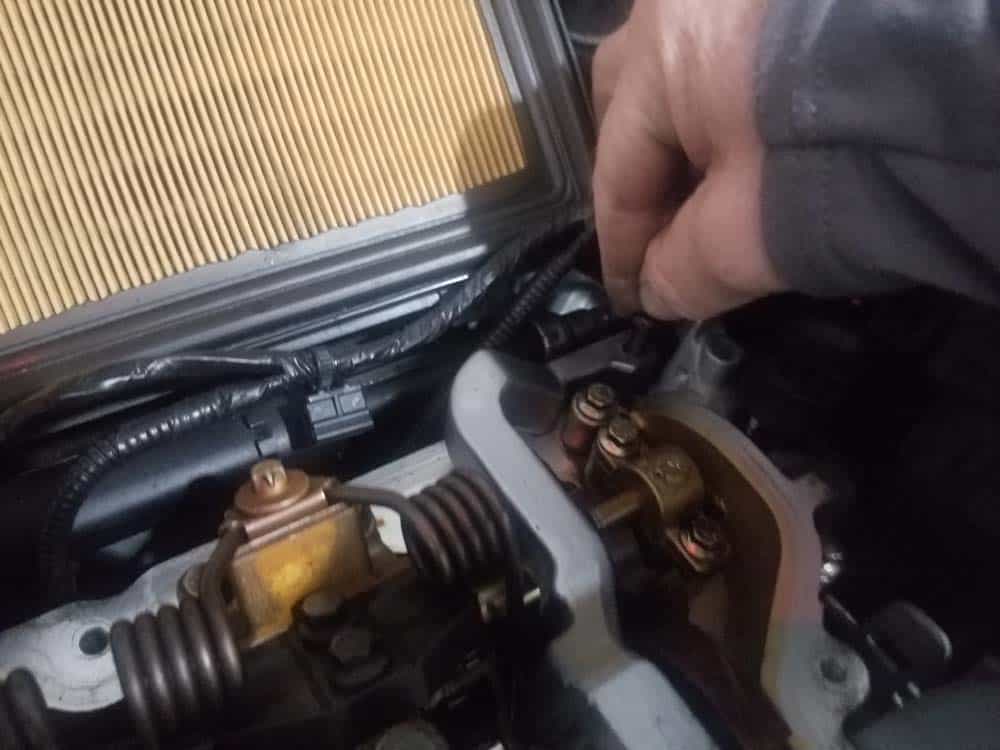
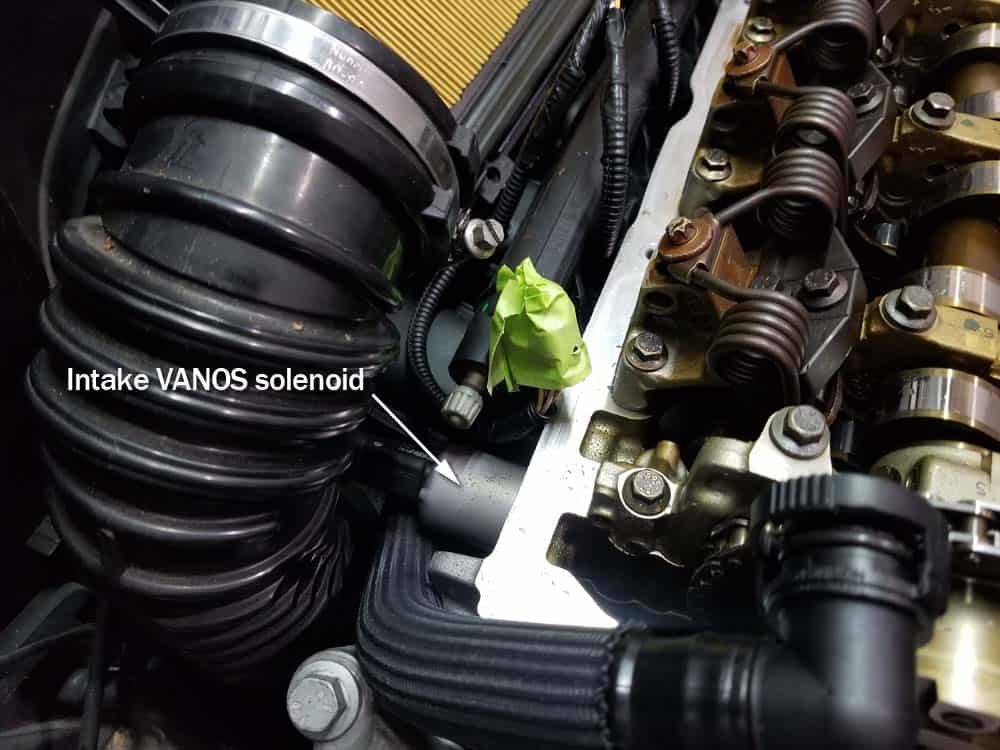
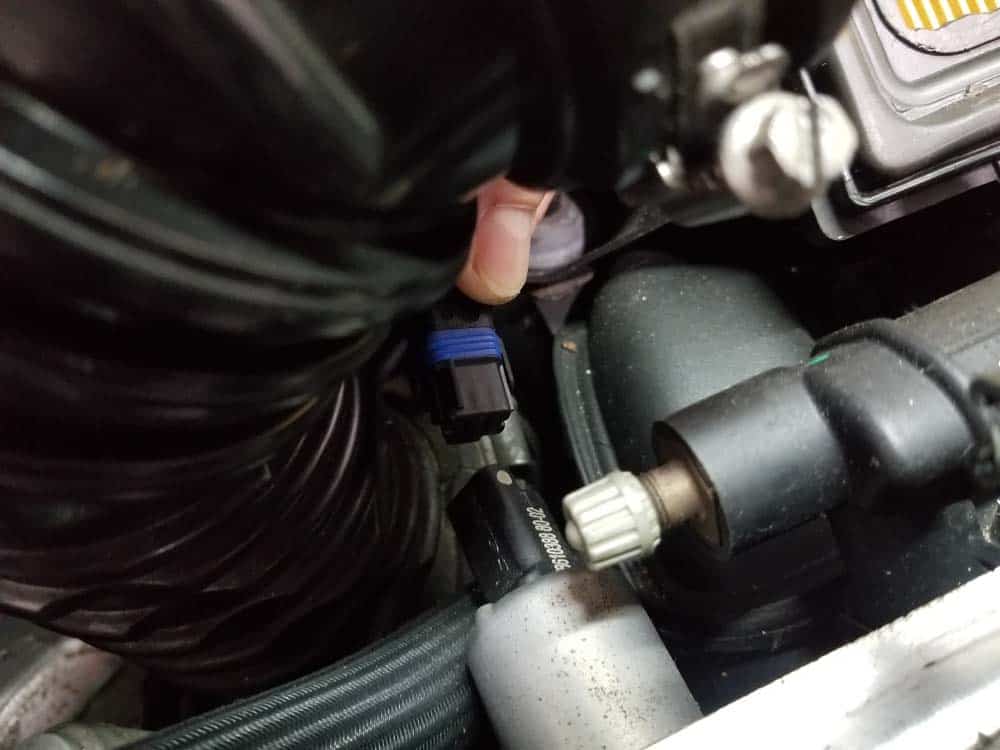
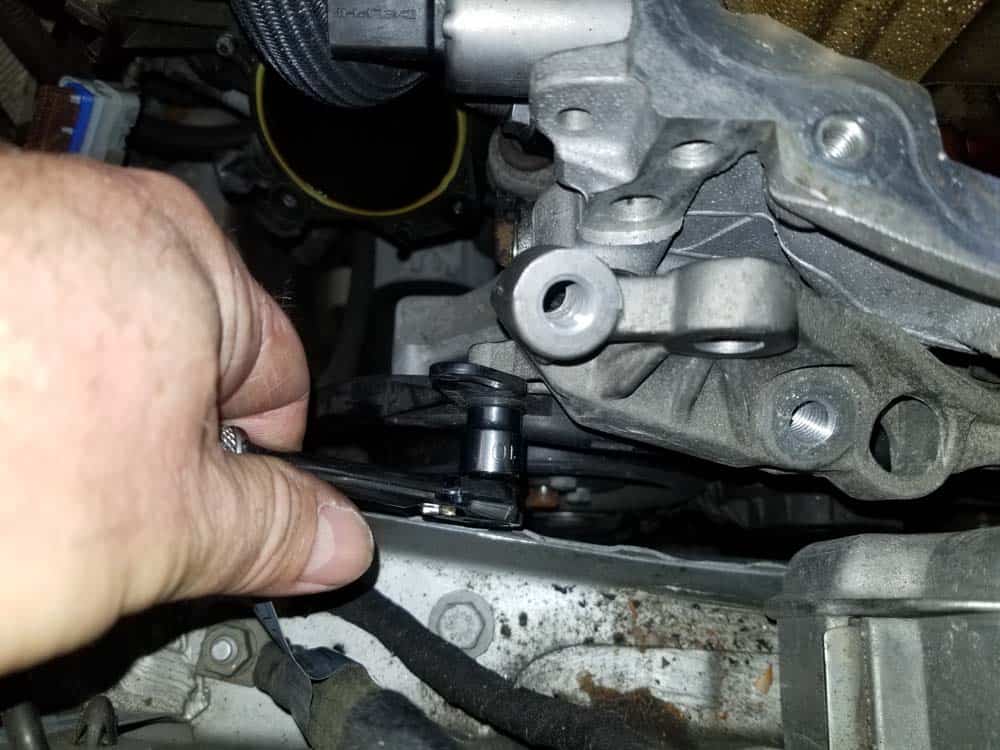
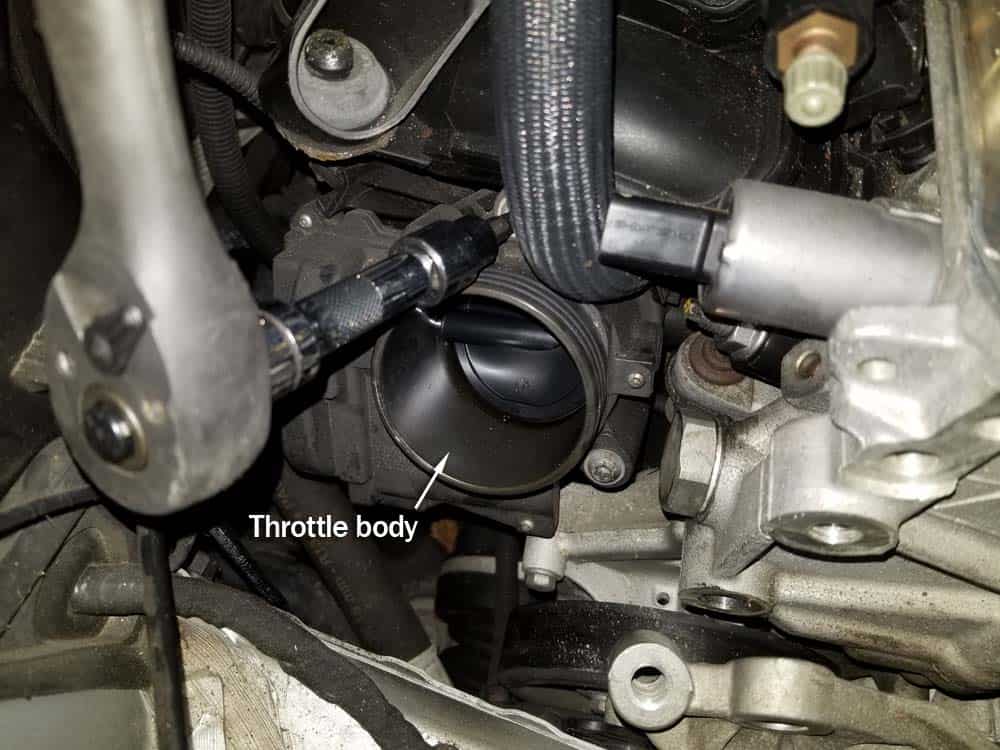
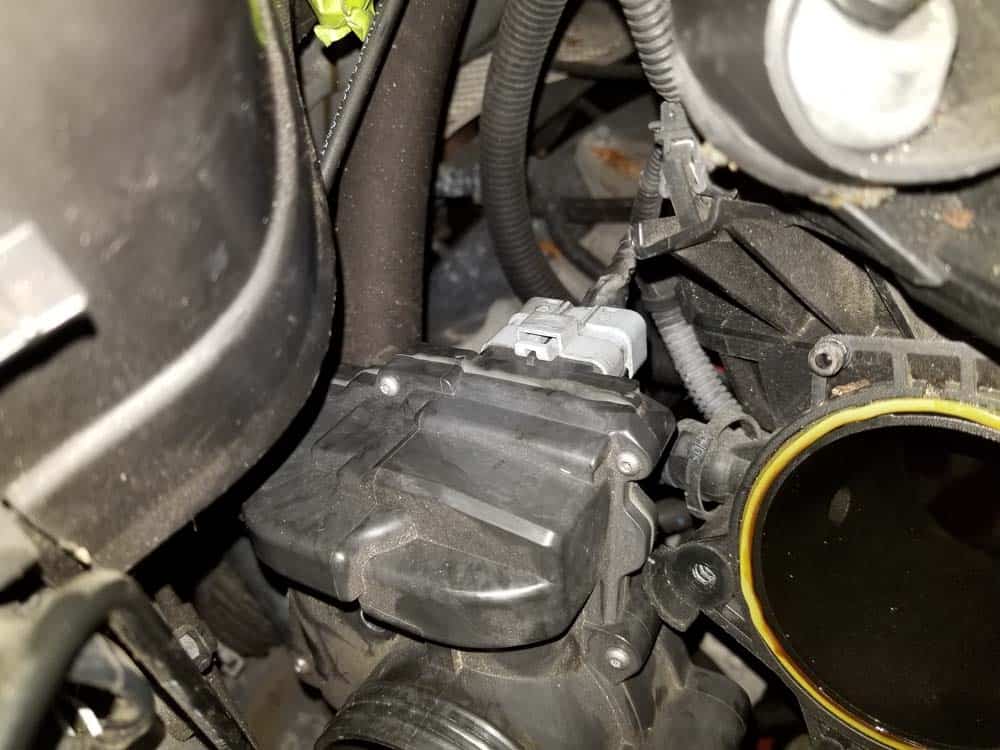
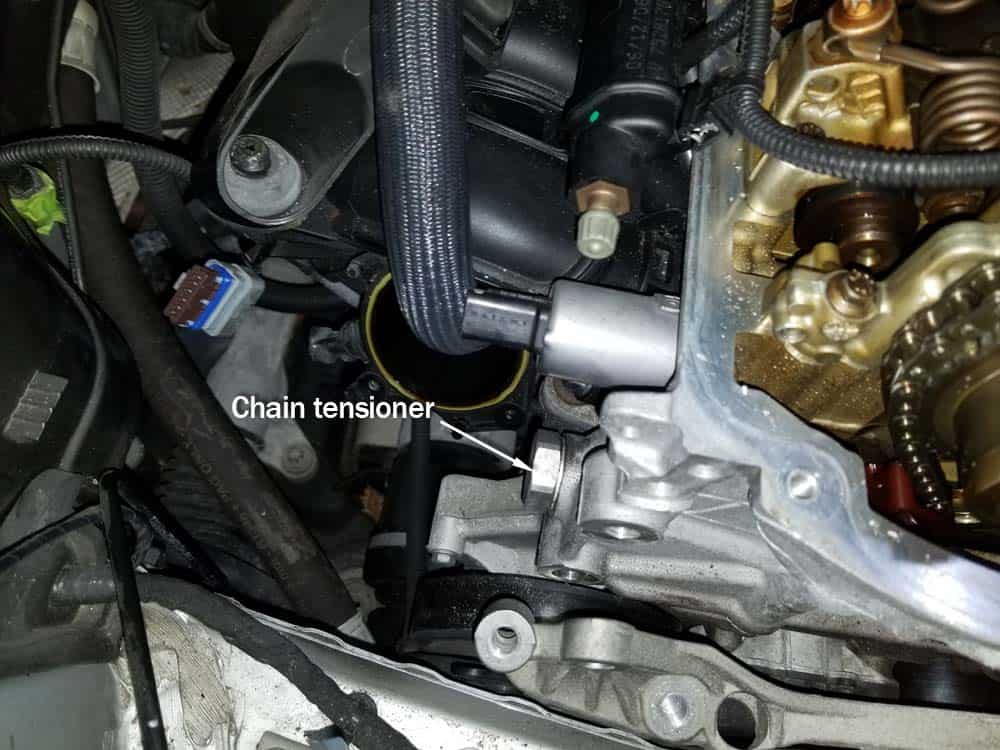
The engine support bracket and the throttle body must be removed from the right side and rear of the motor (respectively) in order to remove the chain tensioner. The reason for this is that the chain tensioner that is located on the back of the engine and cannot be removed with the support bracket or throttle body in place (see following image).- Start by removing the electrical connection from the intake VANOS solenoid on the back of the engine. Using a flat blade screwdriver is helpful in releasing the connection. This connection must be removed so the chain tensioner can be accessed.
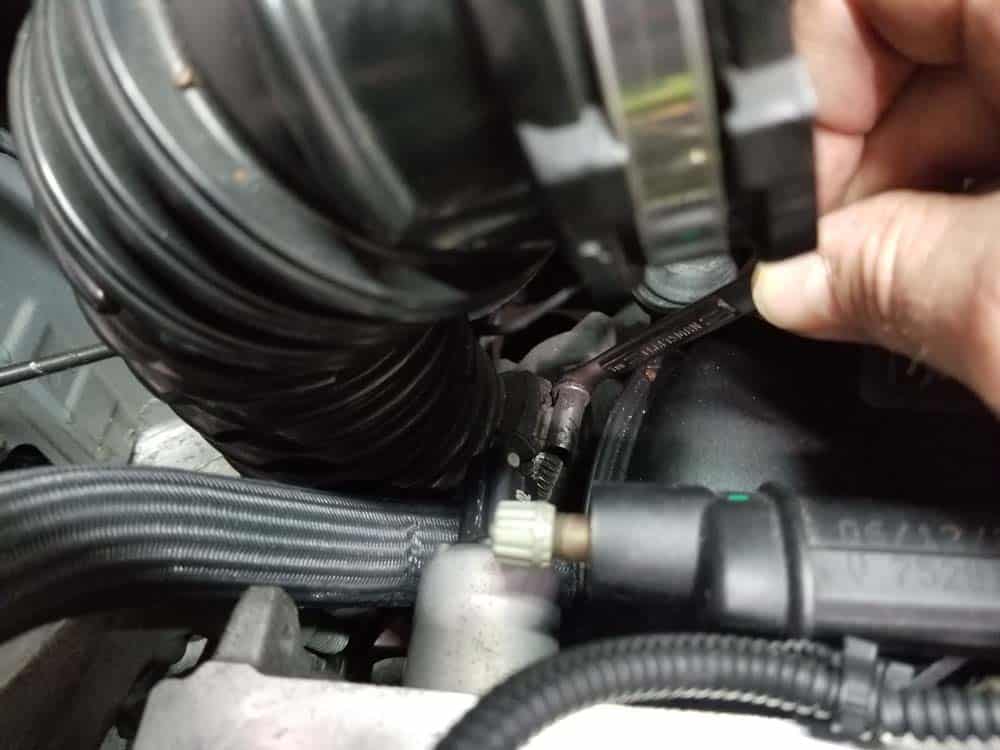
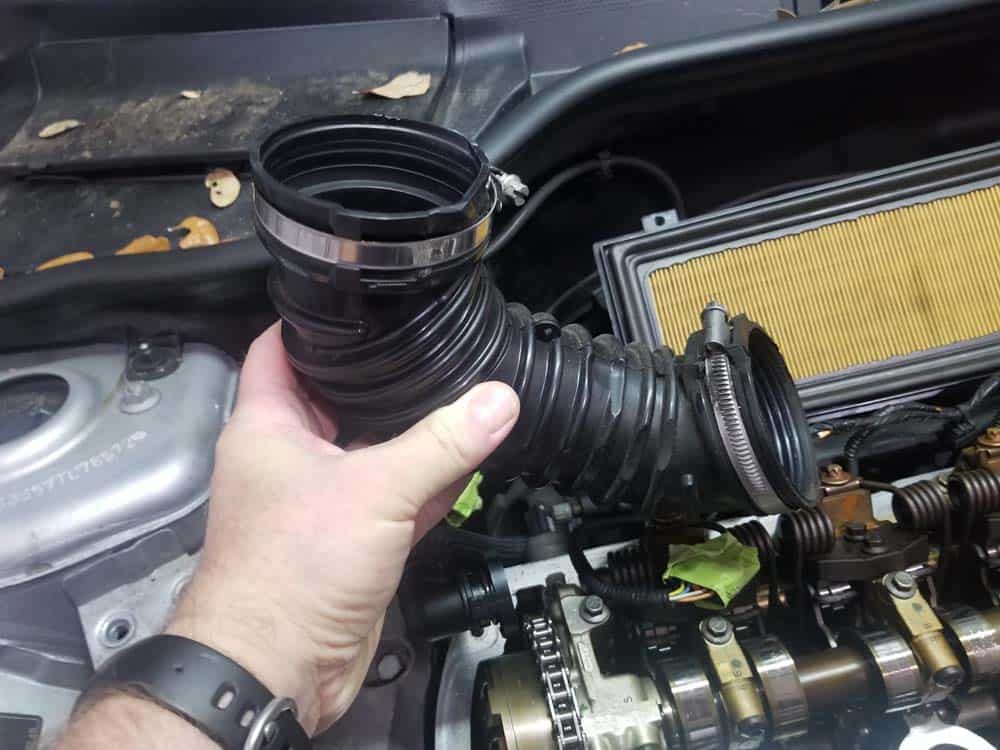
- Loosen the hose clamp attaching the rubber intake boot to the throttle body with a 7mm open end wrench (its often difficult to get a ratchet or screwdriver on it). Remove the intake boot from the throttle body.
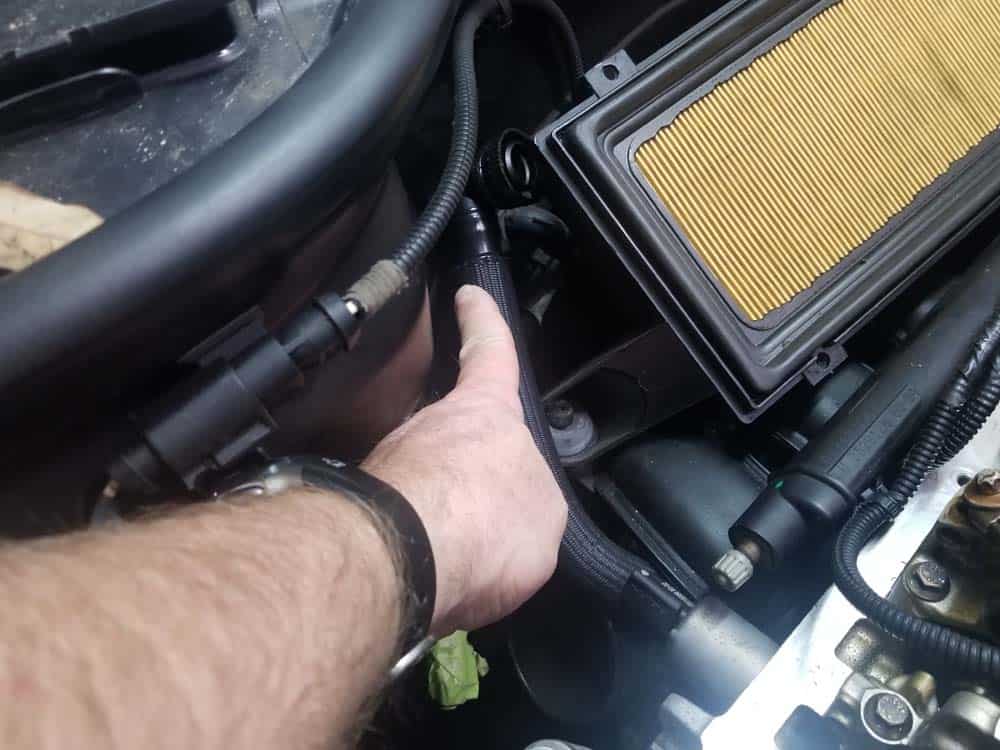
- Gently push the crankcase breather hose out of the way.
- Now it's time to remove the engine support bracket. Start by using a 13mm socket wrench to remove the engine grounding strap on the top of the support bracket.
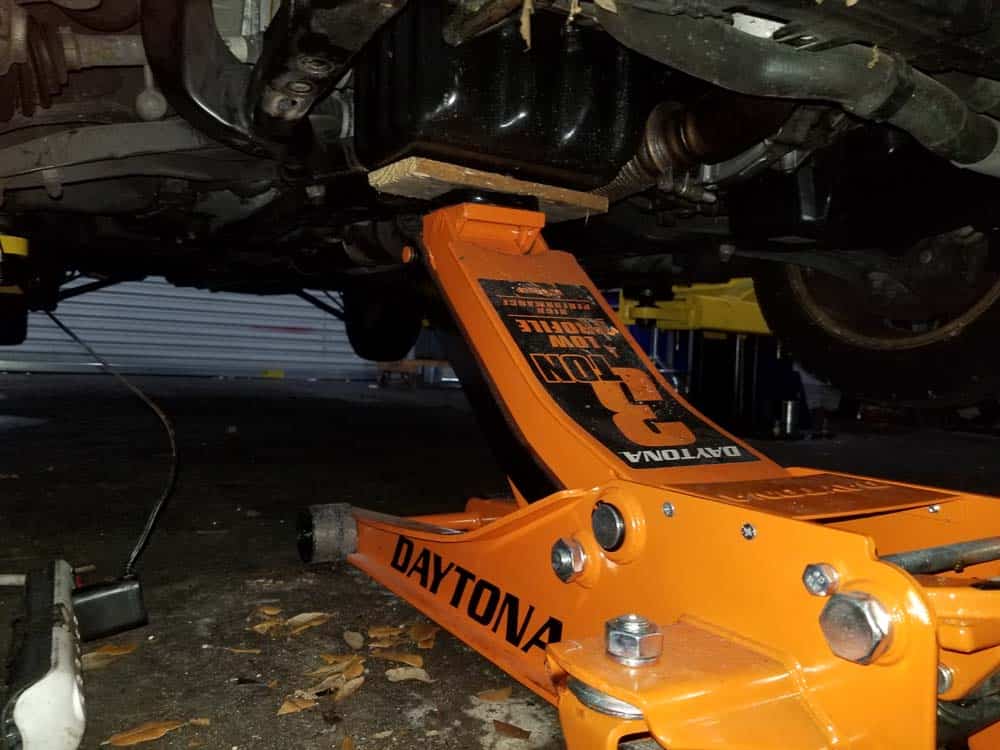
- Next, position a floor jack with a flat piece of scrap wood under the oil pan and raise until it just touches the engine. This is to support the engine when the bracket is removed in the next steps. The scrap of wood is recommended to prevent damage to the oil pan.
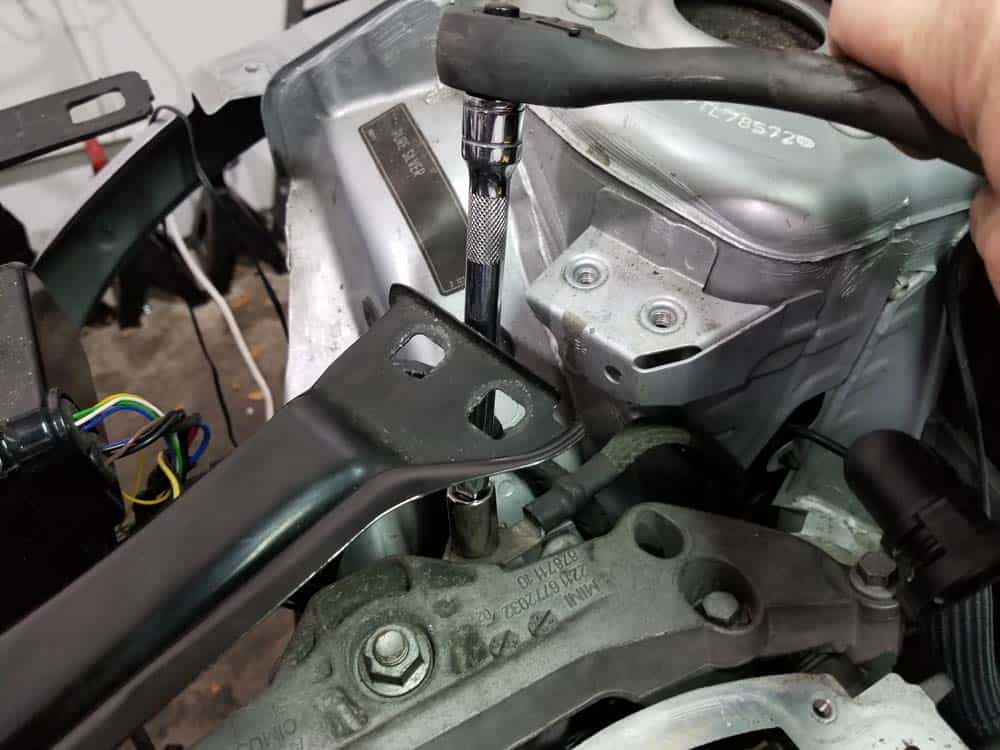
- Remove the four engine support bracket mounting bolts with a 13mm socket wrench.

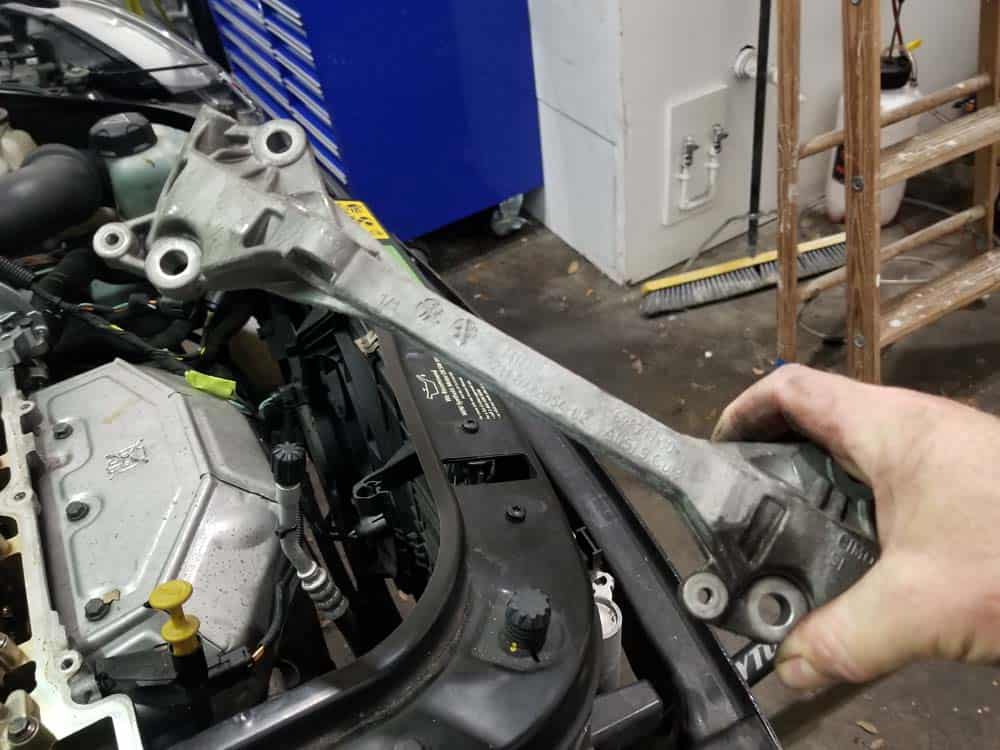
- Next, remove the 18mm nut securing the engine mount to the support bracket. Remove the support bracket from the vehicle.
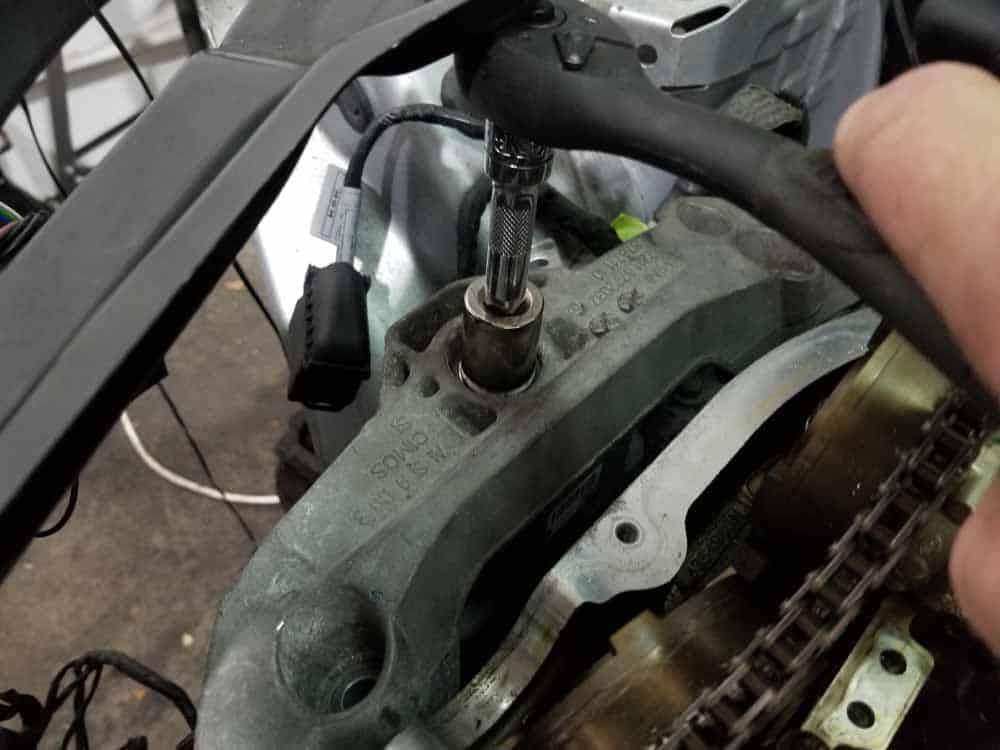
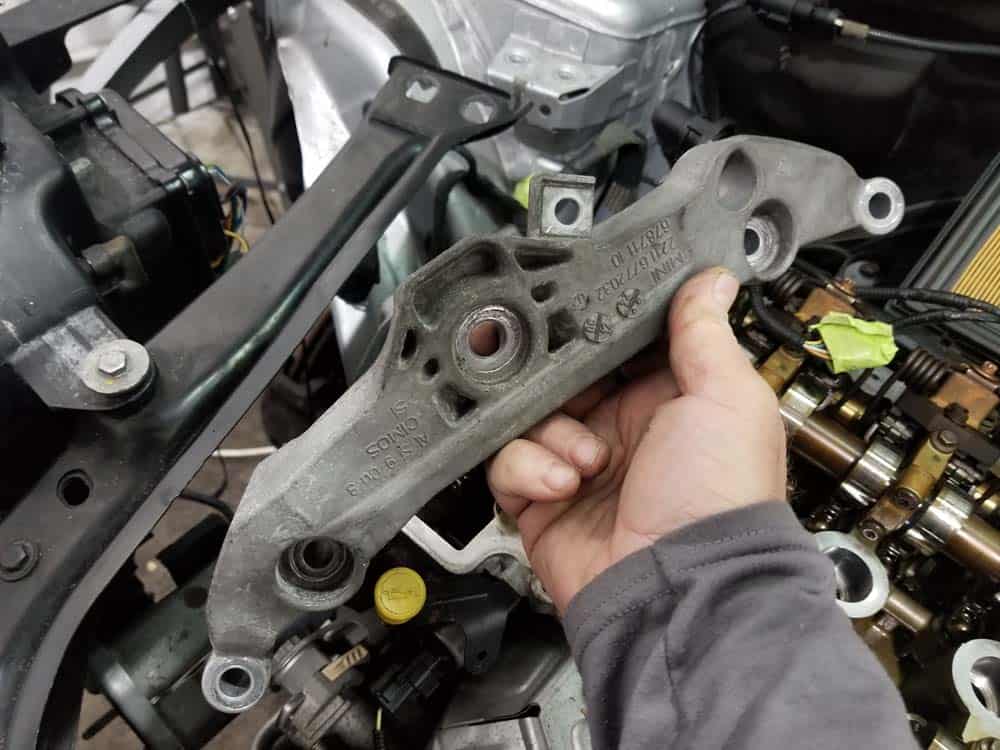
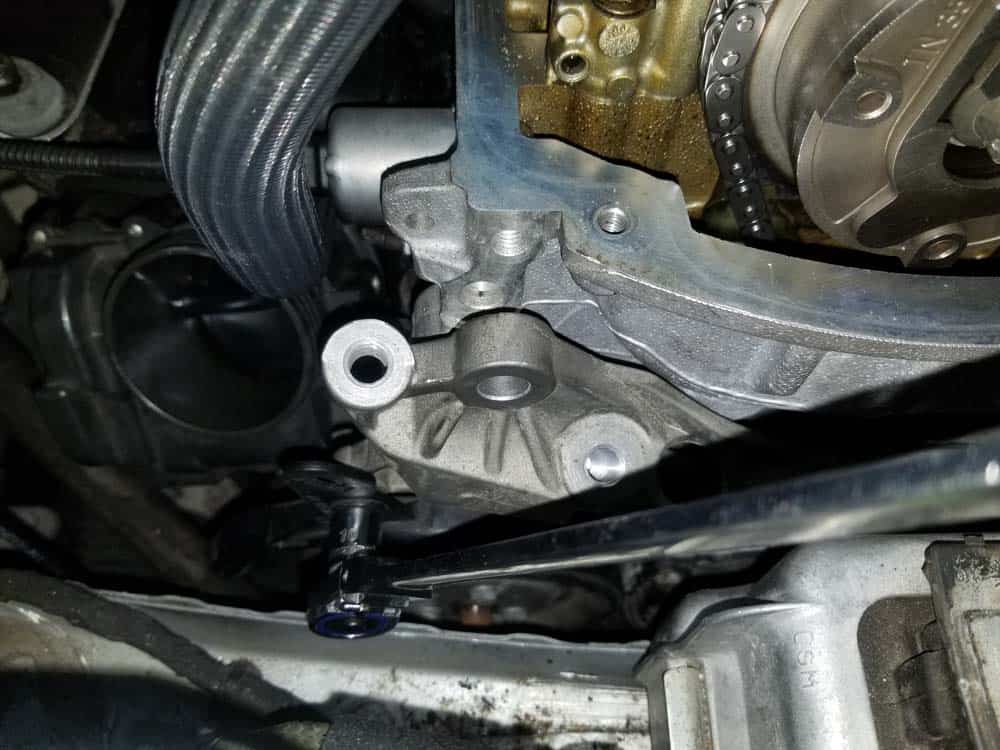
- You will now need to remove the lower adapter plate from the engine block. It is held in place by four E12 torx bolts.
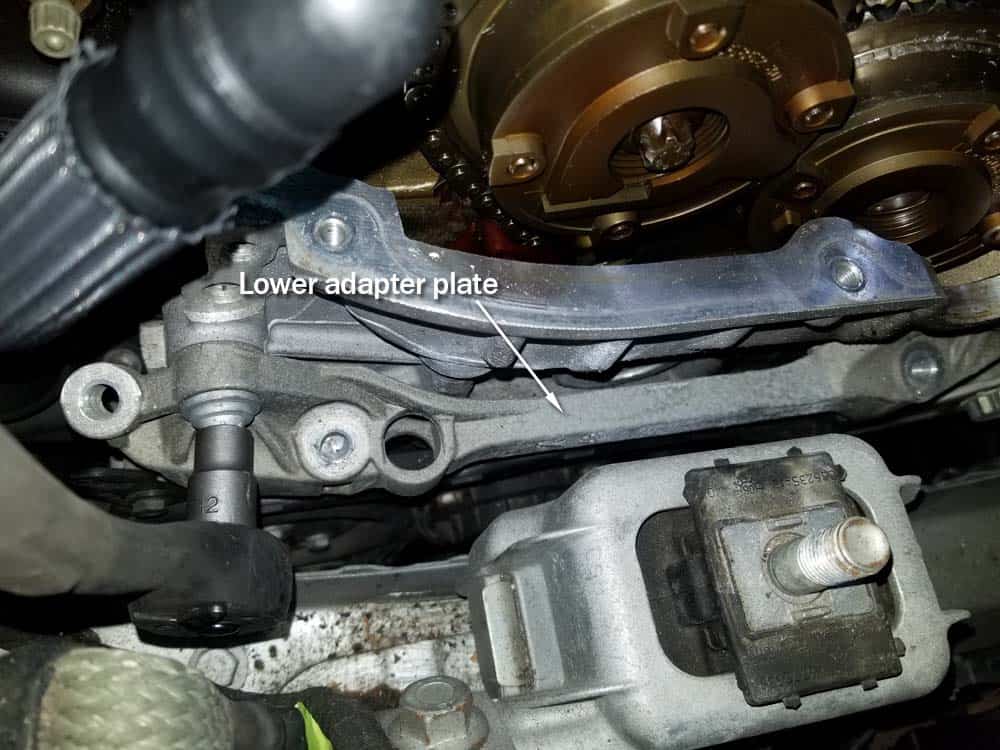
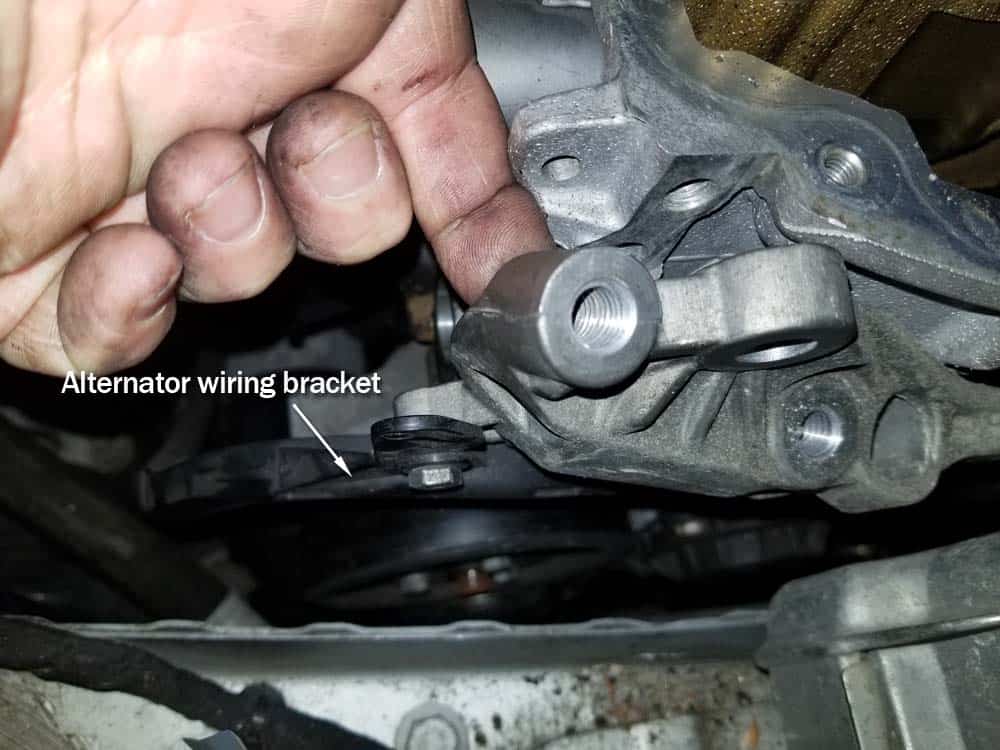
- When the four bolts are removed, gently rotate the adapter plate forward and remove the 10mm bolt anchoring the alternator wiring bracket to the adapter plate. Repeat on the front 10mm bolt. Remove the adapter plate from the engine. The adapter plate must be removed from the engine compartment so the friction wheel can be accessed in Section 3-step 2 below.
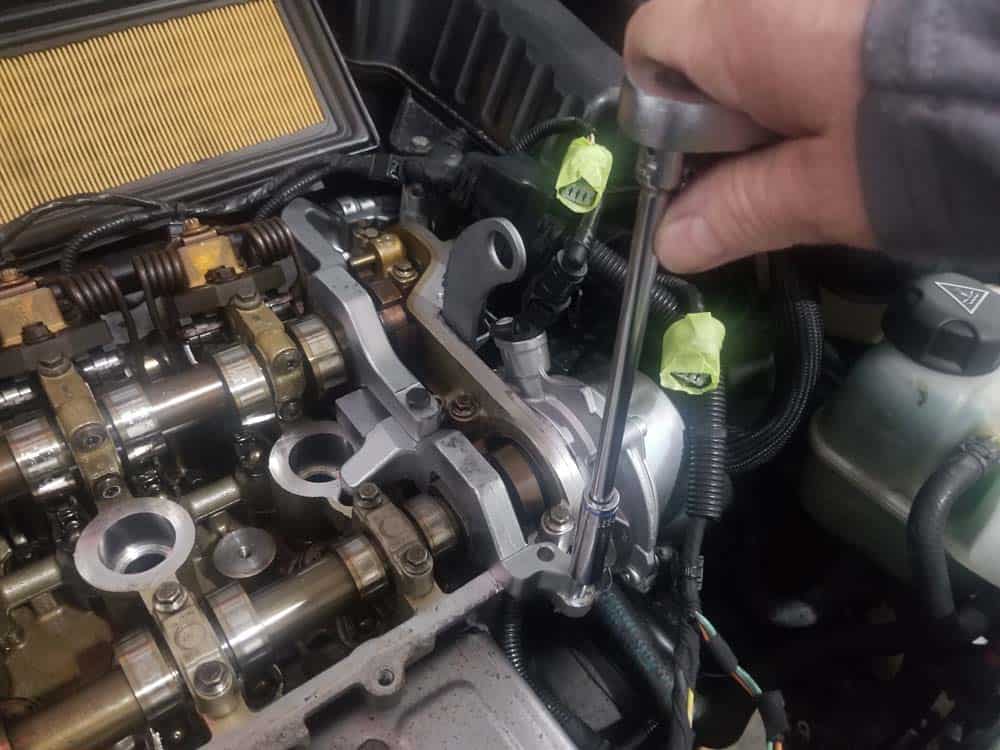
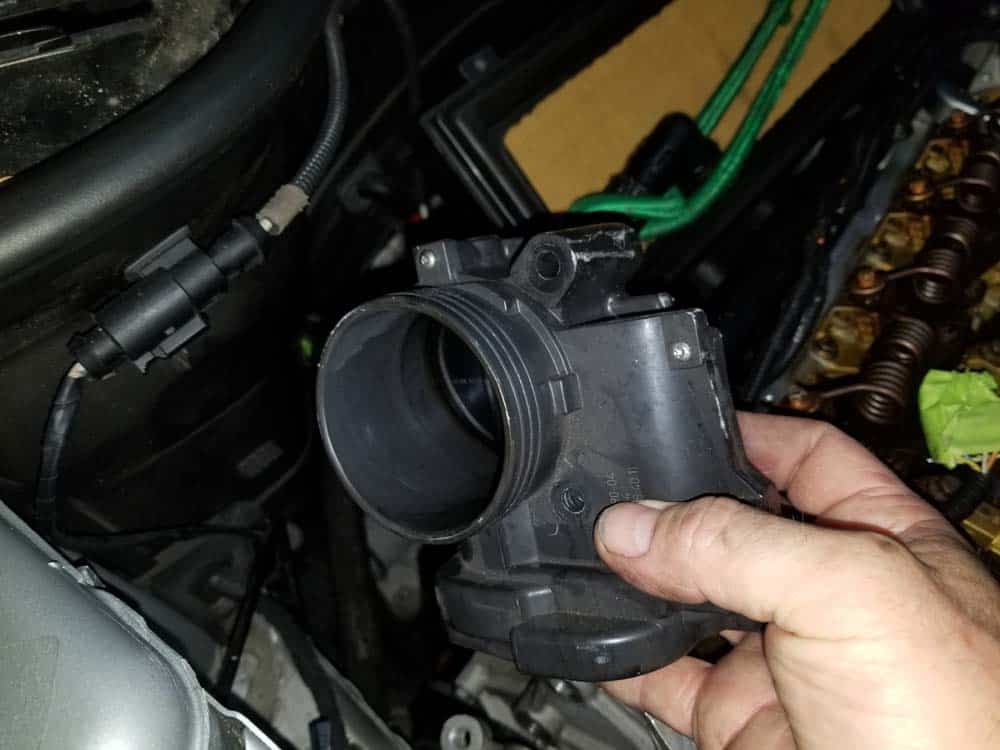
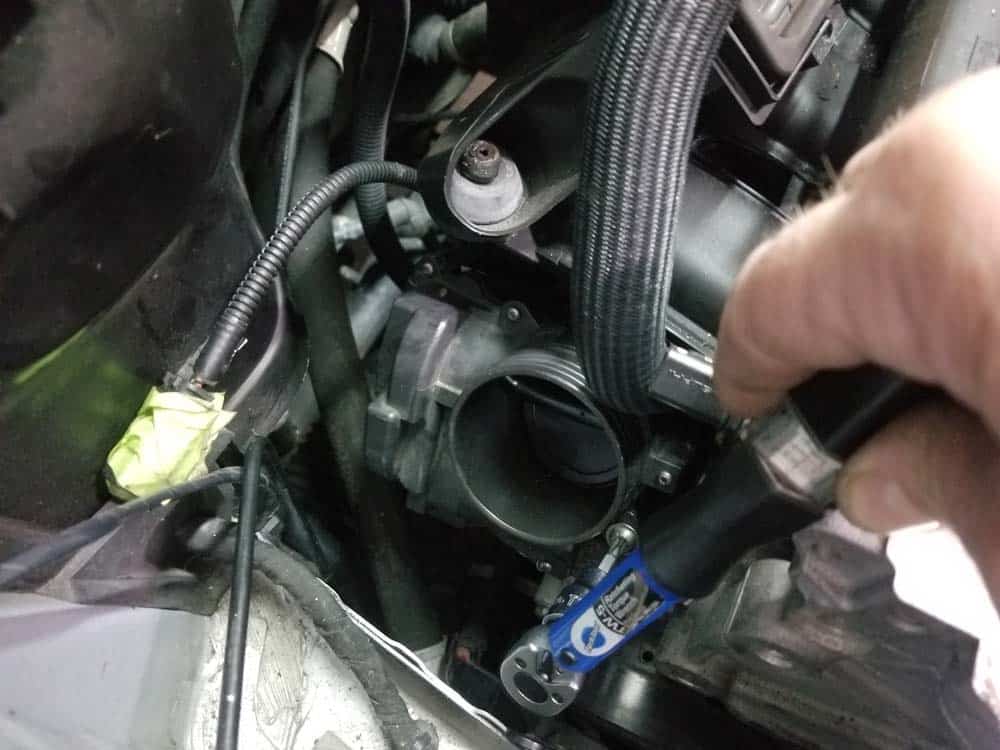
- Use a T30 torx bit to remove the three mounting mounting bolts securing the throttle body to the intake manifold. Turn the throttle body over exposing the rear electrical connector. Use as flat blade screwdriver to gently push in on the plastic tab to release the connection. Remove the throttle body from the vehicle.
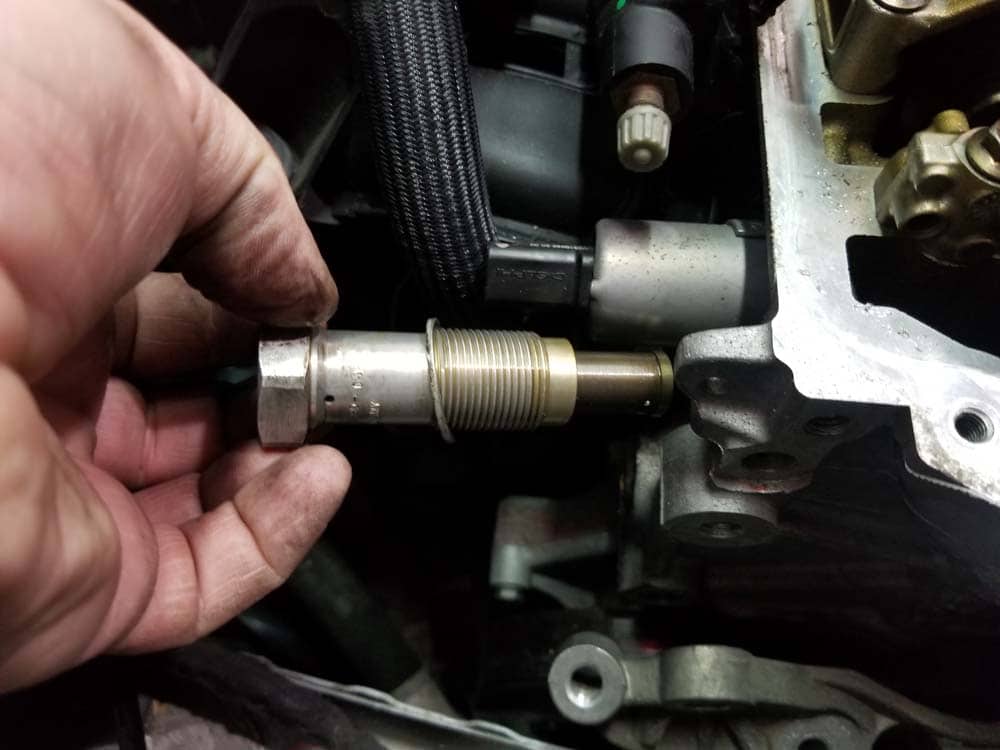
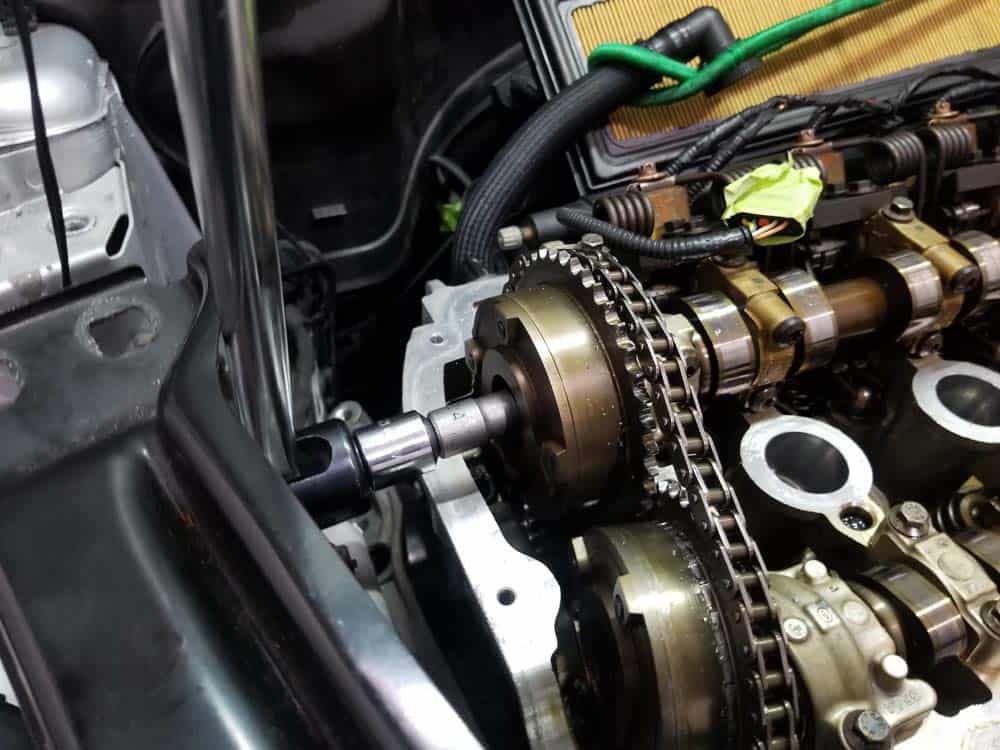
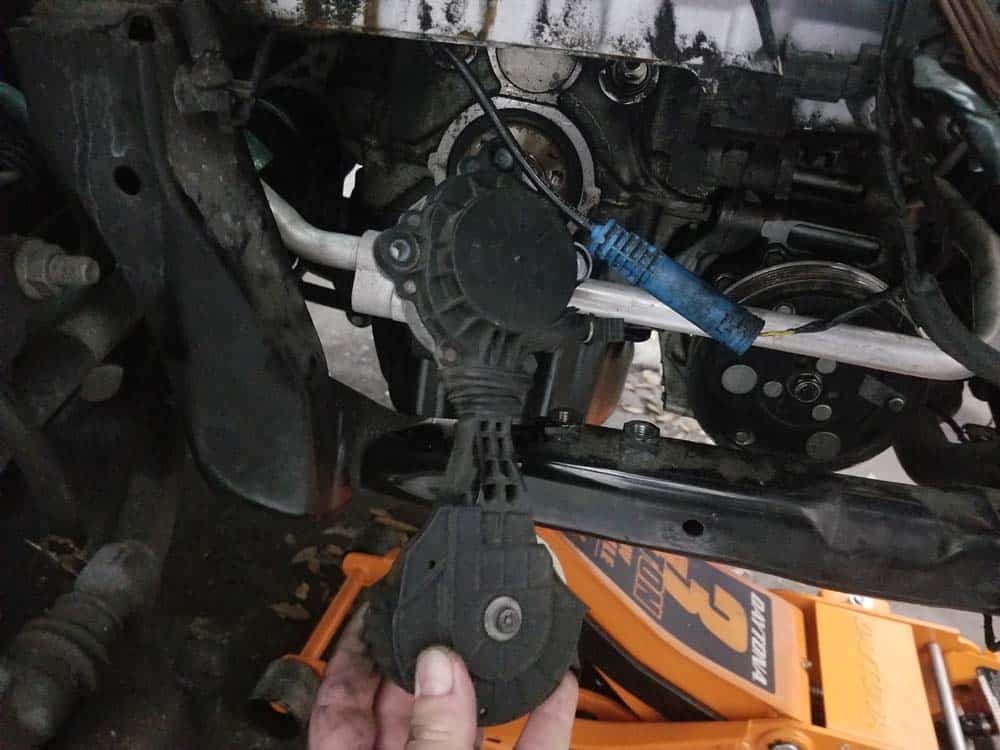
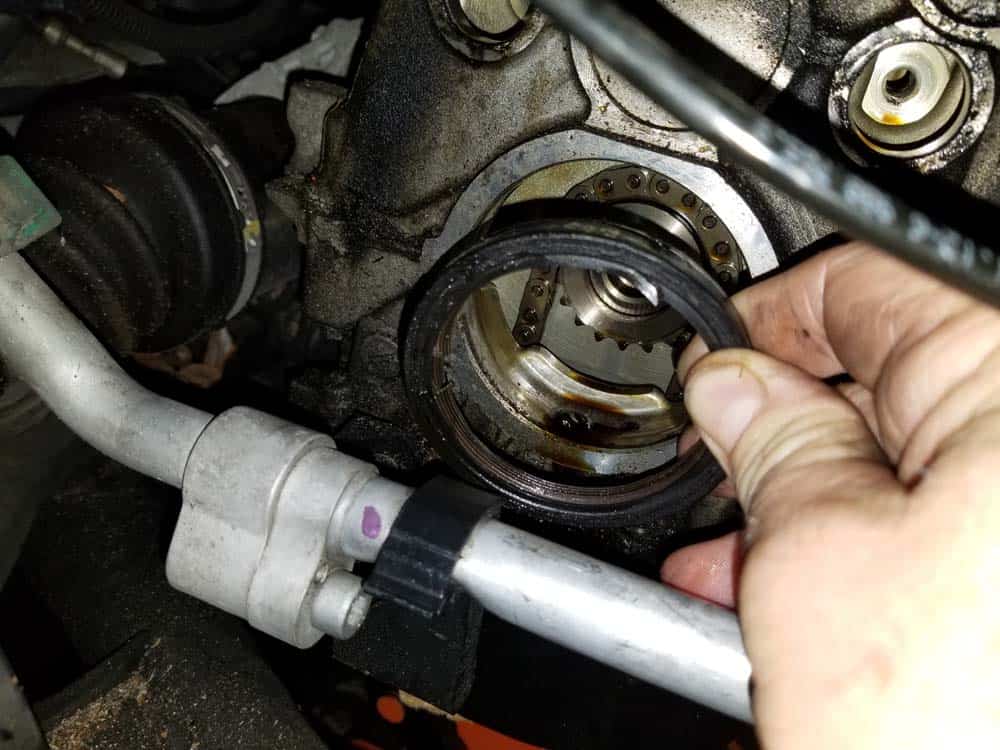
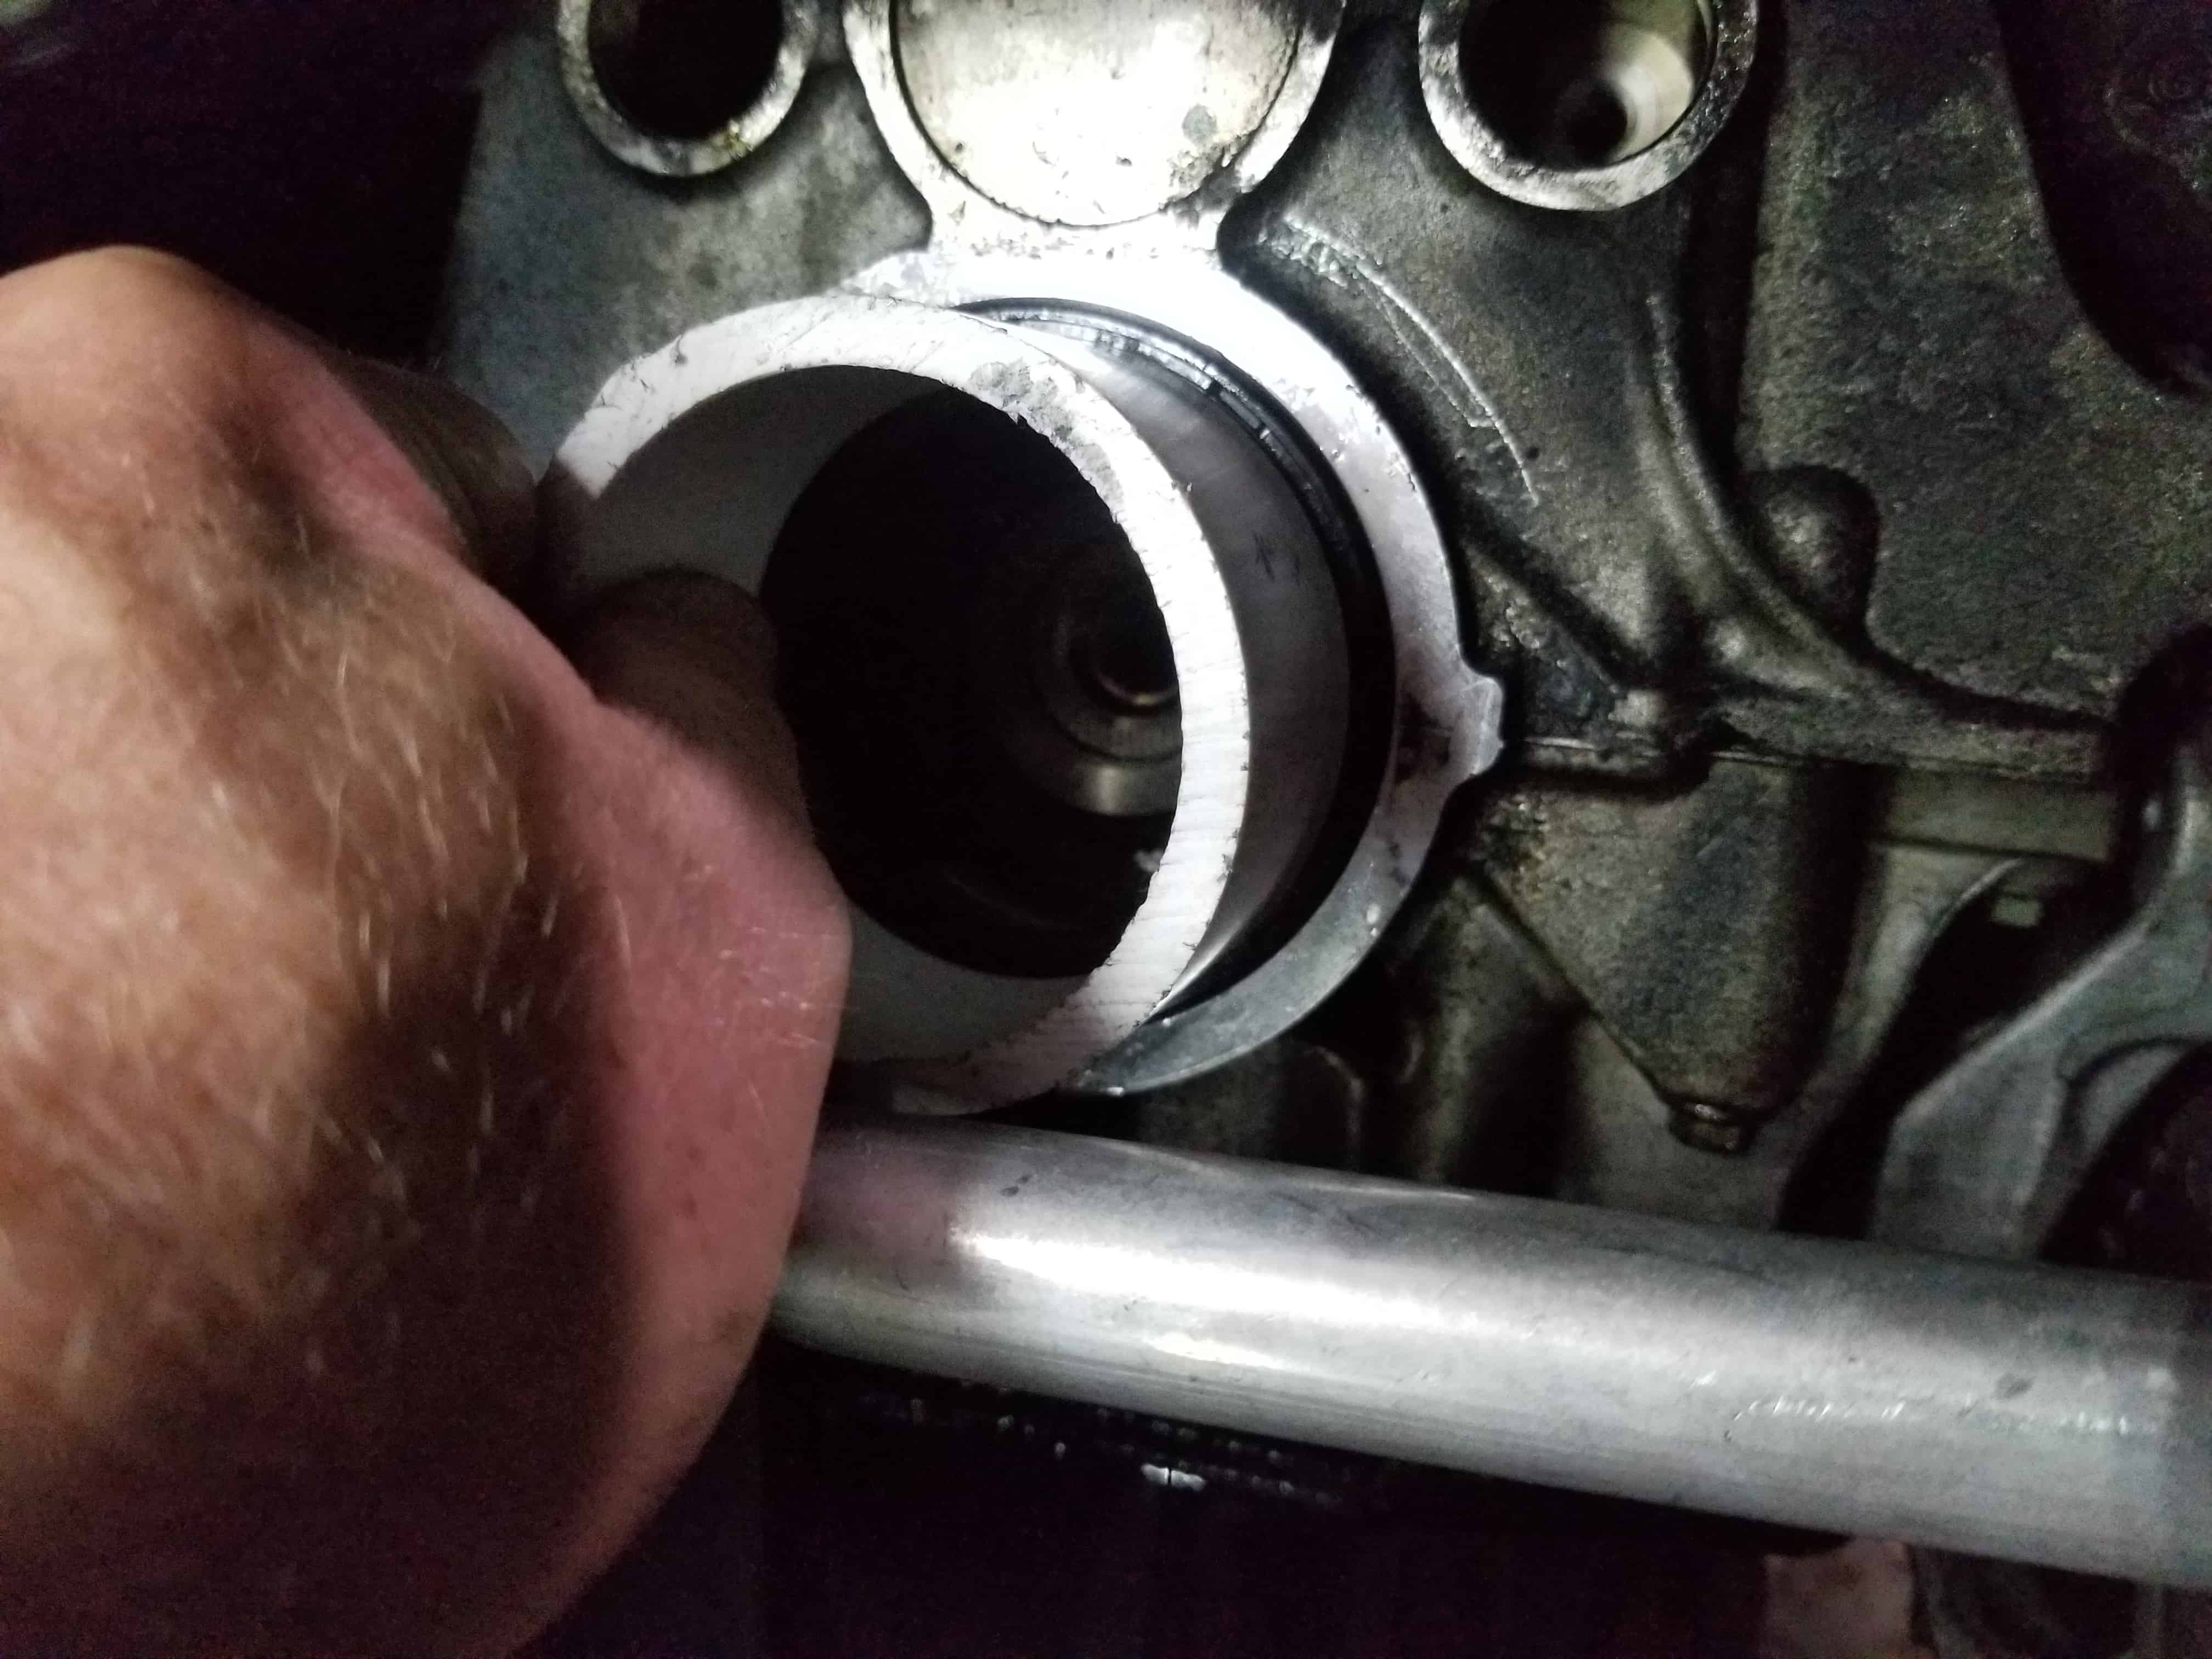
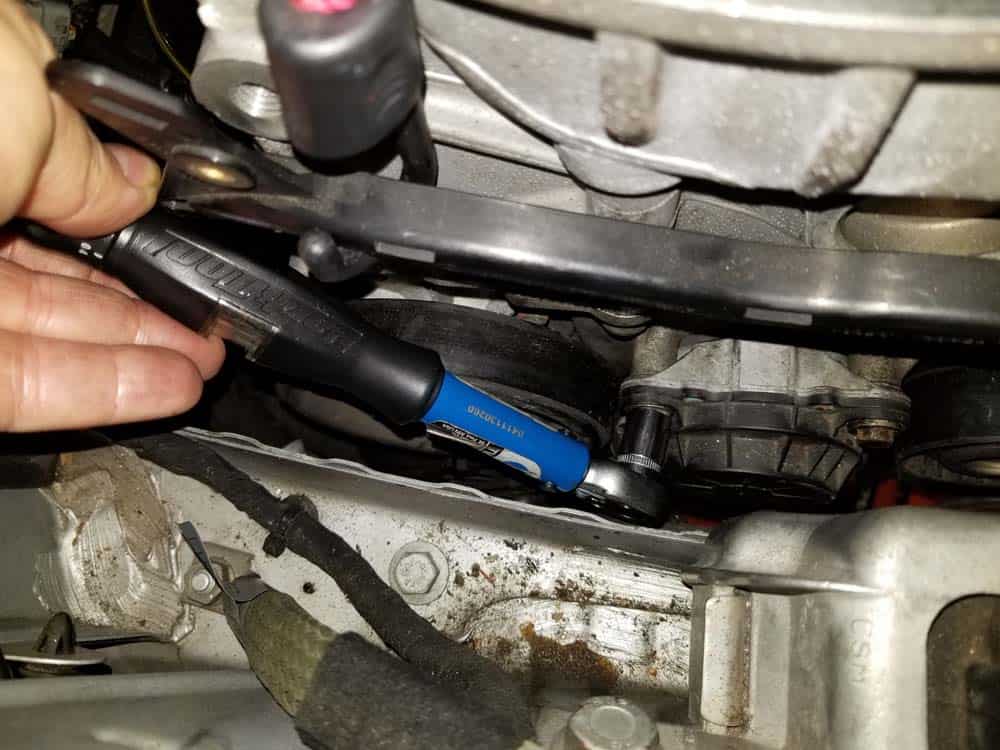
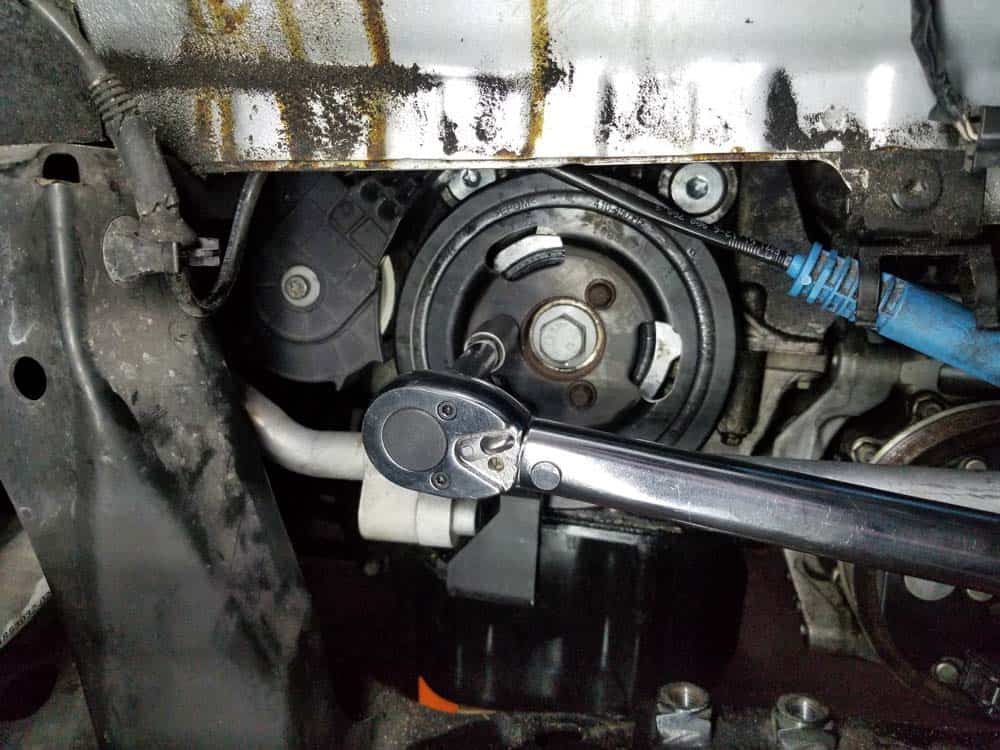
- You can now easily access the chain tensioner. Use a 27mm open end wrench to loosen the tensioner. Unscrew the tensioner by hand and remove from the engine block.
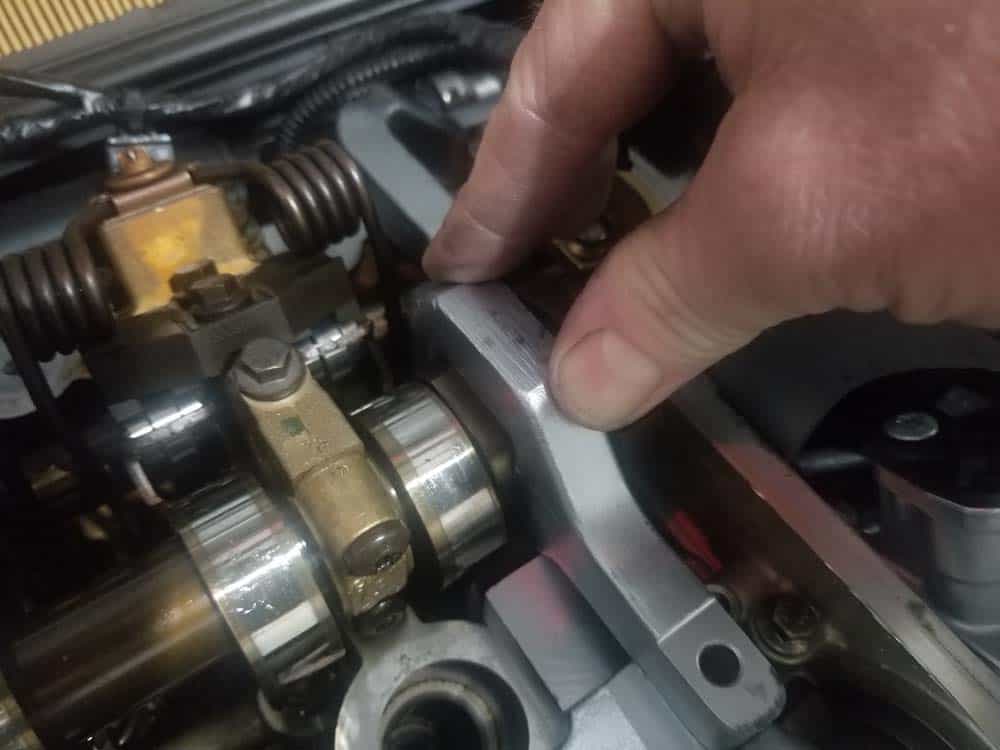
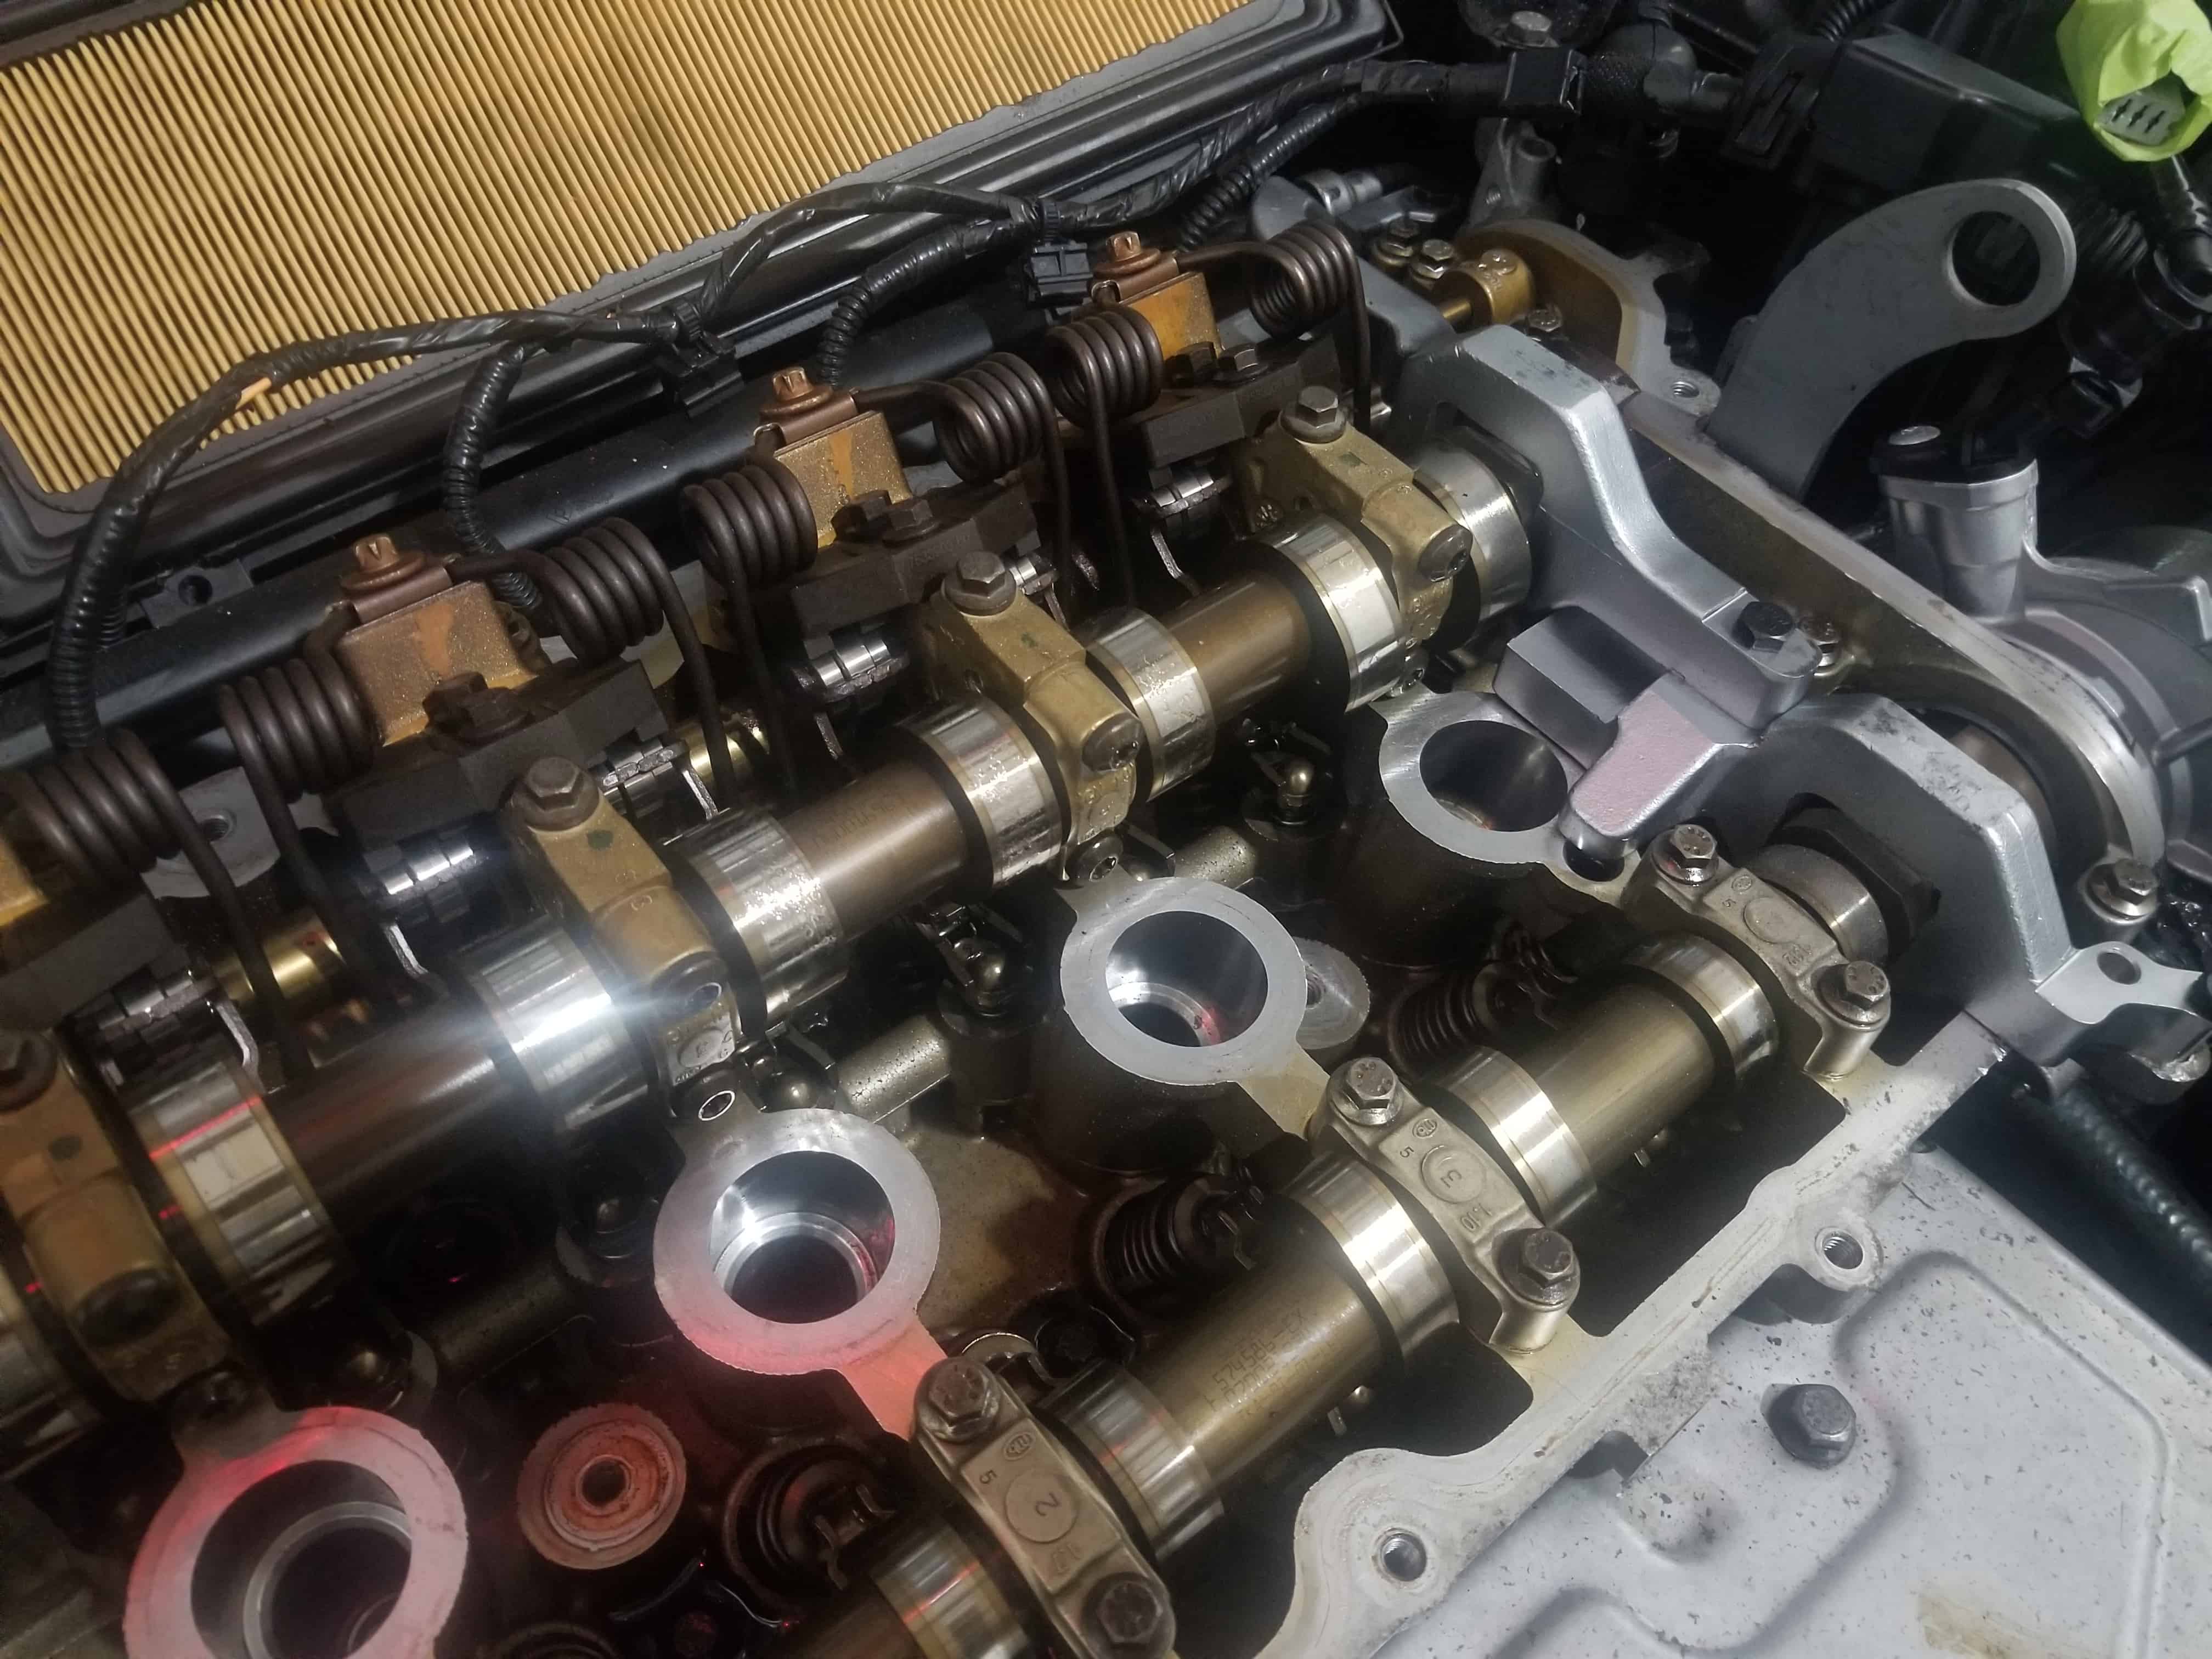
- Moving back to the top of the engine, use an 8mm socket to remove the two bolts anchoring the chain slide rail to the engine head. Remove slide rail from engine compartment.
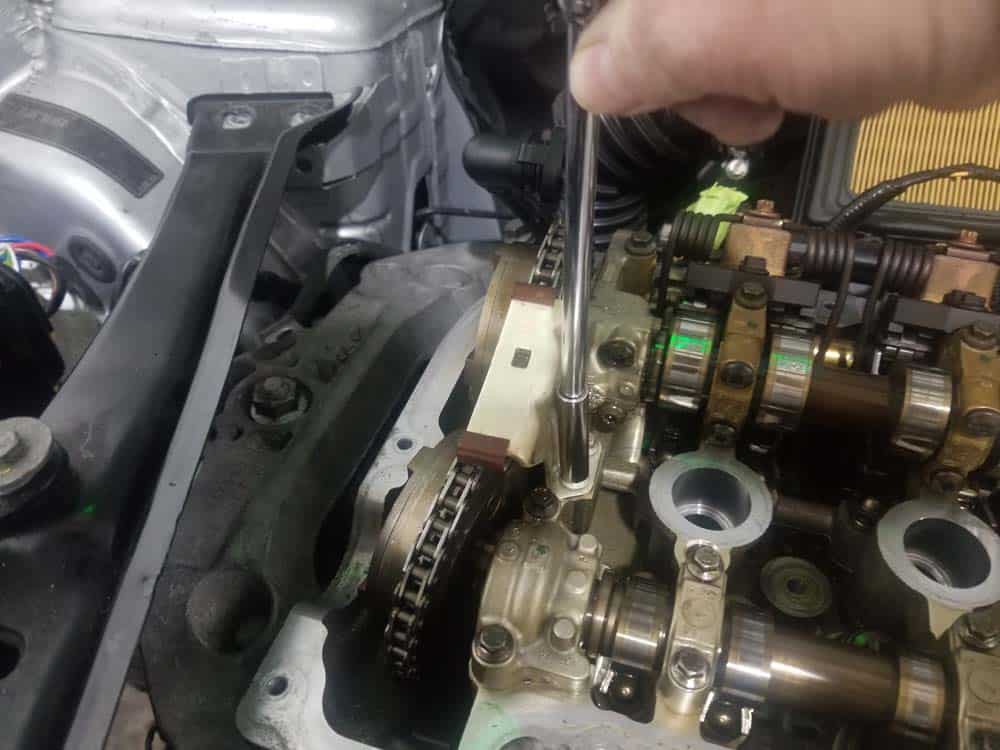
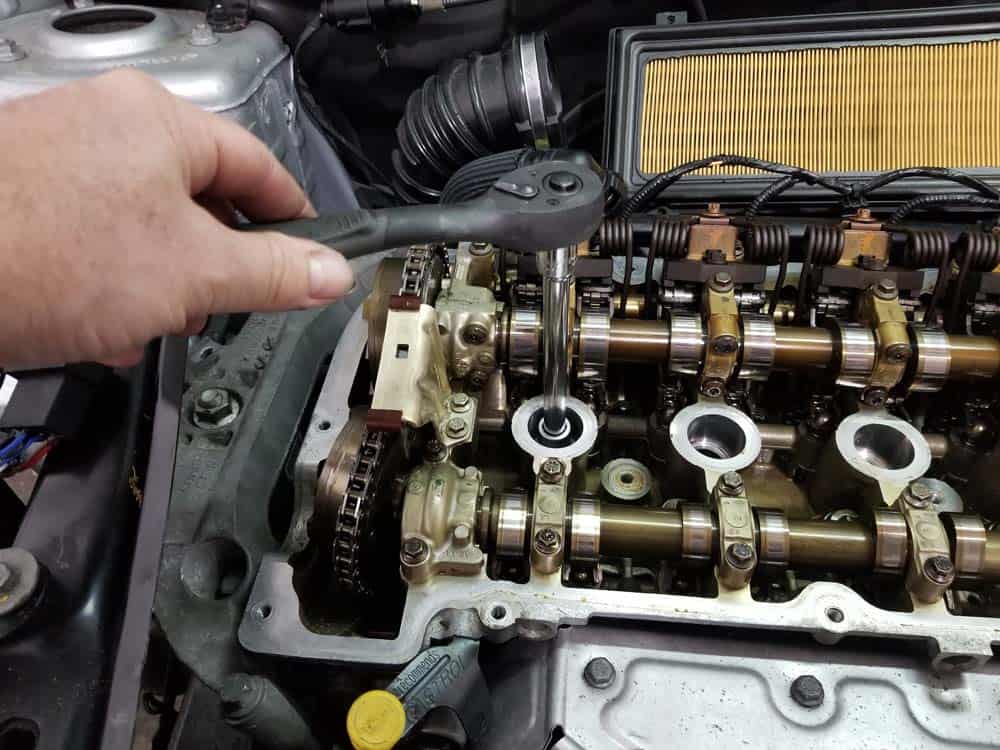
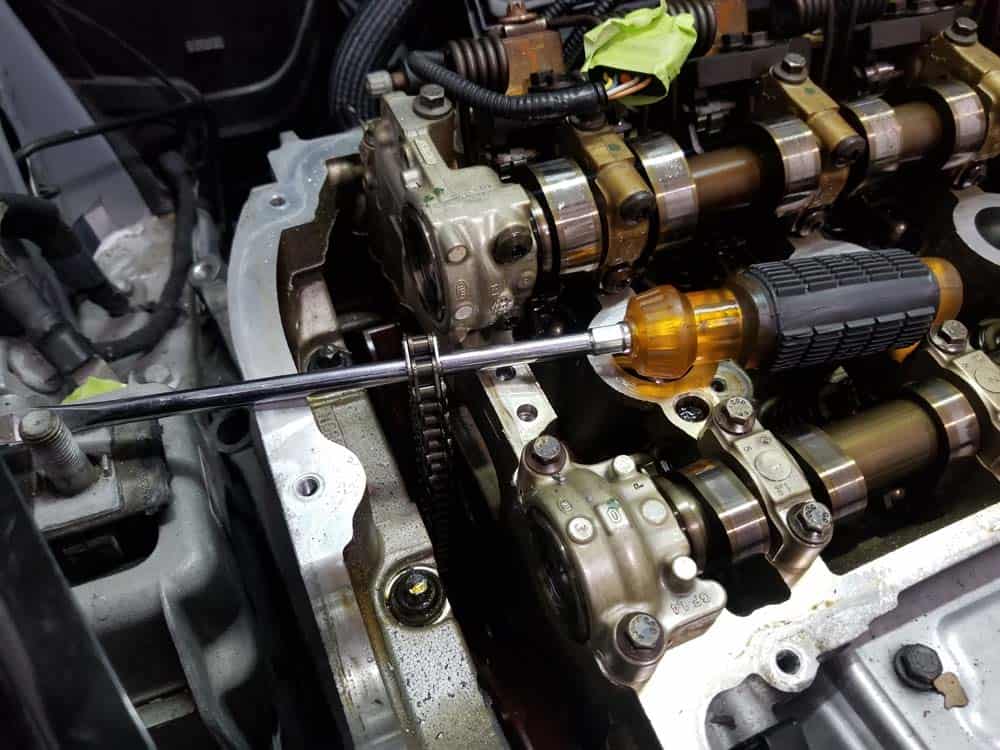
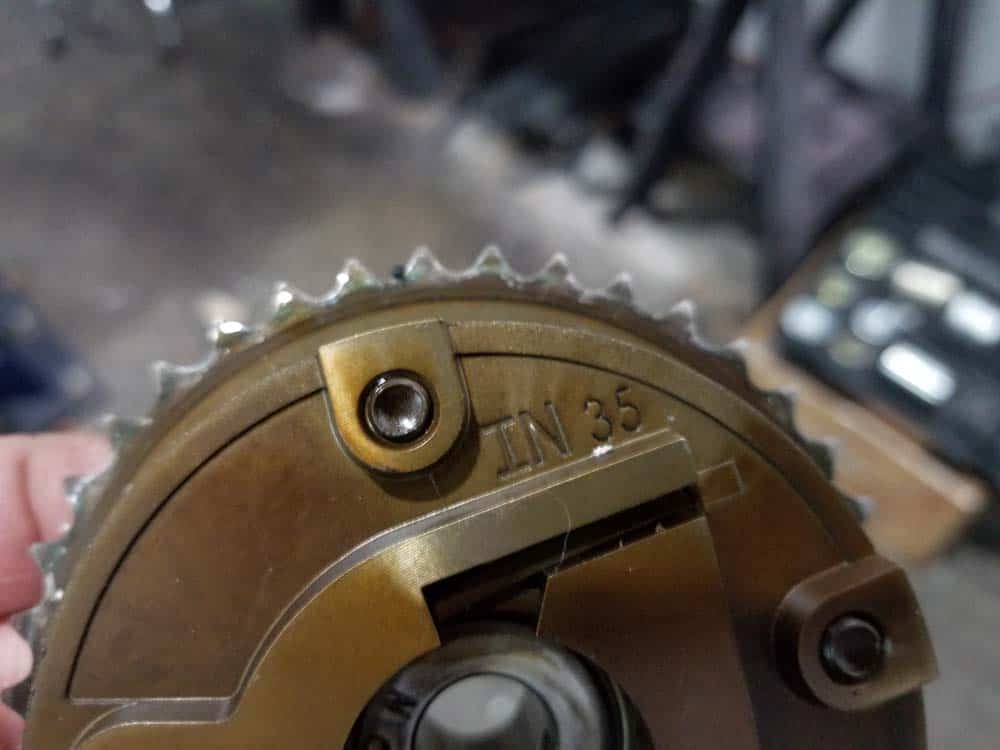
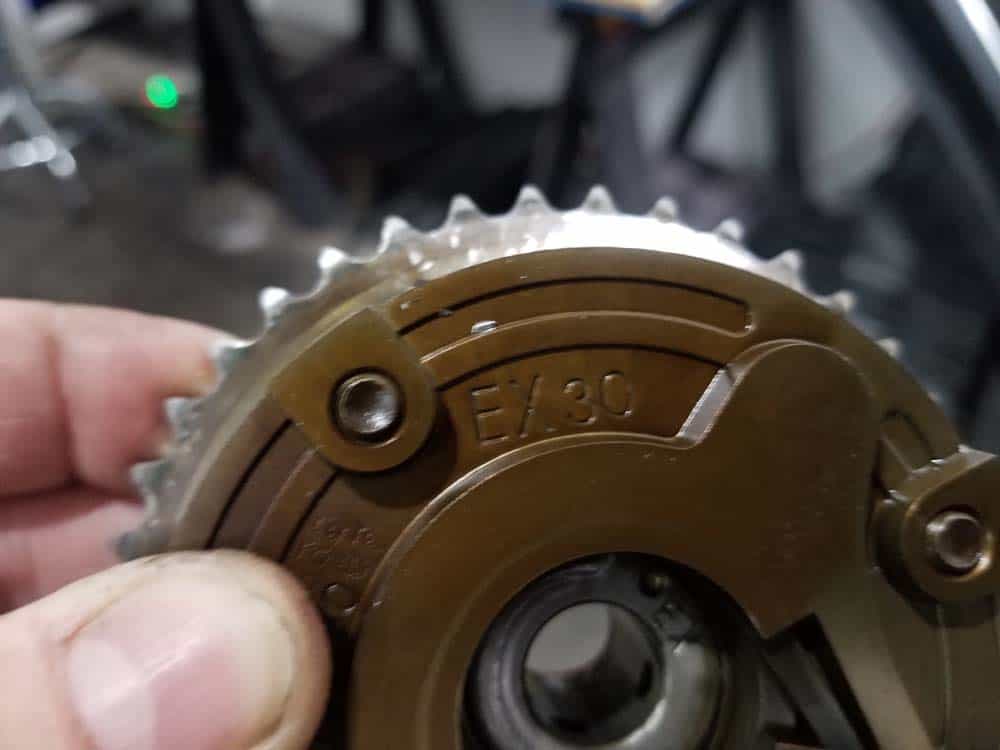
- Using an E14 torx socket and a breaker bar, remove the bolts securing the exhaust and intake sprockets to the camshafts. Note that the camshaft sprockets are embossed so you don’t get them mixed up during reassembly (EX=front exhaust, IN=rear intake). Lay a screwdriver underneath the timing chain so it doesn't fall into the engine.
Section 6 - Removing the Timing Chain
The final steps of disassembly involve removing the timing chain from the engine. The timing chain is connected to the crankshaft at the bottom of the engine via the crankshaft sprocket. To remove this sprocket, the vibration dampener (also known as the crank pulley) must be removed. Contrary to other articles written on this procedure, there are no special tools needed to accomplish this. Since we have already immobilized the crankshaft with the timing chain locking pin (Section 1 - step 7), the crankshaft bolt can be easily removed without any special tools needed.- Remove the three bolts anchoring the vibration dampener (crank pulley) to the crankshaft with an E10 torx socket. Wedge a flat blade screwdriver through one of the holes in the pulley to keep it from spinning when removing the bolts. Remove the pulley from the engine. If the pulley is stuck, give it a couple of light taps with a rubber mallet to release it. The pulley must be removed before removing the crankshaft bolt.
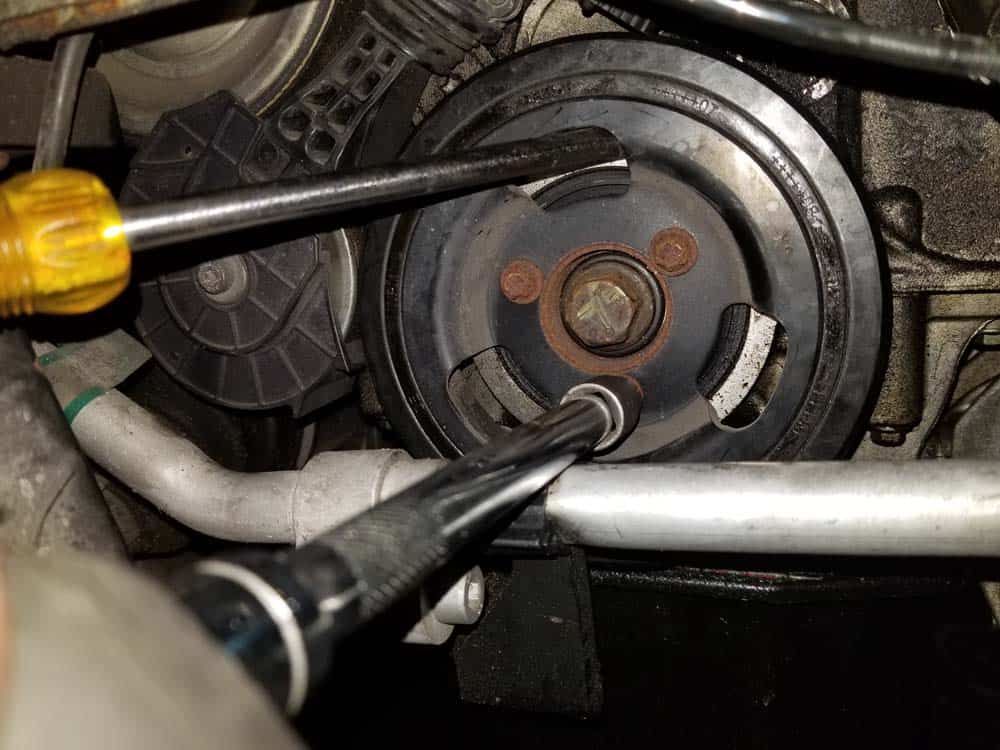
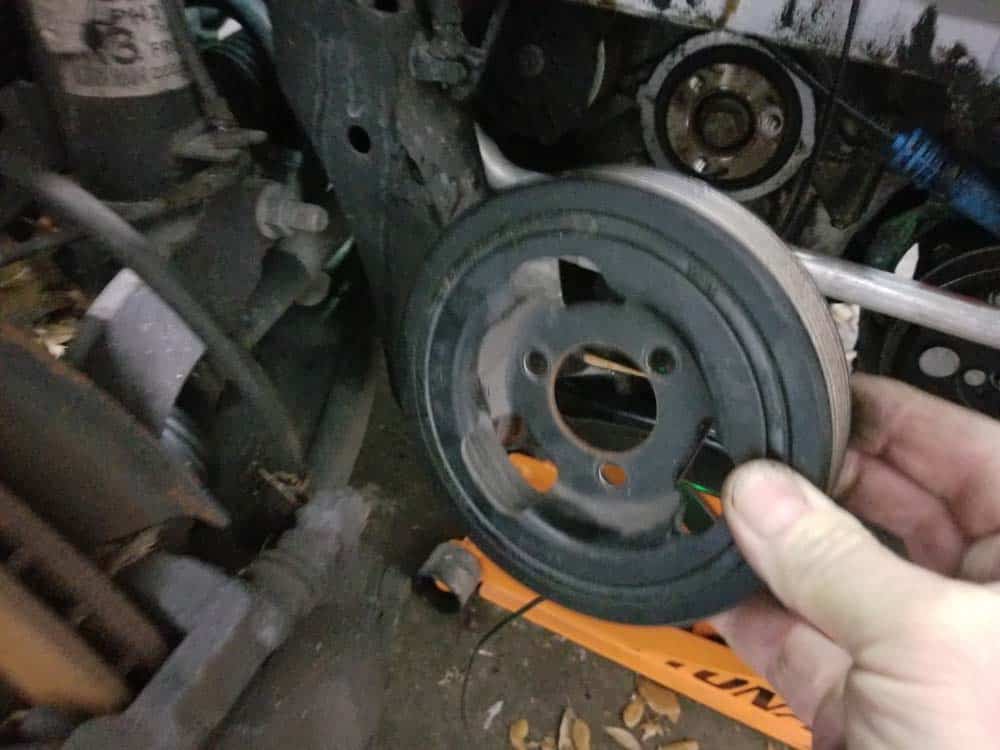
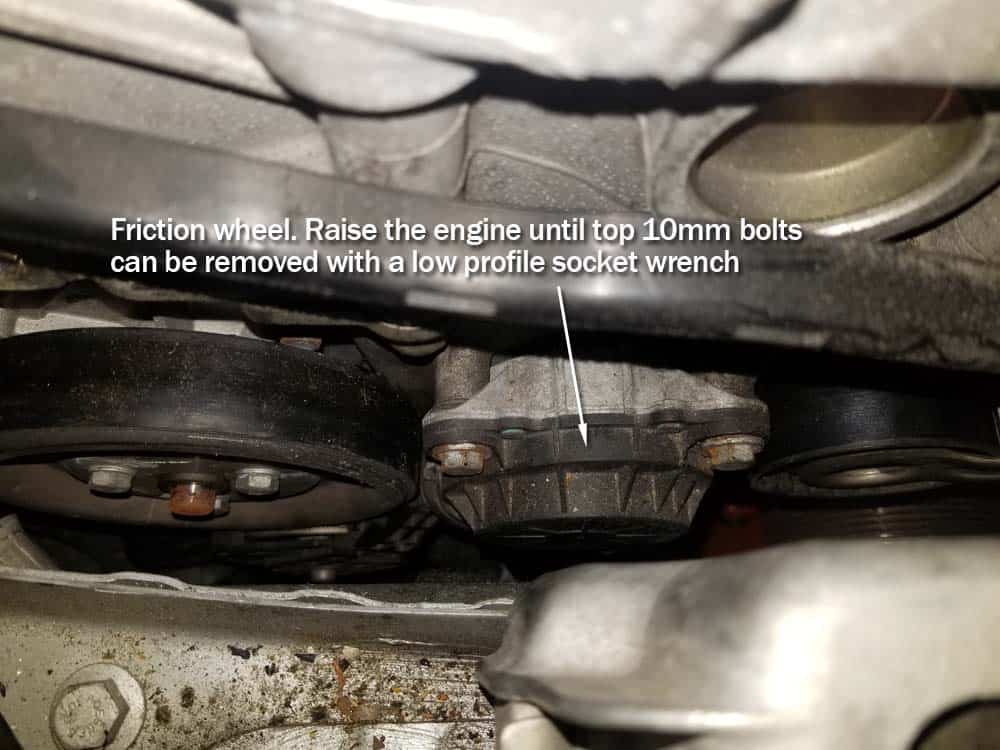
- Next, the friction wheel must be removed from the right side of the engine. You unfortunately will not be able to remove the rear bearing bolt in the next step if you don’t remove the friction wheel. The three bolts anchoring the friction wheel are a challenge to remove because of their proximity to the right side frame of the car. You will need to raise the engine with the floor jack just enough until you can get a low profile 10mm socket on the top bolts. Once the top bolts are removed, lower the engine back to its normal operational height and remove the lower 10mm bolt. Remove the friction wheel from the vehicle.

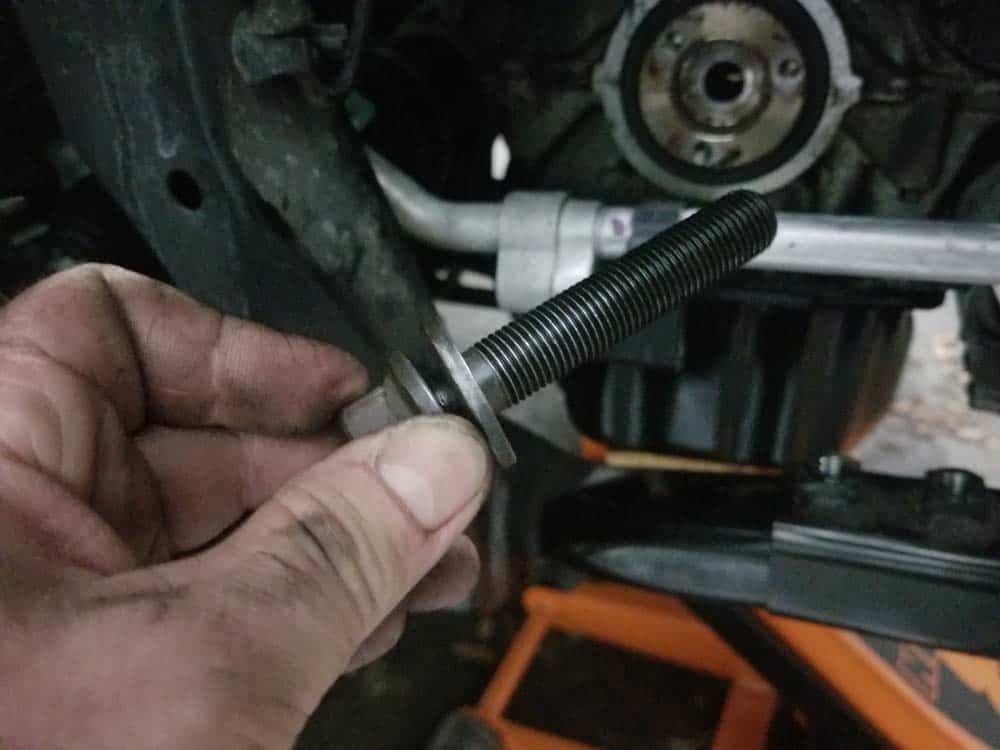
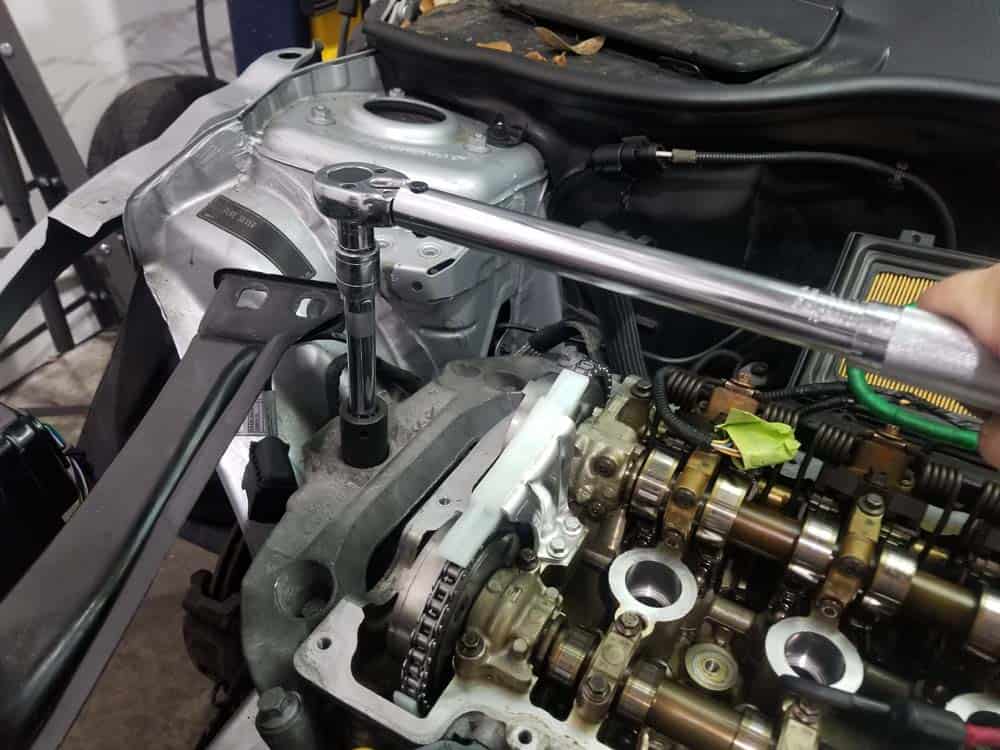
- Using a T45 torx bit, remove the front and rear bearing bolts from the engine.
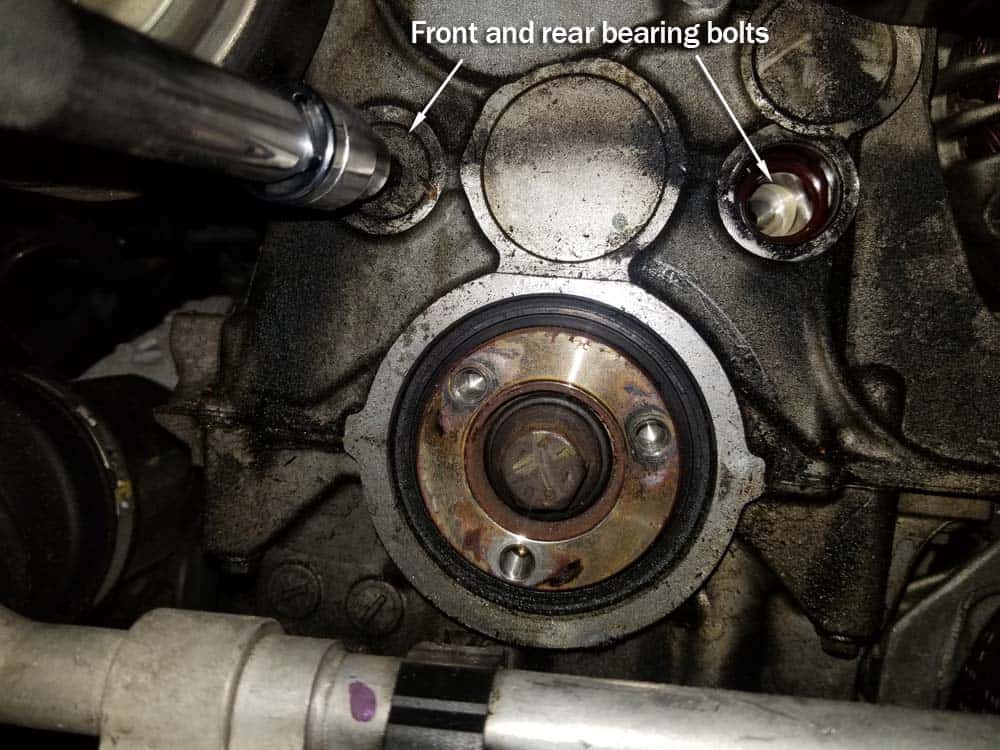
- Use a T50 torx bit to remove the top bearing bolt from the engine.
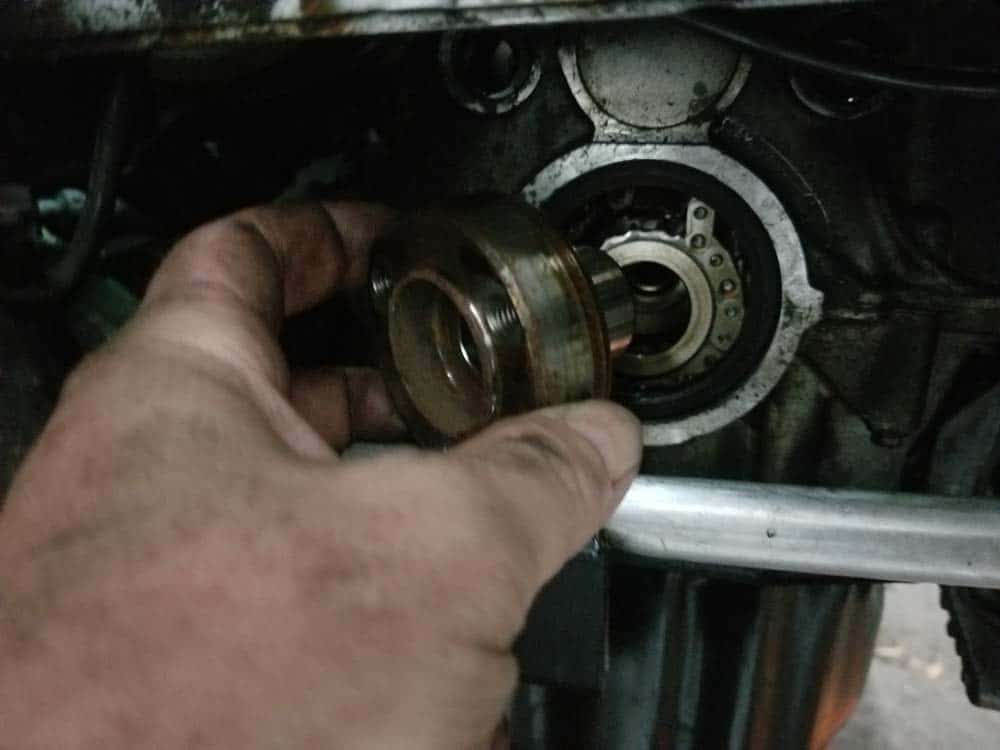
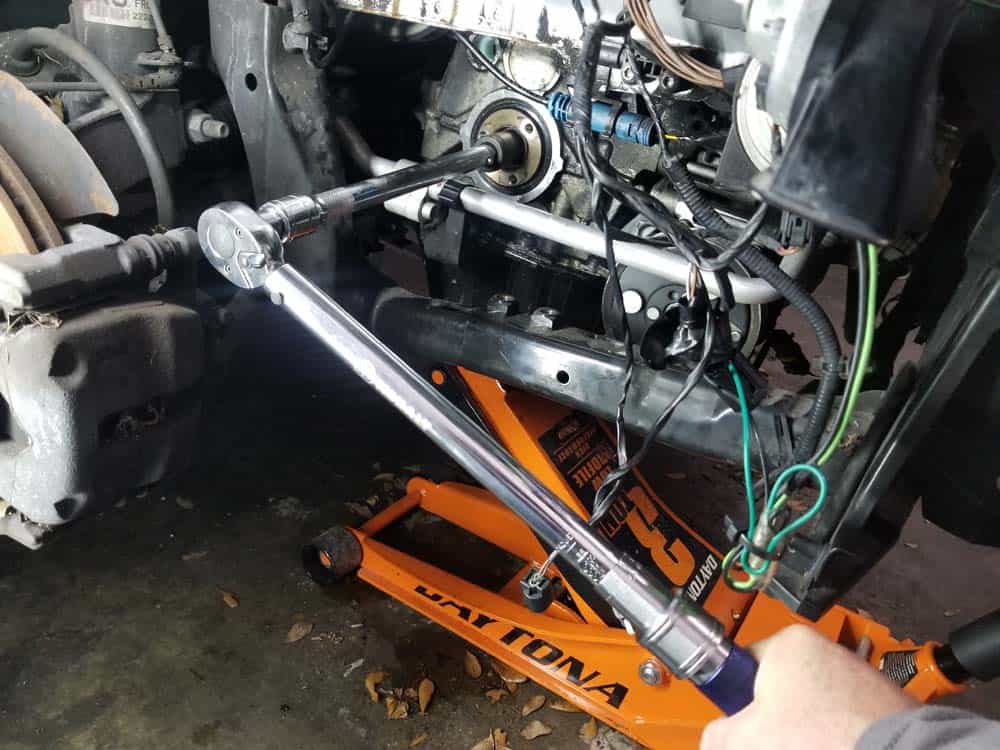
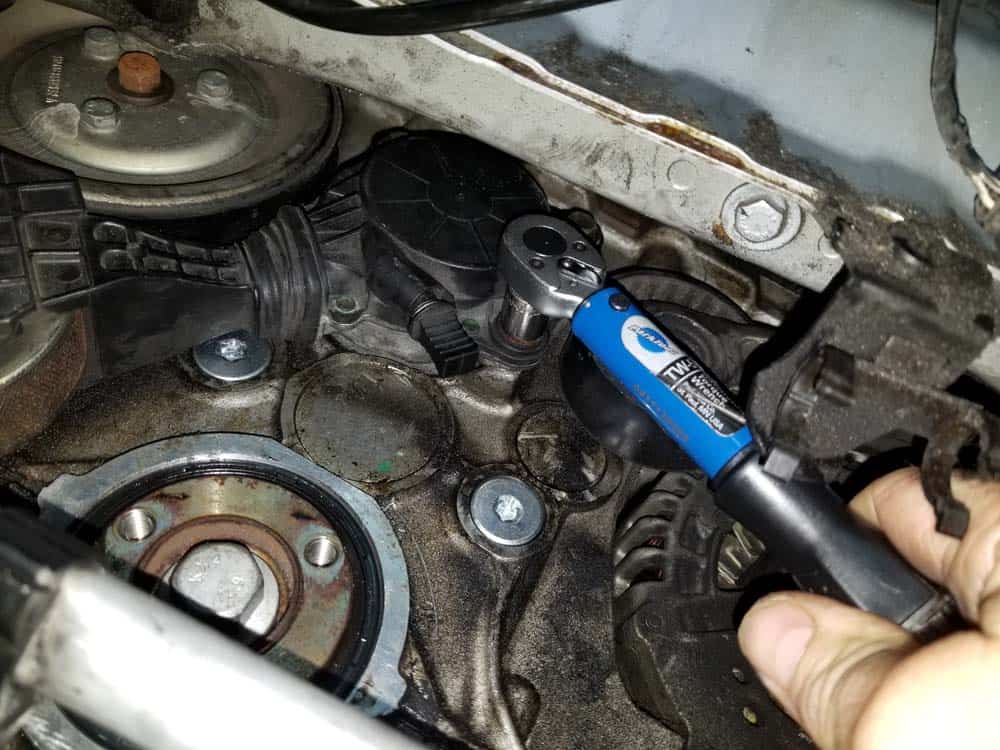
- Use an 18mm socket and breaker bar to loosen the crankshaft hub bolt. Remove the bolt from vehicle.
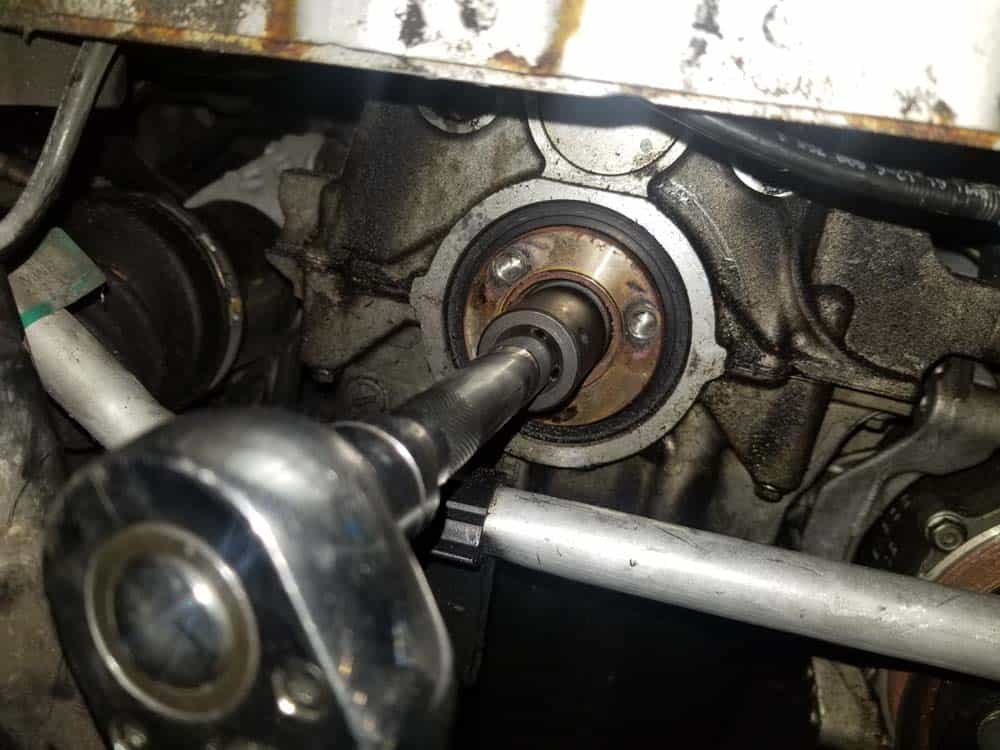
- Grasp the crankshaft hub and remove from engine.
- Remove the oil dipstick from the engine! This is the most overlooked step...you cannot remove the chain until the dipstick is removed.
- The timing chain is now free. Grasp the top of the chain and lift the entire assembly up and out of the engine.

Section 7 - Installing the New Timing Chain
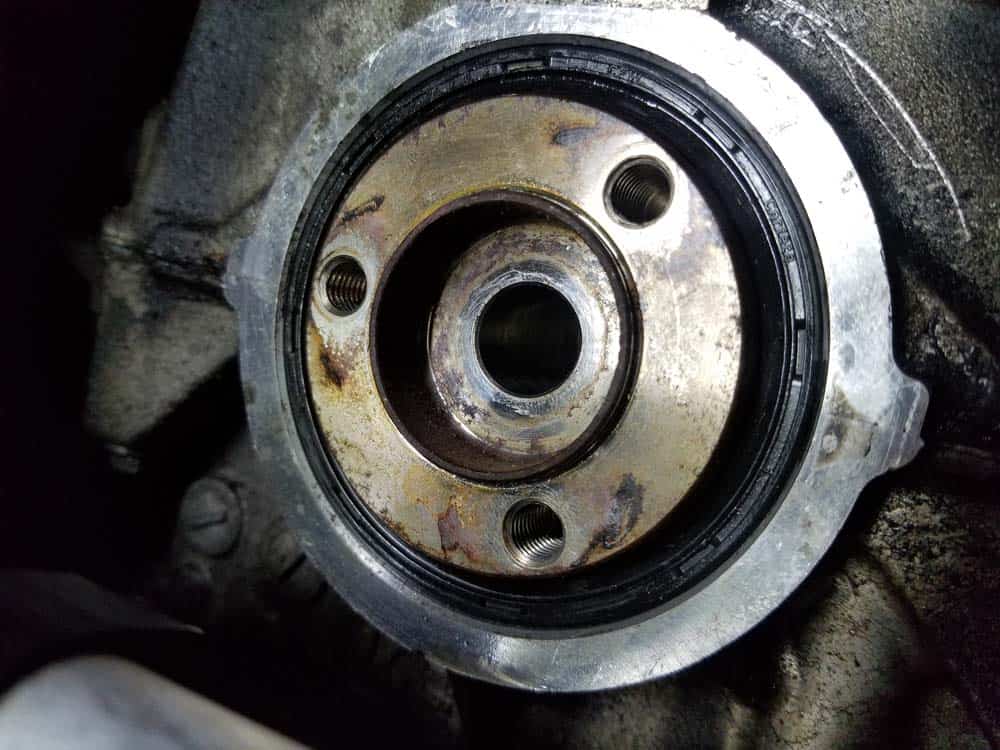
Installing the new timing chain is very straightforward...in fact now that you know your way around the MINI's engine it may seem simpler than taking it out. Make sure to always use a new crankshaft hub bolt and VANOS bolts when replacing your timing chain.- Remove the old crankshaft seal by gently tapping it with a steel punch until it can be grabbed with your fingers and pulled out of the engine.
- Thoroughly clean the crankshaft seal opening with CRC Brakleen and a rag, being sure to remove any old oil and gunk deposits.

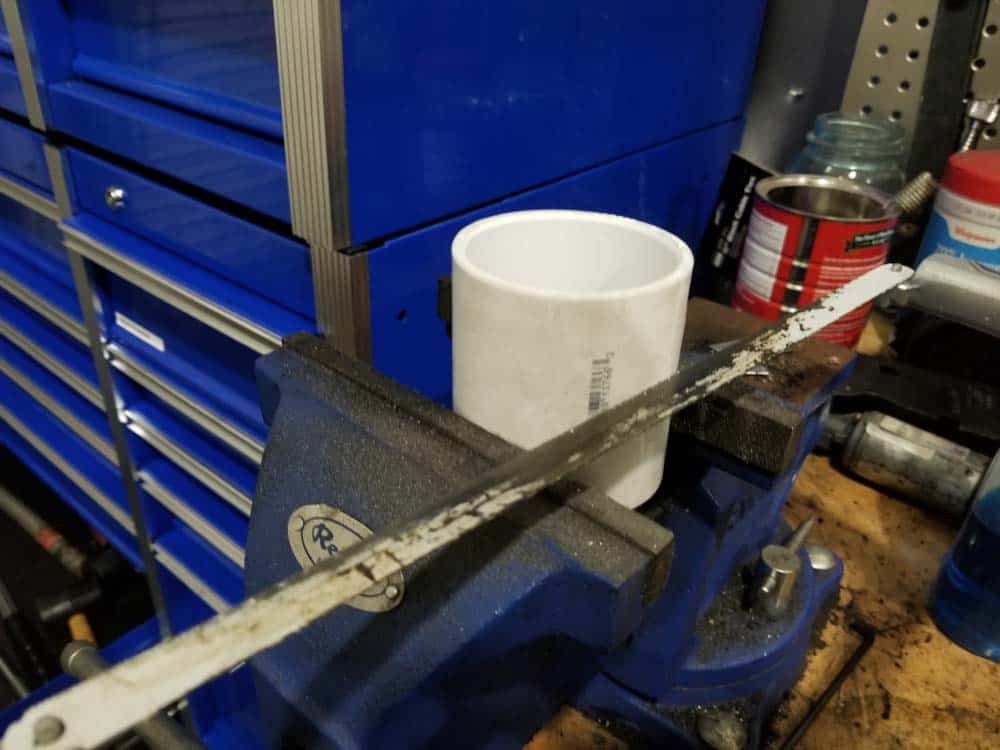
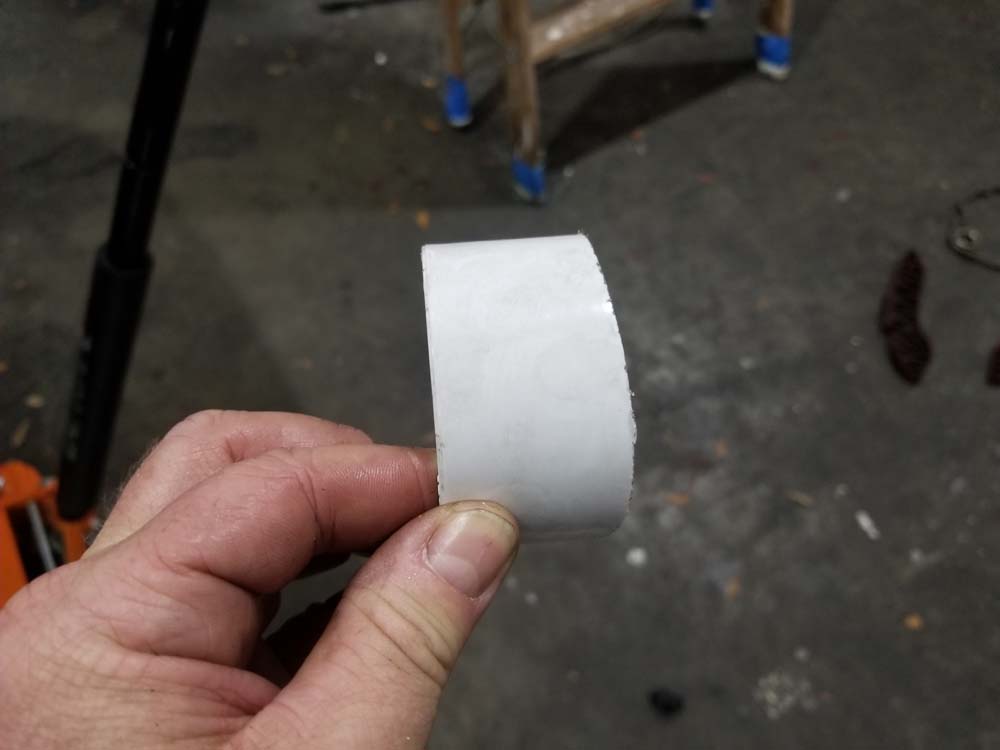
- Cut a 2” PVC coupling (found at any home improvement store) approximately 1 ½” from the end. You will use the small piece of PVC to press the new crankshaft seal into the engine. No special tools are needed for this...in fact the seal can almost be pushed in by hand. You must cut the coupling down though...it will not fit between the air conditioning cooling line and the seal if you don't.
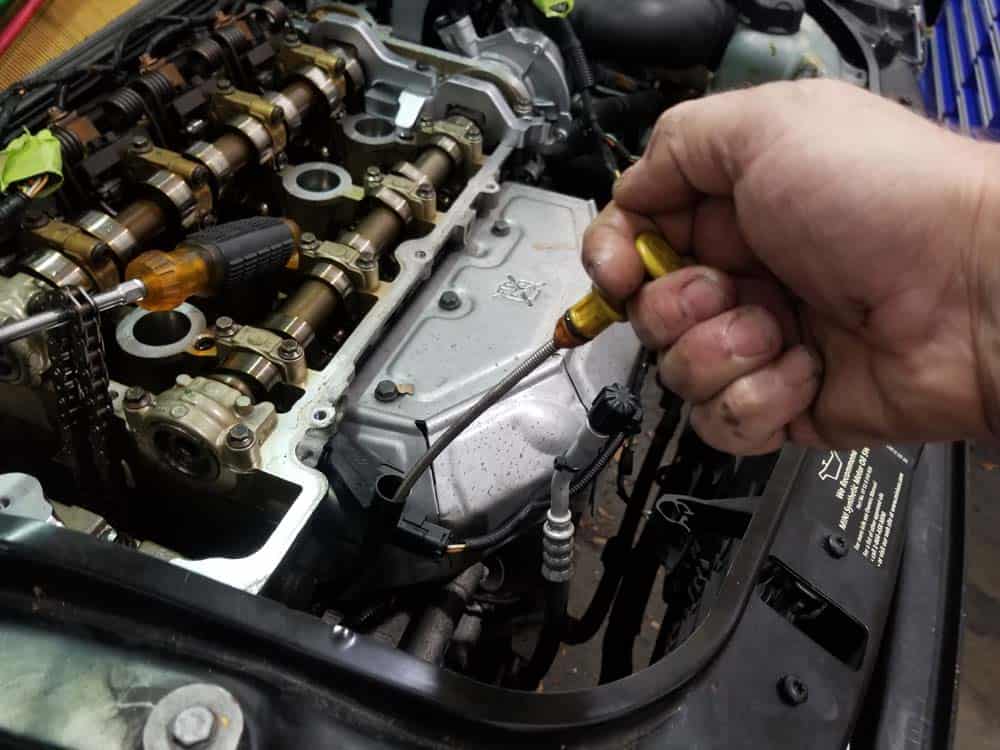
- Apply a thin layer of clean engine oil to the seal opening, then press the seal into the engine with your fingers to get it started. Make sure it is aligned in the opening straight.
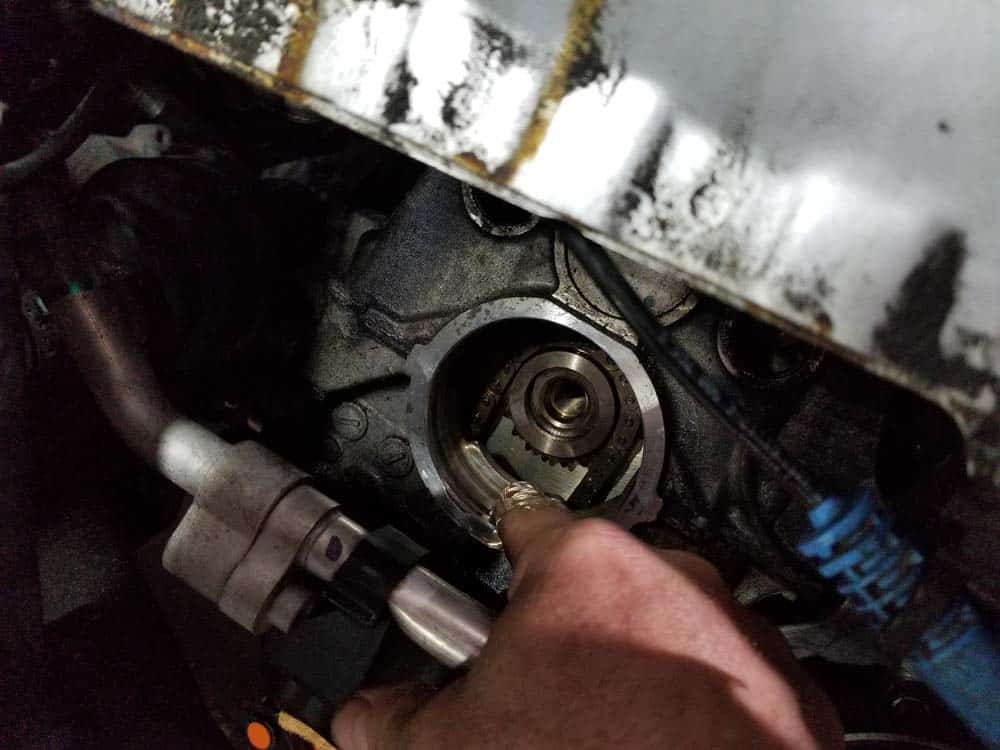
- Position the piece of 2” PVC coupling in front of the seal and VERY LIGHTLY tap with a hammer (or the handle of a large screwdriver), pushing the seal into the engine. Continue your way lightly tapping around the circumference of the pipe until the seal is flush inside the opening.

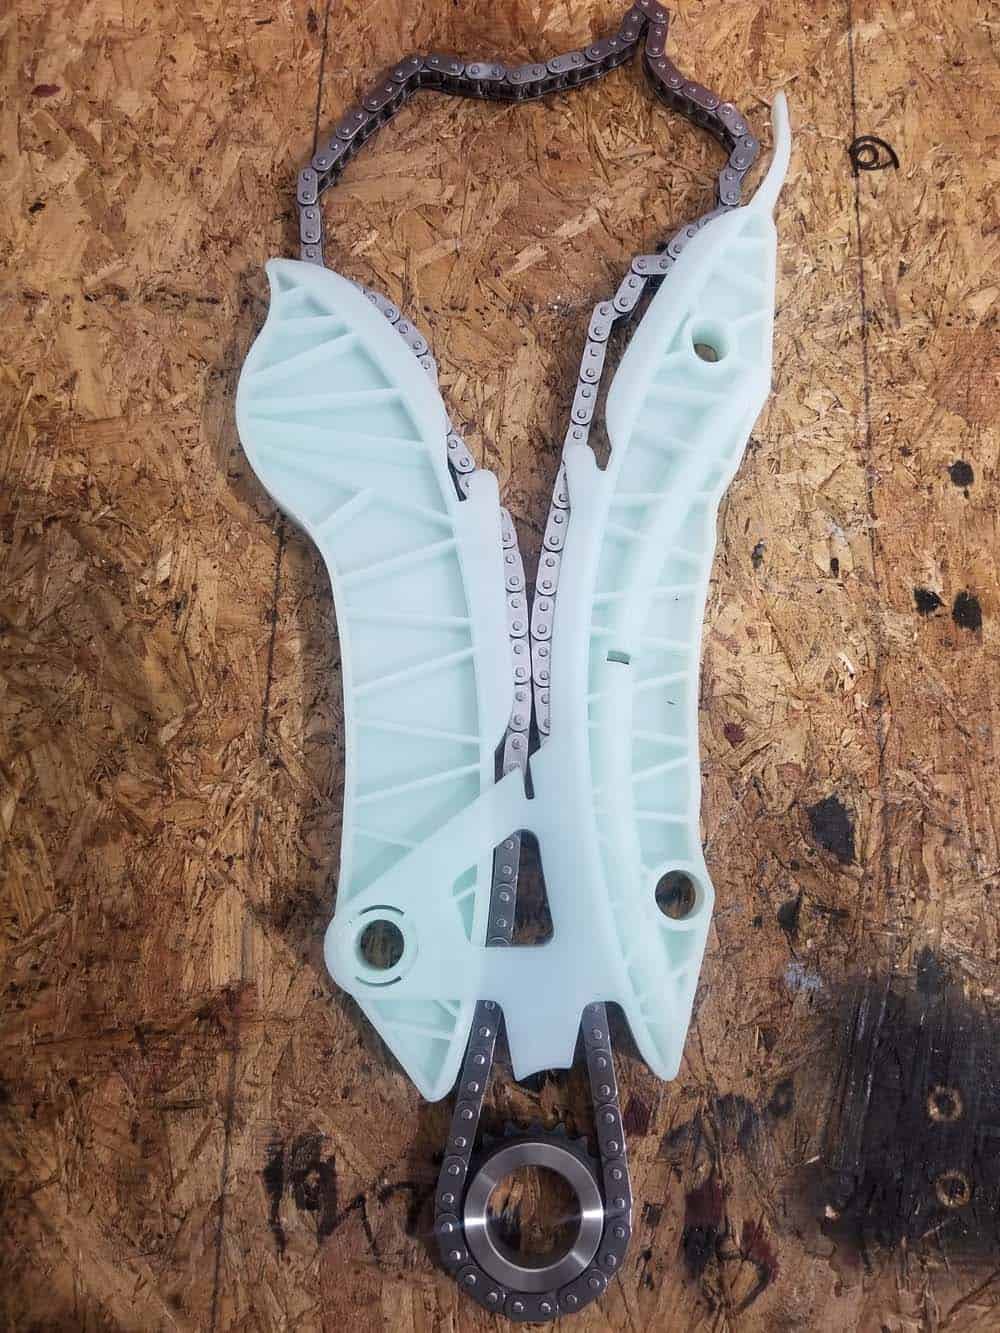
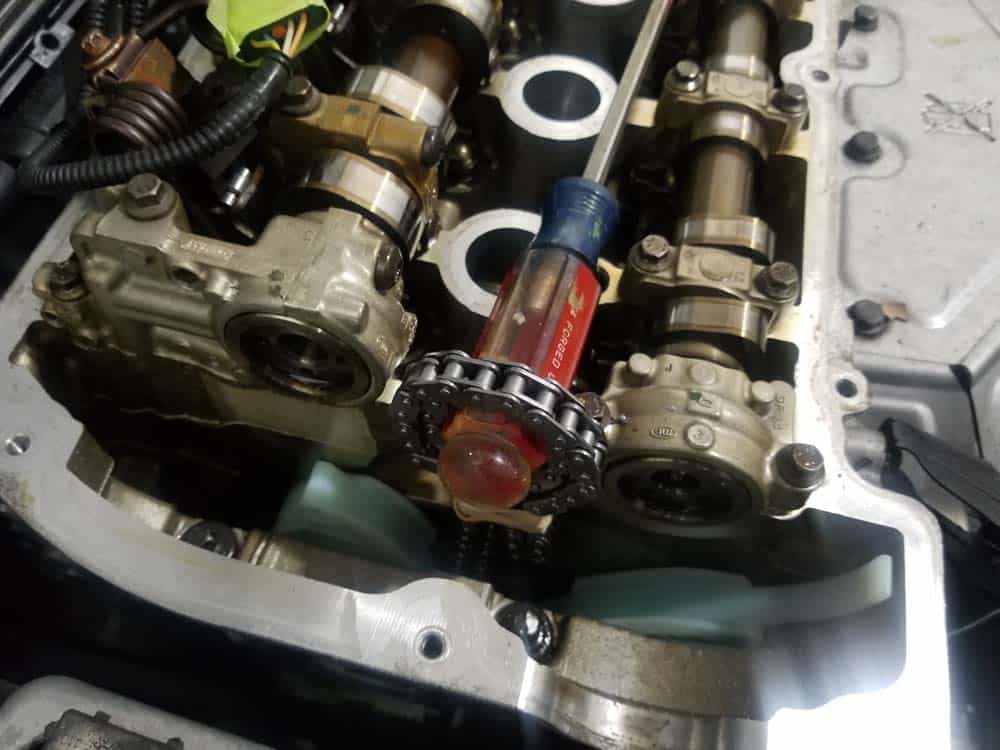
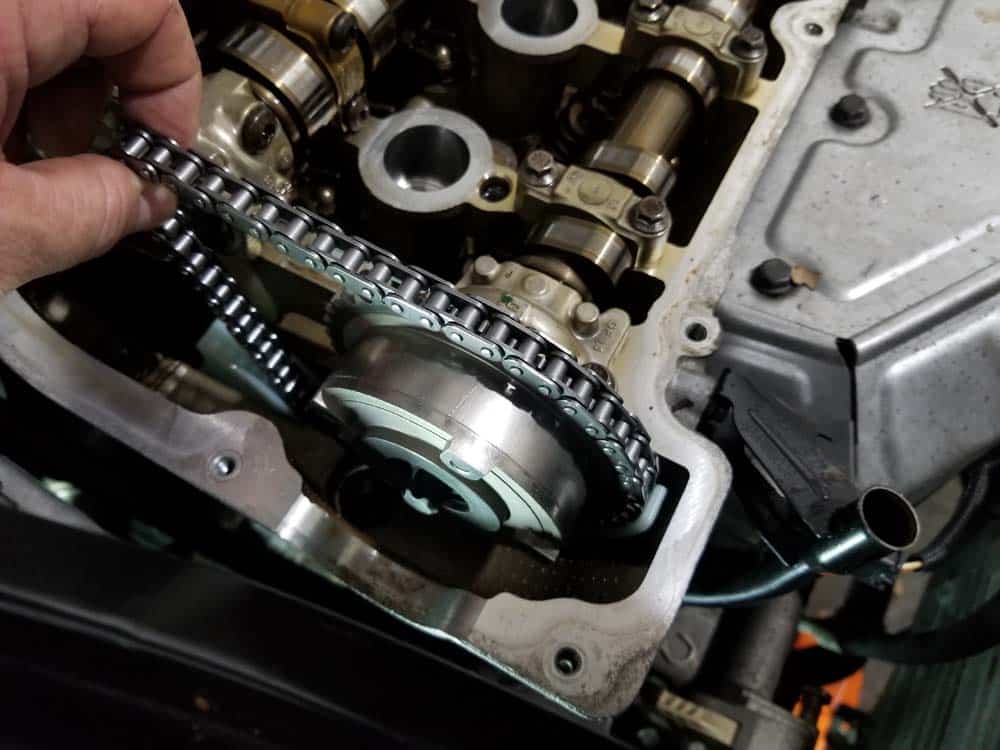
- Unpackage the new timing chain, chain guide rails and crankshaft sprocket and lay out on a bench. Route the new chain through the cassette as shown. Attach the left hand side of the plastic cassette to the right side as shown in the images below.


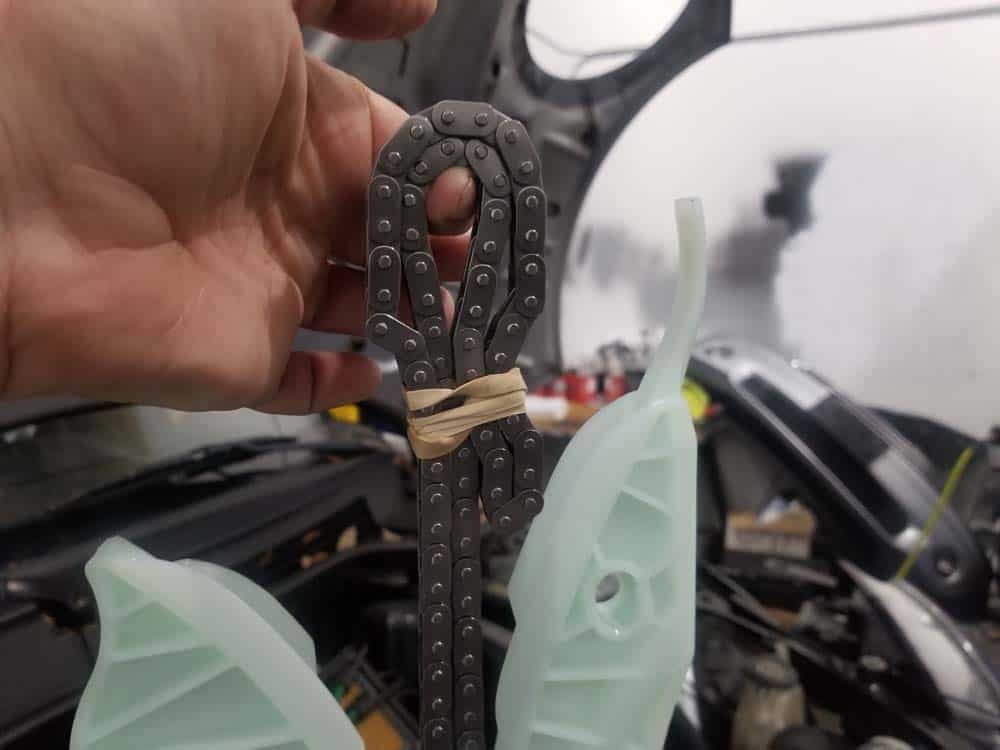
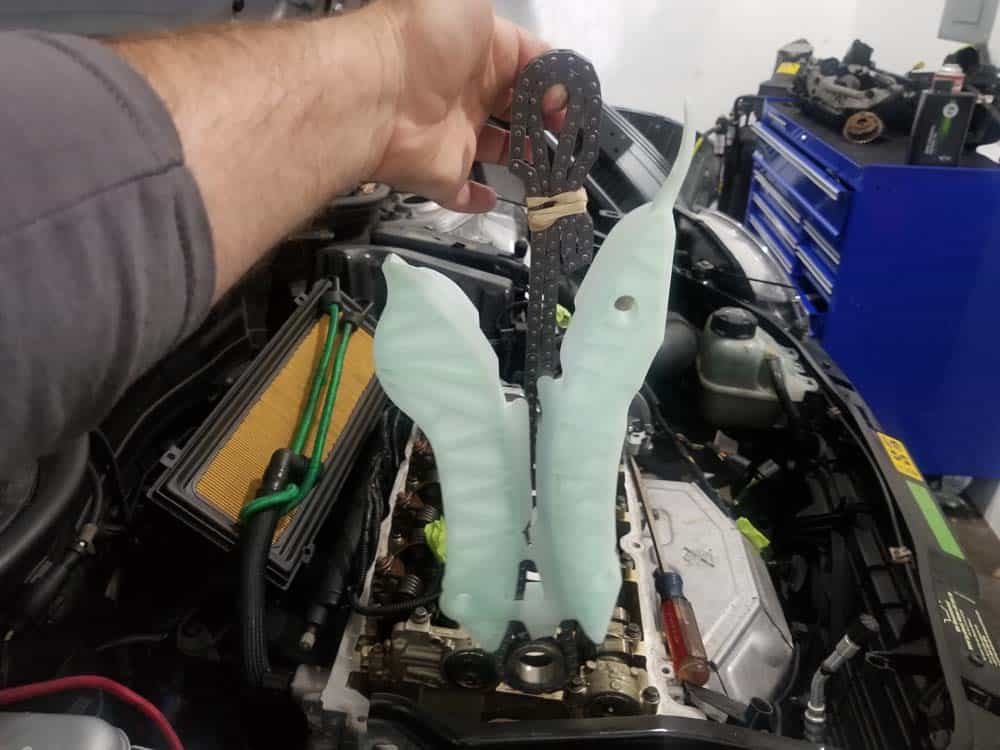
- If you don’t have a helper who can hold the chain while you install the sprockets, you can use the following trick to do it yourself: fold the chain about halfway down and wrap a rubber band tightly around it. You can now slowly lower the chain assembly down into the engine and hold in place with the handle of a screwdriver (see the following images). Folding the chain keeps it tight and prevents it from falling off of the crankshaft sprocket.
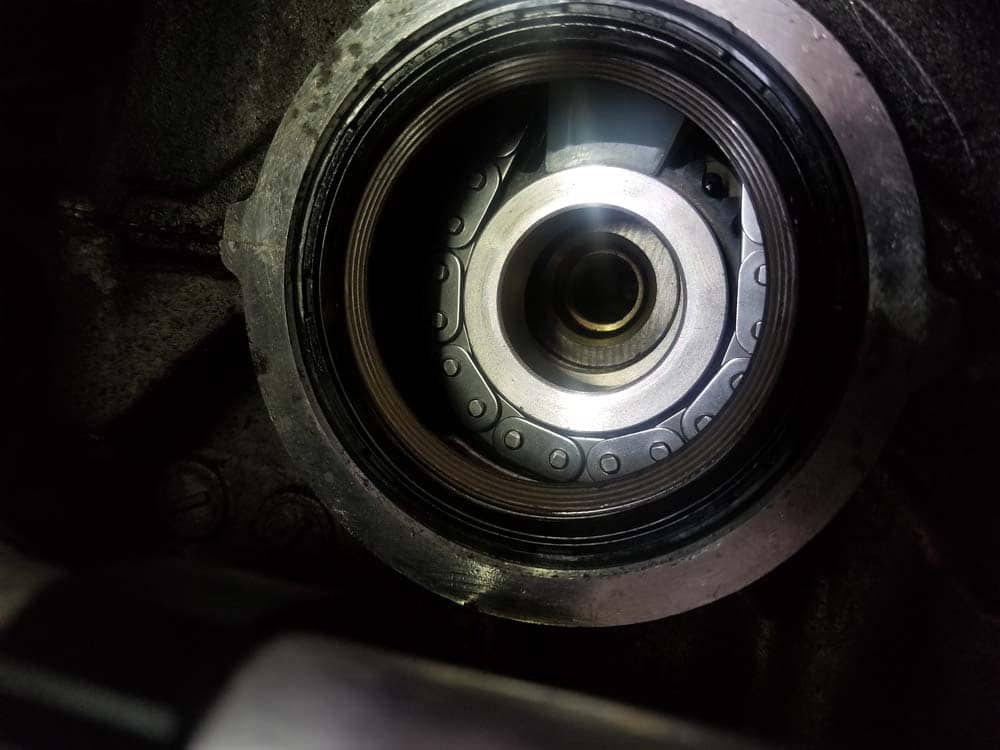
- Make sure the crankshaft sprocket is aligned in the opening, then insert the crankshaft hub back into the engine. Be sure that it engages both then timing chain and oil pump sprockets. Turning the hub back and forth with your fingers while pushing on it will help the hub properly seat back into the engine.
- Lightly oil the new crankshaft hub bolt (always replace the bolt) with fresh engine oil and install finger tight. Final torque is achieved in two stages: Stage 1 - Use a torque wrench to torque bolt to 50 Nm (36.8 ft-lb). Stage 2 - Use a large socket wrench or breaker bar and turn the bolt another 180 degrees (or 90 degrees twice if you don't have the clearance).
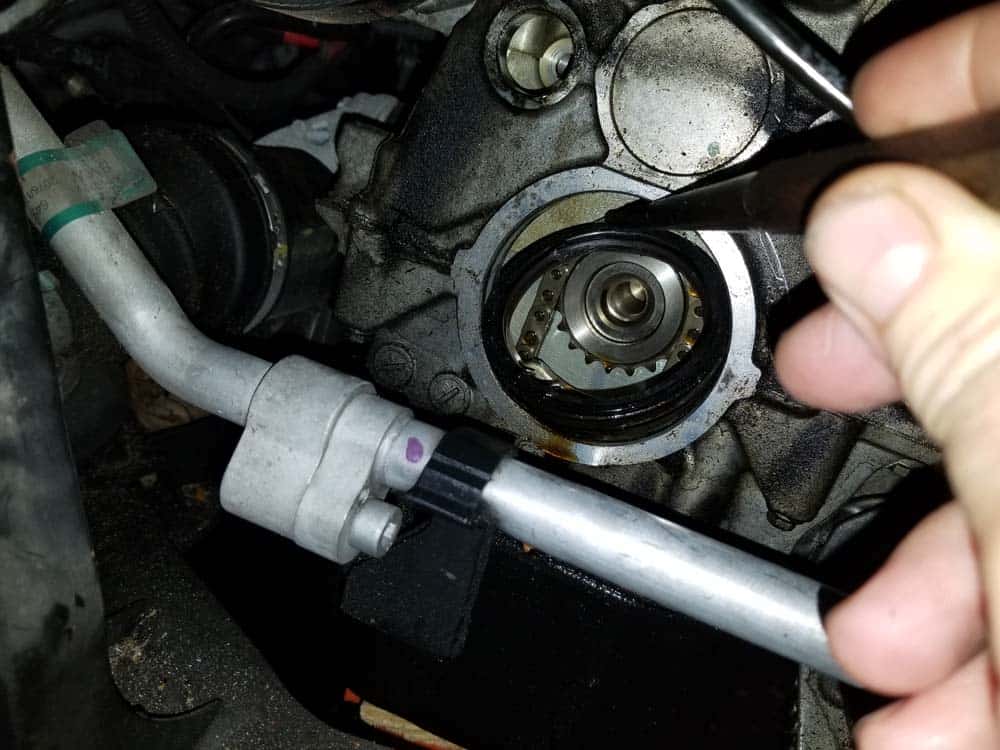
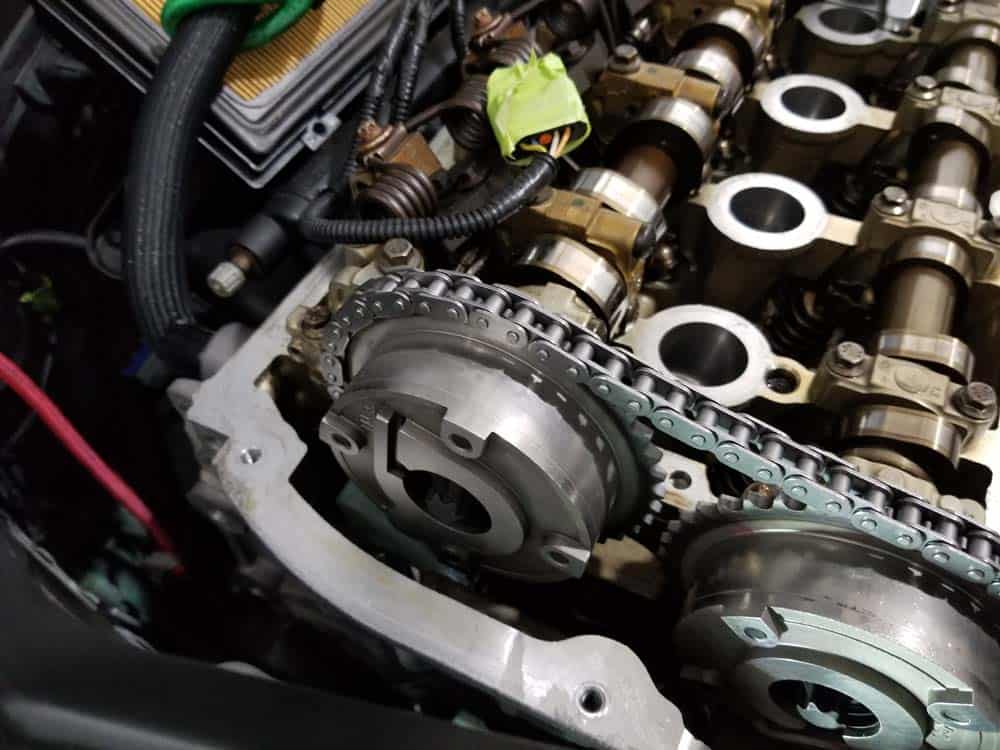
- Loop the chain over the exhaust (front) camshaft gear (VANOS) and install on the camshaft using a new mounting bolt. It does not matter what position the camshaft gear is in. Turn the mounting bolt till finger tight. DO NOT torque the bolt yet.
- Repeat this procedure on the rear intake camshaft gear.
- Install three new bearing bolts on right side of engine and torque to 30 Nm (22 ft-lb). Make sure the lower two bolts have new rubber o-rings and the upper has a new washer.
- Install the new chain rail on top of the engine. Torque bolts to 20 Nm (14.7 ft-lb).

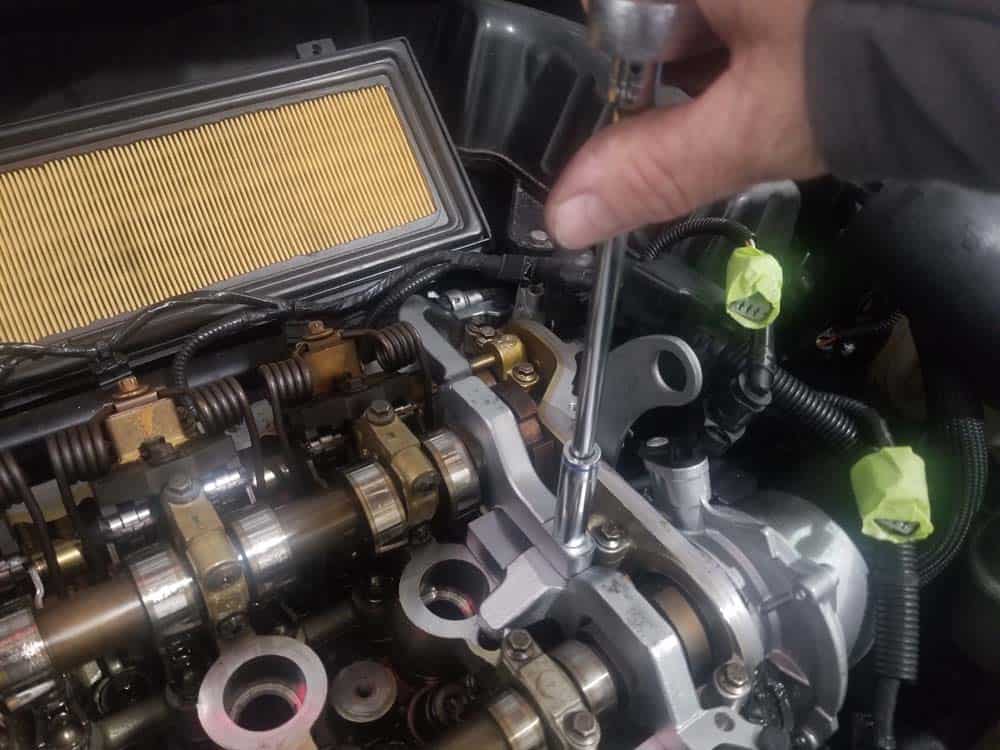
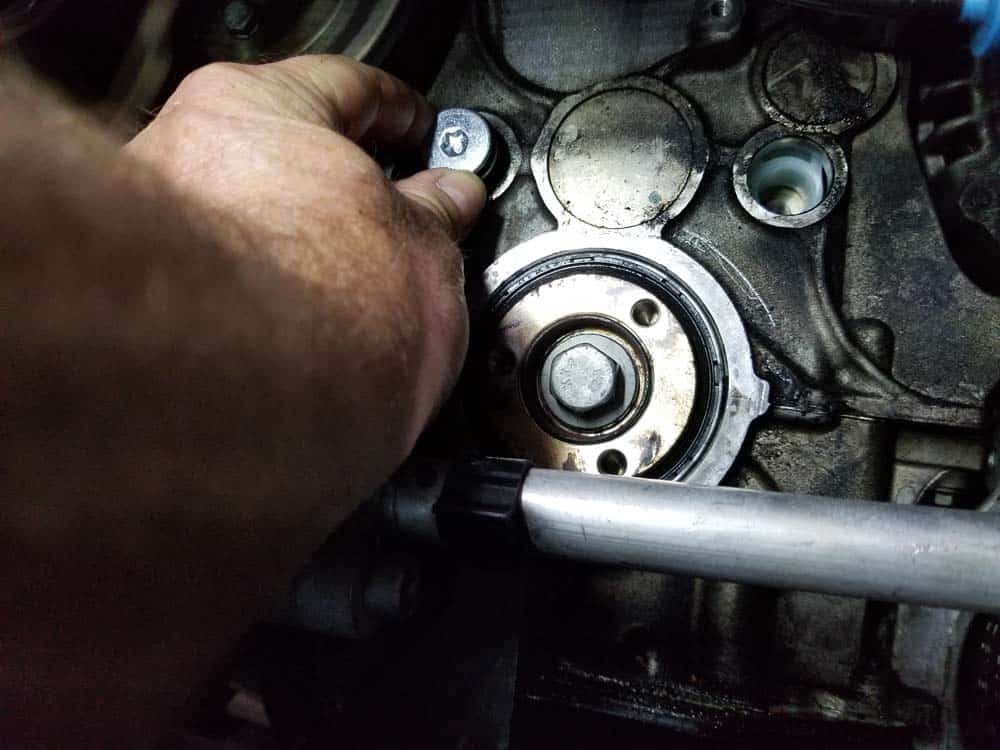
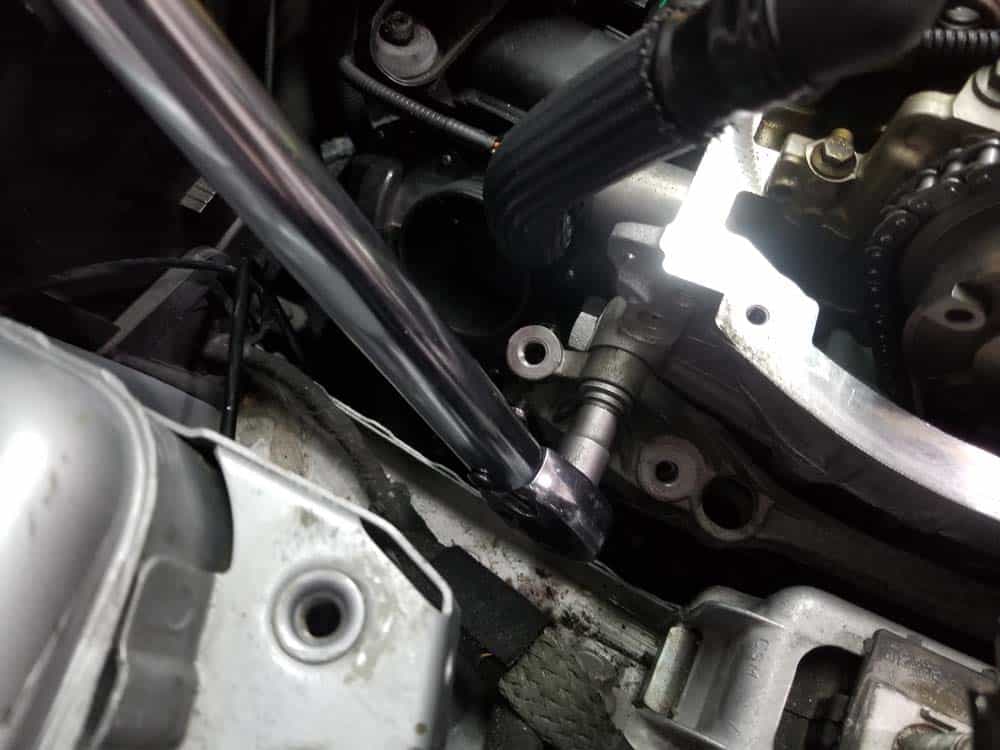
- Install the new chain tensioner in the rear of the engine. Use a 27mm crows foot socket to torque tensioner to 65 Nm (48 ft-lb).
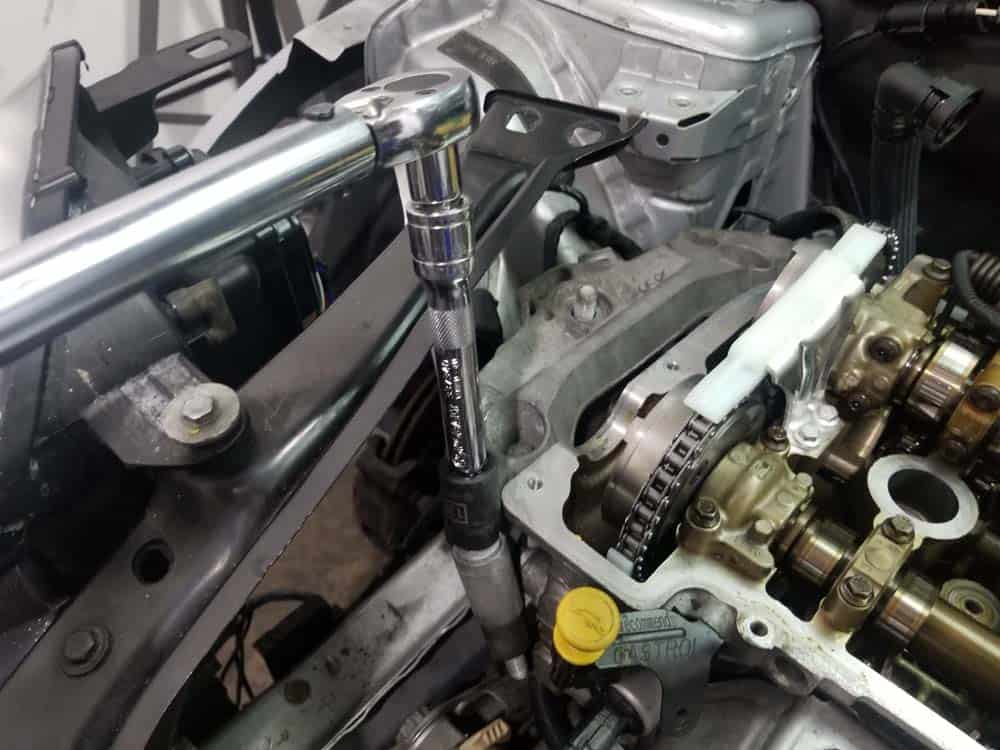
- Starting with the rear intake VANOS, torque the mounting bolt in two stages: Stage 1 - use a torque wrench and torque mounting bolt to 20 Nm (15 ft-lb). Stage 2 - Use a socket wrench and turn bolt an additional 180 degrees (or if you don't have clearance, 90 degrees twice).
- Repeat the above step on the front exhaust VANOS mounting bolt.
- Replace the oil dipstick back into the engine.
Section 8 - Stage One Reassembly and Testing
The reassembly of the vehicle is split into two stages. In stage one, you will reassemble the vehicle just enough to be able to start the engine and check for proper operation. It is highly recommended that you do not “close up” the right wheel well or take the vehicle out of its service position until it has been started and thoroughly checked for leaks and proper operation.- Reinstall the friction wheel on the engine. Remember that you will need to carefully raise the engine up to install the top mounting bolts, then lower it to install the lower bolt. Torque all bolts to 9 Nm (6.5 ft-lb).
- Install the crankshaft pulley back onto the crankshaft hub.Torque the mounting bolts to 28 Nm (20.5 ft-lb).
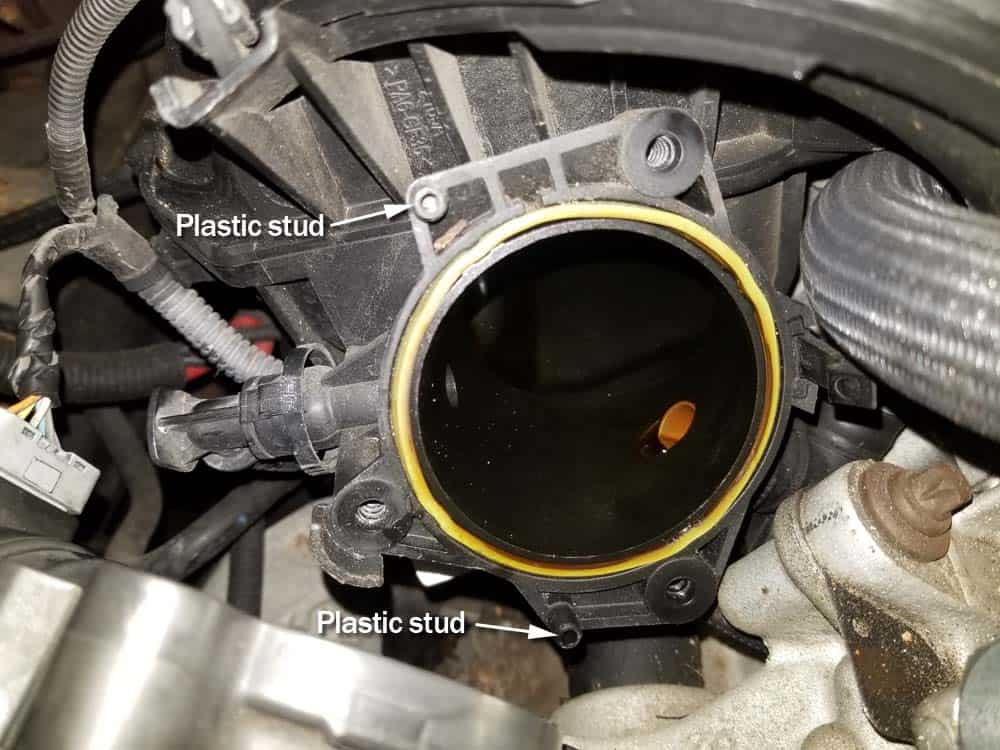
- Install the throttle body back into the car by first connecting the electrical fitting then mounting on the intake manifold. Note there are two plastic studs on the intake manifold that line up with two holes on the back of the throttle. Torque the mounting bolts to 7 Nm (5 ft-lb).
- Mount the alternator wiring bracket back on the engine adapter plate with two 10mm bolts. Attach the adapter plate back on the side of the engine with the four mounting bolts and finger tighten. Torque the adapter plate bolts to 47 Nm (34.5 ft-lb).
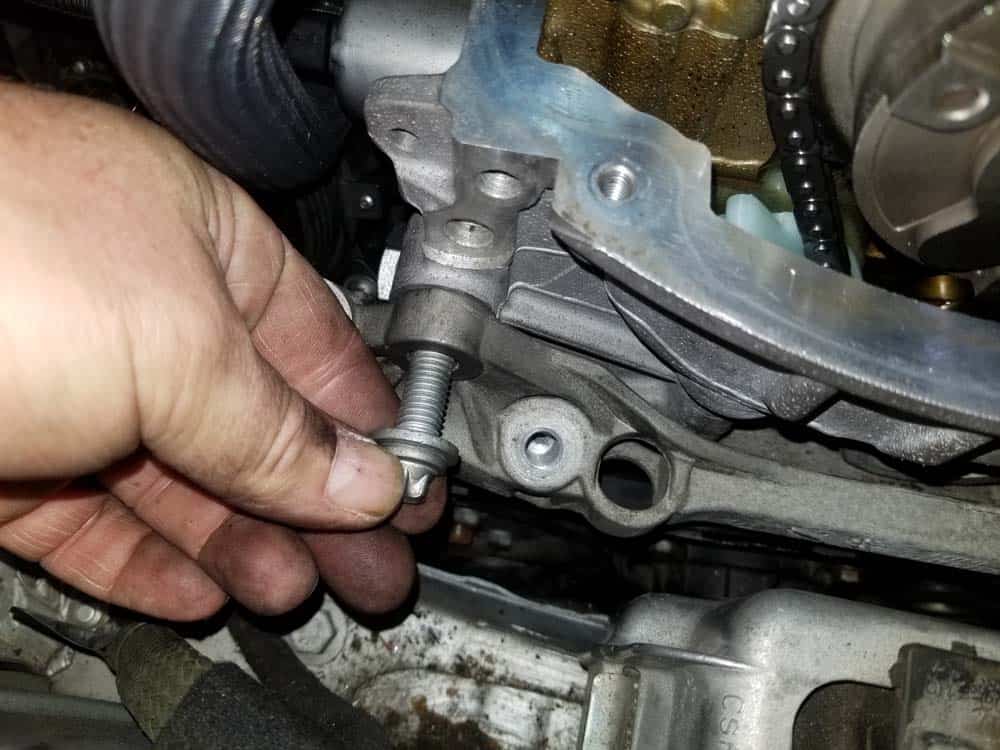
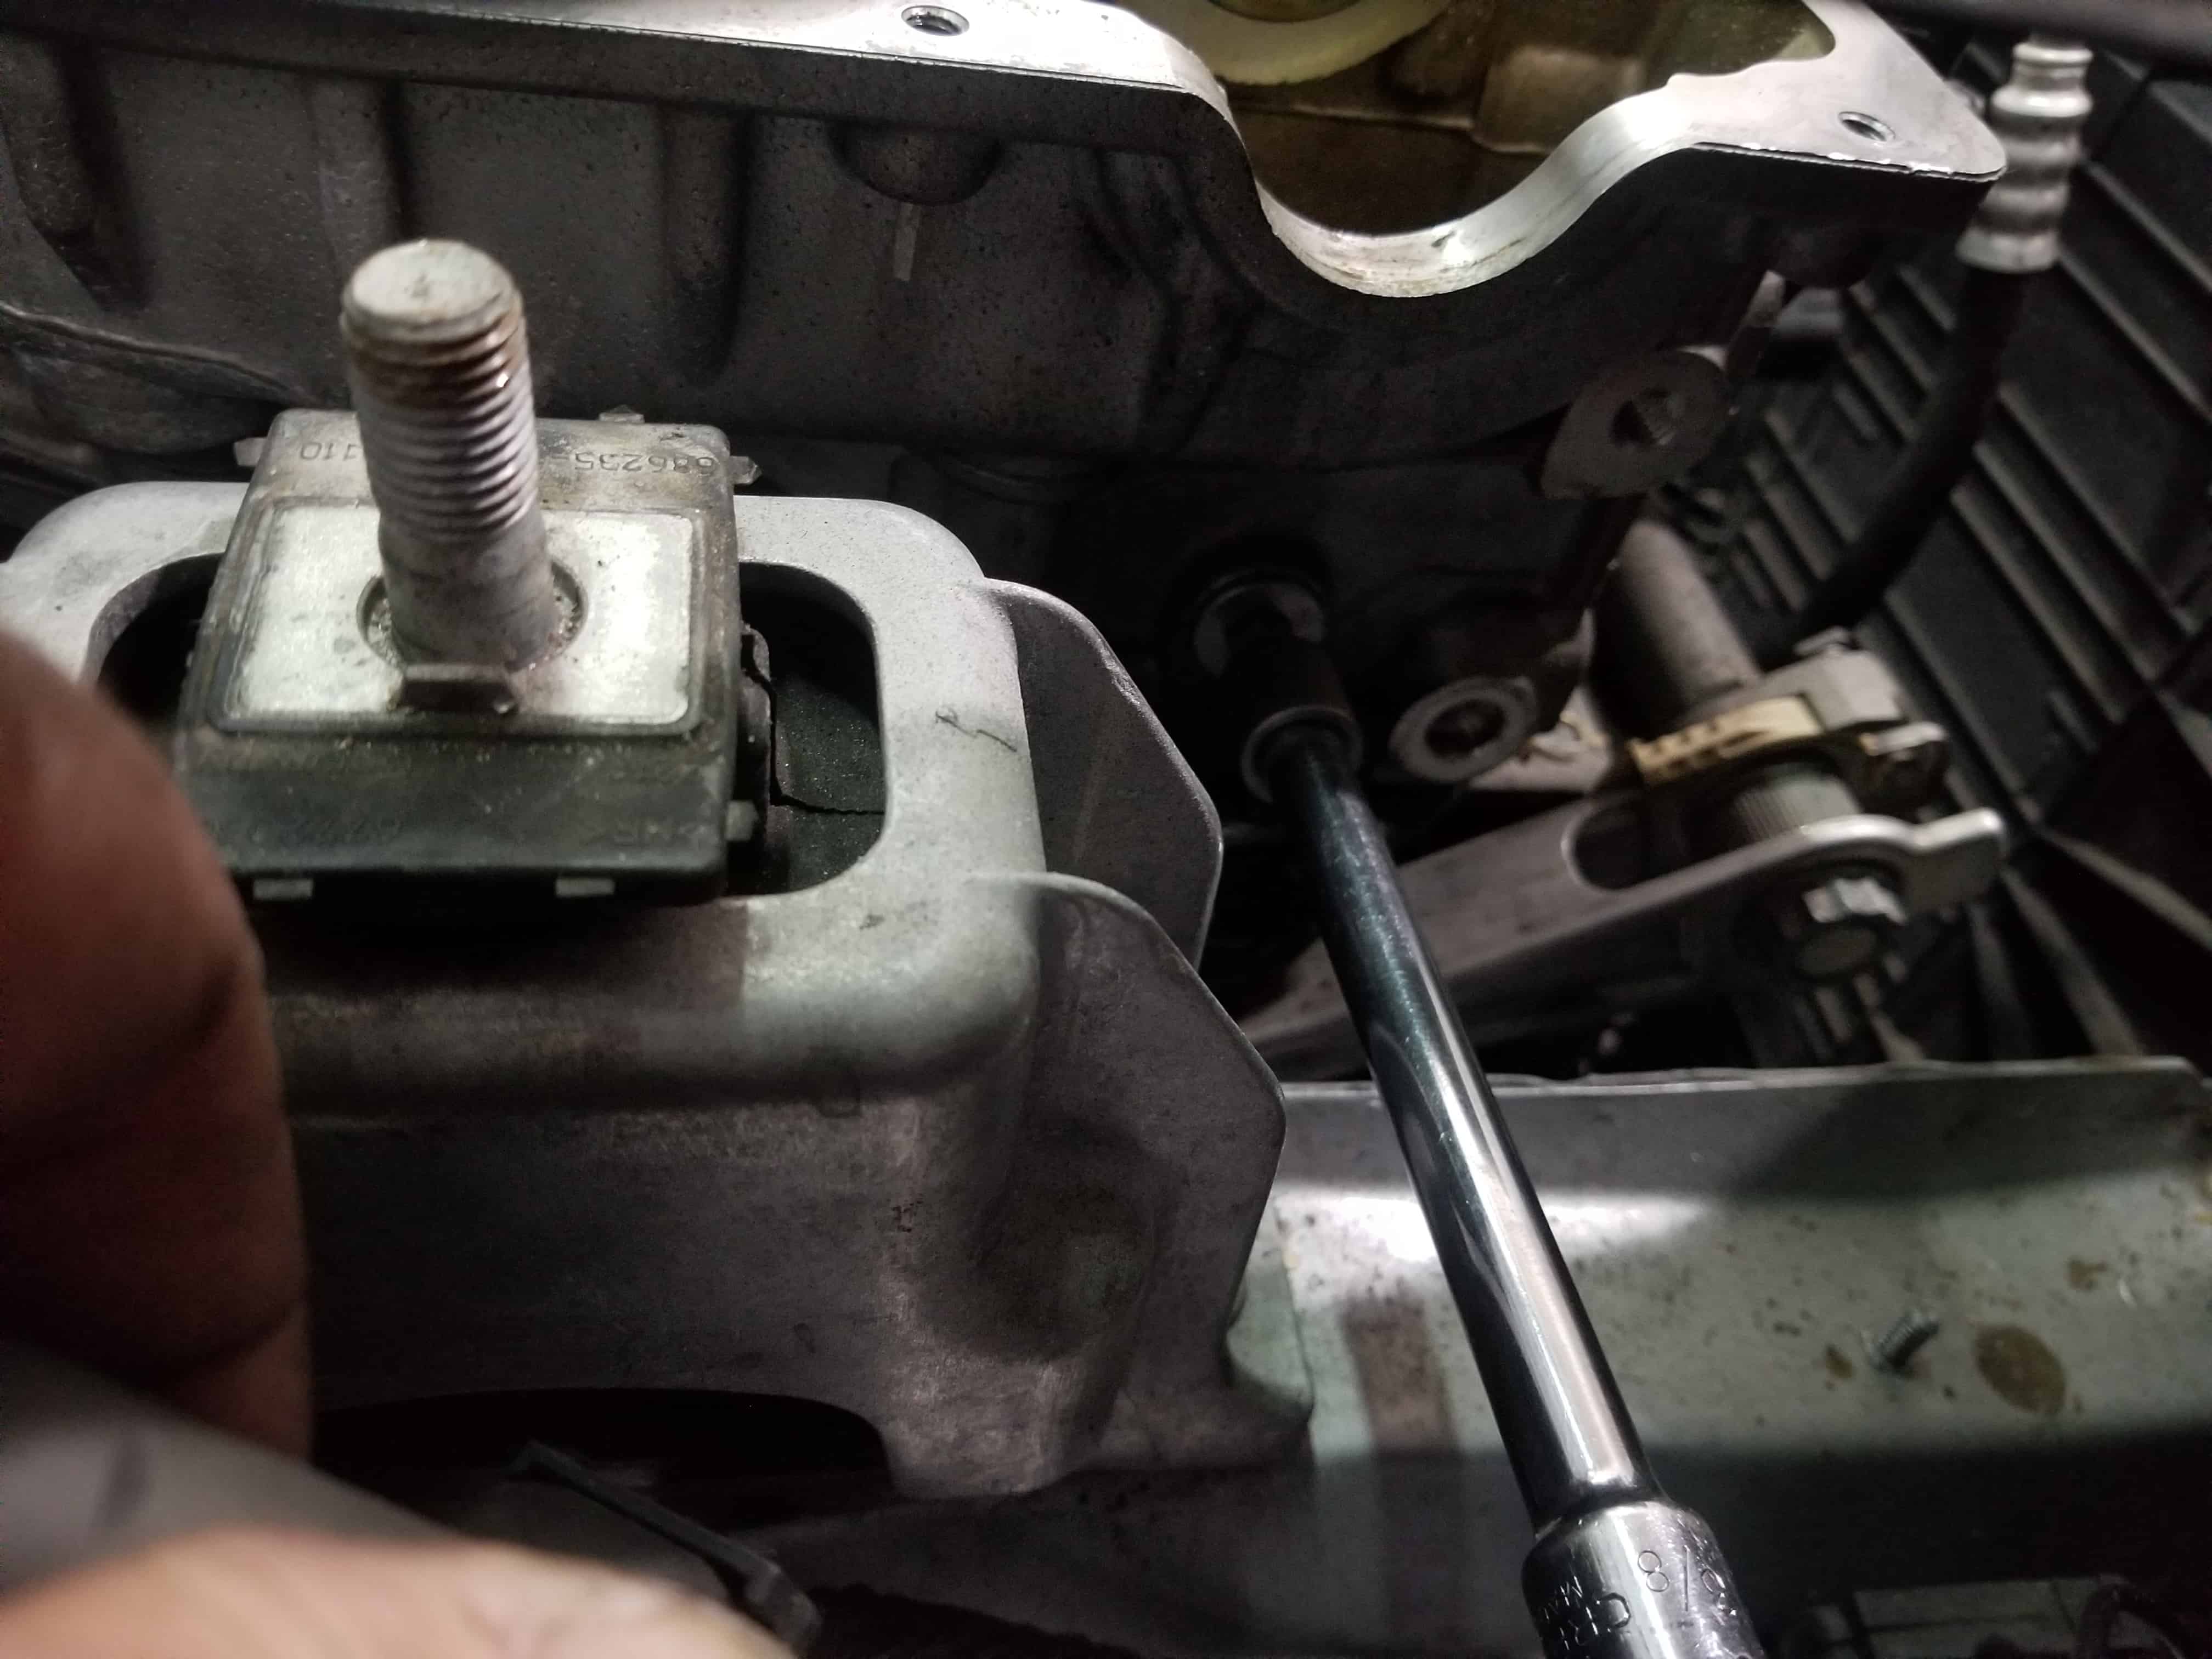
- Before re-installing the engine mount bracket, now is a great time to check the tightness of your engine mount bolts since they are easy to get to. Loose engine mount bolts can cause a thumping noise while driving...it only takes a minute to check their torque so you might as well do it now (you will thank us later if they were loose)! The rear engine mount bolt takes a 16mm socket and should be torqued to 82 Nm (60 ft-lb). The front engine mount bolt uses a 13mm socket and should be torqued to 66Nm (48.5 ft-lb).


- Reinstall the engine mount support bracket on the engine with the four mounting bolts. You may need to raise, lower, or push engine to get bolts to line up with engine block. Take you time doing this...you don’t want to force a bolt into the engine and strip it. Use a 13mm socket and torque the mounting bolts to 47 Nm (34.5 ft-lb).
- Lower floor jack and remove from vehicle.
- Install the engine mount nut and torque to 47 Nm (34.5 ft-lb).
- Reinstall the engine grounding strap.

- Reinstall the air intake boot on the throttle body.
- Reconnect the rear VANOS solenoid electrical connector.
- Remove the camshaft and flywheel locking tools from the vehicle. *** Many mechanics completely forget the flywheel locking tool, then wonder why the car doesn't start.
- Reinstall the main accessory belt per our article MINI R56 Belt Replacement – 2006-2013 Cooper. DO NOT install the fender liner or reinstall the front wheel. Leave everything open so it can be inspected after starting the vehicle below.
- Reinstall the valve cover and surrounding parts per our article article MINI R56 Valve Cover Gasket Replacement – 2006-2013 Cooper .
- Install the spark plugs and torque to 23 Nm (17 ft-lb).
- Install the ignition coils.
- You are now ready to start the vehicle. If you have replaced the timing chain do to failure of any parts (sprockets, chain rails, or if you found any broken parts while performing this repair, please read the following paragraph before starting your vehicle:
Section 9 - Stage Two Final Reassembly
At this point, you should have completely tested the vehicle for normal operation, and have checked for any leaks in the valve cover (or oil pan if you had to remove debris from it). Once you feel completely confident that everything is operating normally, you can go ahead and complete the final reassembly of the vehicle.- Replace the right fender liner and remount the right wheel back on the vehicle. Torque the lug nuts to 140 Nm (103 ft-lb).
- Return the car to its normal configuration by taking it out of its service position per our article MINI R56 Service Position – 2006-2013 Cooper.
MINI R56 Timing Chain Repair Finished