
Affiliate link disclosure – The BMW Repair Guide uses affiliate links in their site. For more information on affiliate links, please click here.
Repair Summary
The following article gives detailed instructions on replacing the front axle shaft on a BMW E60 5 series xDrive (all wheel drive) car. Even though we have used a 2006 BMW 530xi to perform this installation, this article can be applied to any E60/E61 5 series xDrive vehicle with minor modifications.
See all vehicles this article applies to
E60 5 Series M5
E60 5 Series 523Li
E60 5 Series 550i
E60 5 Series 545i
E60 5 Series 540i
E60 5 Series 535d
E60 5 Series 530xi
E60 5 Series 530xd
E60 5 Series 530Li
E60 5 Series 530i
E60 5 Series 530d
E60 5 Series 525i
E60 5 Series 525xi
E60 5 Series 525Li
E60 5 Series 525d
E60 5 Series 523i
E60 5 Series 520i
E60 5 Series 520d
E60N 5 Series 550i
E60N 5 Series 525xi
E60N 5 Series 540i
E60N 5 Series 535xi
E60N 5 Series 535i
E60N 5 Series 535d
E60N 5 Series 530xi
E60N 5 Series 530xd
E60N 5 Series 530Li
E60N 5 Series 530i
E60N 5 Series 528xi
E60N 5 Series 530d
E60N 5 Series 528i
E60N 5 Series 525Li
E60N 5 Series 525xd
E60N 5 Series 525i
E60N 5 Series 525d
E60N 5 Series 523Li
E60N 5 Series 523i
E60N 5 Series 520Li
E60N 5 Series 520d
E60N 5 Series 520i
E61 5 Series 550i
E61 5 Series 530d
E61 5 Series 545i
E61 5 Series 535d
E61 5 Series 530xi
E61 5 Series 530xd
E61 5 Series 525i
E61 5 Series 530i
E61 5 Series 525xi
E61 5 Series 525d
E61 5 Series 523i
E61 5 Series 520d
A BMW E60 front axle shaft repair may be needed if you are experiencing shaking in the front end of your xDrive vehicle during acceleration and braking.
During a recent road trip in our BMW Repair Guide Guide 2006 530xi touring wagon, we collided with one of I-95's infamous exit ramp potholes (thank you SCDOT). This deep void in the asphalt sent a bone-jarring jolt through the right front side of the vehicle, through the steering wheel, and through our teeth. Immediately after the collision we noticed a "side to side" shake in the front end of the car when applying the accelerator. It was a strange shimmy; it sometimes disappeared at high speeds (over 80 mph) as well as when we let our foot off of the accelerator pedal. The shake also mysteriously vanished when the car sat in the hotel parking lot for the night...only to quickly reappear after driving for a couple of minutes.
Upon returning to our shop, we raised the vehicle and inspected the front end. We quickly found our first clue. When we grasped the right front axle shaft and put pressure on it, it moved back and forth with a clicking sound. The front axle shafts on an xDrive BMW operate exactly like the rear ones...they transfer power from the front differential to the wheels. The front axle shafts on a BMW should not have any play in them...much less make a clicking sound when you pull on them with your hands. When heavy torque is applied to a damaged front axle shaft, it will cause the front end to vibrate uncontrollably.
To further verify this may be our issue, we removed the fuse that supplies power to the transmission's transfer case. The transfer case in your BMW xDrive is an electronically actuated set of gears that controls how much power is sent to the front and rear wheels. Removing the fuse that controls the xDrive transfer case shuts down any power being sent to the front differential, and effectively turns the vehicle into a rear-wheel-drive automobile. When we removed the transfer case fuse in our 530xi, it drove perfectly; there was no more shaking in the front end.
Diagnosing a BMW E60 Front Axle Shaft Failure
If the front end of your BMW xDrive vehicle is shaking during acceleration, and then the shake dissipates when you release the gas pedal, you may have a damaged front axle shaft. As we discussed above the only way to determine this is to get under the car, grasp the axle shaft with your hands, and give it a good shake. There should be absolutely no play in the shafts; if either one of them moves back and forth (usually with a clicking sound), then it is possible it is damaged.
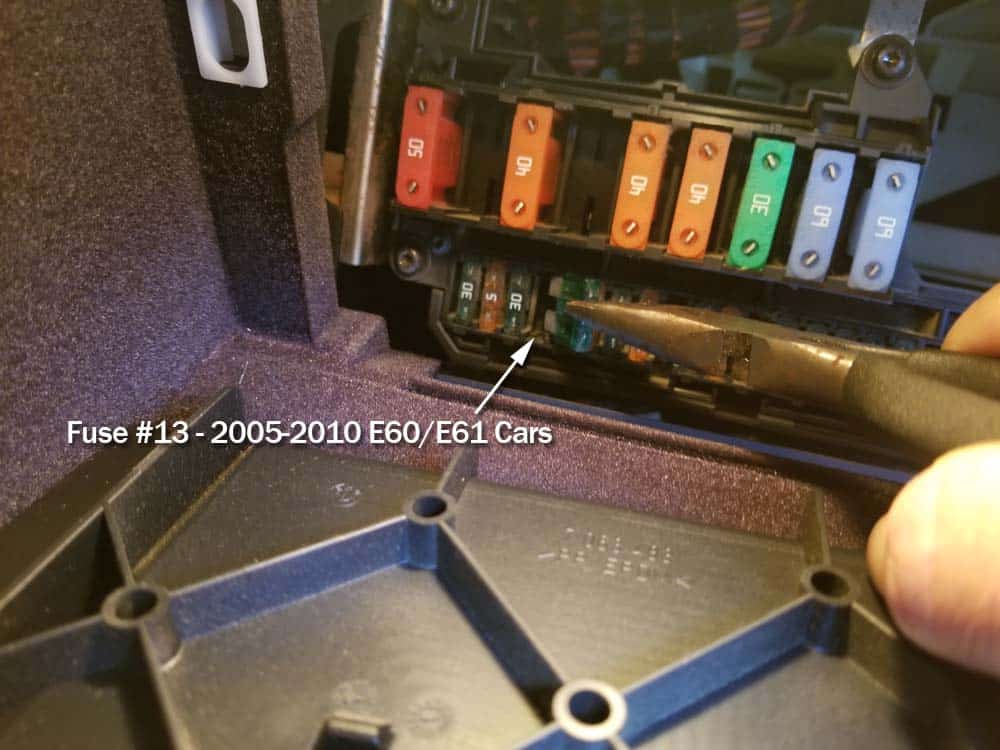
The next step in verifying a BMW front axle shaft failure is to temporarily shut off power to the vehicle's front wheels. This is done by simply removing the fuse that supplies power to the transmission's transfer case. In a BMW E60/61 5 series car, this fuse is easily accessed in the glove box fuse block. Start by opening the glove box and removing the fuse block cover by turning the two release clips. The 30 amp fuse that controls the transfer case is located in position #13 in all vehicles produced from 2005-2010. In pre-2005 cars, the fuse may be found in a different position - consult the fuse diagram included with your car for more details. Use a pair of needle-nose pliers to pull the fuse out of the block.
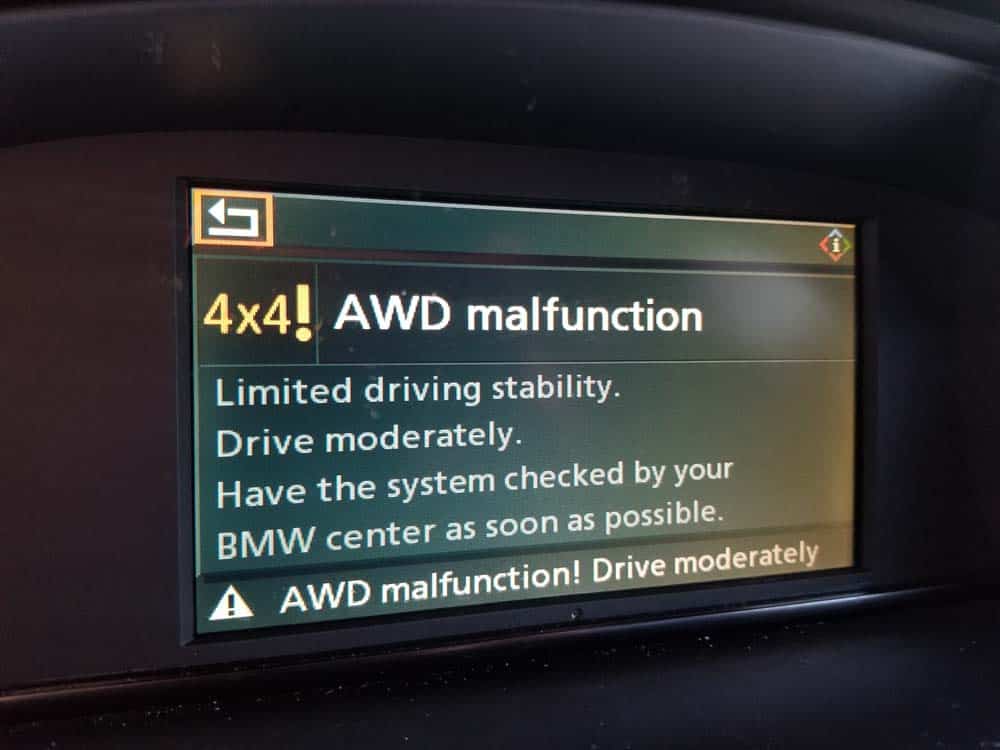
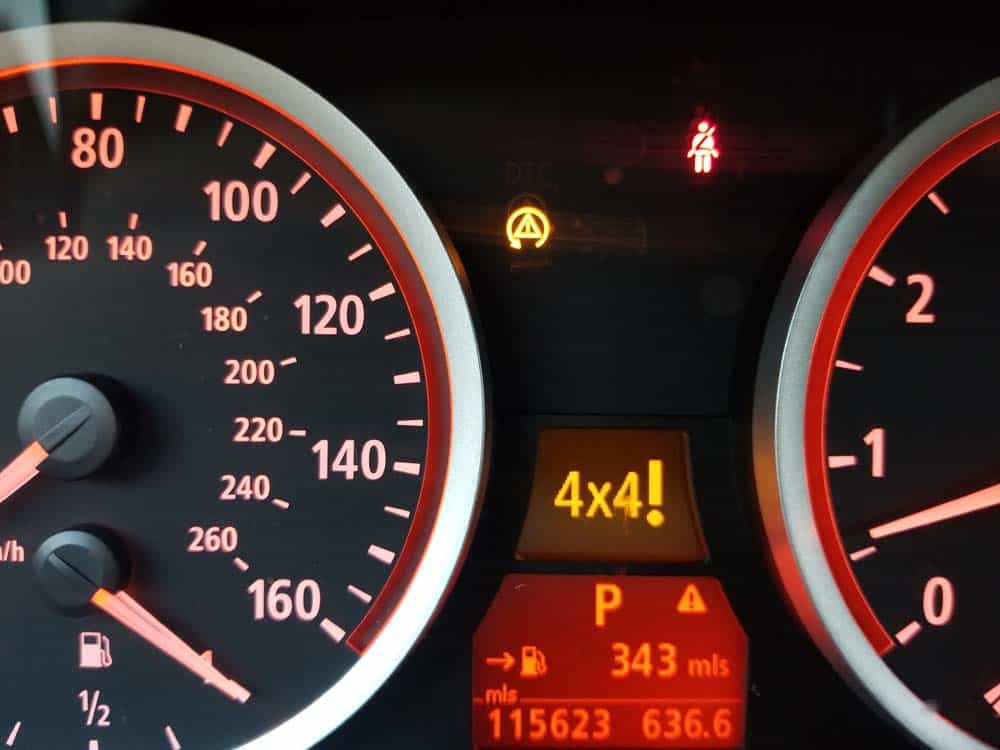
With the transfer case fuse removed, start the car. You should see the following warnings on the iDrive and instrument cluster; this is a good thing...this means you removed the correct fuse.
Take the car for a drive. If the front-end shake has disappeared, then you most likely have a front axle shaft failure. If the shake remains, then you will need to continue with your diagnosis to find the culprit.
Tools needed to perform a BMW E60 front axle shaft replacement
There seems to be quite a bit of confusion about which specialty tools are needed to perform a BMW E60 front axle shaft replacement. The following is a list of what you must have, and what you can get by without.
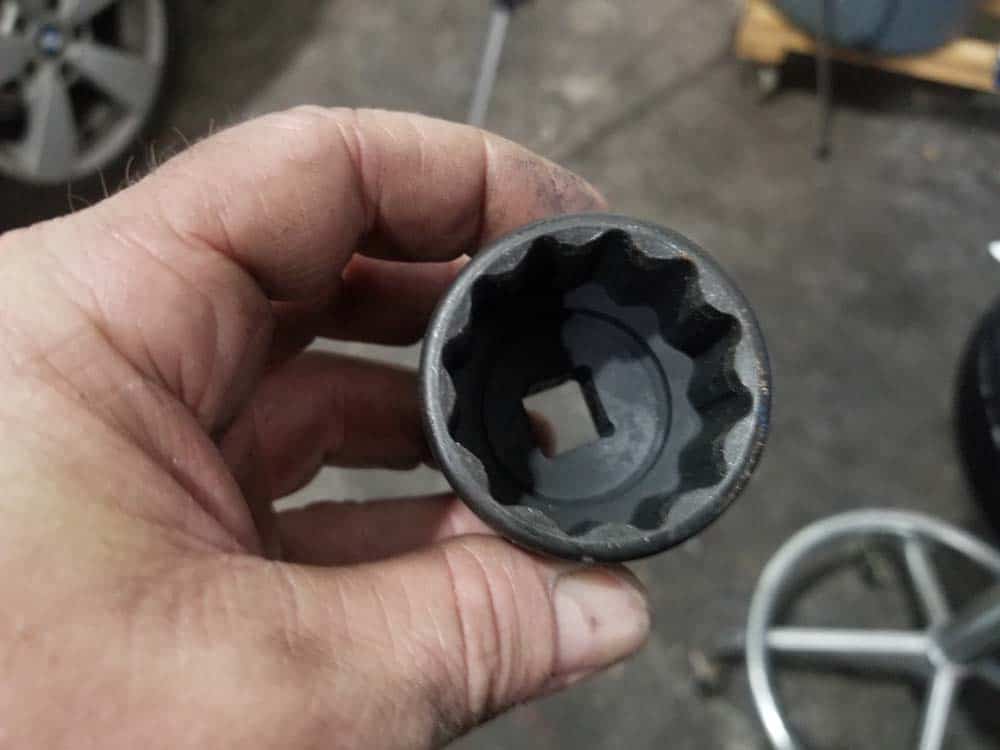
1. 32mm and (or) 36mm 12 point shallow Socket (required) - You must have a 36mm 12 point socket to remove an original BMW axle nut. Avoid purchasing deep sockets when removing and installing axle nuts with a breaker bar or torque wrench; deep sockets can slip off of the axle nut under heavy torque loads and literally break an arm (or neck). If you are using a high torque impact wrench, then deep sockets are fine. Be aware that many aftermarket axle shafts are shipped with a 32mm 12 point axle nut. Determine which size axle nut sockets you need before starting the repair...they are not always easy to find on short notice. You can order both sizes from our Tools and Supplies list below.
2. Hub Puller (75mm opening) (required) - There are a lot of repair articles floating around online claiming you can "hammer" the axle shaft out of the hub to remove it. This is an incorrect way of removing the axle from the hub and can actually damage your vehicle...you must use a hub puller. Use caution when ordering a hub puller - there are a lot of inexpensive ones online that WILL NOT WORK on a BMW E60 5 series. You must have the larger 75mm hub puller to clear the hub flange so the drive axle can be pressed out. We used the Orion Motor Tech 9-Way Internal/External Slide Hammer Puller Set to do this repair and it worked great. You can order one by clicking here.
3. Large Torque Wrench (300 ft-lb) (required) - The axle nut on your new axle shaft will need to be torqued to 310 ft-lb...this is a high torque that most wrenches don't go to. The issue in purchasing a torque wrench for this job is once you exceed 300 ft-lb, the price for the tool goes up exponentially. Unless you are comfortable paying $150 or more for a 600 ft-lb wrench, you can get by with a 300 ft-lb wrench for less than half the price.
4. Inner CV Joint Puller (slide hammer) (optional) - There are claims that a joint puller or slide hammer is required to remove the drive axle from the differential. These claims are not true...you can easily remove the drive axle with a large flat blade screwdriver or small prybar. If you happen to have a slide hammer sitting around the garage with an adapter that will work on a BMW E60...then go ahead and use it. If not, save yourself some money and just use a flat blade screwdriver as we do below.
A Quick Note on New Axle nuts
All new axle nuts are shipped without locking tabs. Why? Because it would be near impossible to torque the nut properly and have pre-cut locking tabs line up with the slots in the axle shaft. The locking tabs are created with a hammer and a chisel by the mechanic after the axle nut is torqued on the axle. For more information on this, please see Section 7 -Step 9 below.
Replacing the Front Axle Shaft Seal
Although not required, the BMW Repair Guide strongly recommends replacing the front axle shaft seal when performing this repair. The front axle shaft seals do leak over time, so it makes sense to replace this inexpensive part while the axle is being replaced. You DO NOT need any special tools to reinstall a BMW E60 front axle shaft seal; in fact, you can easily fabricate a tool for about $4 out of a 2" PVC coupling and plug from your local home improvement store. We give you detailed instructions on replacing the front axle shaft seal in Section 5 below.


View the detailed parts diagram for this repair.
Includes detailed part diagrams, part numbers and links to purchase all of the required components needed to complete this repair.

Before starting this repair, you must have the following required parts.
All BMW E60 and E61 xDrive vehicles
If the front end of your xDrive BMW is shaking at high speeds or during braking, you may have damaged one of the front axle shafts.
All BMW E60 and E61 xDrive vehicles
If the front end of your xDrive BMW is shaking at high speeds or during braking, you may have damaged one of the front axle shafts.
All BMW E60 and E61 xDrive vehicles
Drive axle seal, located on the front differential. Seal works on both the left & right side axle.
Fits all BMW vehicles
Flushing and replacing your manual transmission and differential fluid is one way to ensure that components wear properly to avoid costly problems down the road.
Fits all BMW vehicles
Flushing and replacing your manual transmission and differential fluid is one way to ensure that components wear properly to avoid costly problems down the road.
Fits all BMW vehicles
Flushing and replacing your manual transmission and differential fluid is one way to ensure that components wear properly to avoid costly problems down the road.
Section 1 - Removing the Axle Shaft Nut
Removing the axle shaft nut can often be a struggle since they are often heavily corroded and are under a high amount of torque. Further complicating the situation are the locking tabs found on factory axle nuts are difficult to release and usually need to be broken or cut off.- Keep the wheels on the ground...do not raise the vehicle until the axle nut is removed. The nut is almost impossible to get loose without the full weight of the vehicle on the front wheels.
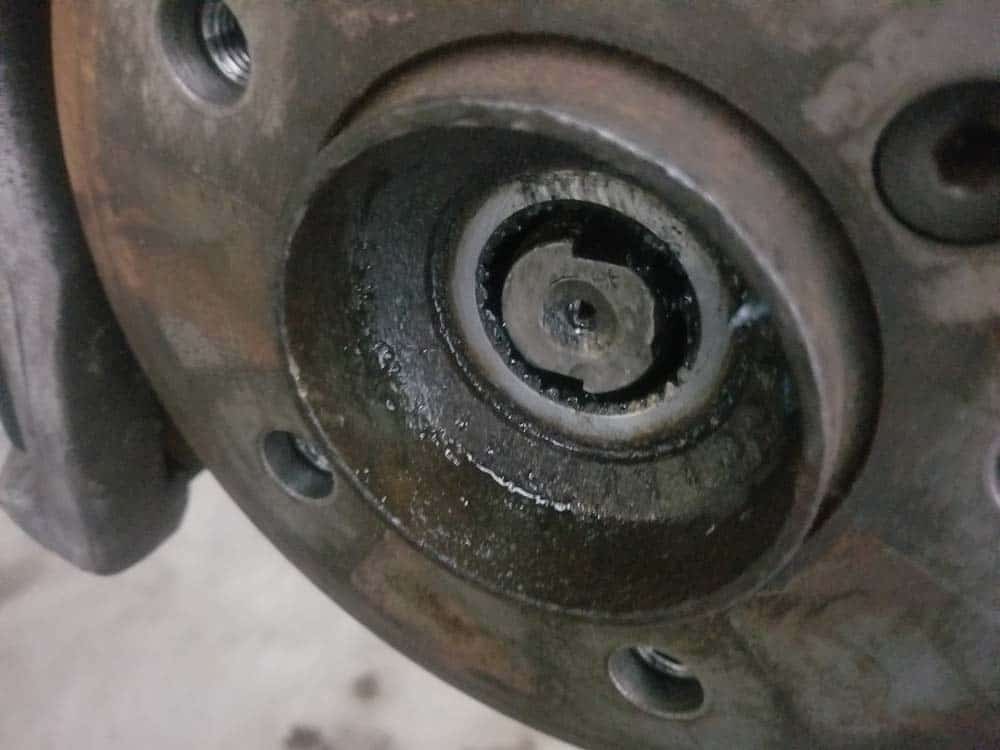
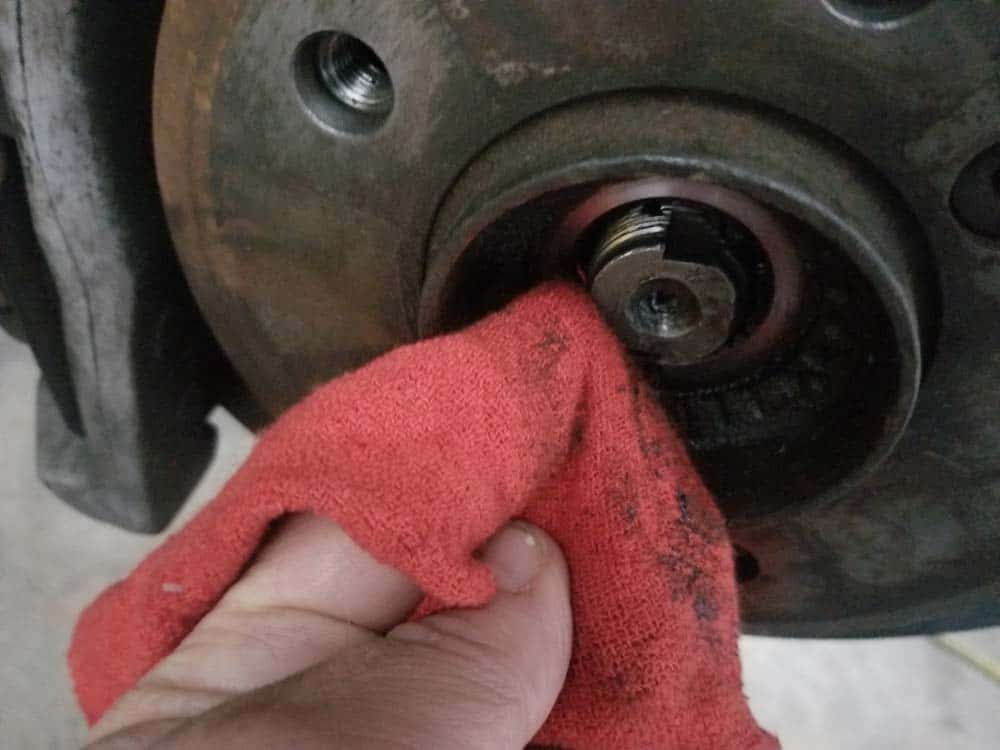
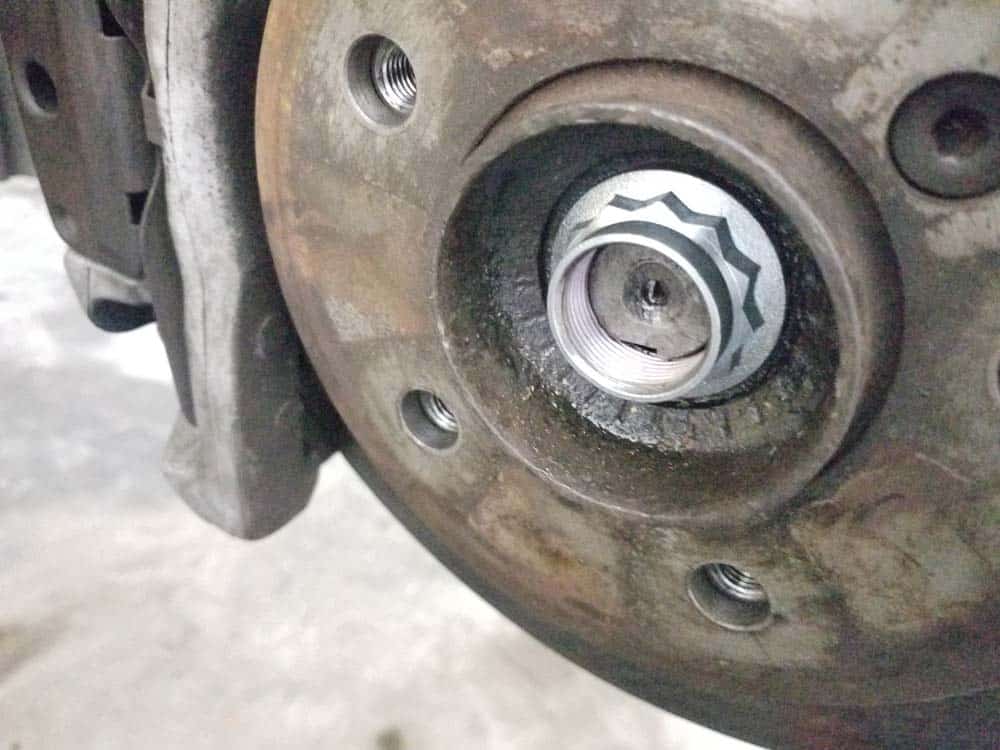
- Use a metal pick or small screwdriver to remove the cap from the center of the wheel exposing the hub nut.

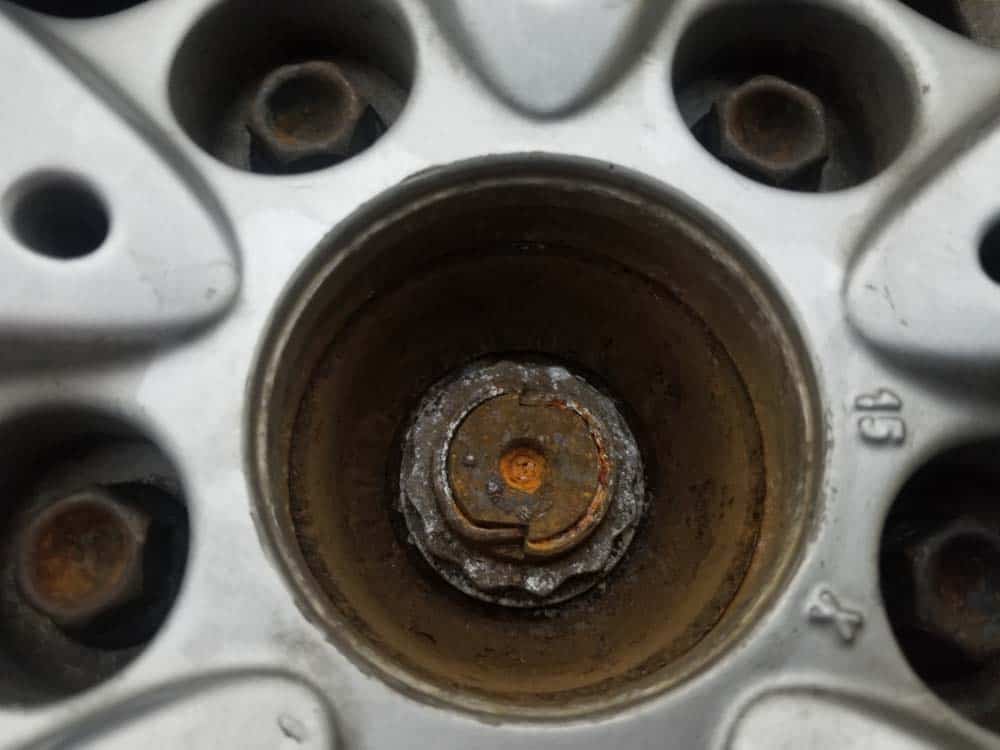
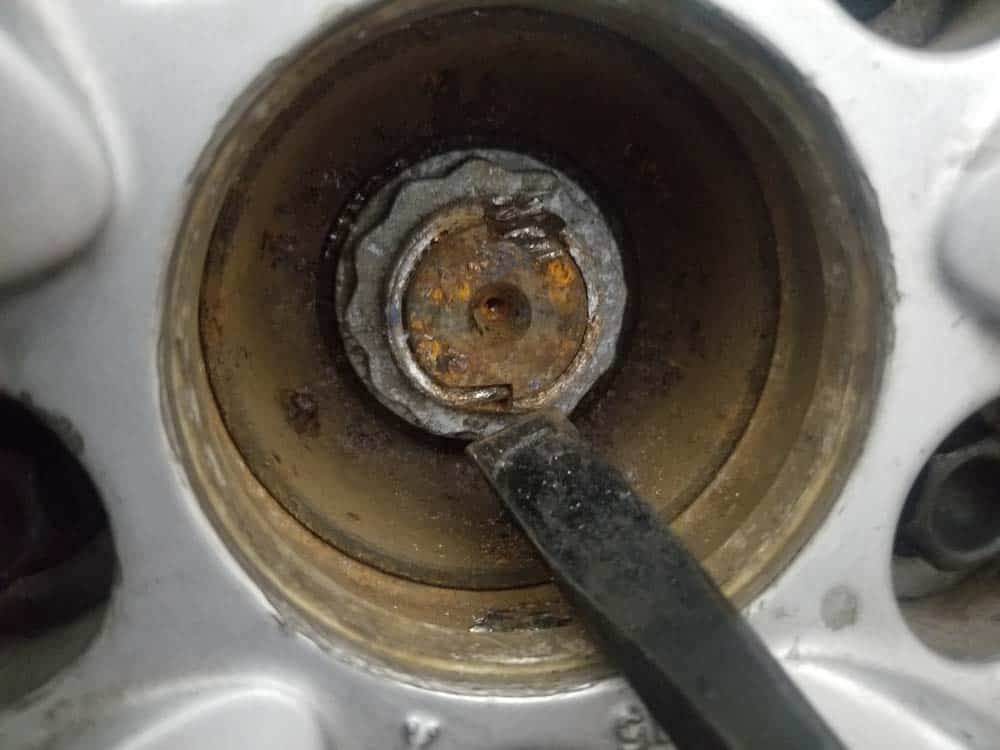
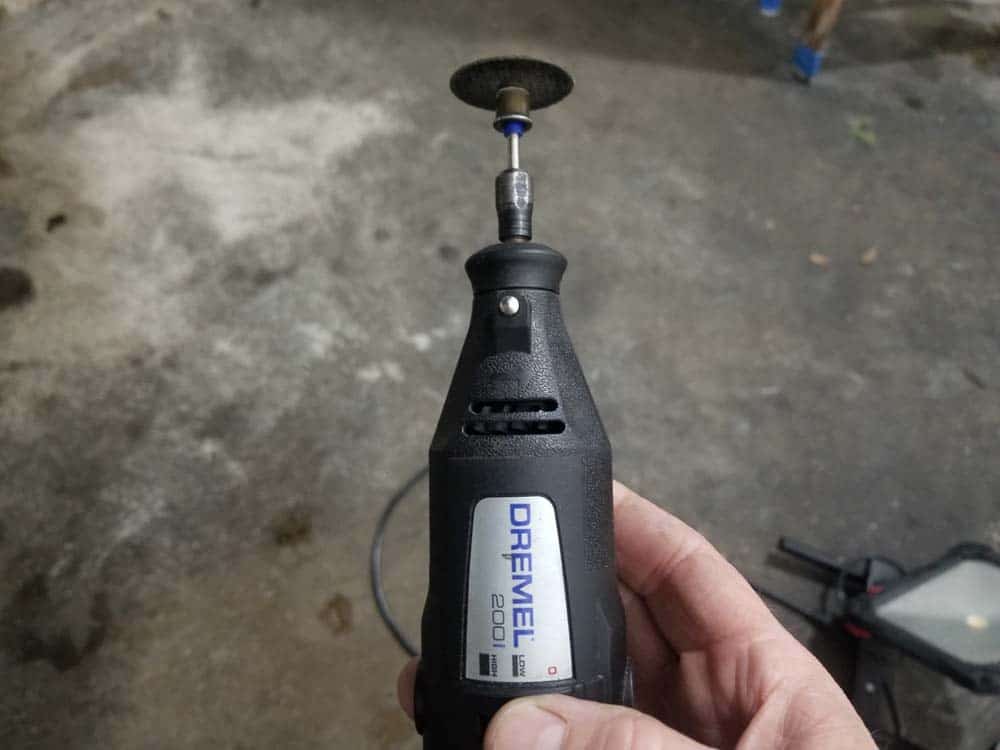
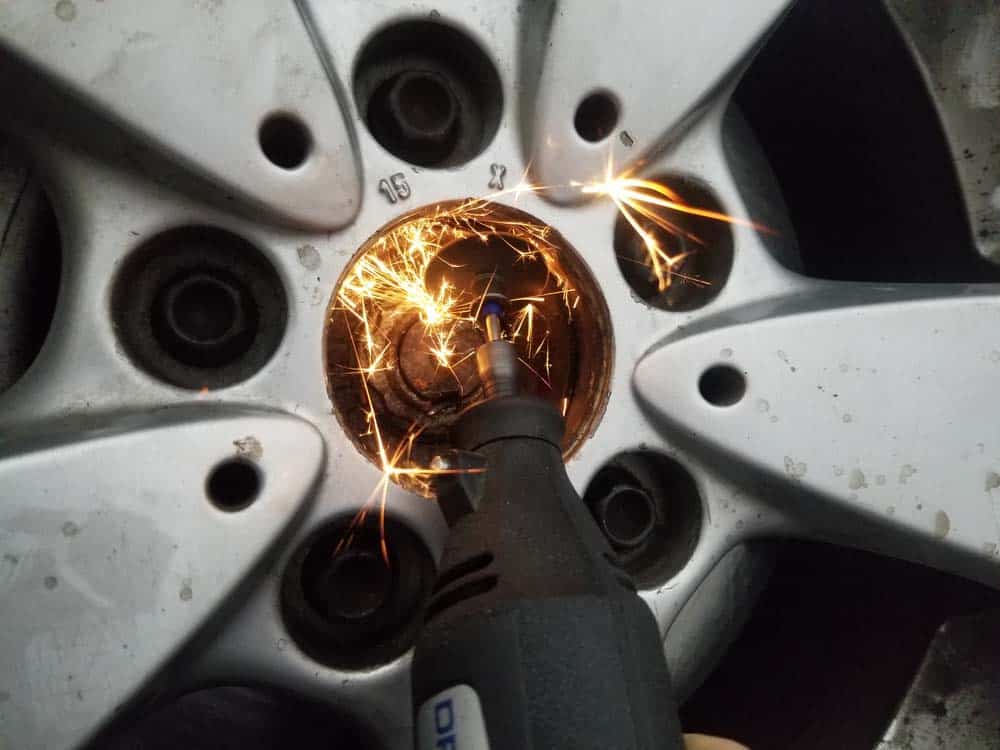
- The axle nut has two locking tabs that fit into slots in the drive axle. The locking tabs must be straightened out or broken off before the axle nut can be removed. Use a hammer and a punch (or chisel) to try and straighten them out. You may have better luck trying to break them off altogether. Sometimes neither of these techniques work - we had to use a Dremel tool with a steel cutting disk to get ours completely cleared out.
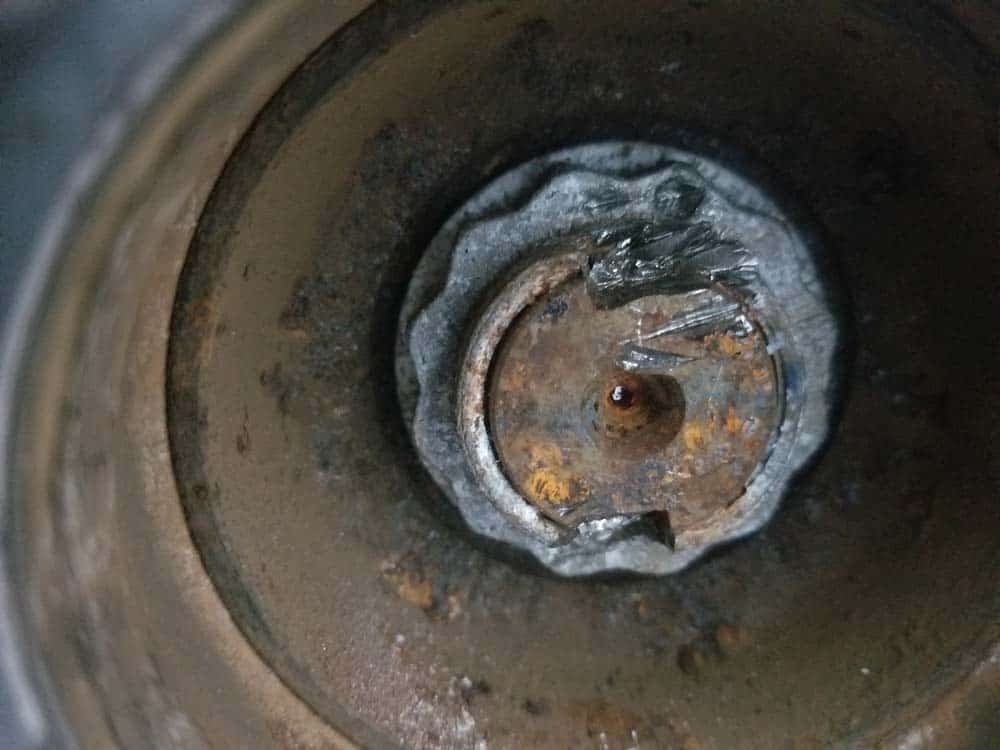
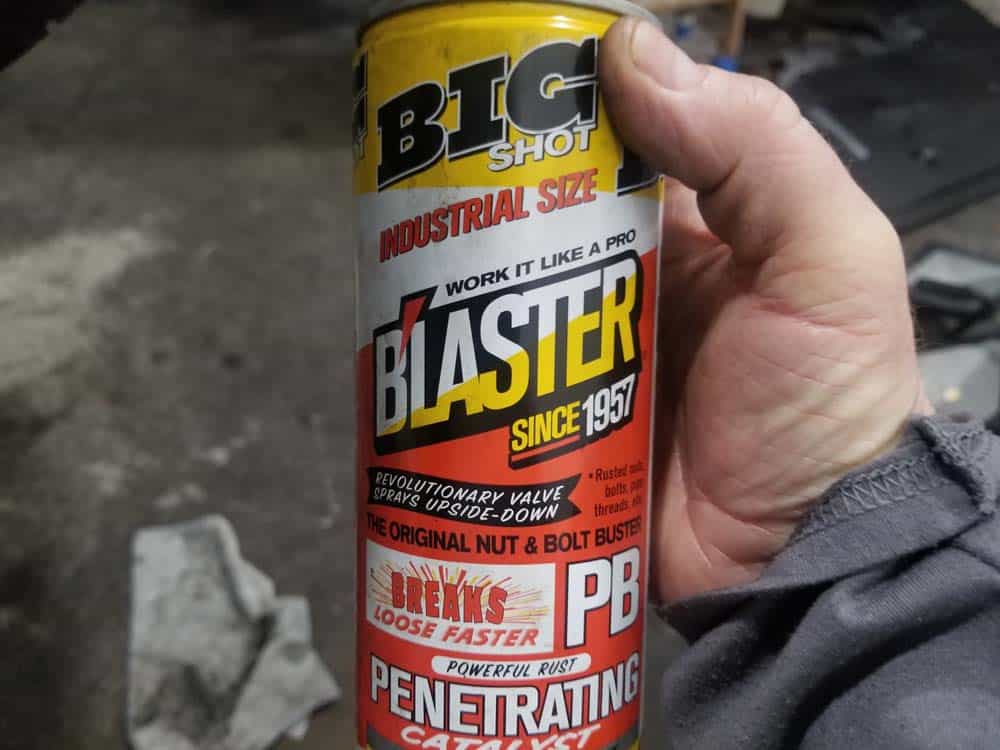
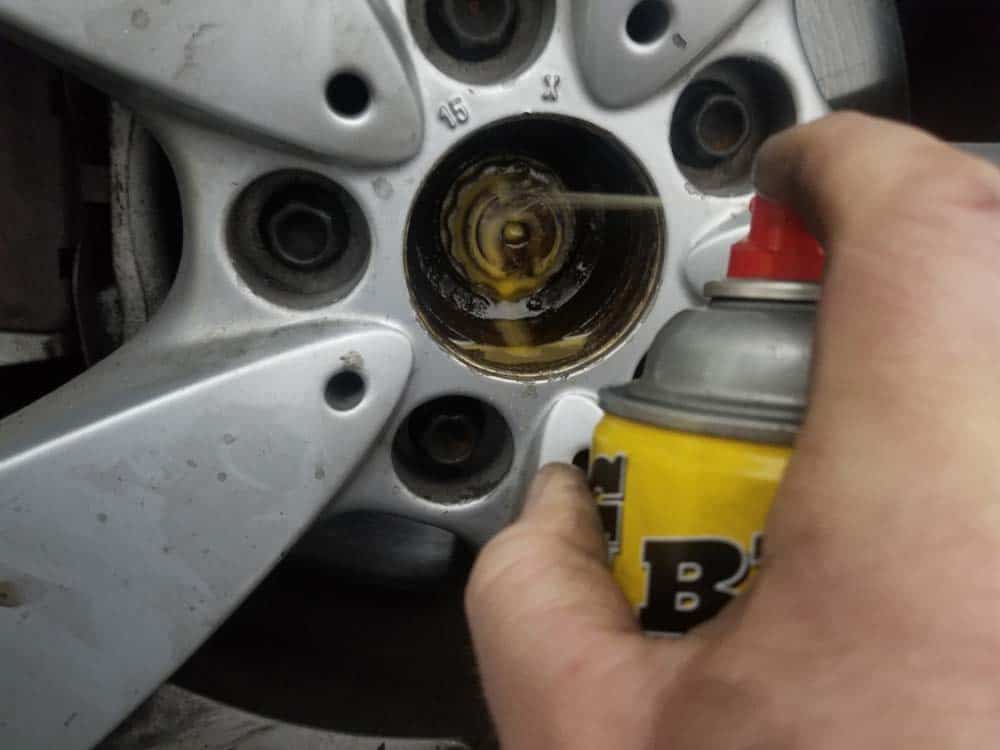
- Liberally spray the axle nut with penetrating oil like Blaster PB and allow to soak for about 15 minutes. Most axle nuts are very corroded and need to be treated prior to removing them. Excessively corroded nuts should be treated several times before attempting to remove them.
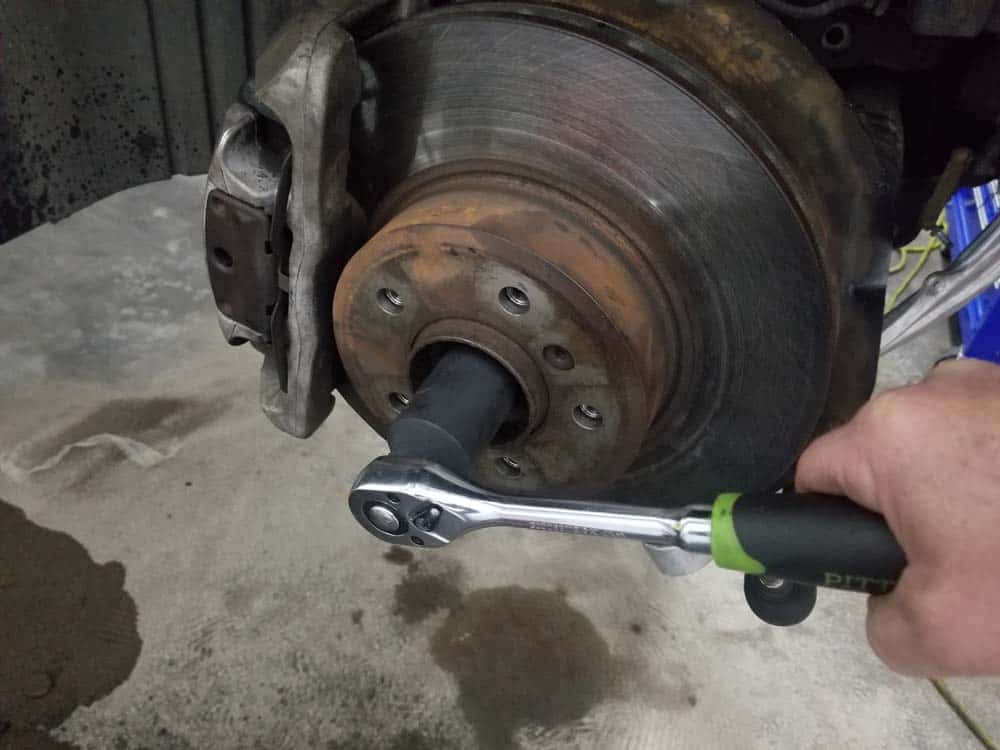
- Using a 36mm 12 point shallow socket and a breaker bar (or high torque impact wrench), remove the axle nut from the wheel. The axle nut is torqued extremely tight. We had to stand on the end of the breaker bar to initially loosen it. If the nut refuses to break free, continue to soak it in penetrating oil and retrying. Make sure you have all of the locking tab raised or removed from the nut...even a small piece can bind it up making the nut impossible to remove.
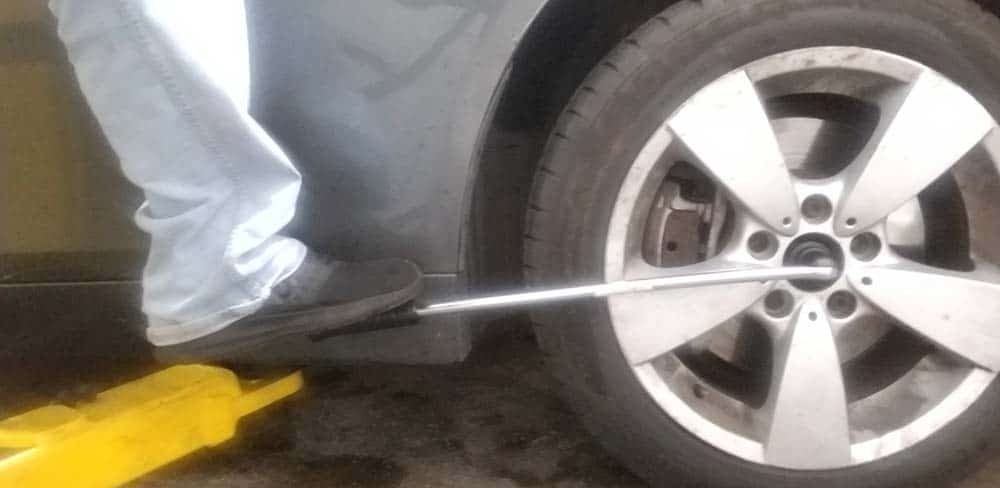
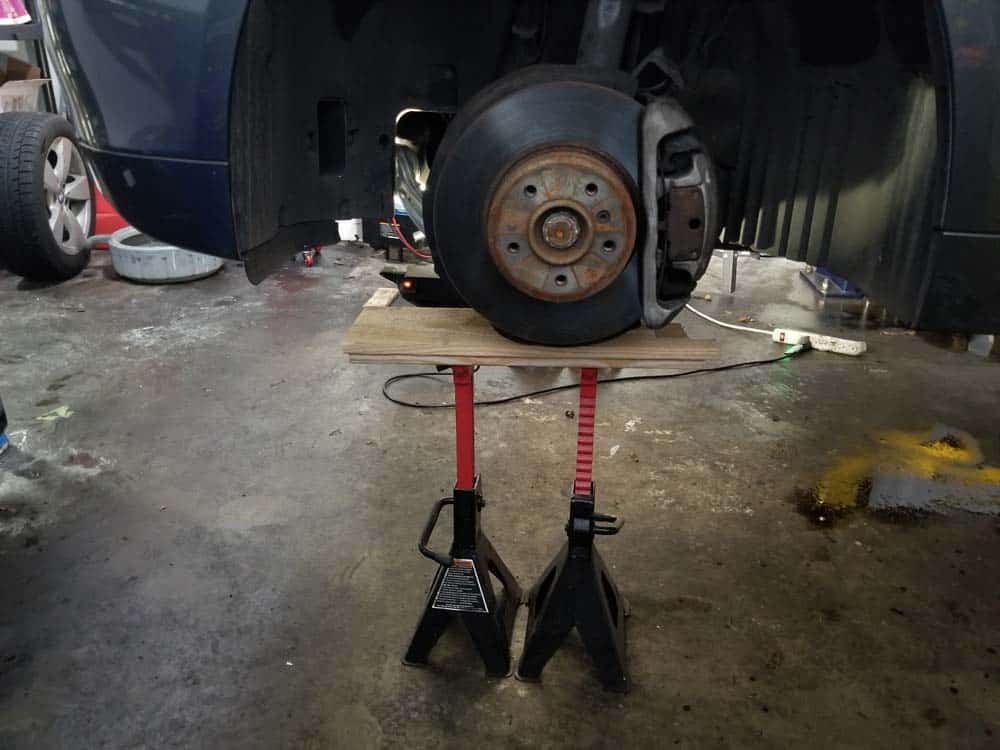
- Jack up the vehicle and support on jack stands. You will have to use jack stands for this repair since the front wheel(s) will need to be removed to replace the drive axle.
- Using a 17mm socket wrench, remove the five lug nuts. Remove the wheel from the car.
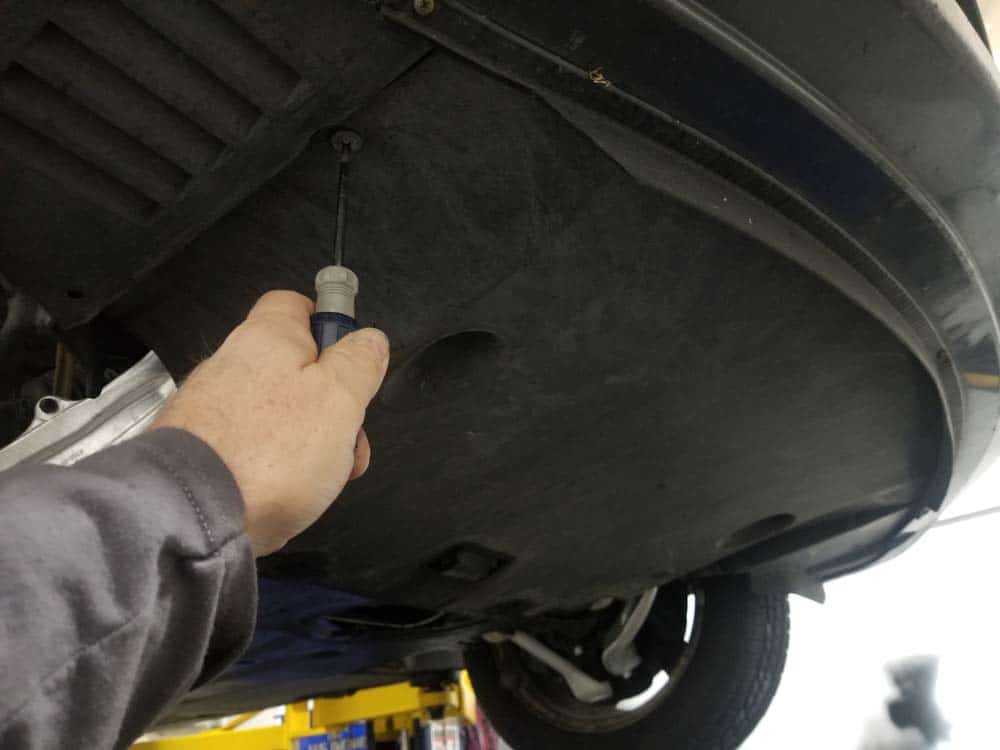
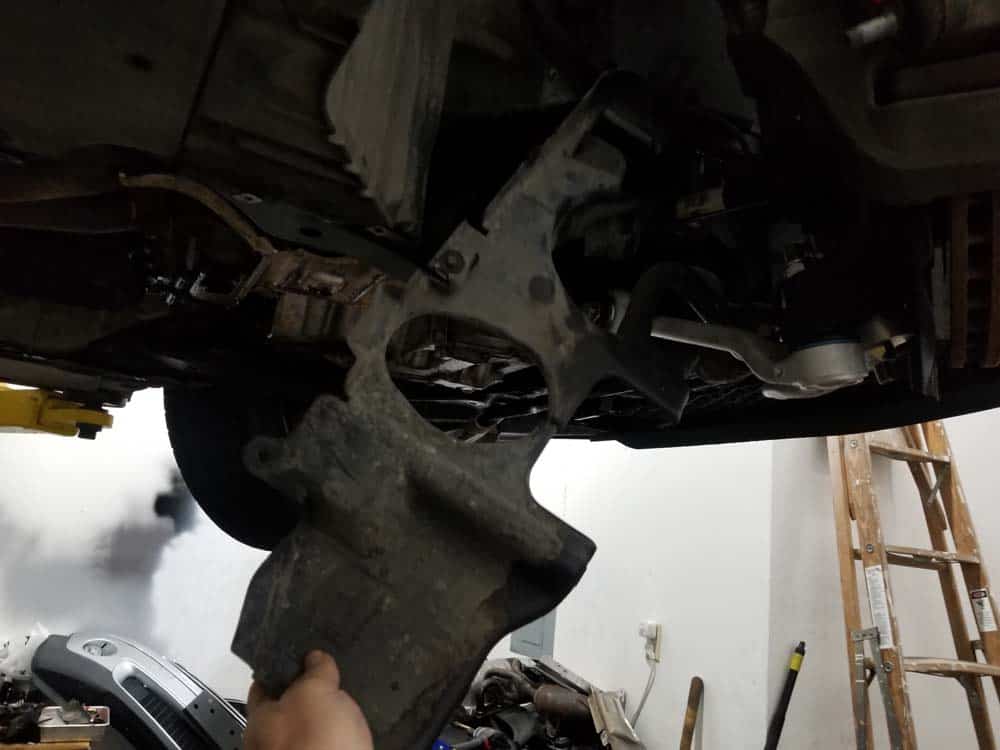
- Remove the front and rear belly pans using a phillips screwdriver and an 8mm nut driver.
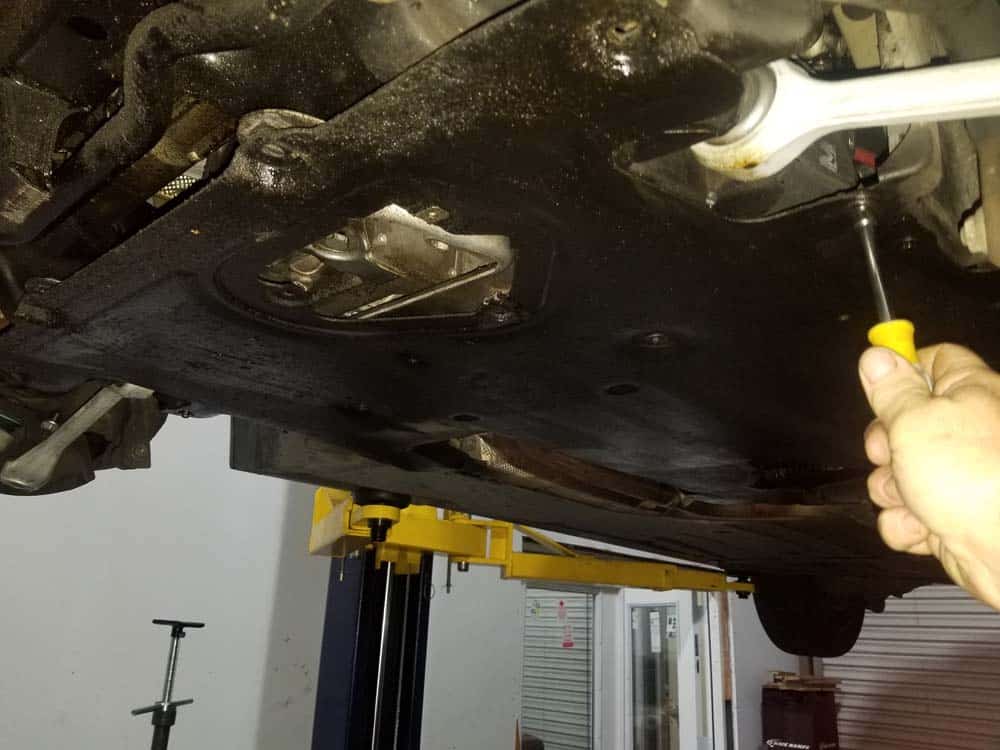
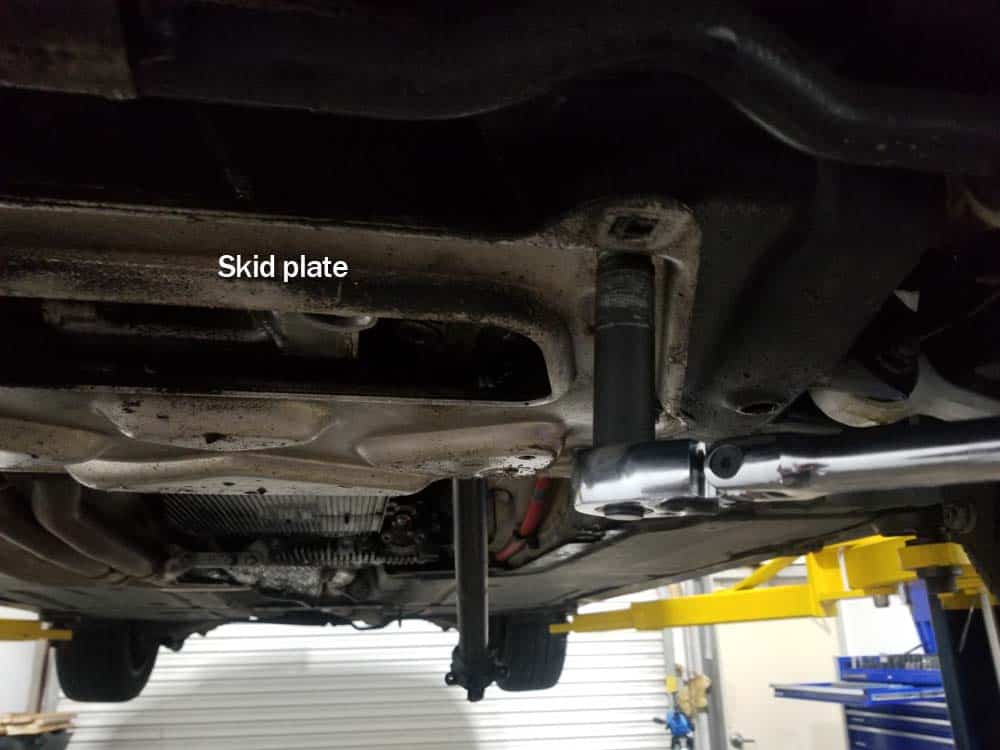
- Use a 16mm socket wrench to remove the six M10 bolts securing the skid plate to the frame of the car. Use an 8mm socket wrench to remove the mounting bolt from the rear of the skid plate. Remove the plate from the bottom of the car.
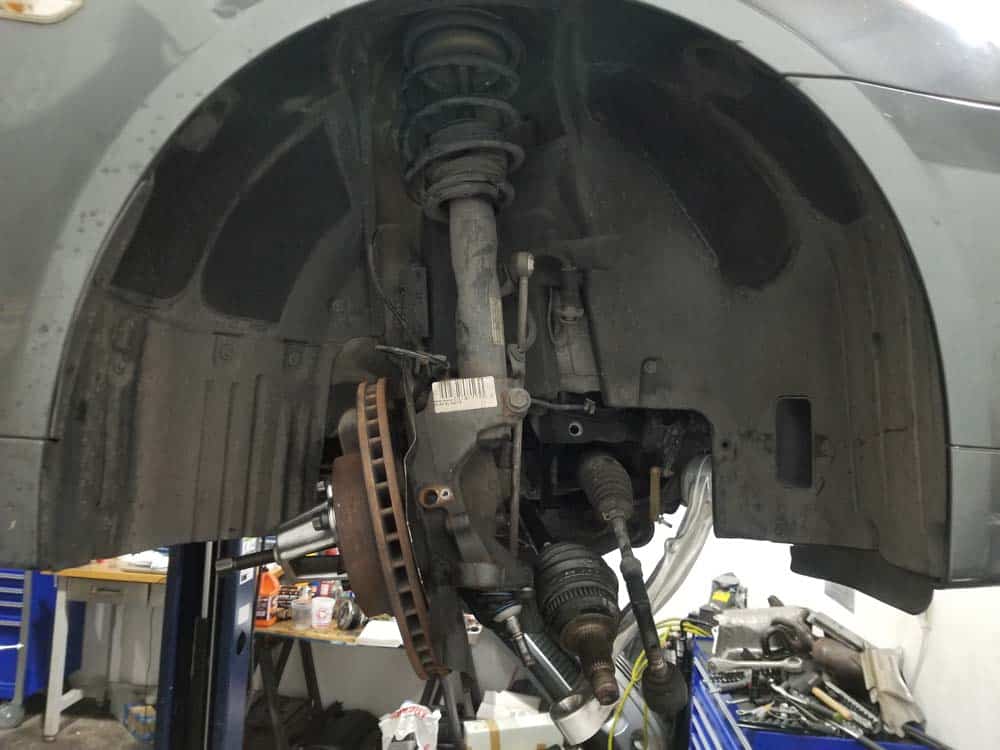
Section 2 - Preparing for the BMW E60 Front Axle Shaft Removal
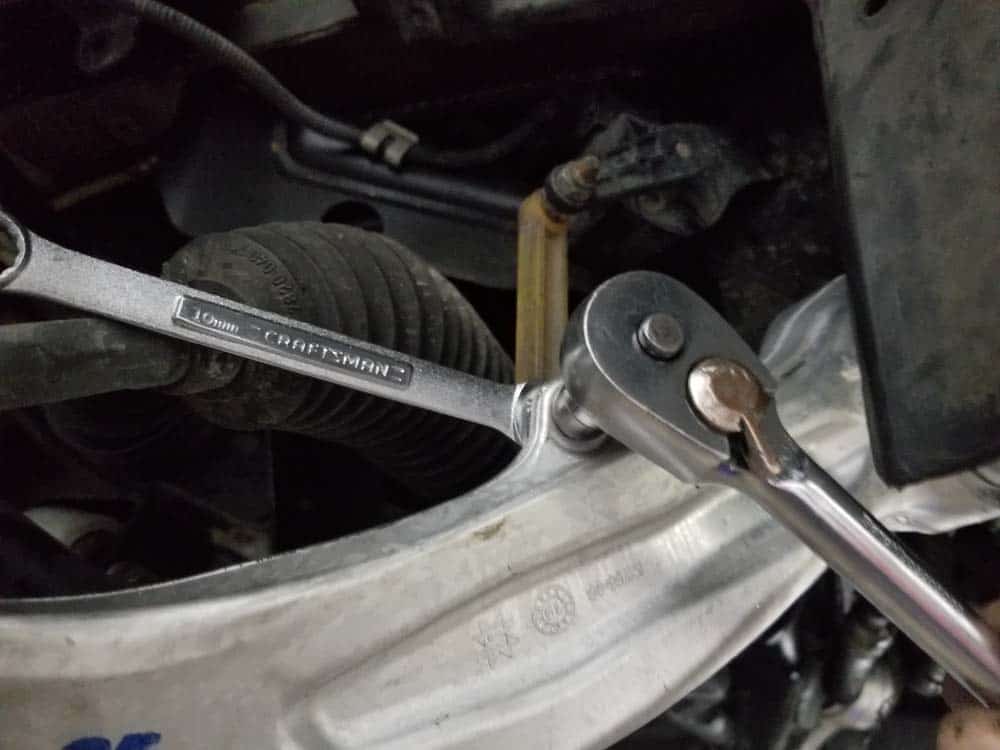
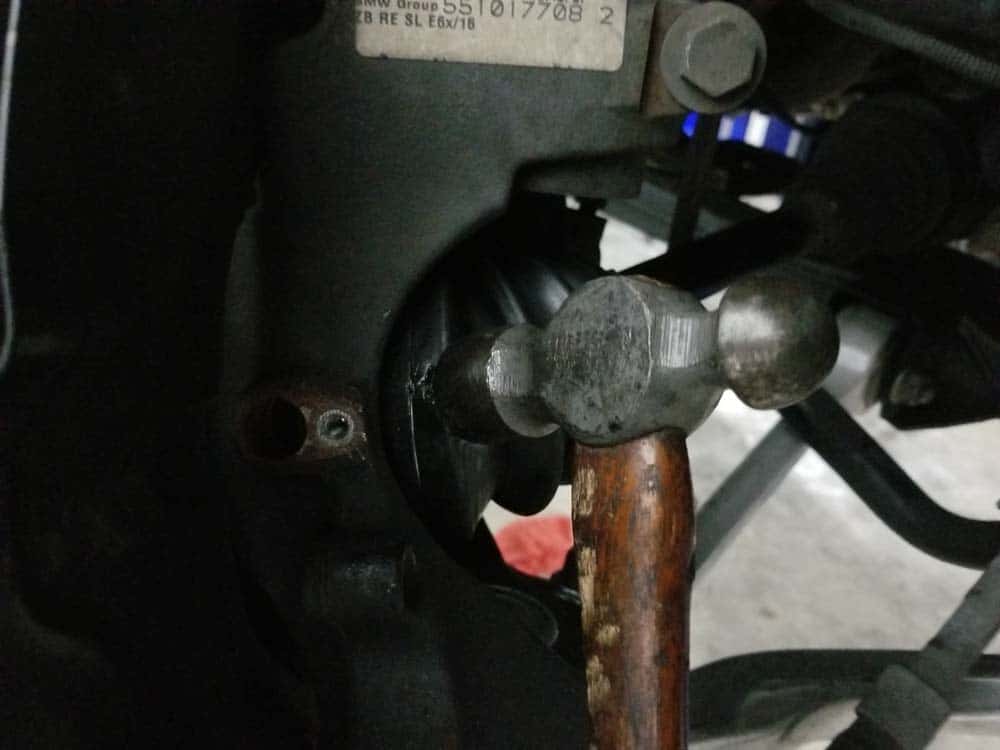
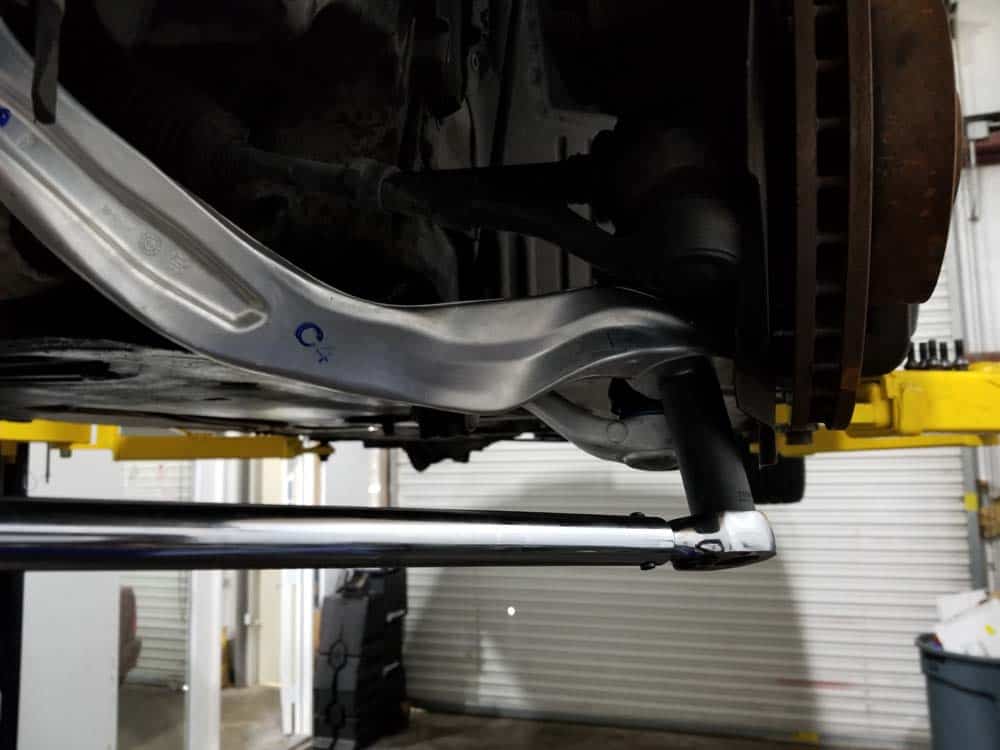
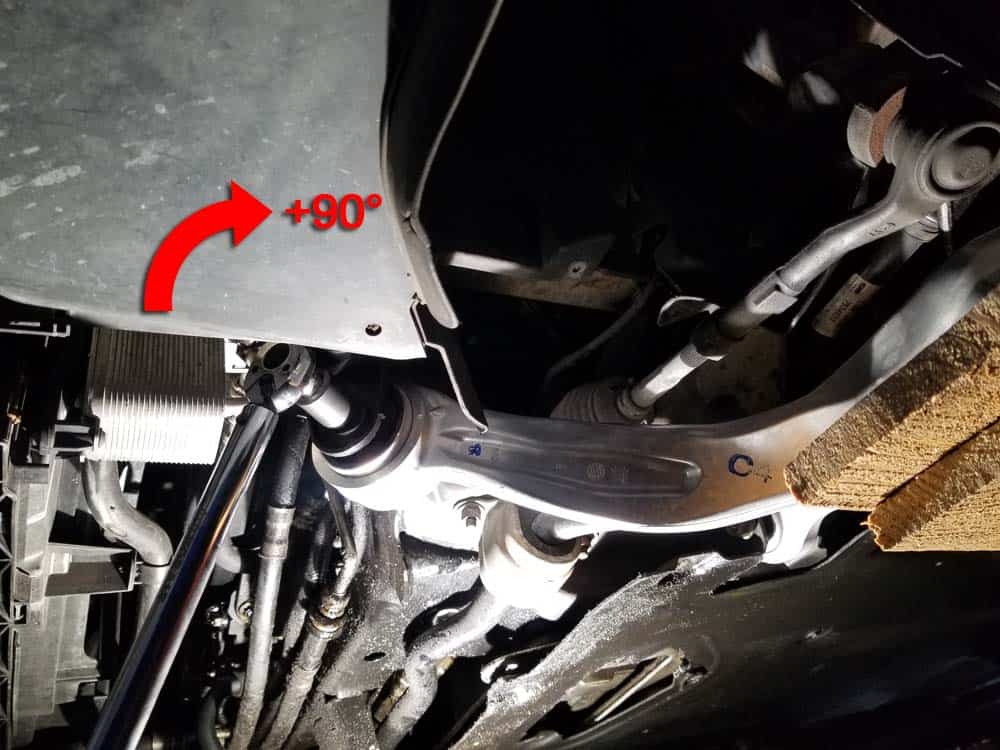
In order to remove the BMW E60 front drive axle, the steering knuckle must be rotated backward 90 degrees inside the fender well (see Section 3 - Step 8 below for photos explaining this). There is unfortunately not enough clearance to remove the axle any other way. The following components must be disconnected from the steering knuckle in order to properly rotate it: the upper control arm (tension strut), lower control arm, steering tie rod, and sway bar link. Contrary to other repair articles, you do not have to remove the brake caliper or any brake components to remove the front drive axle on a BMW E60 vehicle.- Using a 16mm boxed or open end wrench and a T40 torx bit, remove the sway bar link from the sway bar. The T40 torx bit is necessary to counterhold the anchor nut. DO NOT remove the sway bar link from the front strut...this is not necessary. Just let the link swing freely out of the way.

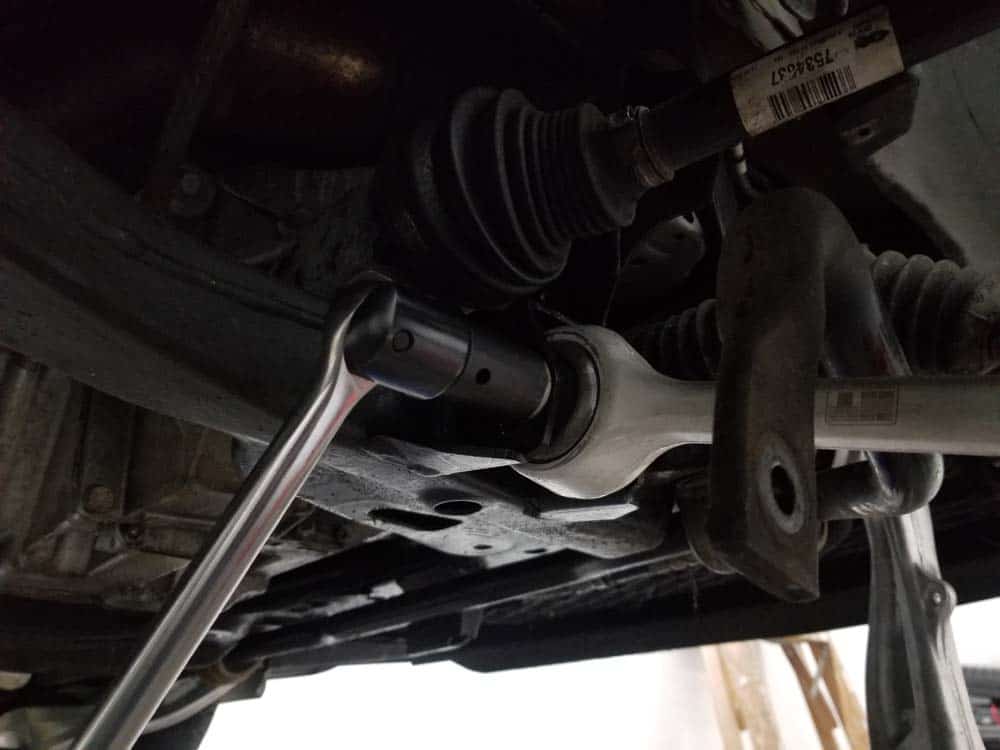
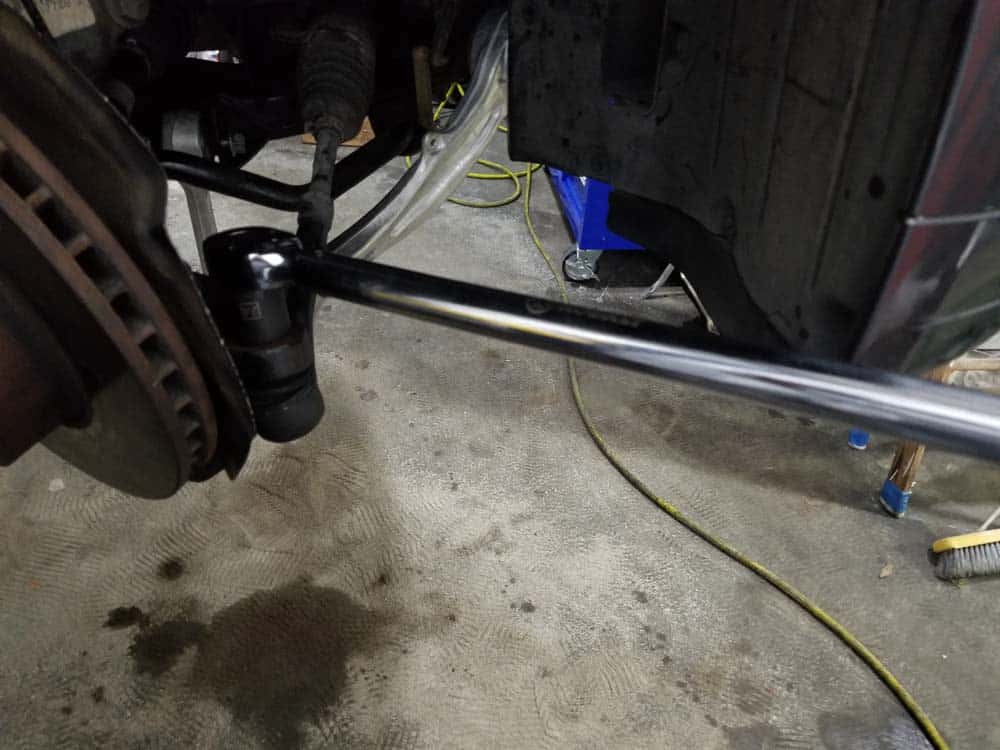
- Using a 24mm socket and a breaker bar, loosen the nut anchoring the tie rod to the steering knuckle. Use a T40 torx bit to counter hold the tie rod while removing the nut with a boxed end wrench. If you don’t have a 24mm wrench, an adjustable wrench works great too.
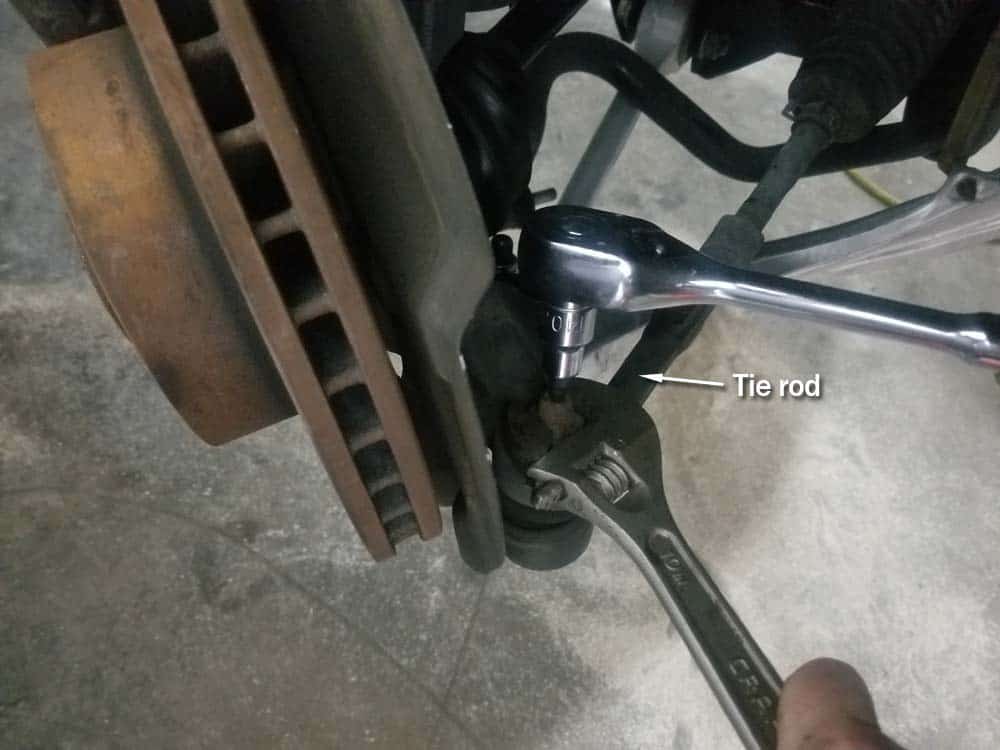
- Give the top of the tie rod bolt a couple of firm strikes with a hammer until it pops out of the steering knuckle. If it is being particularly obstinate, soak it with some penetrating lubricant first like Blaster PB.
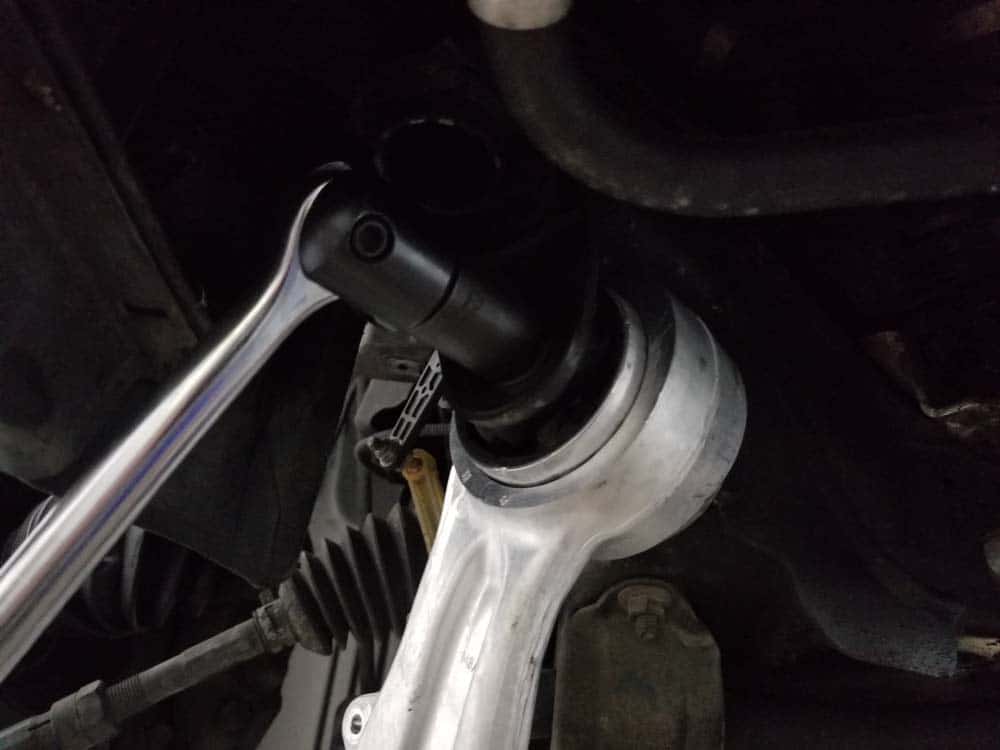
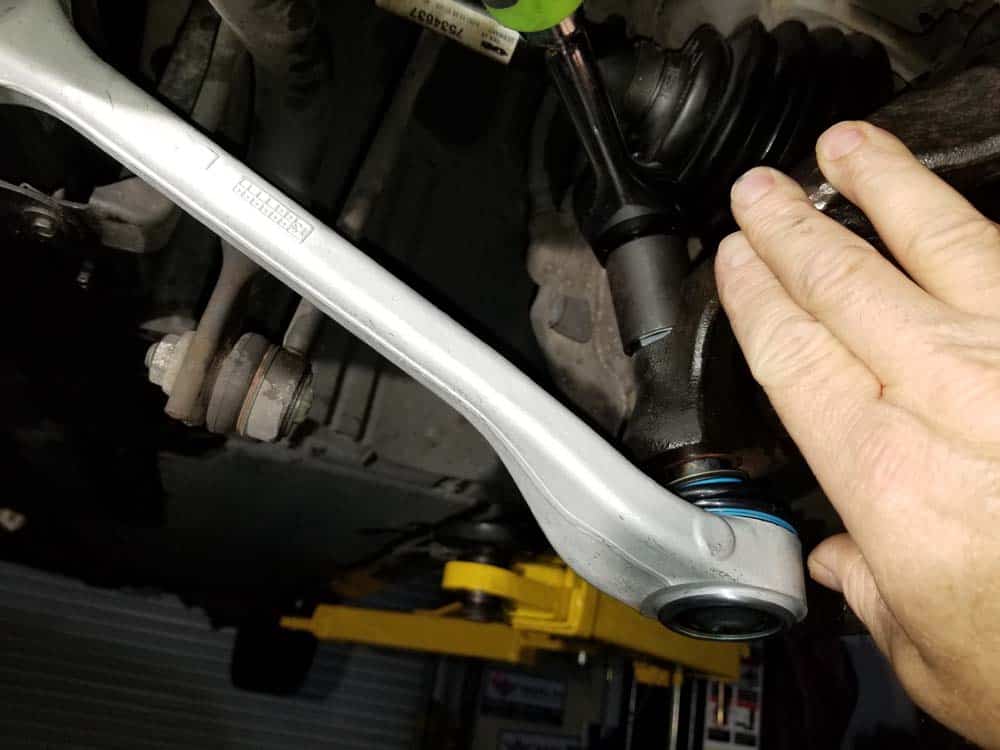
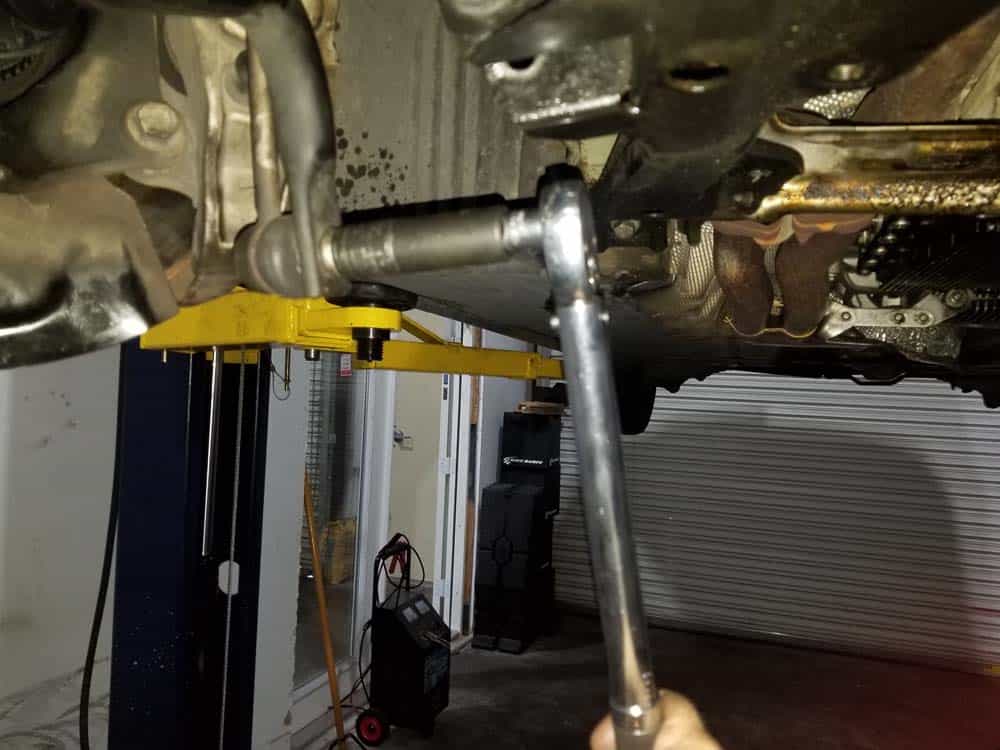
- Use a 22mm socket and breaker bar to loosen the upper control arm (tension strut) ball joint nut. Use a T40 torx bit and a 22mm open end wrench to finish removing the nut. If you are working on the right control arm, remove the headlight vertical aim control sensor with a 10mm socket wrench and open end wrench.
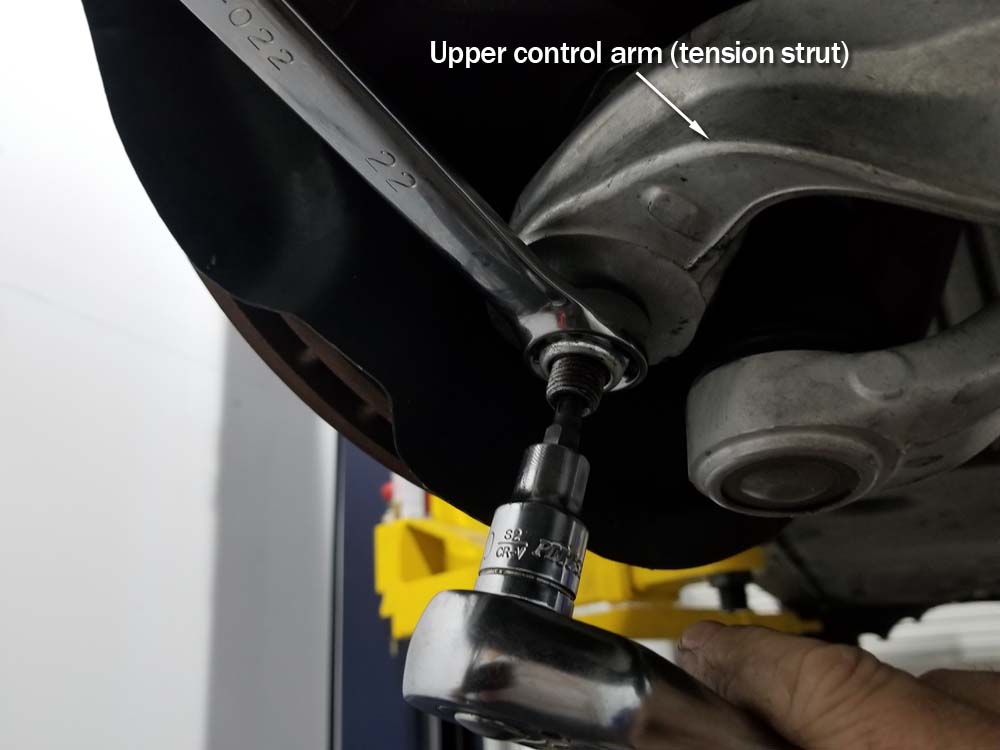
- Using an 18mm socket and breaker bar, slightly loosen the upper control arm bushing bolt so control arm can be swung down out of the way. Pull the control arm off of the ball joint. If it is being obstinate, gently strike it with a rubber mallet until it pops off.
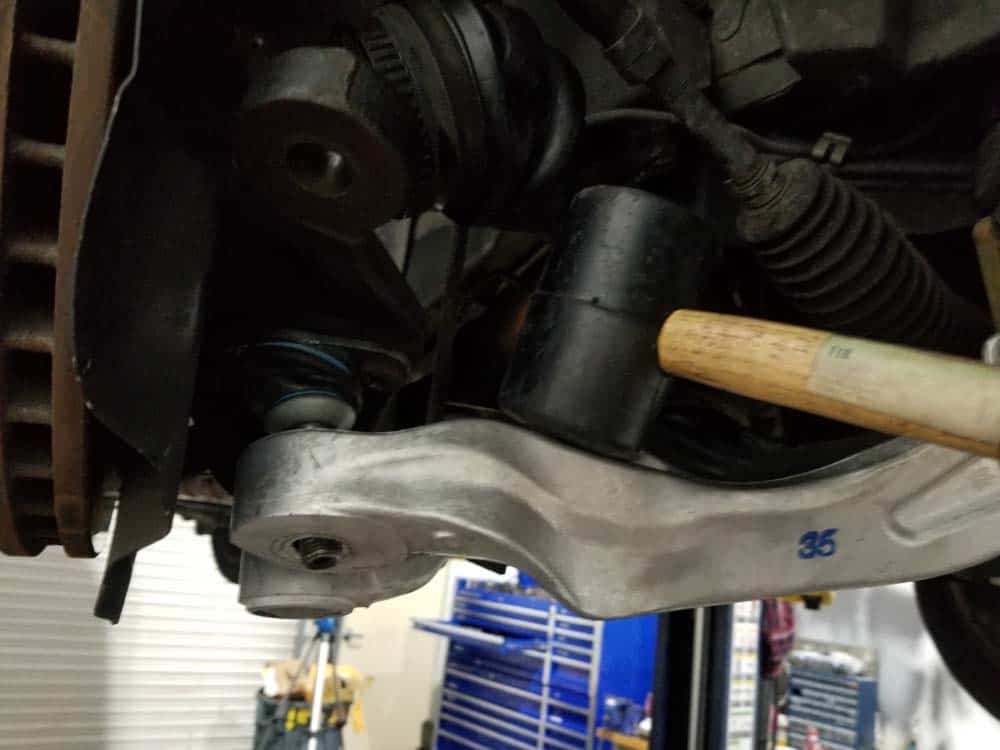
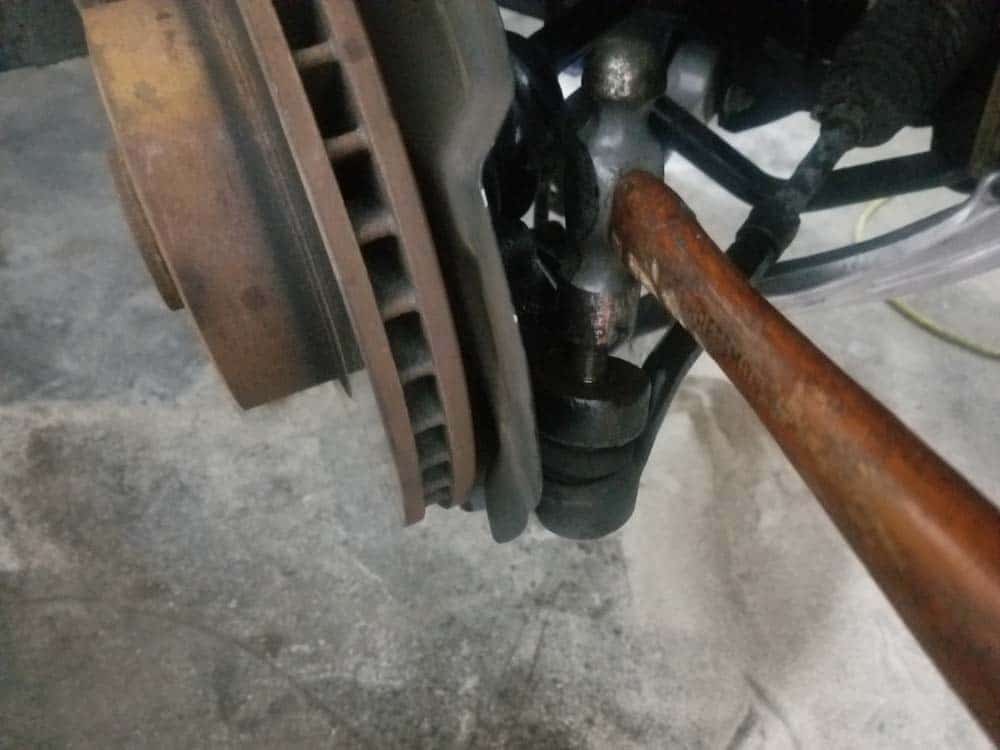
- Next, use a 22mm socket wrench to remove the ball joint nut off of the lower control arm. Use an 18mm socket and breaker bar to slightly loosen the lower control arm bushing bolt.

- Use a ball peen hammer to strike the lower control arm ball joint out of the steering knuckle. If it is giving you a hard time, soak it in Blaster PB and let it soak for a few minutes. Rotate the control arm down and out of the way.
- Use an 8mm socket wrench to remove the side splash guard from the inside of the fender well.
- You can now easily rotate the steering knuckle backwards 90 degrees to allow removal of the front axle shaft. You DO NOT have to remove the brake caliper or any brake components to complete this repair.
Section 3 - Removing the BMW E60 Front Axle Shaft from the Steering Knuckle
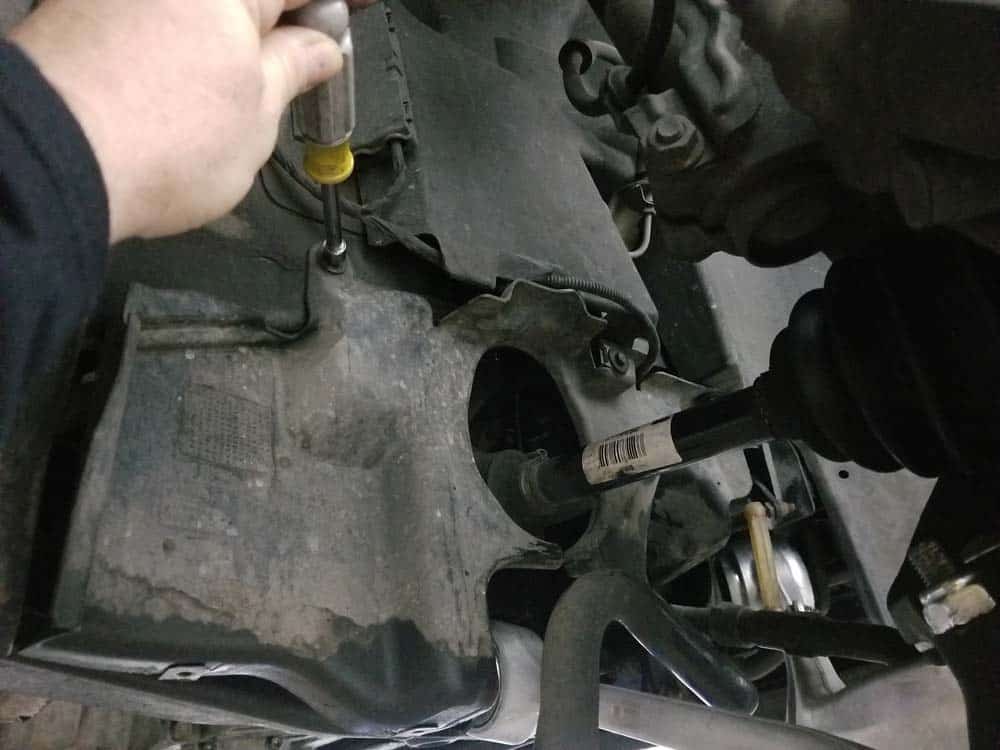
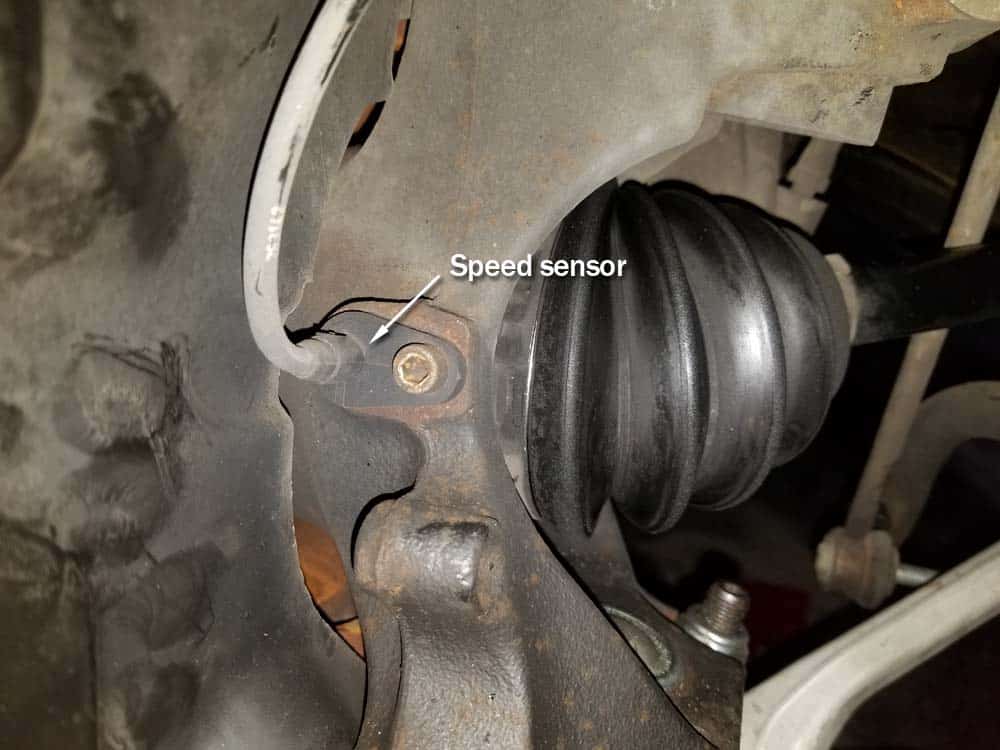
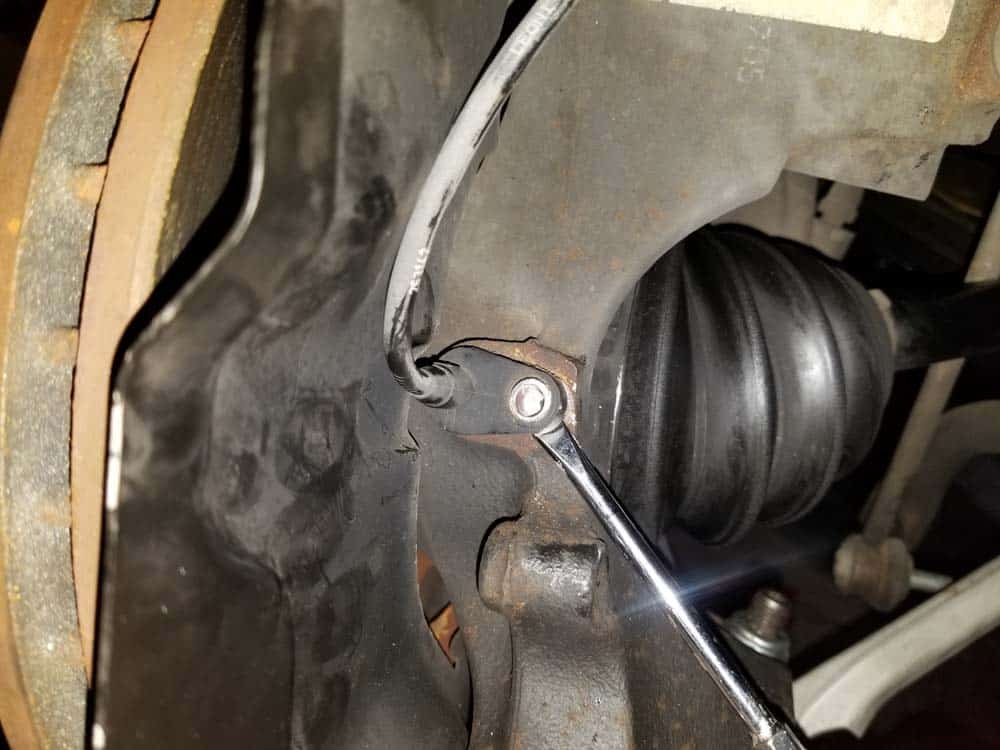
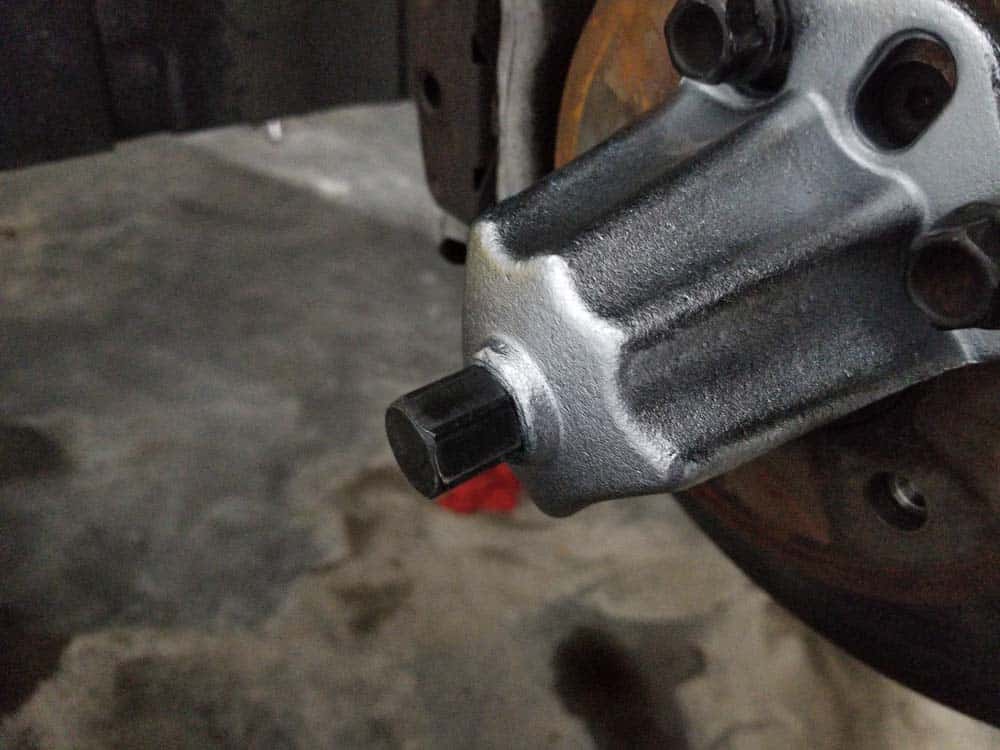
Removing the drive axle from the steering knuckle requires the use of a 75mm hub puller. DO NOT try and remove the drive axle from the steering knuckle without the use of a hub puller. Trying to hammer the axle out with a steel punch or other method of impact can damage the vehicle and is strongly discouraged. If you do not have the correct hub puller, you can order one from our parts list above.- Using a T30 torx bit, remove the wheel speed sensor from the steering knuckle. Use a flat blade screwdriver to pry it out of the knuckle if it is stuck.
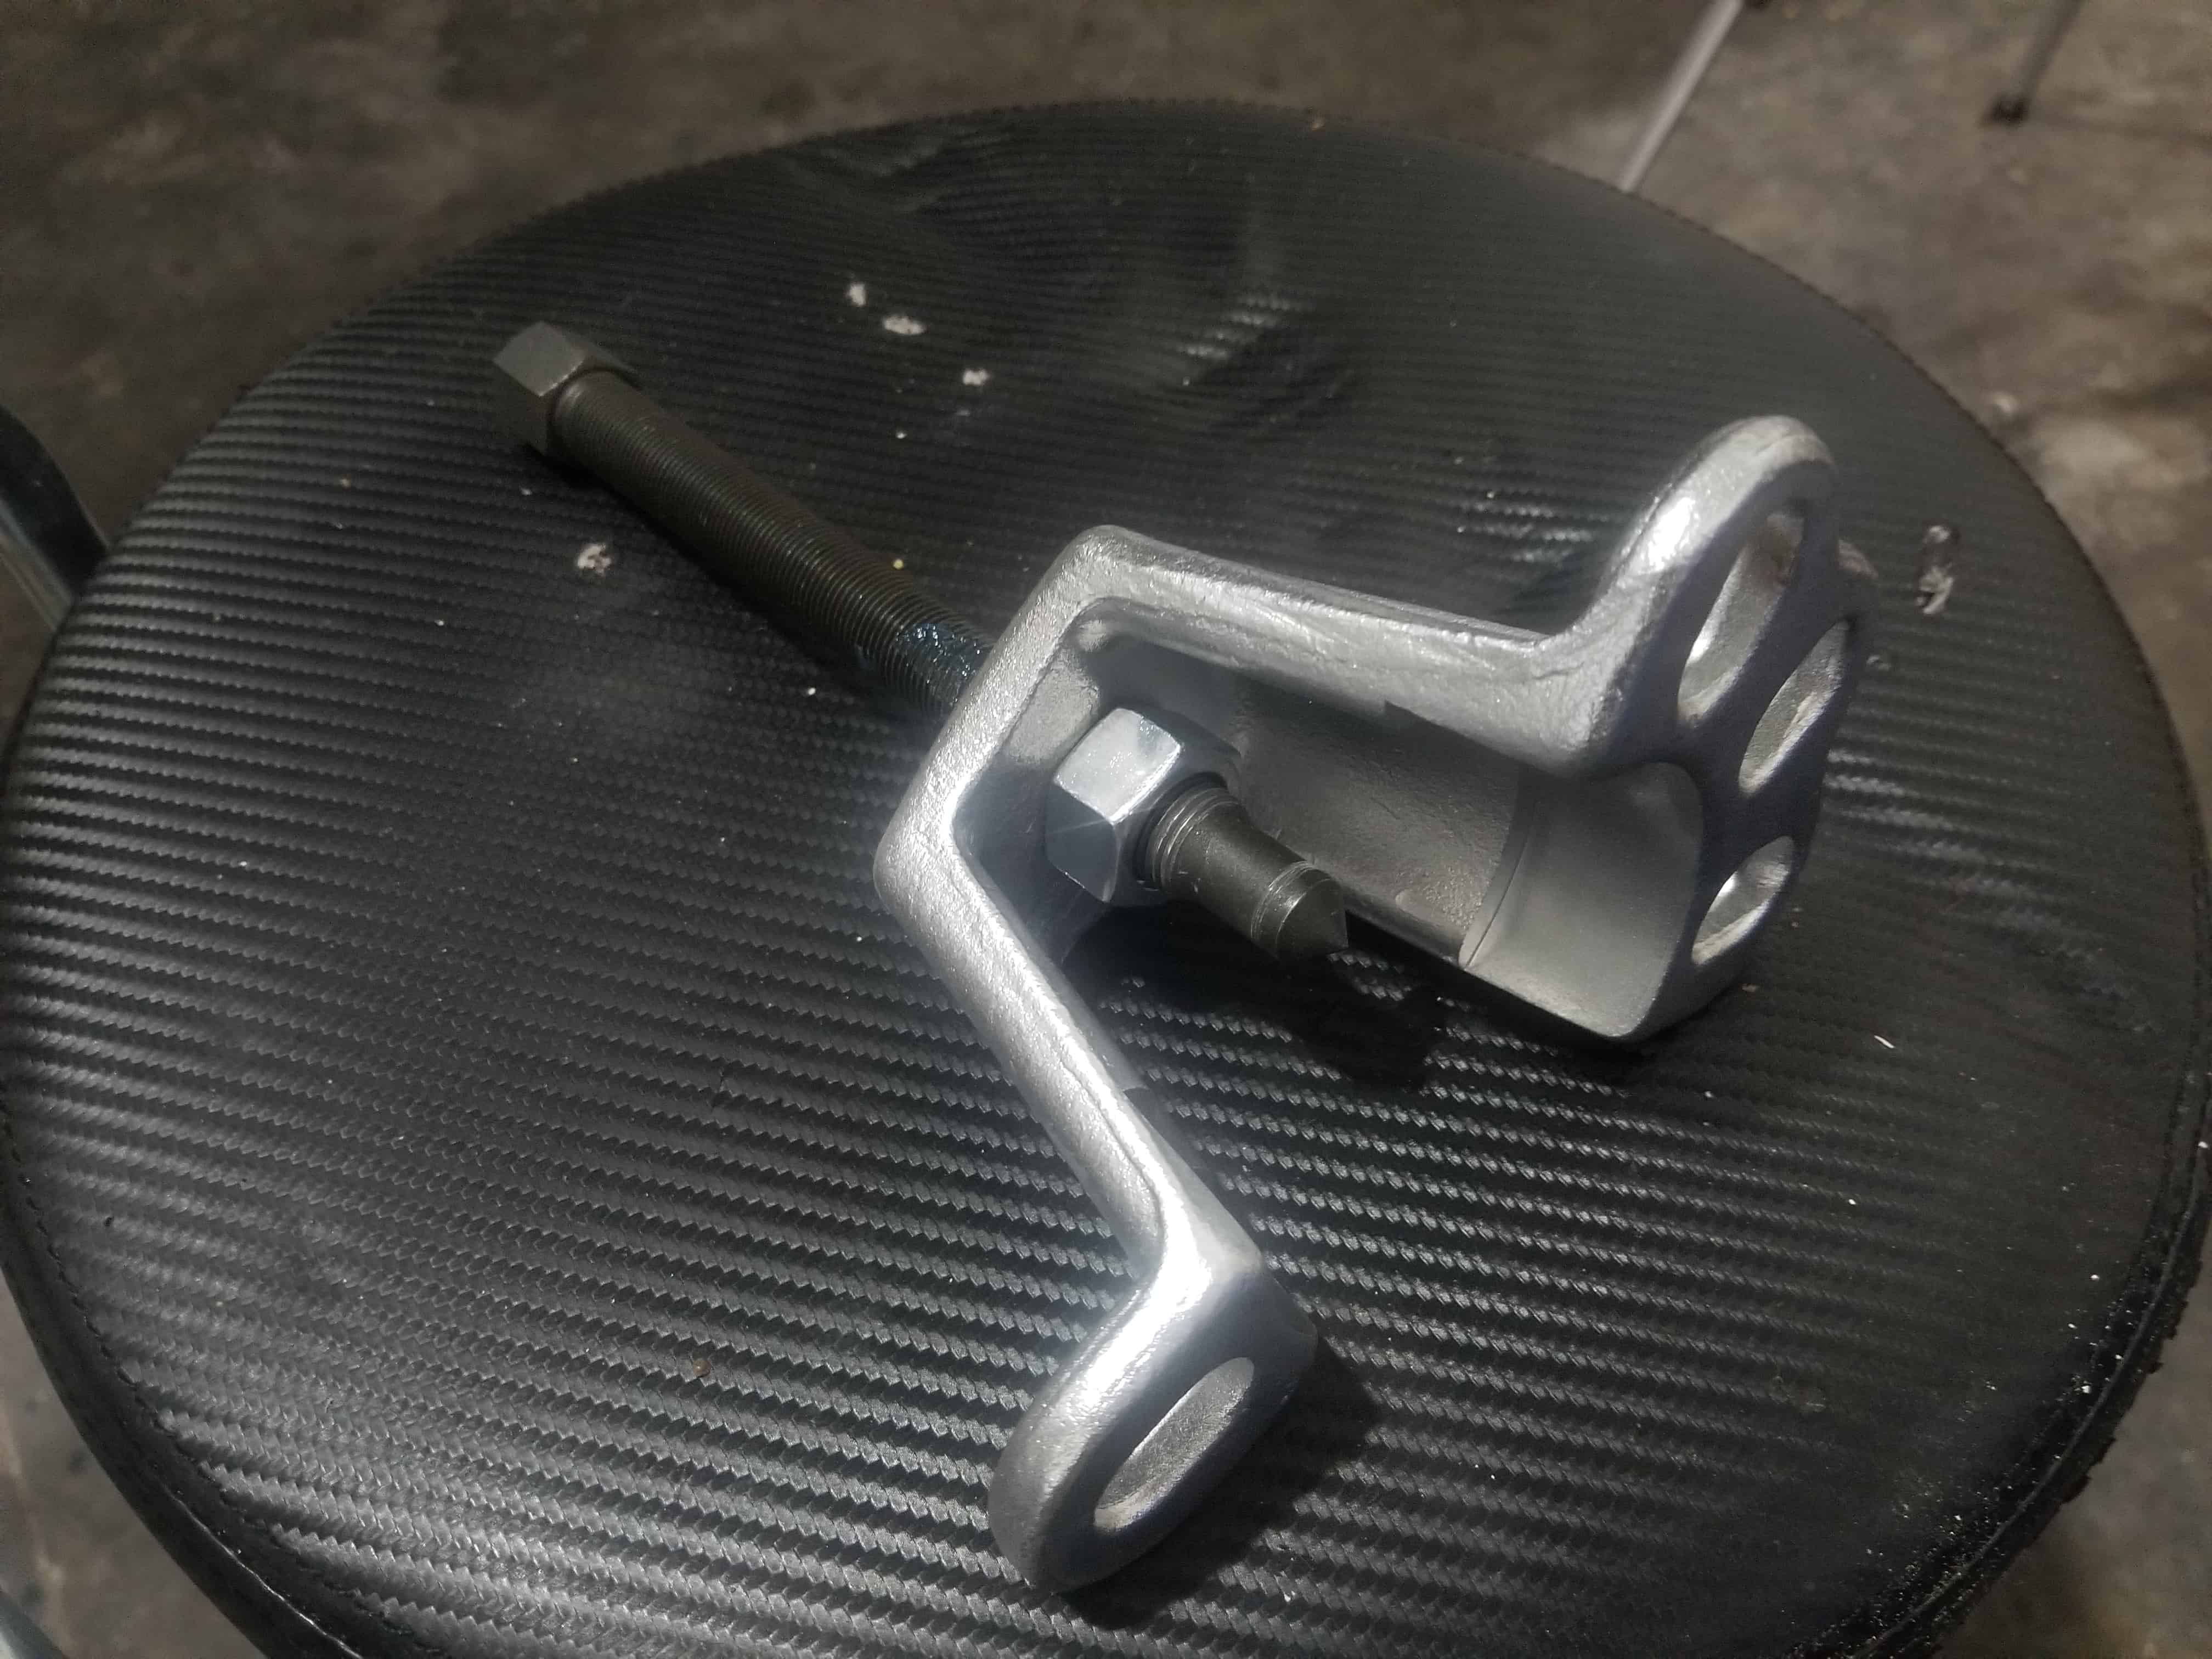
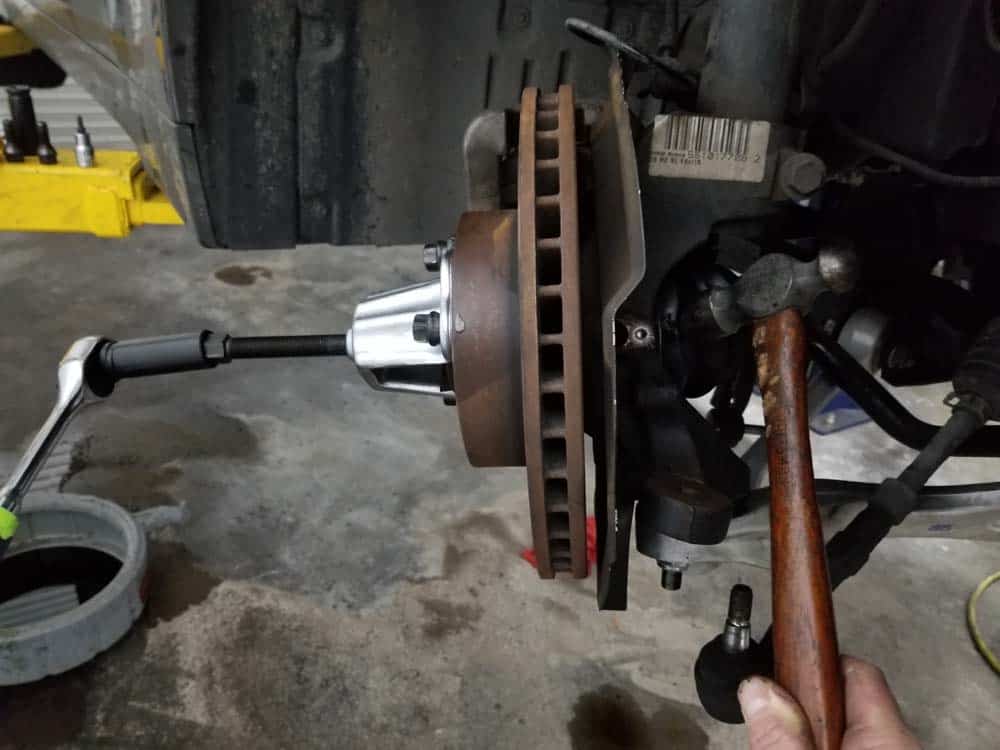
- You will need to use a 75mm hub puller to remove the drive axle from the steering knuckle. Before starting, apply a thin layer of grease to the threads of the hub puller. This will help prevent the threads from stripping and will prolong the life of the tool.
- Have an assistant sit in the car and apply the brakes. The brakes must be applied to keep the wheel hub from spinning in the following steps.
- Attach the puller to the wheel hub with three lug nuts. Use a 17mm socket wrench to firmly tighten them.
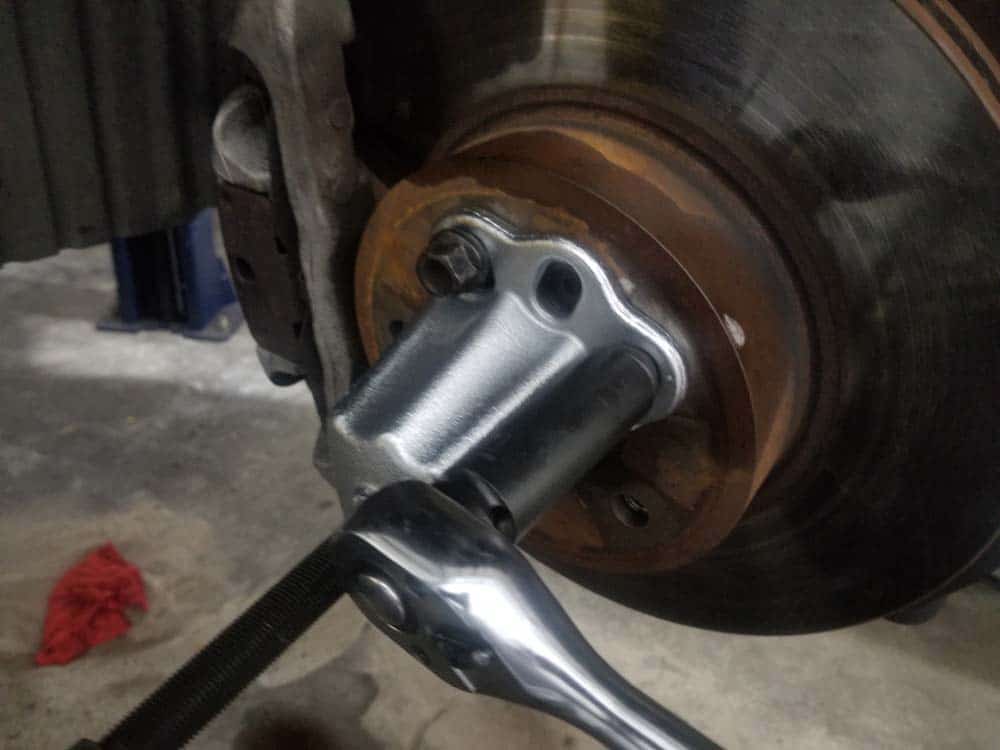
- Using a socket wrench, slowly tighten the threaded rod on the puller. The rod should line up with the center of the drive axle. Continue to tighten the threaded rod until the axle pushes out of the hub. If the axle is stuck and won’t push out, proceed to the next step.
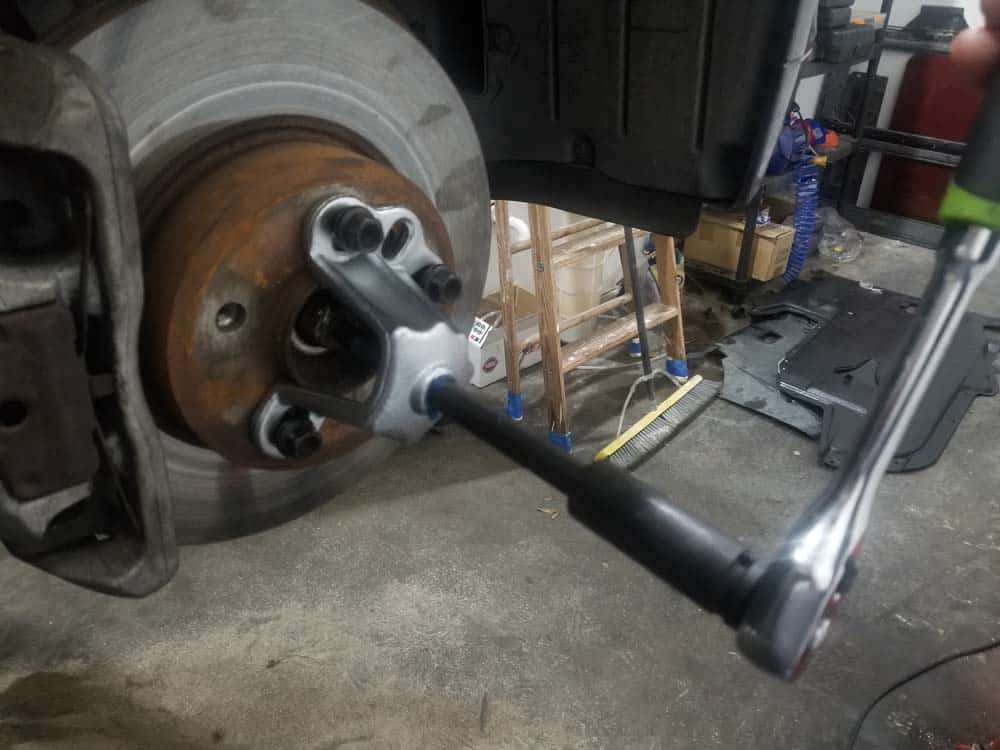
- If the drive axle is stuck and won’t push out, spray it liberally with Blaster PB and allow to soak for a few minutes. Tighten the hub puller as much as you can so there is adequate pressure being put on the drive axle. With pressure being applied, strike the axle behind the steering knuckle several times with a hammer until it releases from the hub (see image below). It took us six good blows with the hammer until the axle released from the hub. Don’t worry about tearing the boot...your replacement axle has a new boot already installed.
- Continue to tighten the threaded rod until it is all the way in. This will completely push the drive axle out of the hub.
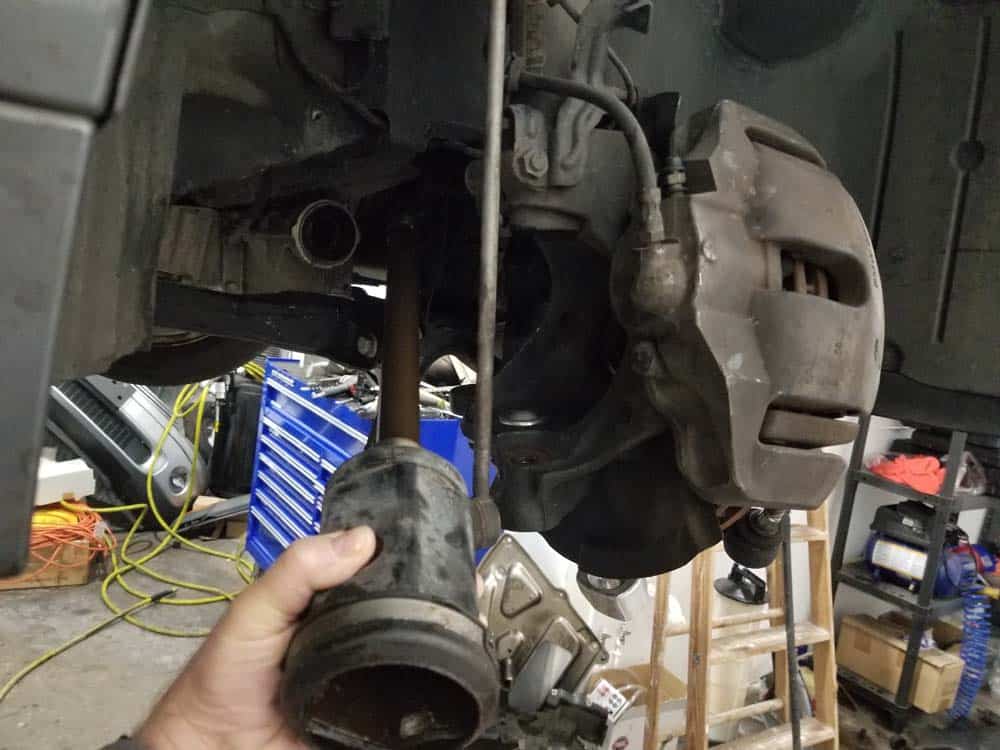
- Rotate the steering knuckle back 90 degrees and pull the drive axle free of the hub.
Section 4 - Removing the BMW E60 Front Axle Shaft from the Front Differential
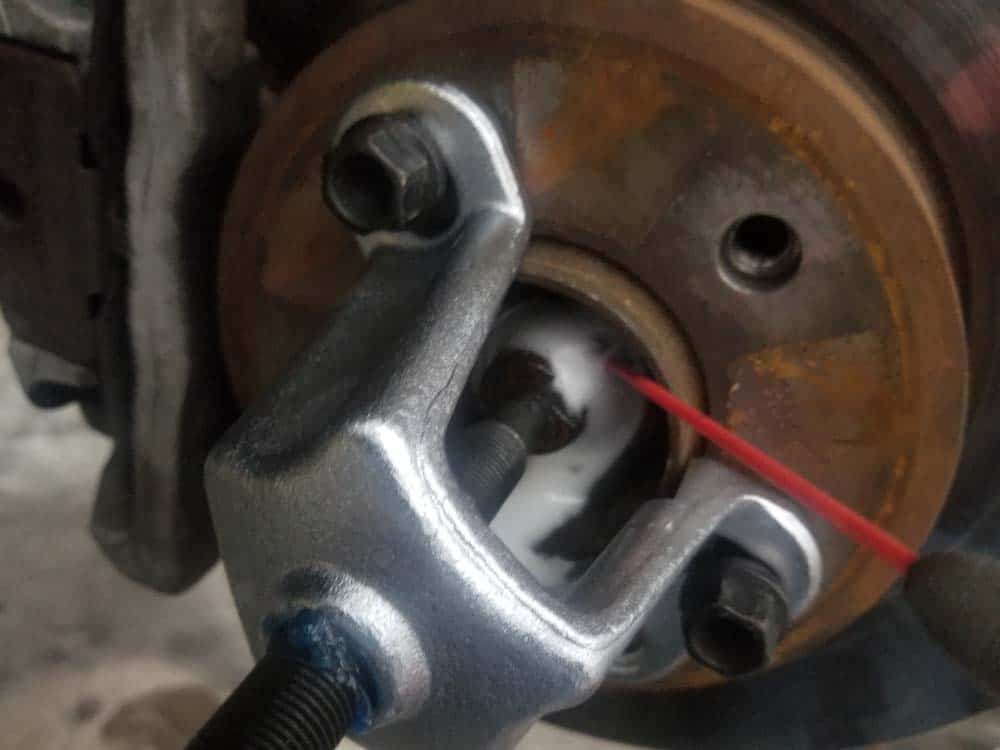
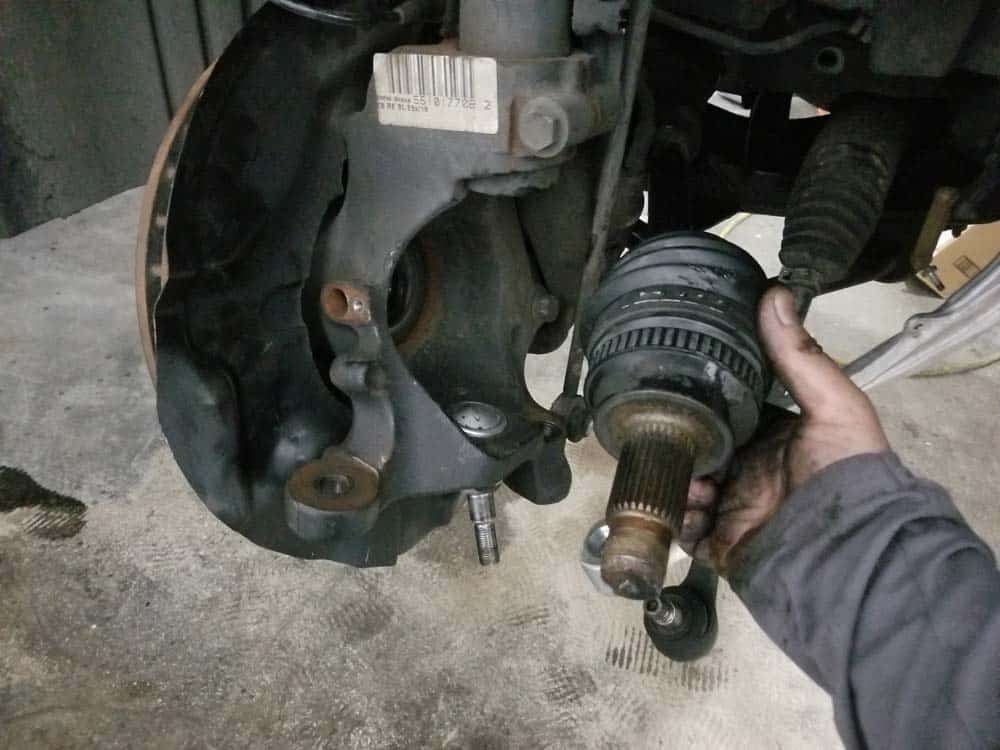
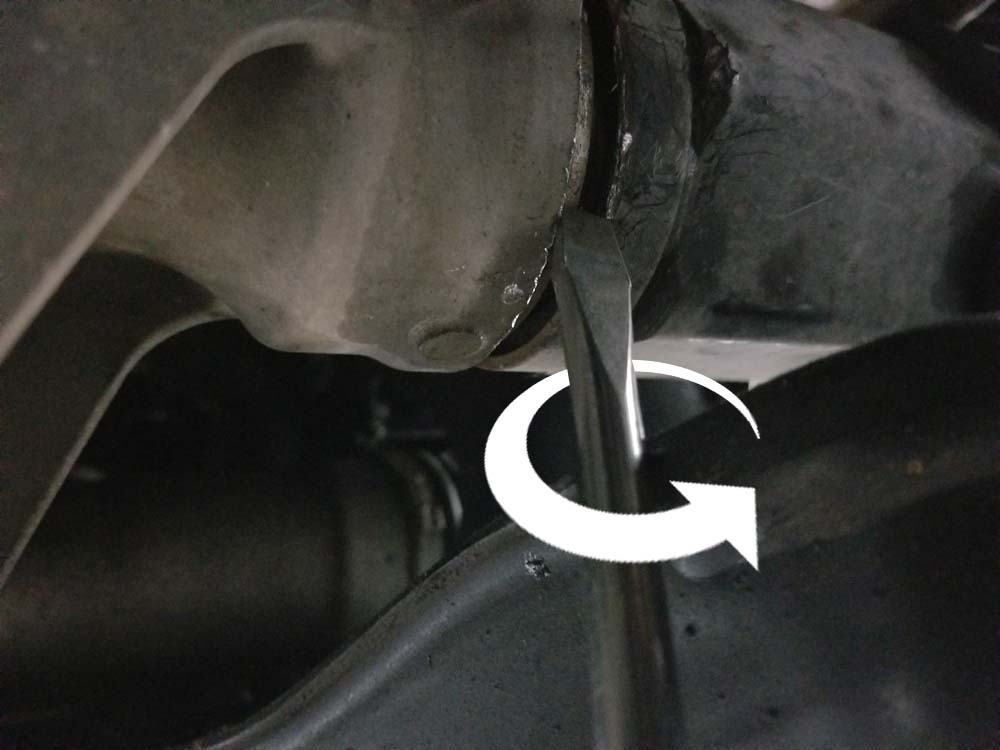
The front-drive axle is held securely inside the differential with a locking ring that works like a spring, applying pressure to the internal gears so the shaft doesn't slip out. The locking ring is recessed into the end of the axle shaft in a groove. In order to remove the axle shaft from the differential, it must be "pulled" just enough to release the locking ring's grip (about 1/2"). Inserting a large flat blade screwdriver or pry-bar into the groove between the axle and the differential will easily force the locking ring to release.- Locate the groove where the drive axle and the differential meet. This is where you will separate them from each other.
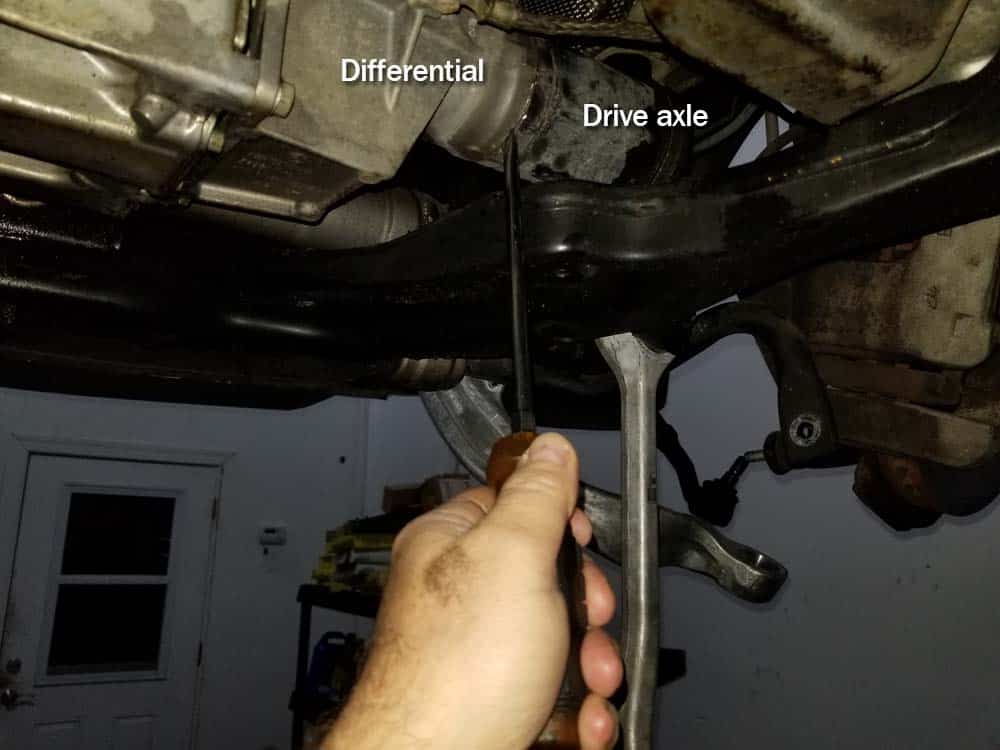
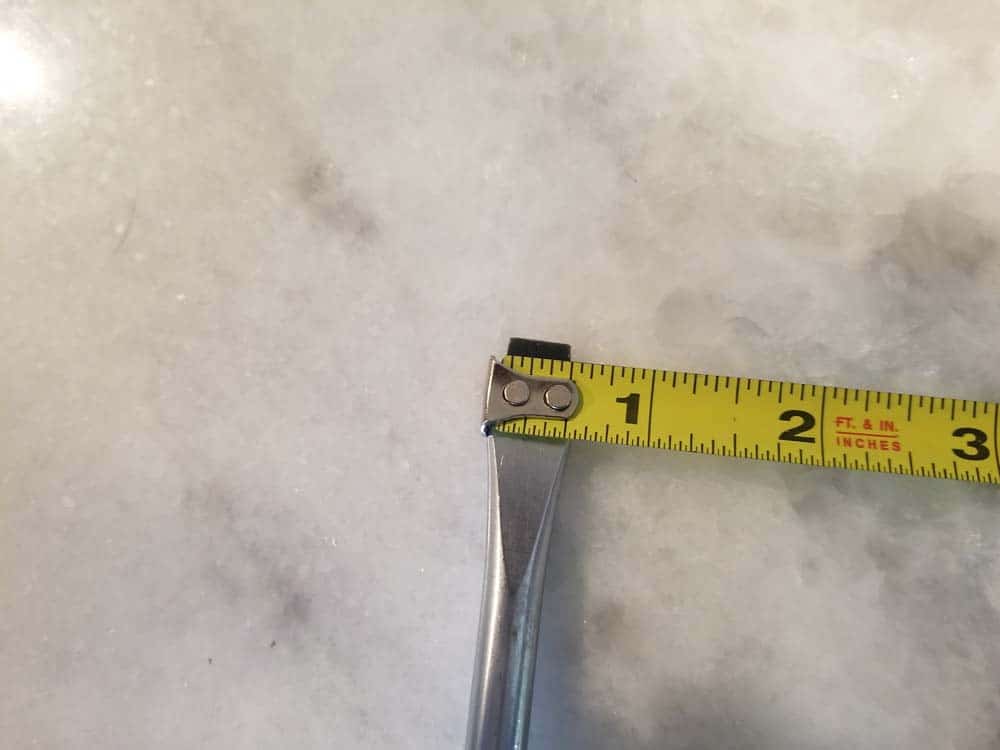
- Insert a large flat blade screwdriver into the groove. The screwdriver should have a blade width of about 1/2". You can also use a small pry-bar if you wish.
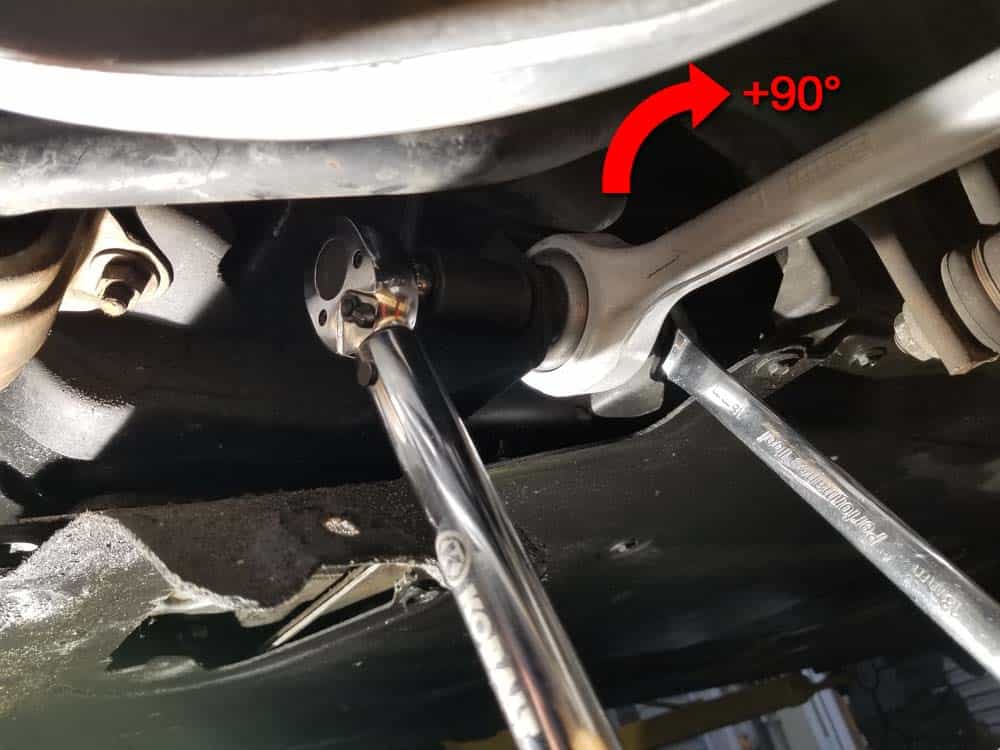
- Using two hands, start to turn the screwdriver 90 degrees prying the axle away from the differential. You will feel the axle lock ring "pop" out of the differential gears when the blade of the screwdriver reaches 90 degrees.
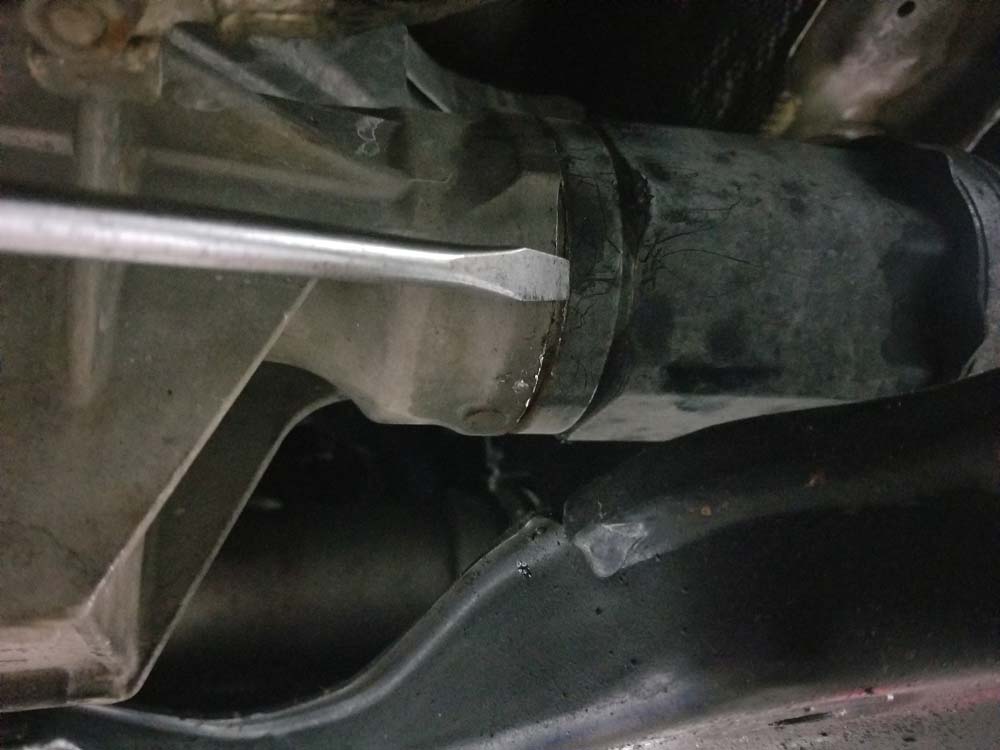
- If you are having a hard time getting the axle to separate from the differential, give the axle a couple good strikes with a hammer and the flat blade screwdriver then try step 3 again.
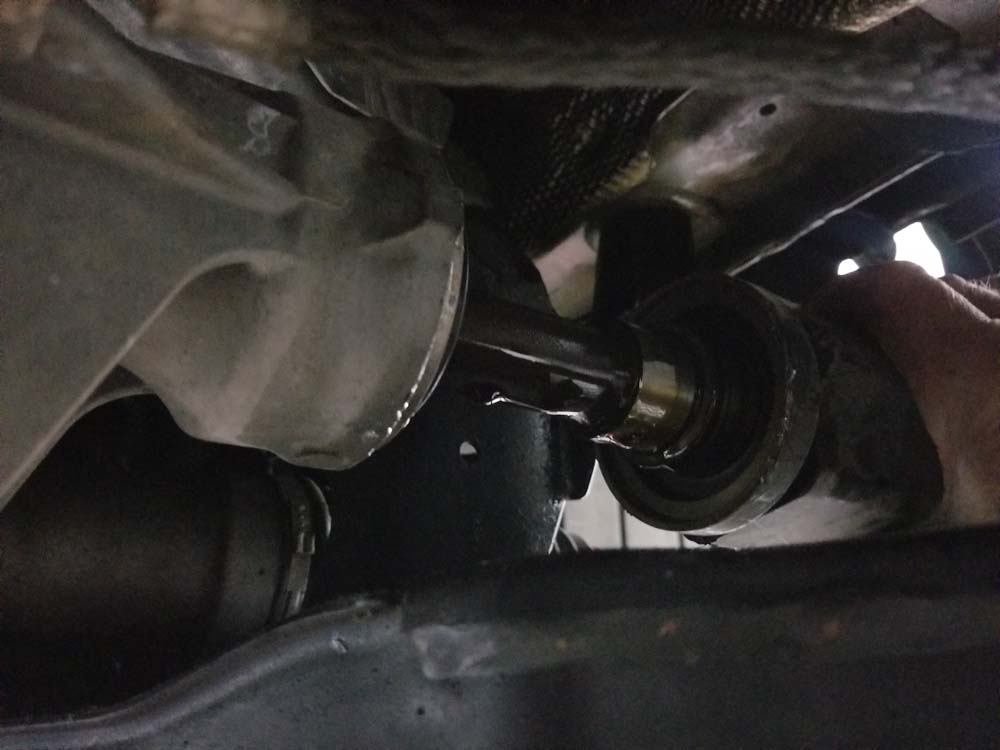
- When the drive axle pops out of the differential, grasp it with your hands and slowly pull it out of the vehicle.
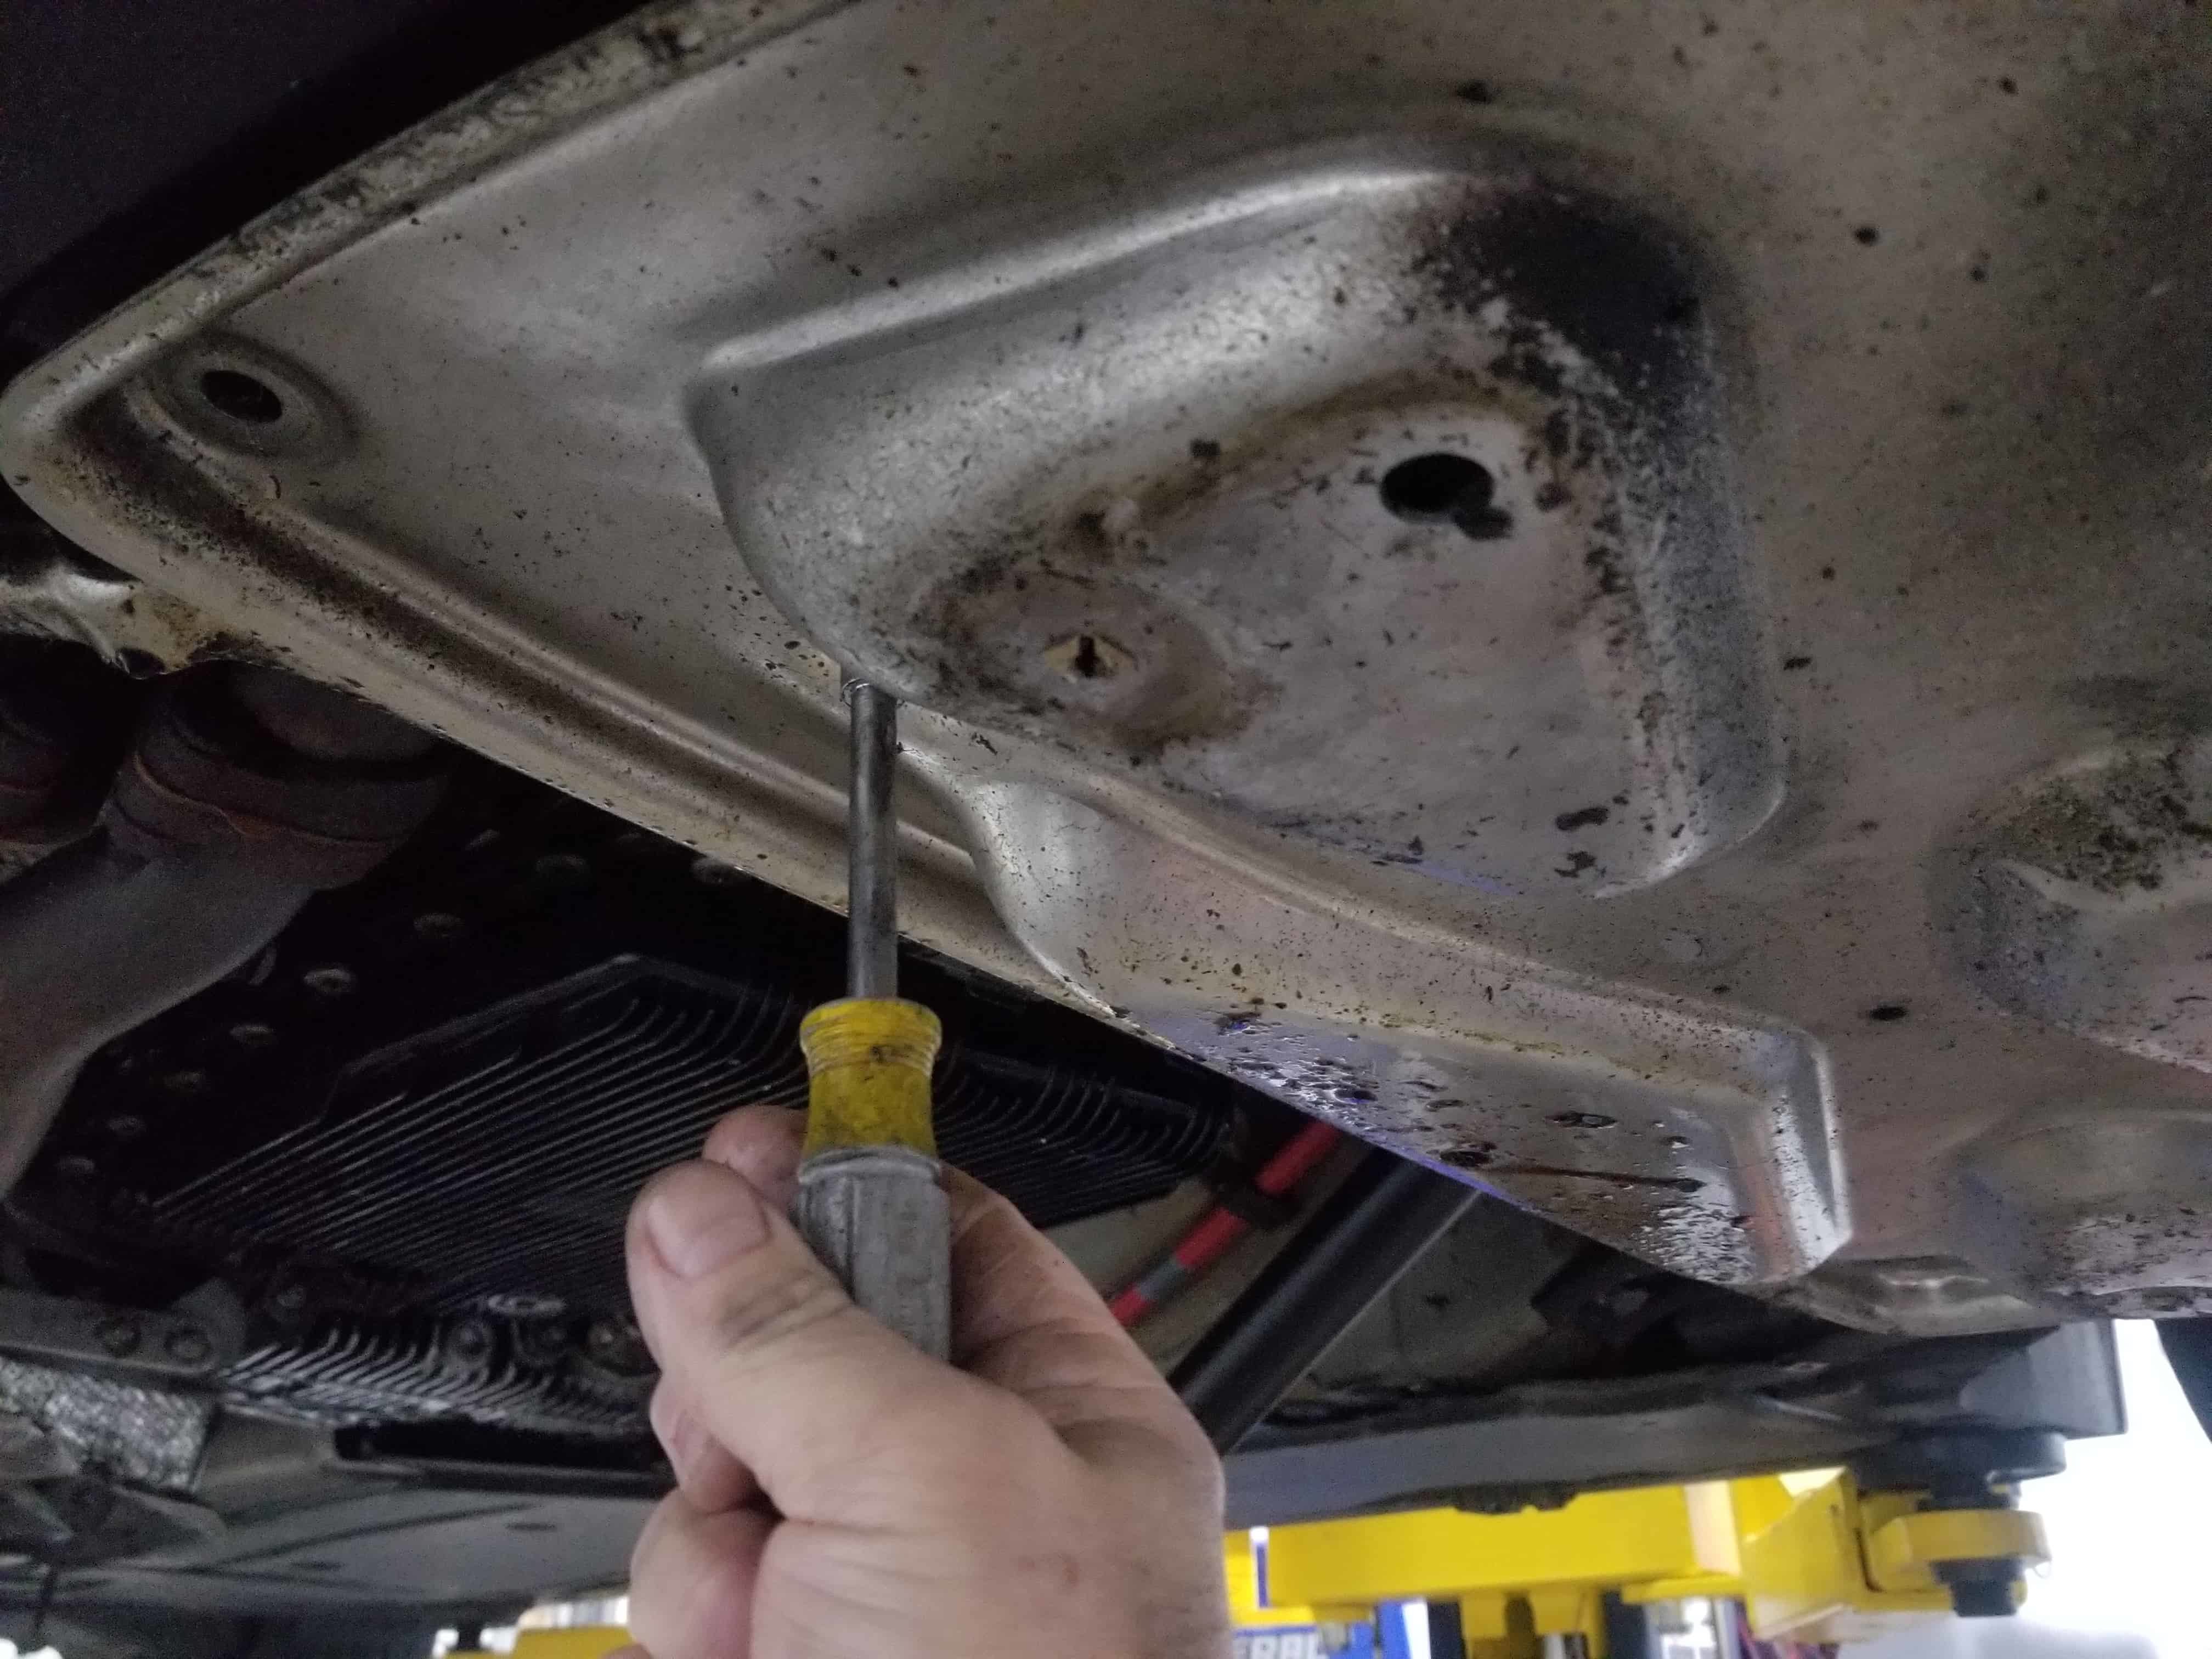
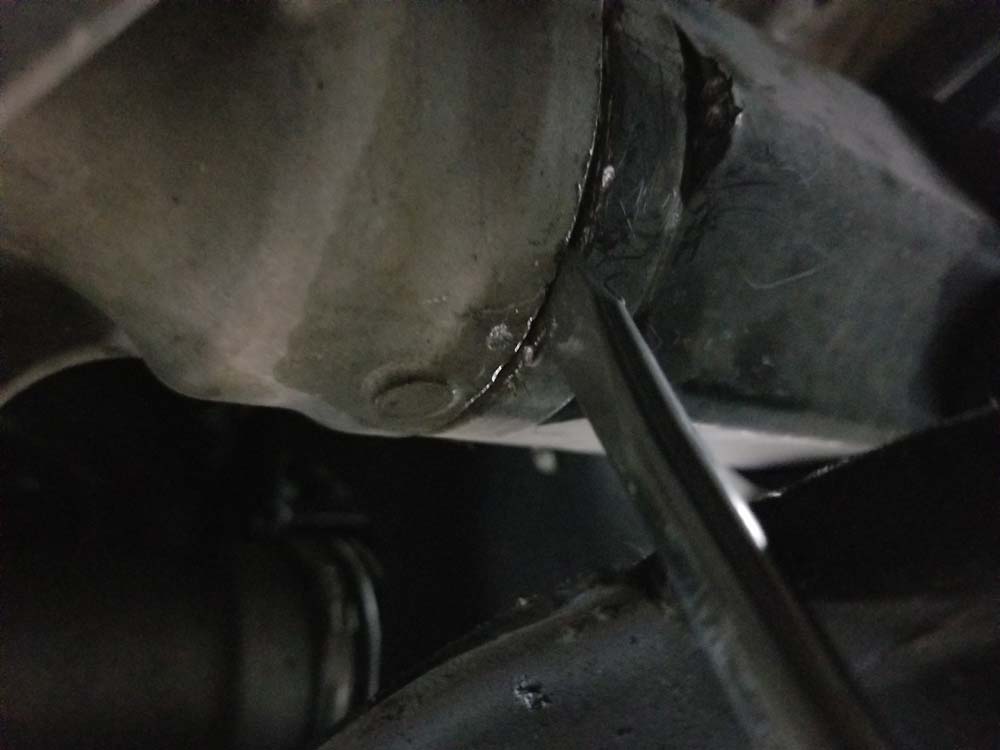
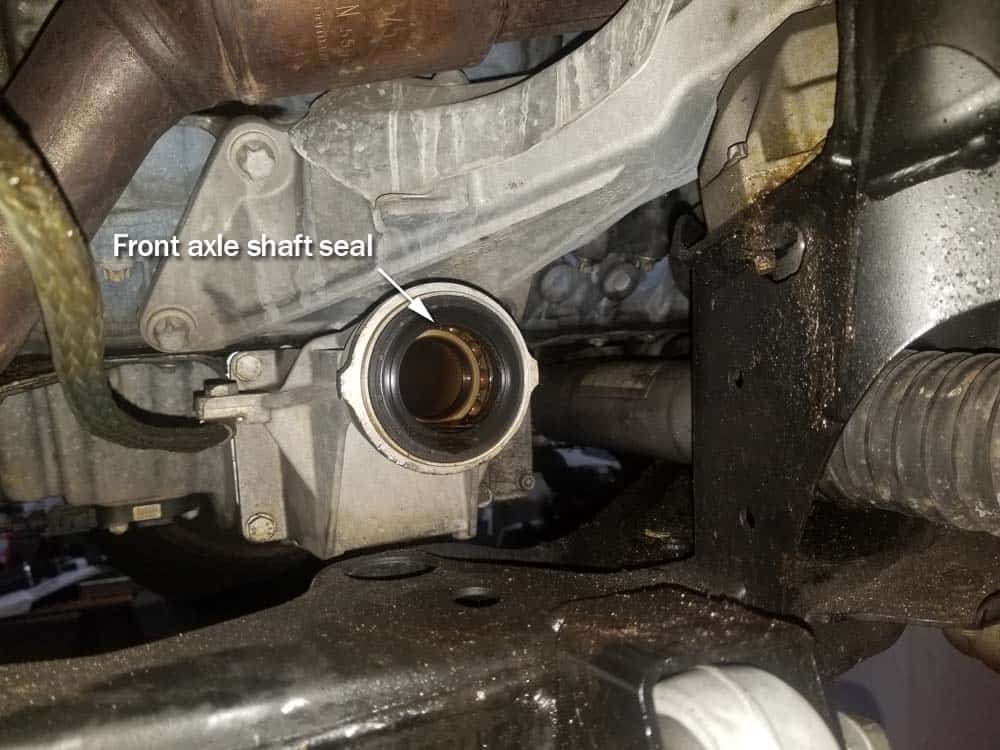
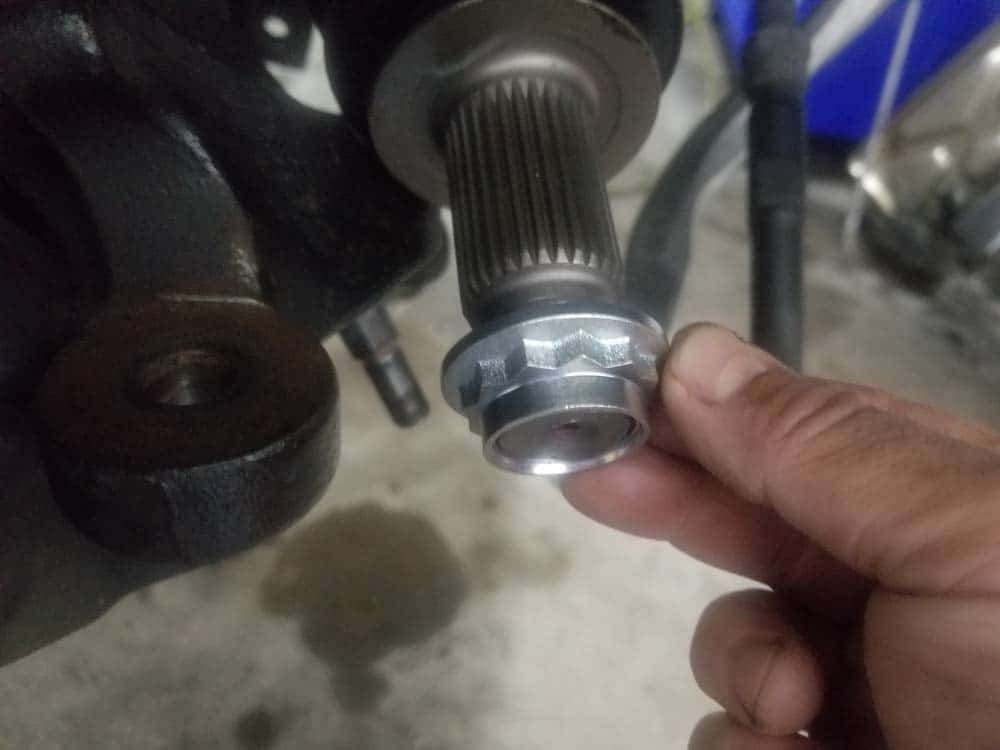
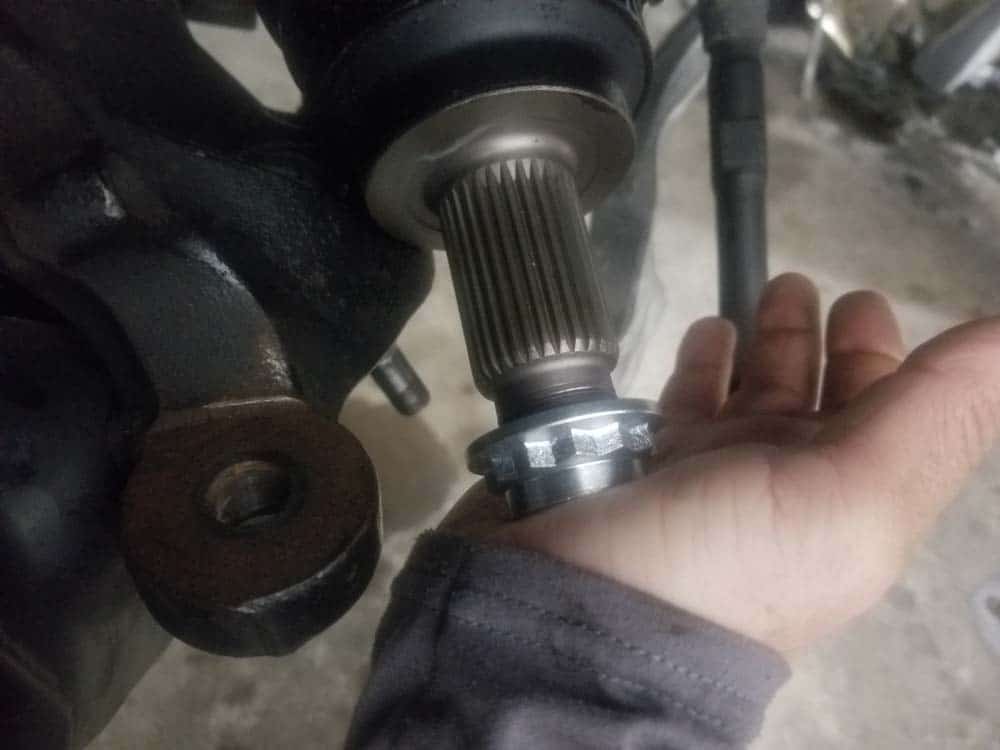
Section 5 - Replacing the BMW E60 Front Axle Shaft Seal
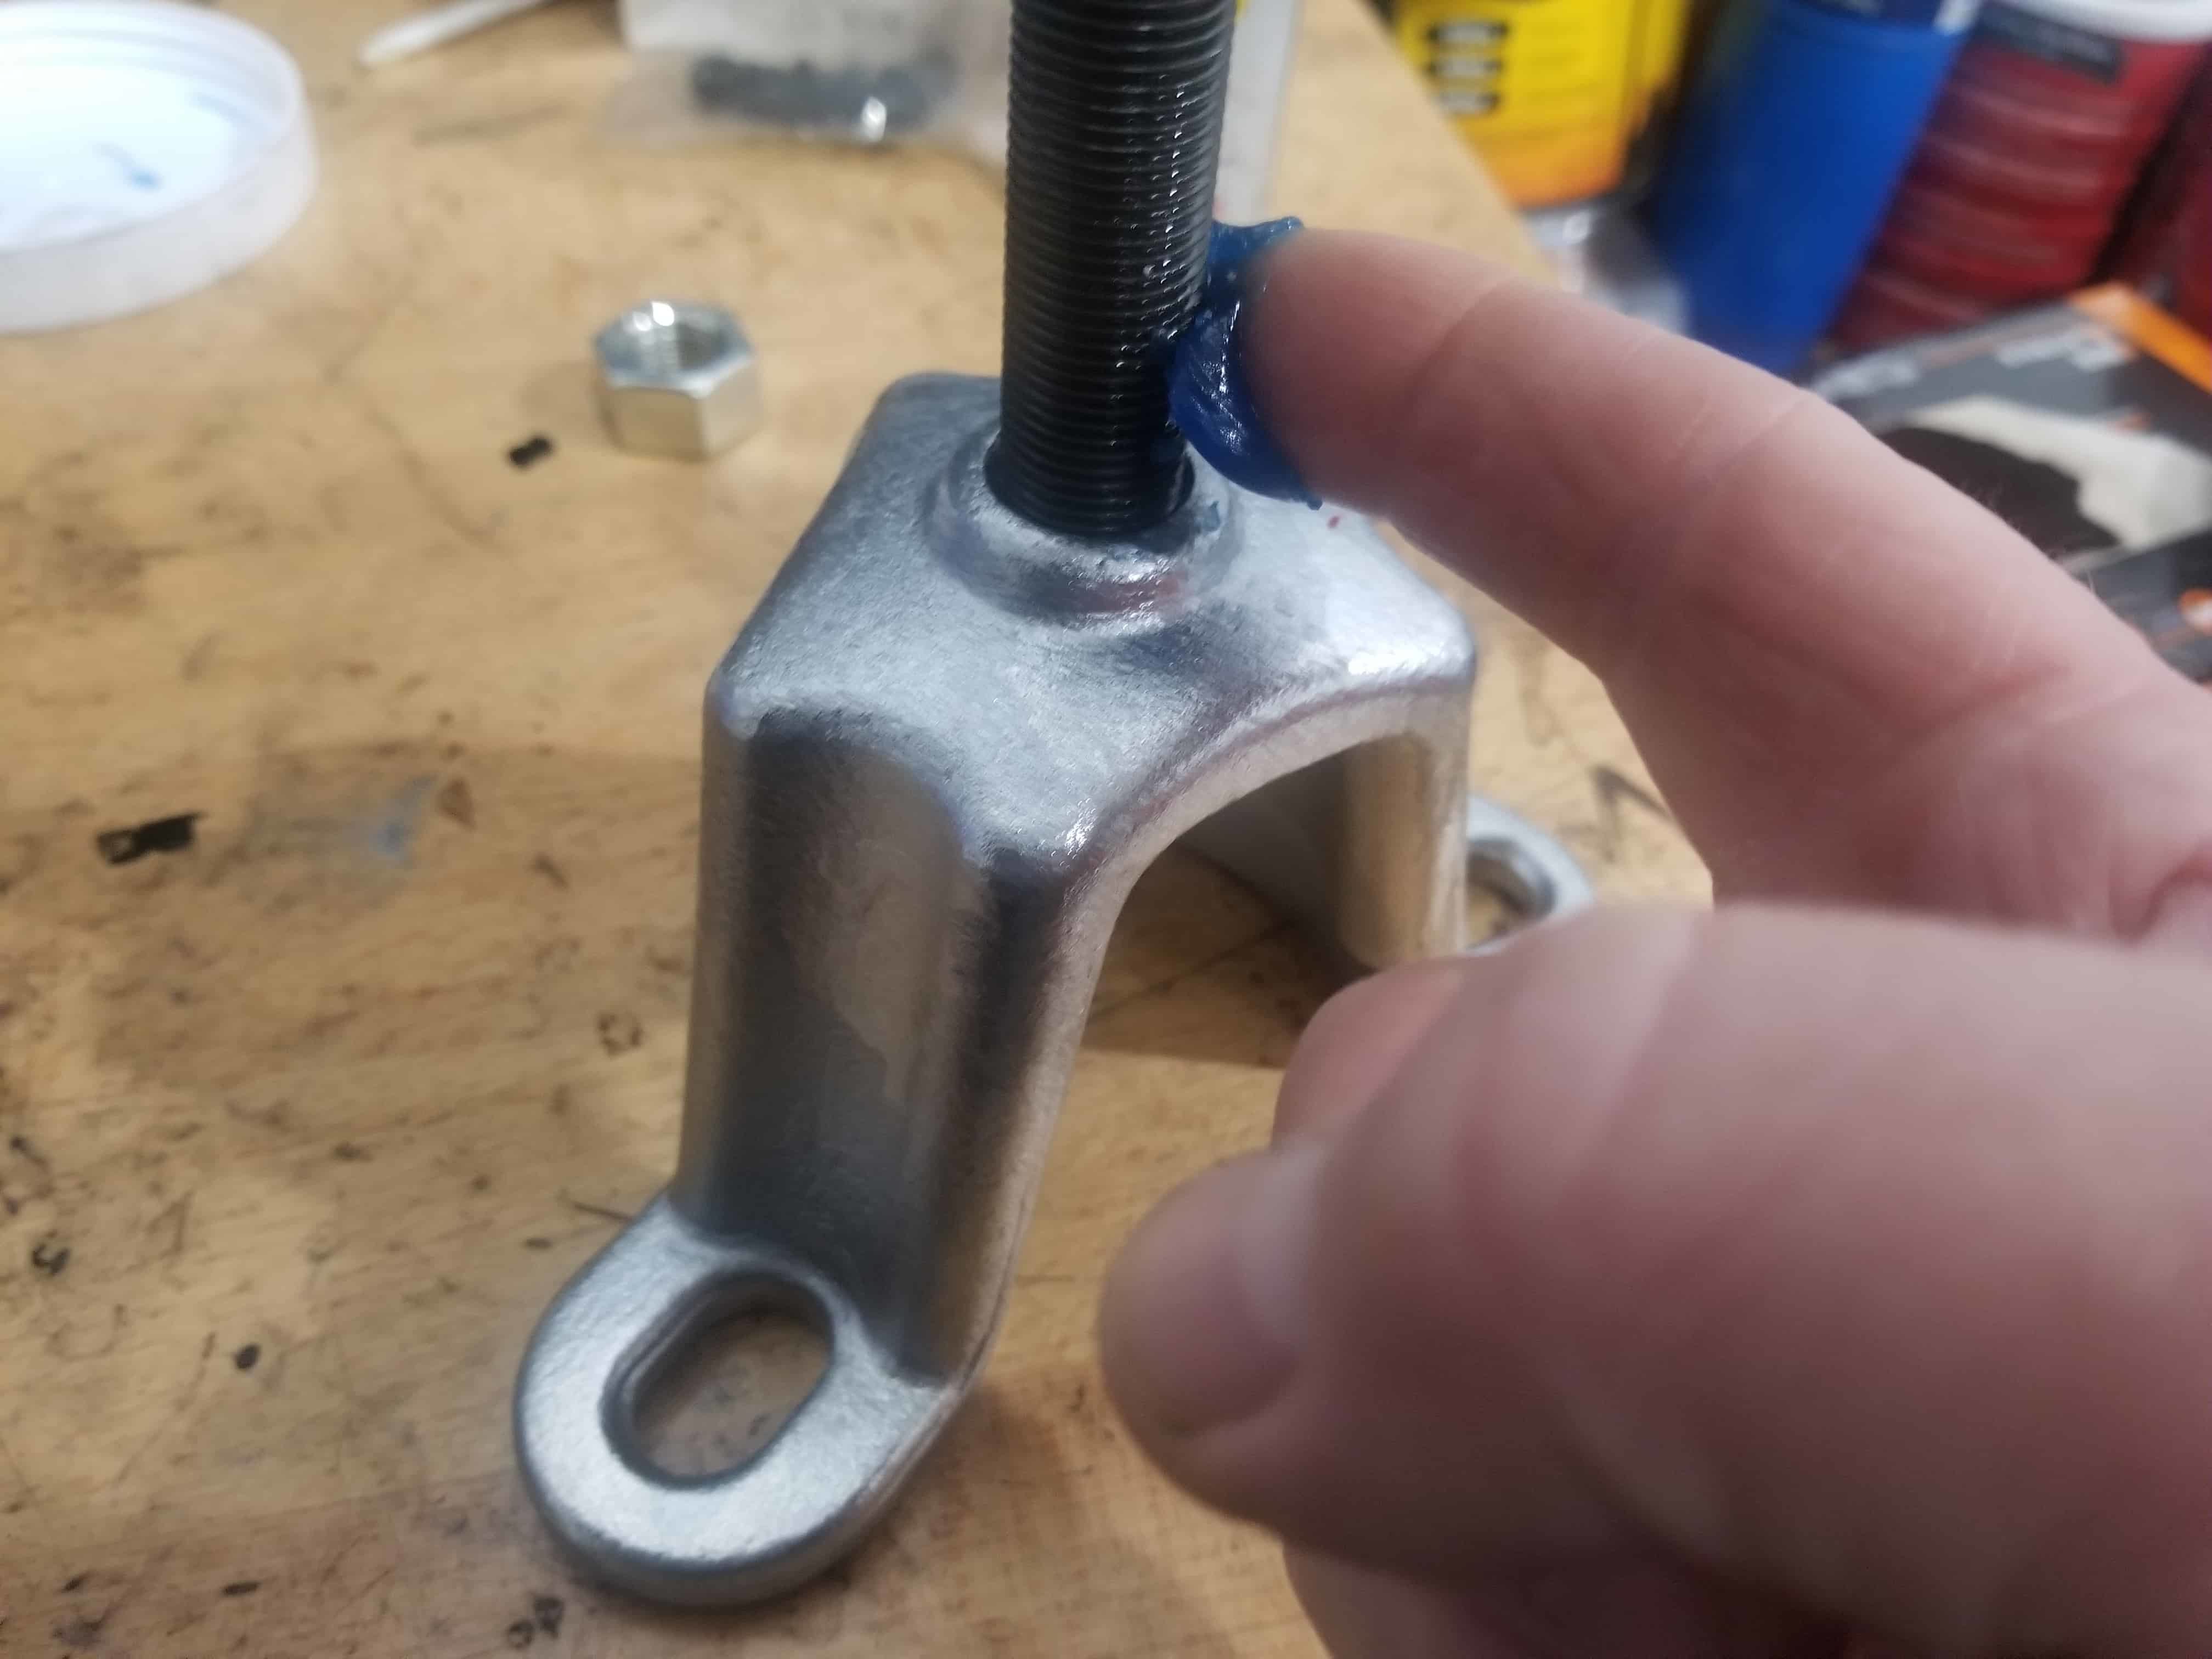
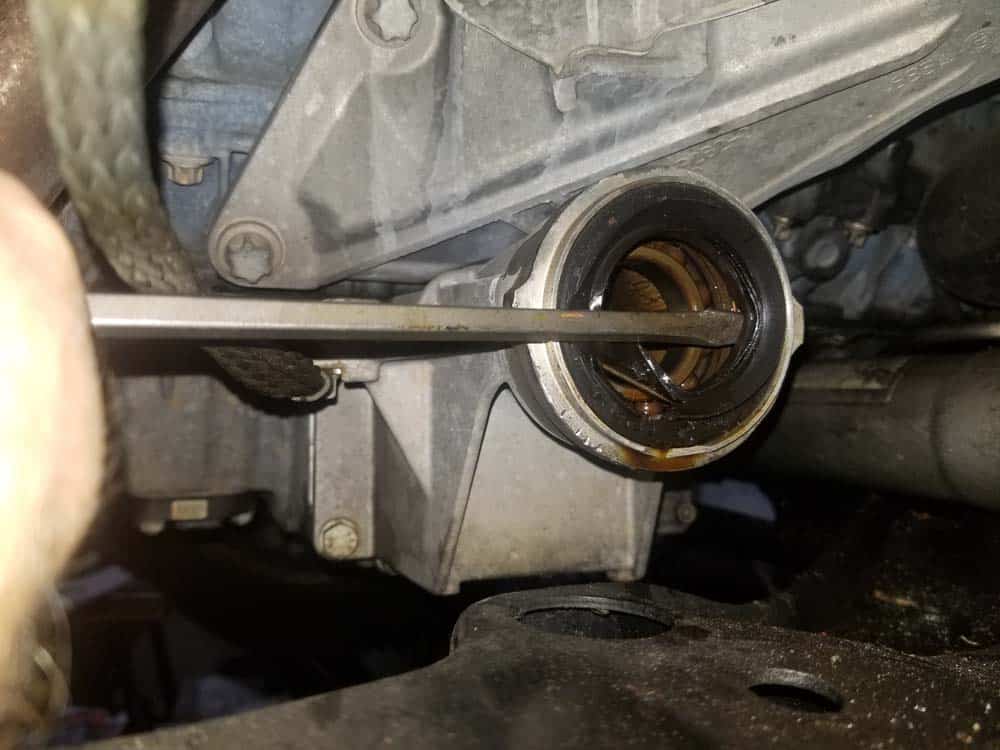
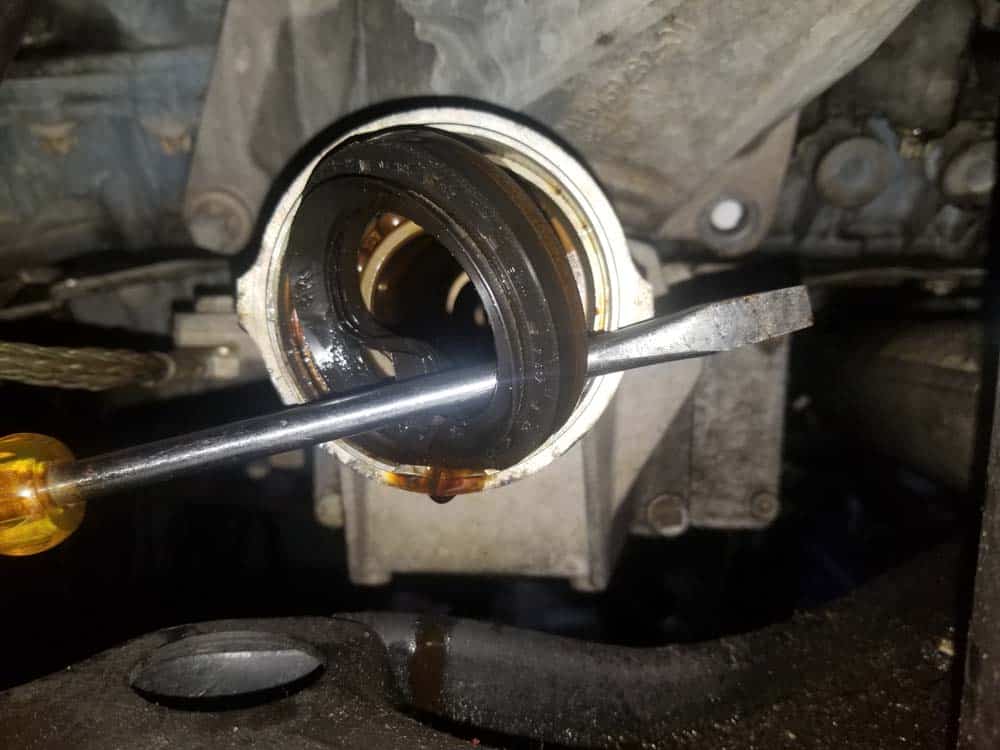
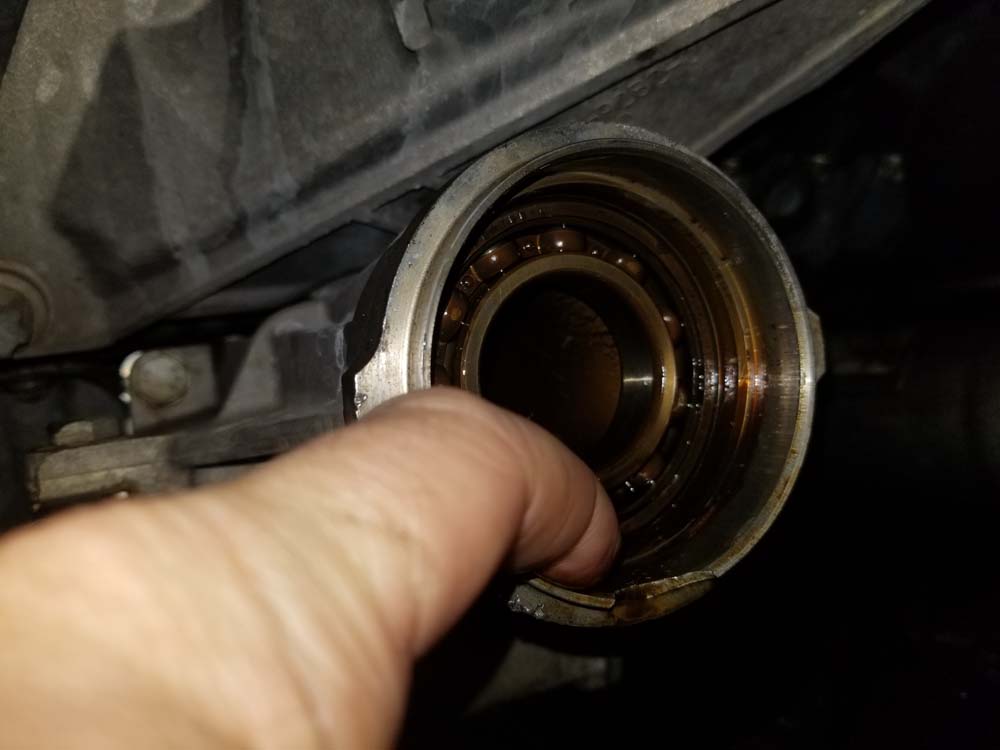
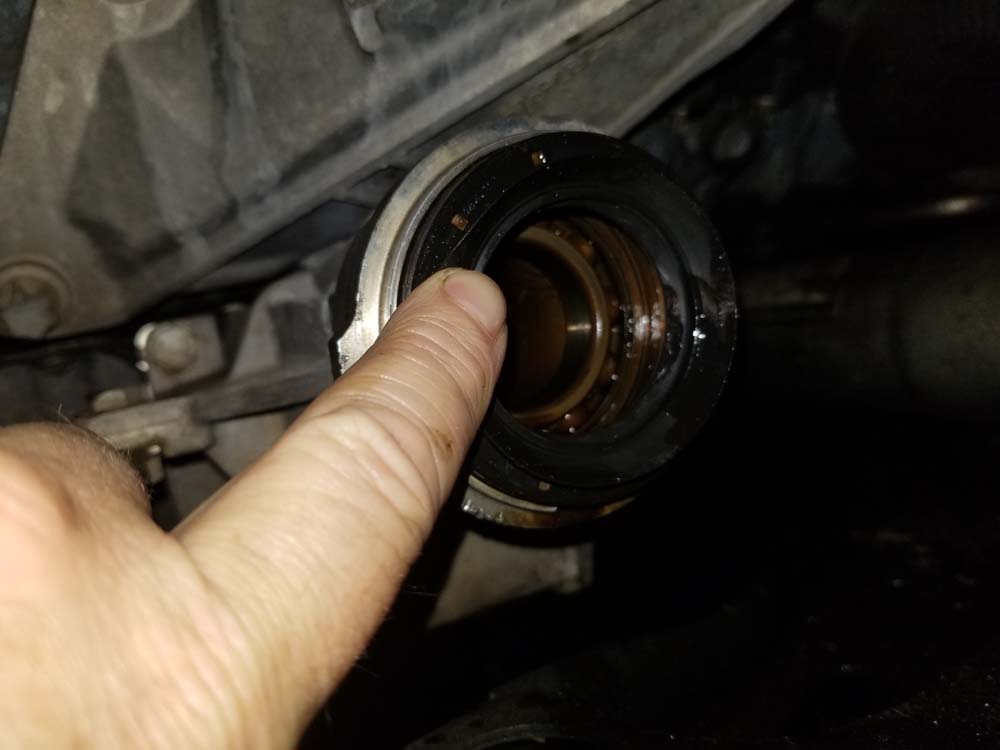
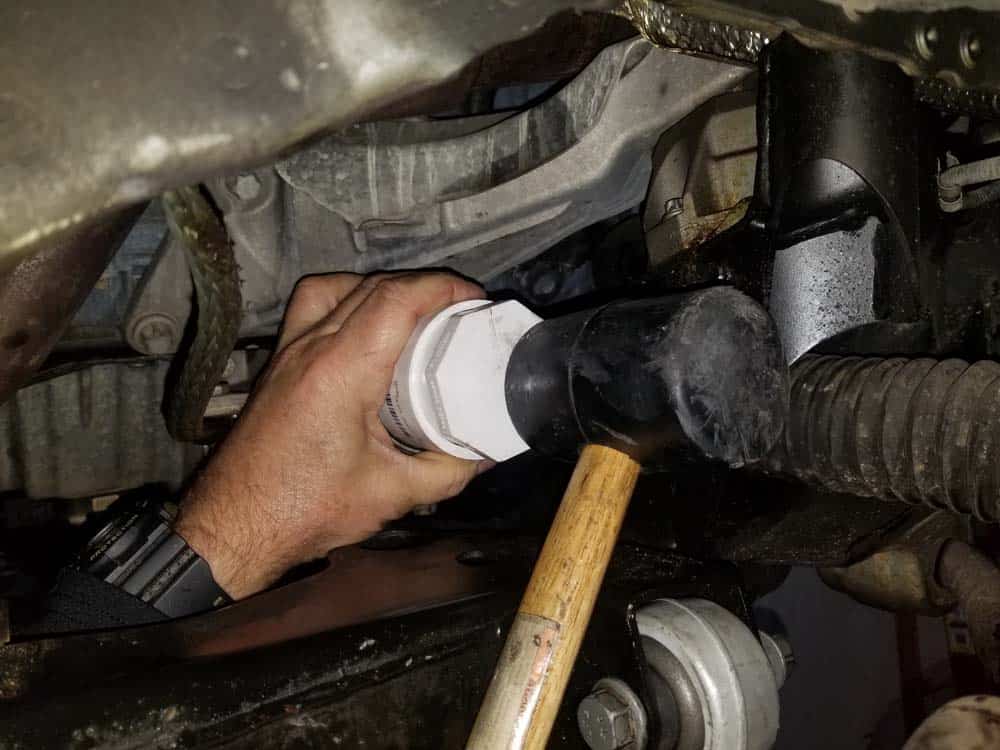
Replacing the axle shaft seal is optional, but strongly recommended by the Repair Guide. The axle shaft seal keeps oil from seeping out of the differential. They are prone to leaking with age, so it only makes sense to replace this inexpensive part now while the axle is removed. Please see our Parts section above if you need to order one. There is no reason to purchase any special tools to reinstall an axle shaft seal...you can fabricate a tool for under $4 with a 2" PVC coupling and plug from your local home improvement store as shown below.- Locate the front axle shaft seal in the side of the differential.
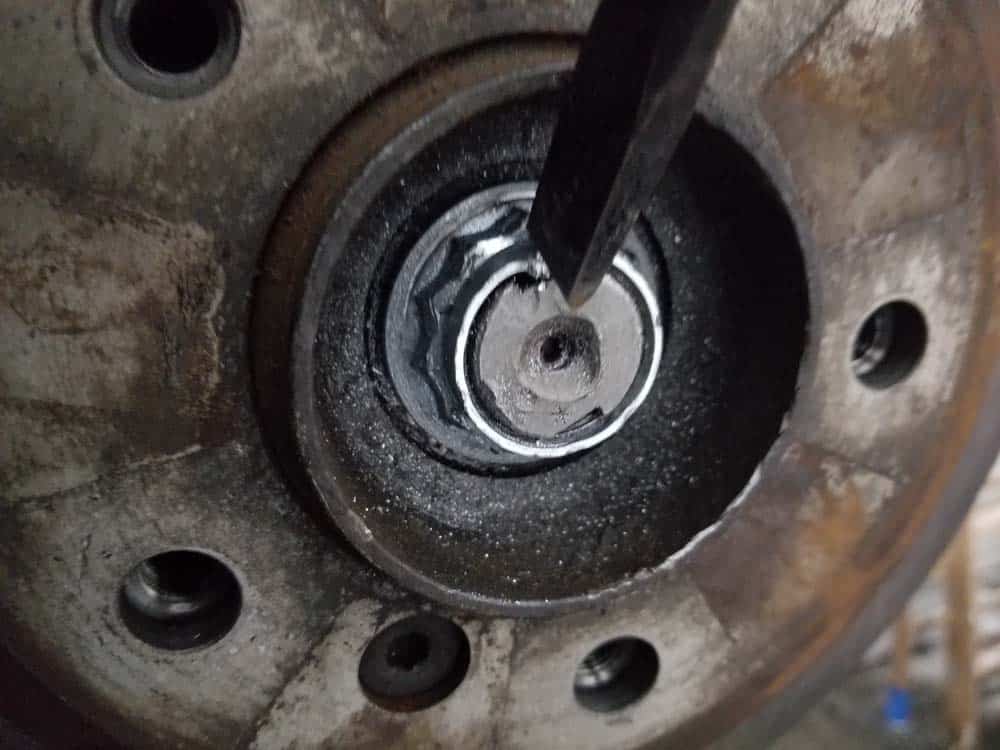
- Remove the old seal by prying it out with a large flat blade screwdriver EXACTLY as shown in the first image below. DO NOT try and pry the seal out any other way...the metal cover is extremely brittle and chips easily.
- Liberally apply fresh lubricant to the inside of the differential and the outside ring of the seal.
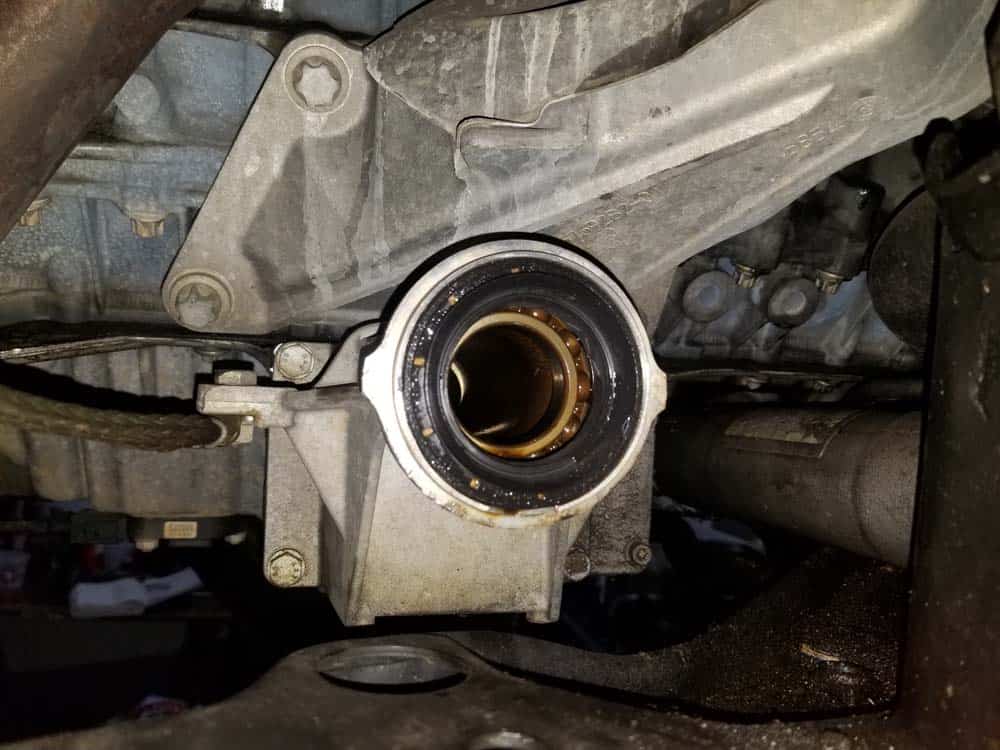
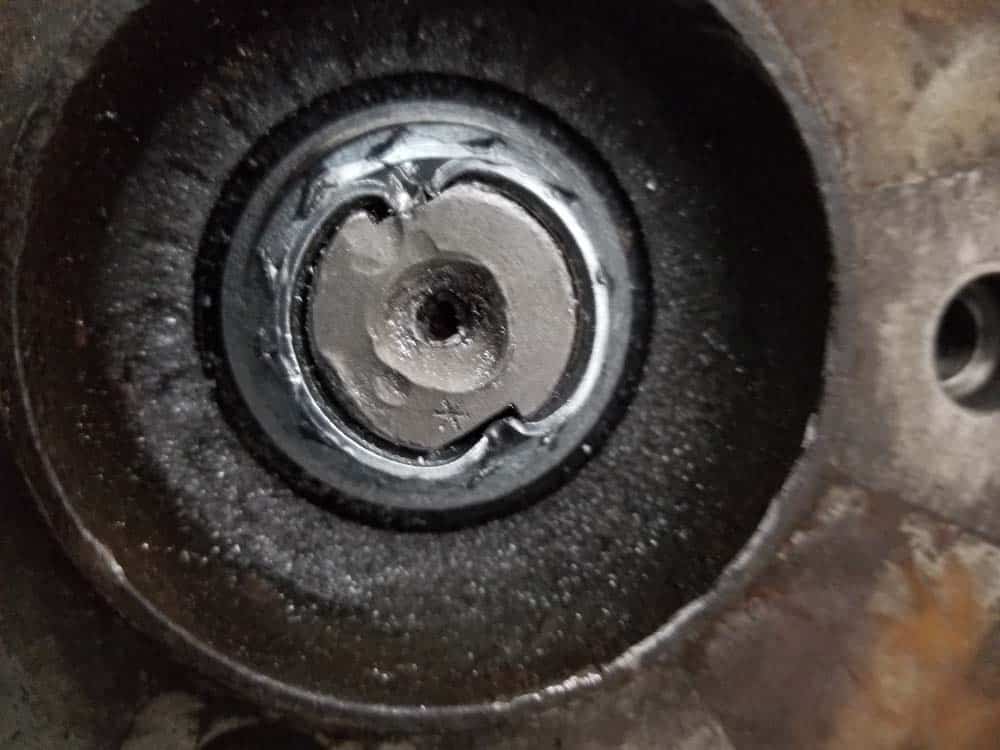
- Using your fingers, press the new seal into the differential as far as possible. Make sure the seal is lined up straight in the opening and not crooked.
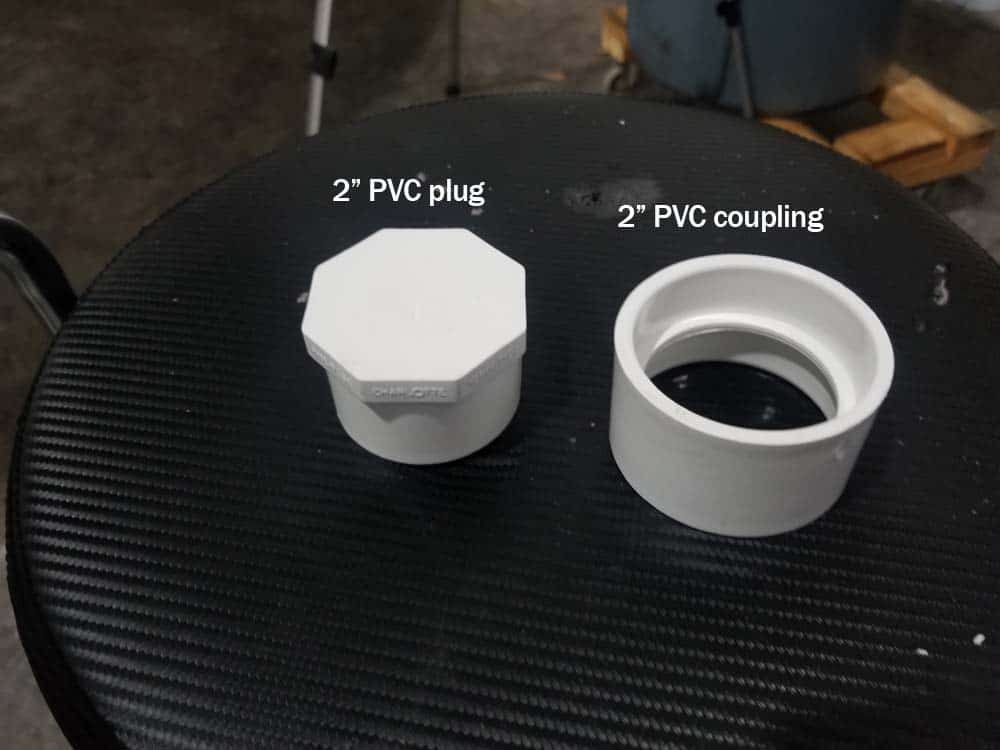
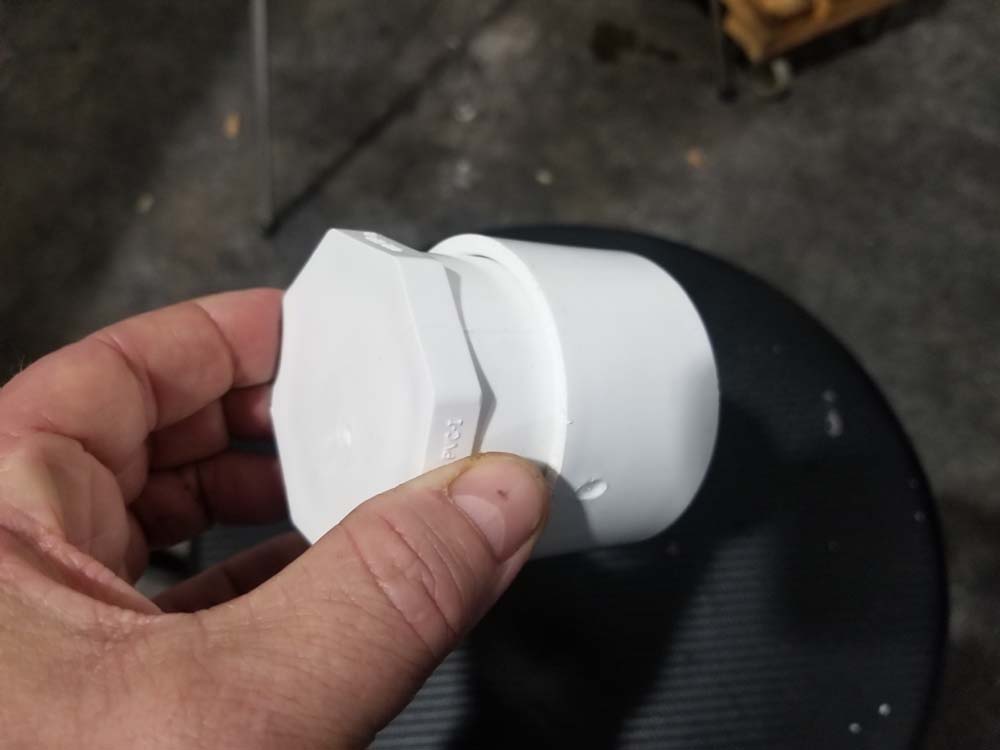
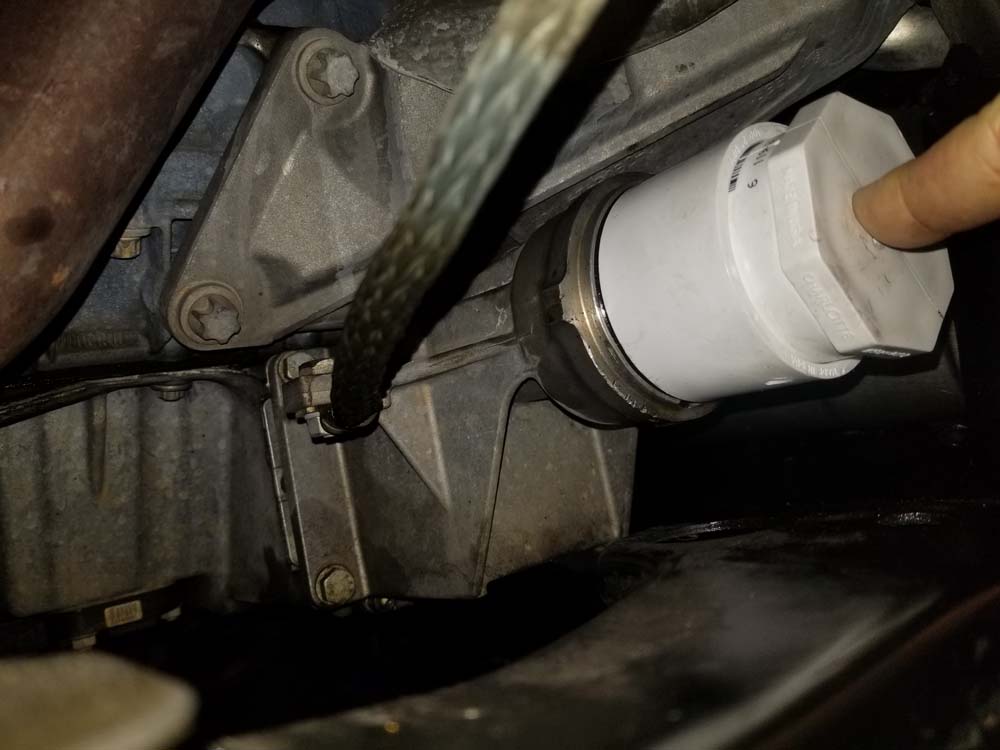
- As discussed at the beginning of this section, you DO NOT need any special tools to finish pressing the new seal into the differential. You can easily fabricate your own tool with a 2” PVC schedule 40 coupling and a 2” PVC schedule 40 plug purchased at any home improvement store or our Tools and Supplies list above (see image below). Simply install the plug into the end of the coupling as shown below - you do not have to glue it in.
- Line up the PVC tool on the seal as shown below. Slowly hammer the seal into the differential with a rubber mallet. Hammer around the edges of the tool in circle so equal pressure is put on the seal as it pushes into the differential. Continue lightly hammering until the seal is all the way in.
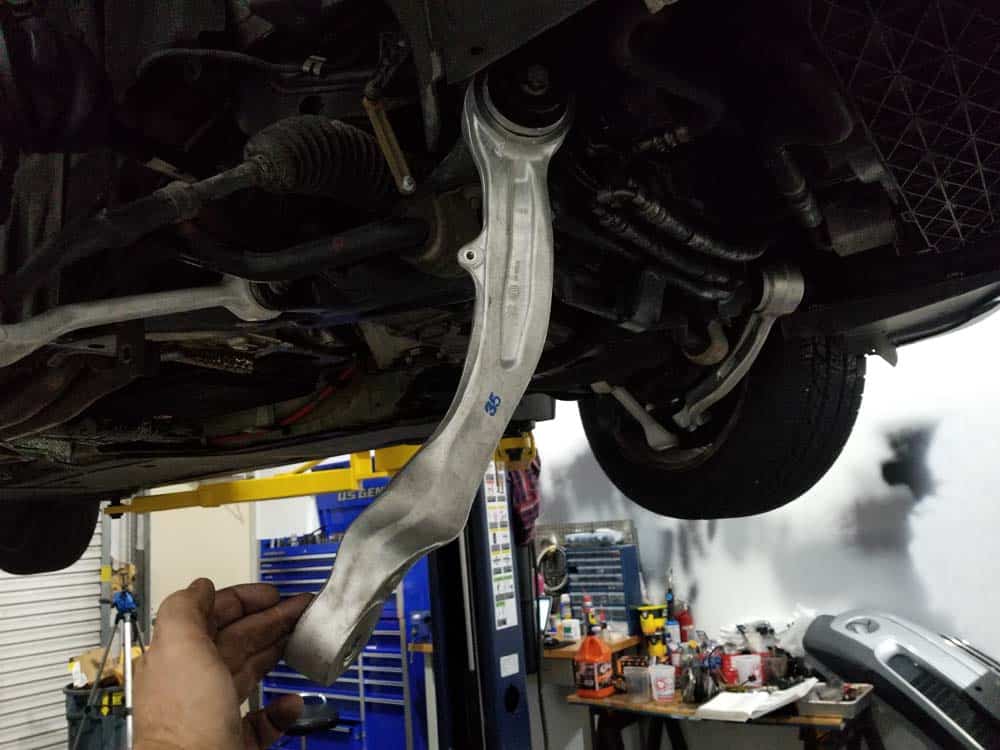
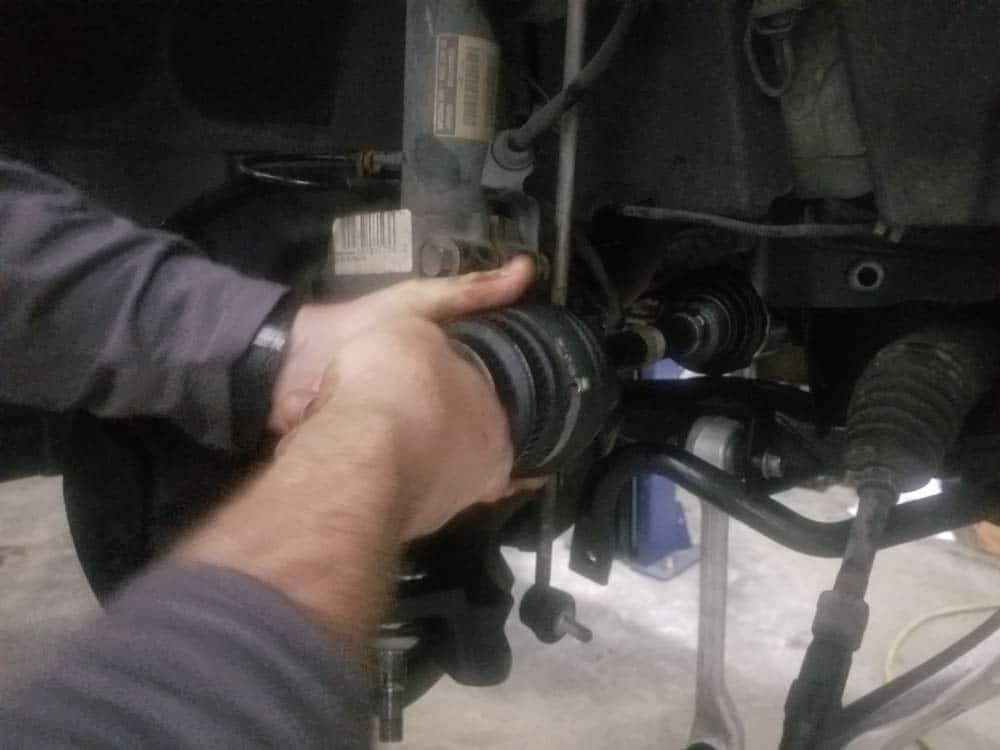
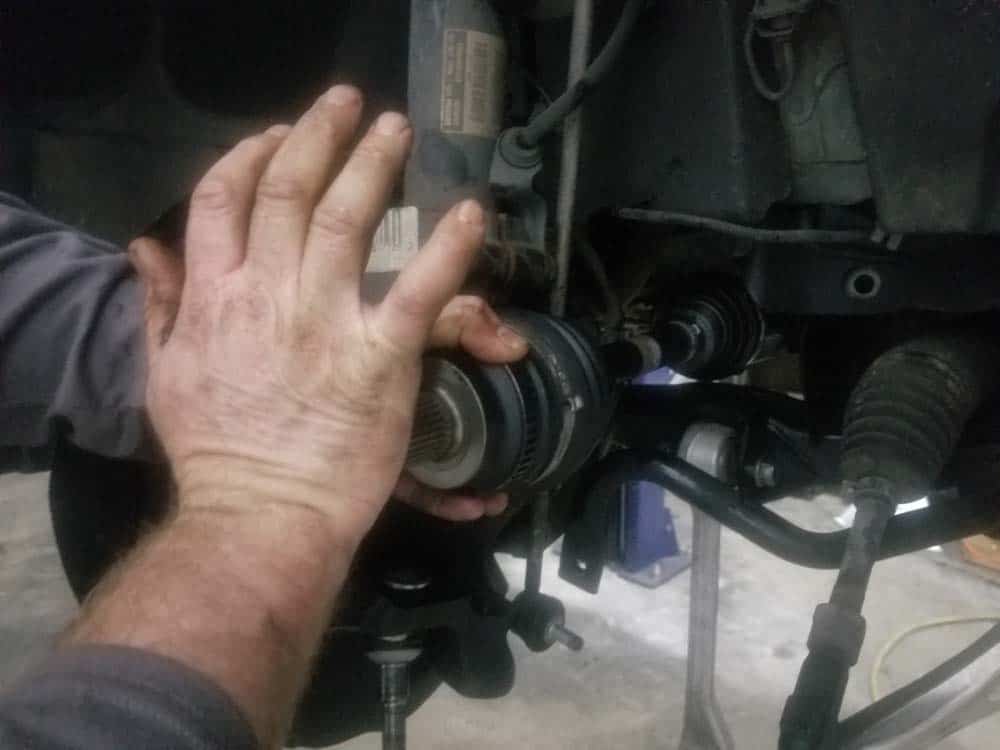
Section 6 - Installing the New BMW E60 Front Axle Shaft
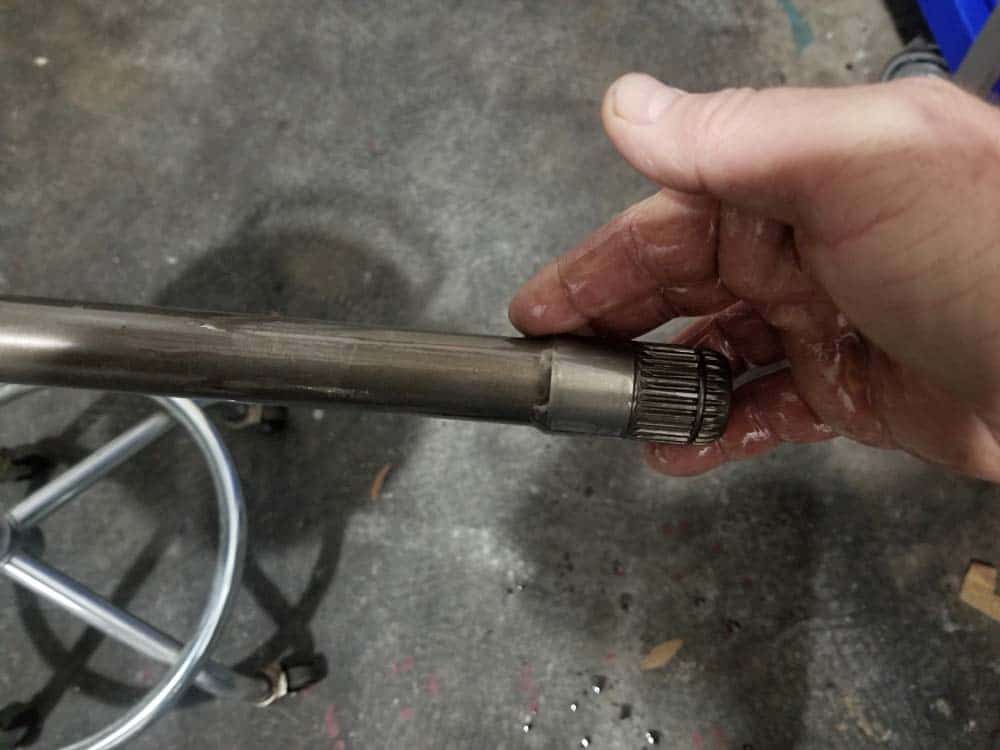
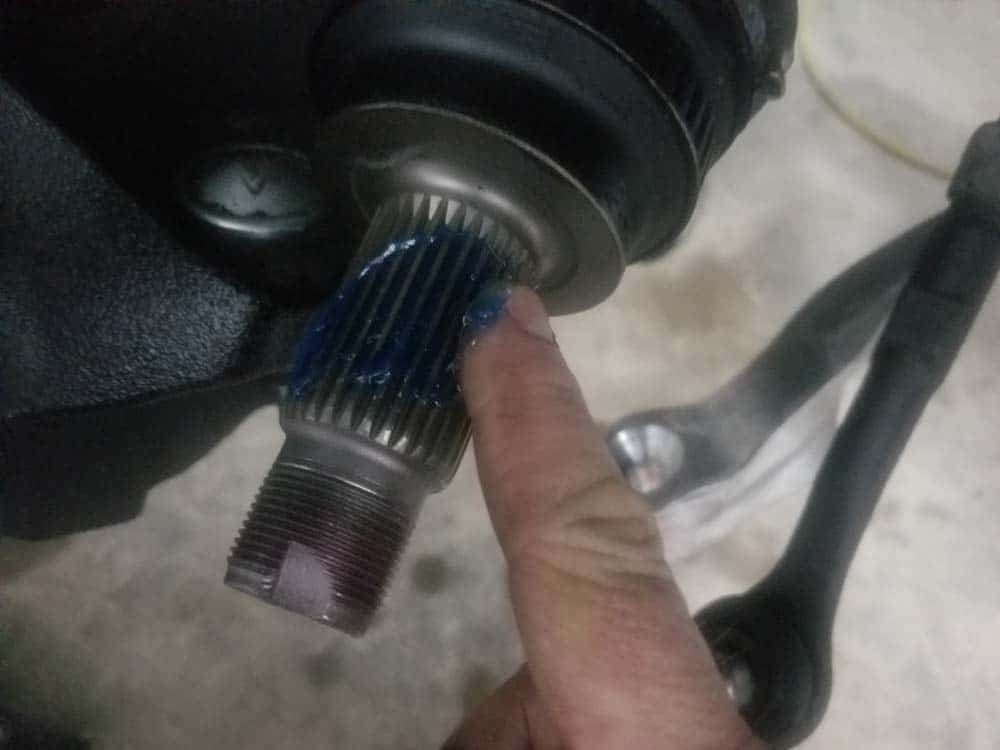
Installing the drive axle back into the differential and wheel hub can often be difficult. Years of corrosion can build up on the hub splines, causing the drive axle to bind up and often making it impossible to get the new axle nut on. Getting the locking clip to engage inside the differential can be equally challenging. If you follow our instructions below, you will be able to get the new axle shaft installed with minimal effort.- Liberally apply clean differential lubricant to the shaft of the new drive axle, paying particular attention to the splines and the lock ring at the end of the shaft. Only use a quality 75w90 lubricant from your local parts store or from our parts list above. Avoid using motor oil, transmission fluid, grease or any other type of lubricants that do not match what is already in the differential.
- Slowly install the new drive axle into the differential. Be aware that the splines on the end of the axle shaft must line up with gears inside the differential. Once the splines are lined up, push the axle into the differential as far as it will go. You will most likely not be able to get the locking clip to snap into place...it is very tight and will need a bit of force to get it to compress (see next step). Turn the axle back and forth a couple times to make sure the splines are lined up and properly engaged in the differential gears.
- The axle shaft lock ring should snap into the differential gears if you follow these easy steps. First, thread the axle nut on the end of the axle shaft so you have a nice solid place to push.
- Straighten out the axle and push it in so it compresses. With the axle straight and compressed, forcefully strike the end of the axle with the palm of your hand until the lock ring snaps into place in the differential (it took us three strikes). NEVER use a hammer or any other tool to strike the end of the axle shaft. ALWAYS keep the shaft straight...never strike it when it is at an angle.
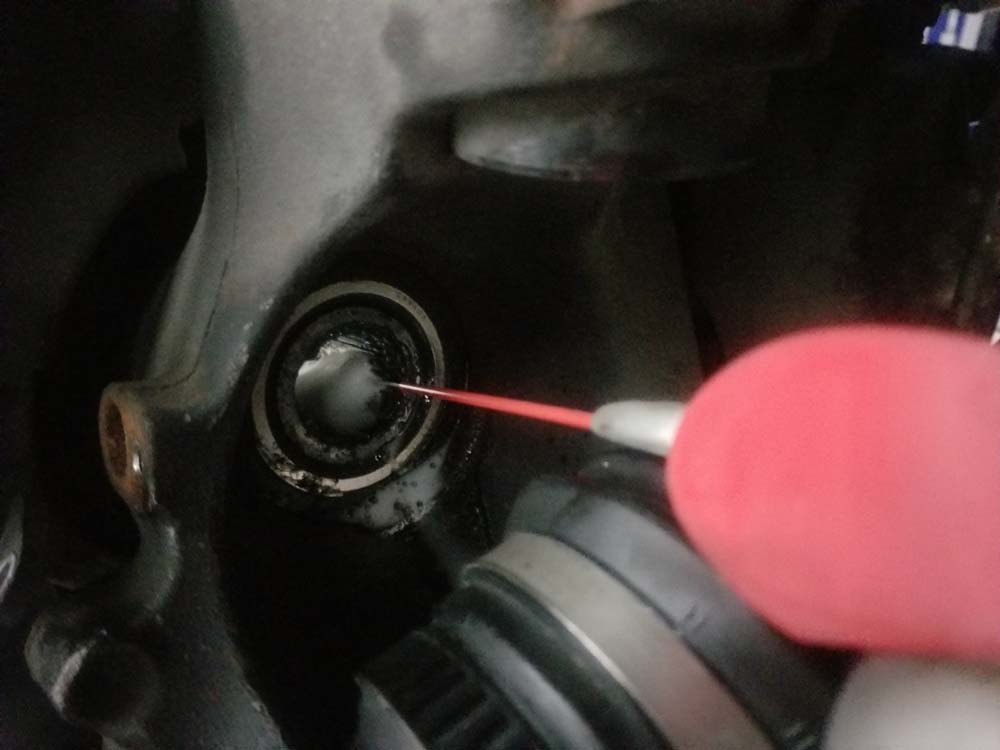
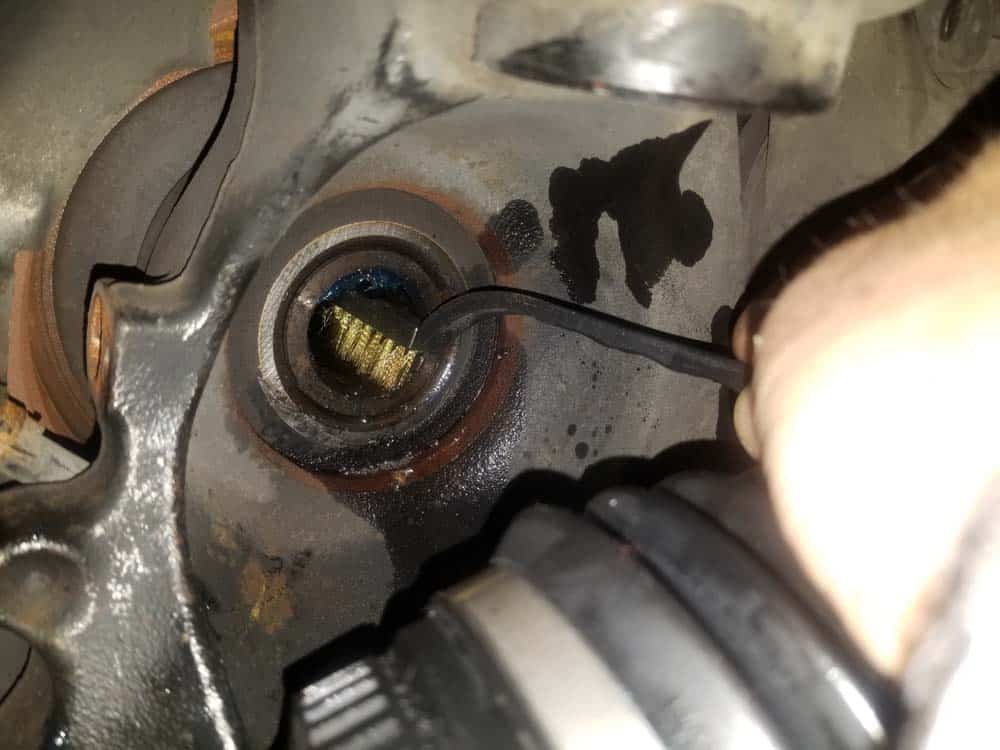
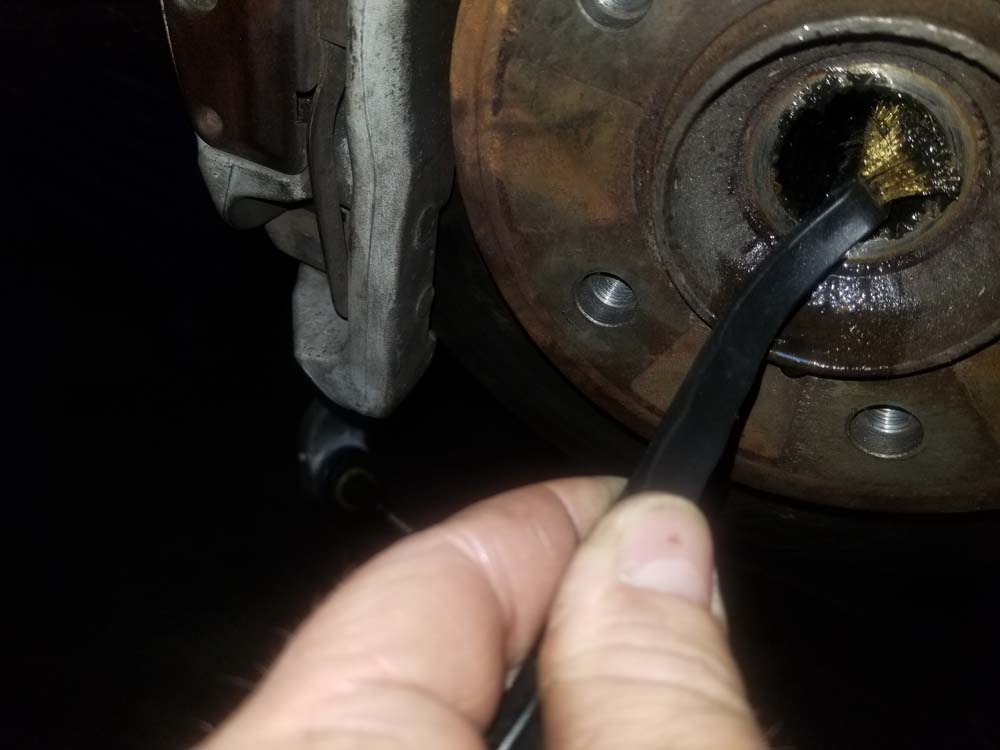
- Next, liberally apply a penetrating lubricant like Blaster PB to the hub splines. Use a metal brush to thoroughly clean the splines. Repeat this several times to make sure the hub splines are free of any dirt and corrosion.
- Apply a generous amount of waterproof grease to the hub splines with your finger.
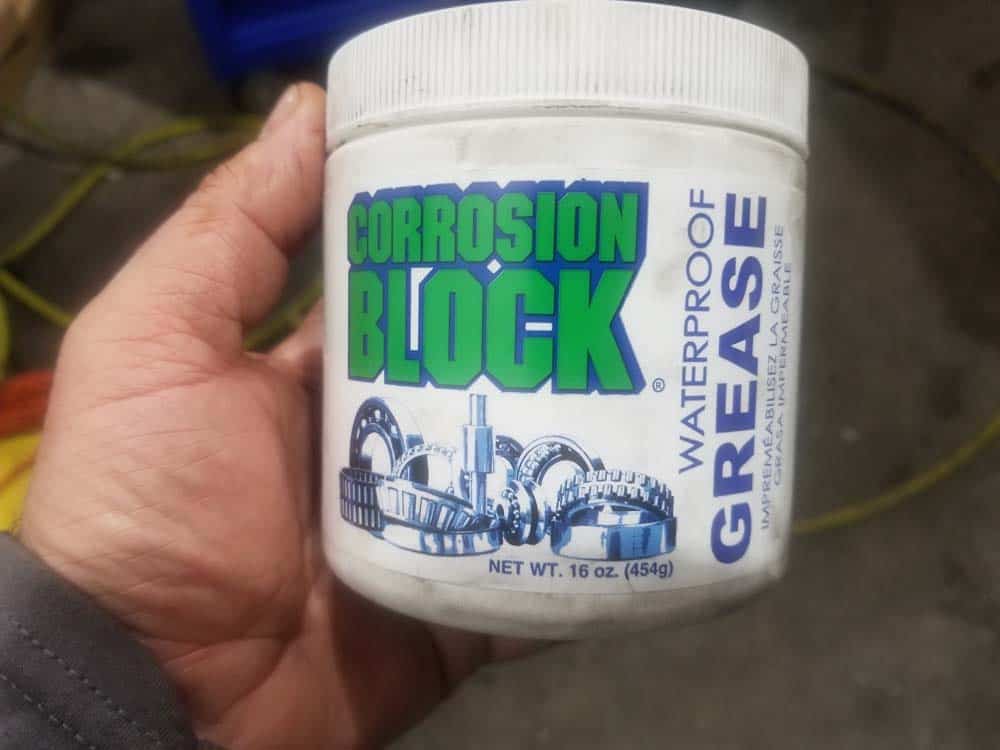

- Next, liberally apply waterproof grease to the splines on the axle shaft. Try not to get any grease on the axle nut threads...wipe off any excess that finds their way onto them. The axle nut can possibly become over-torqued if there is an excess of lubrication on its threads.
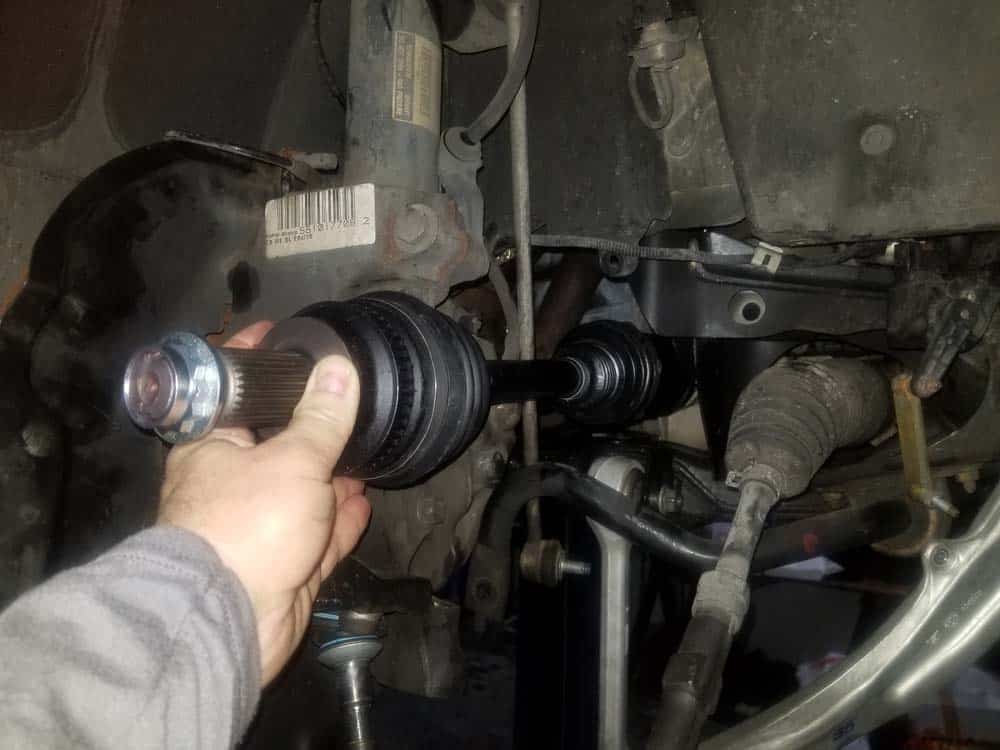
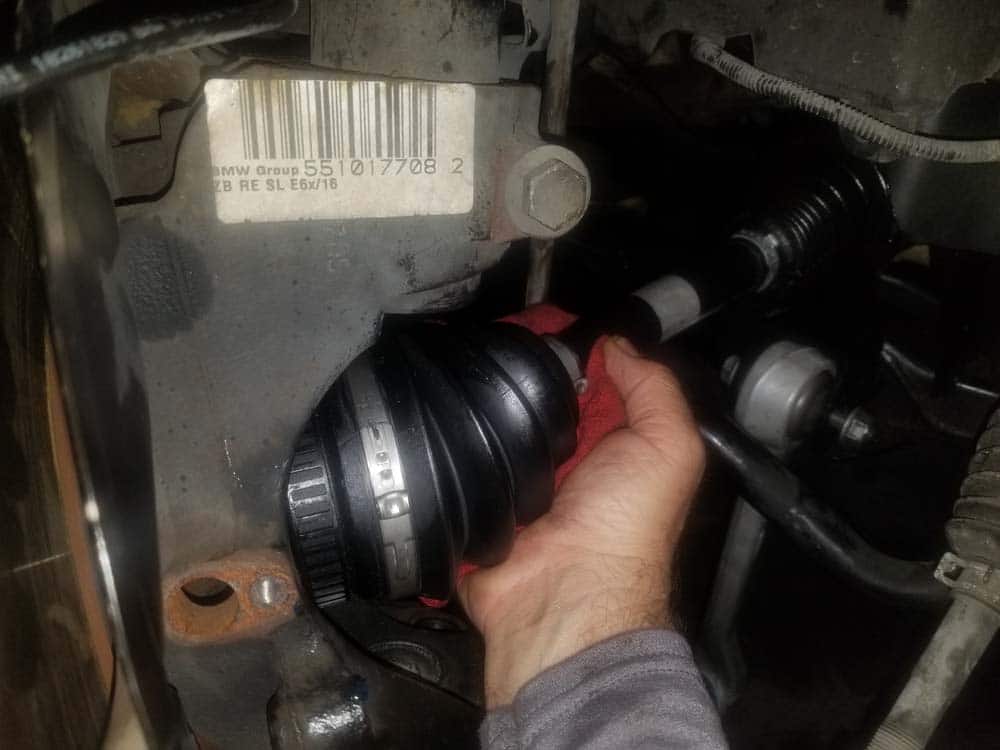
- Grab the steering knuckle and pull it away from the car. Line up drive shaft and insert it into the hub. If the splines will not line up, rotate the axle with your hand until they do. Push the axle as far as you can into the hub. You should be able to get enough in so about ⅛” protrudes from the wheel hub.
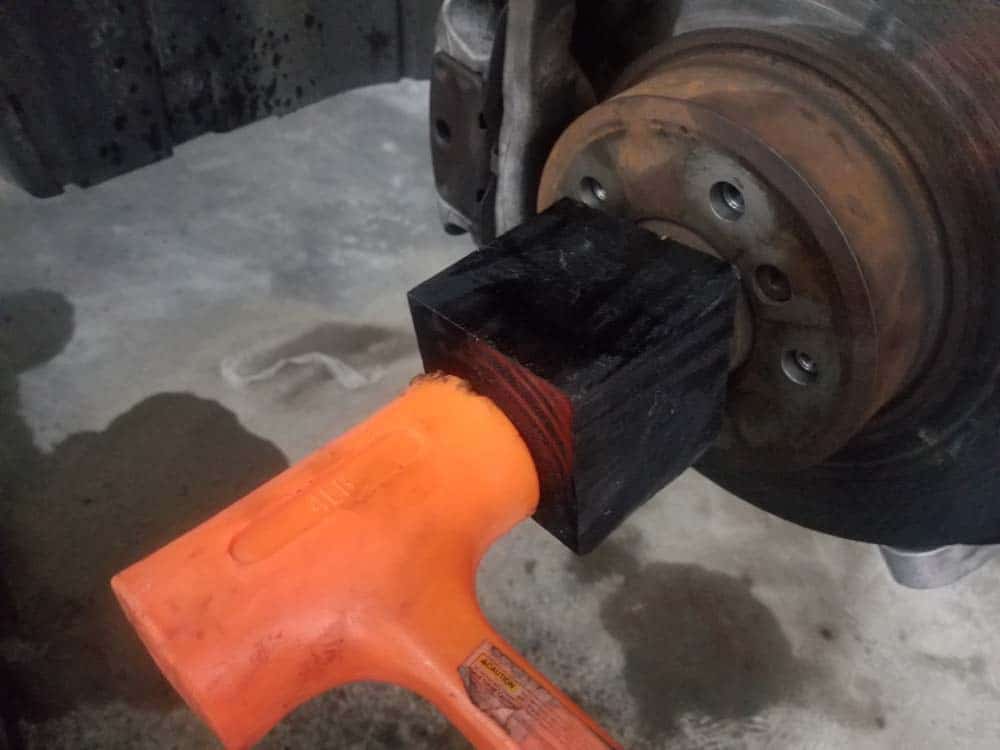
- Using a 4lb hammer and a block of wood strike the wheel hub. Continue to forcefully strike the block of wood until the axle threads protrude out enough to get the axle nut on 1/2 turn. Use a rag to thoroughly wipe off any grease from the threads. Install the axle nut hand tight.
- Use a 36mm (or 32mm on some newer axle nuts) 12 point socket to slowly tighten the nut. Keep tightening slowly until the axle is pulled all the way into the hub. DO NOT torque the axle nut yet. This will be done after the car is lowered on its wheels.
Section 7 - Final Reassembly
Final reassembly of the vehicle after installing the new axle is very straightforward except for one extra important step; the front end of the vehicle must be “loaded” when you torque the control arm bushing bolts. We know this sounds confusing, but it is actually very simple. You must put the full weight of the car on the front wheels before torquing the control arm bushing bolts or the bushings can bind up, greatly reducing their service life and causing possible damage to the front end of the vehicle. You DO NOT have to load the front end when torquing the control arm ball joint nuts.- Reinstall the splash guard inside the fender well using the 8mm screws.
- Install the wheel speed sensor back into the steering knuckle and torque its mounting bolt to 8 Nm (6 ft-lb).
- Reinstall the lower control arm ball joint and its mounting nut. Torque the mounting nut to the following value: 165 Nm (122 ft-lb). ***This may seem like a lot of torque, but it is the correct value for the M14 ball joint nut. DO NOT torque the lower control arm bushing bolt yet...that will be done in step 7 below.
- Reinstall the upper control arm (tension strut). If working on the right wheel, replace the headlight level sensor on the control arm. Torque the mounting nut to the following value: 165 Nm (122 ft-lb). Once again...we know it's a lot of torque but the value is correct. DO NOT torque the upper control arm bushing bolt yet...that will be done in step 7 below.
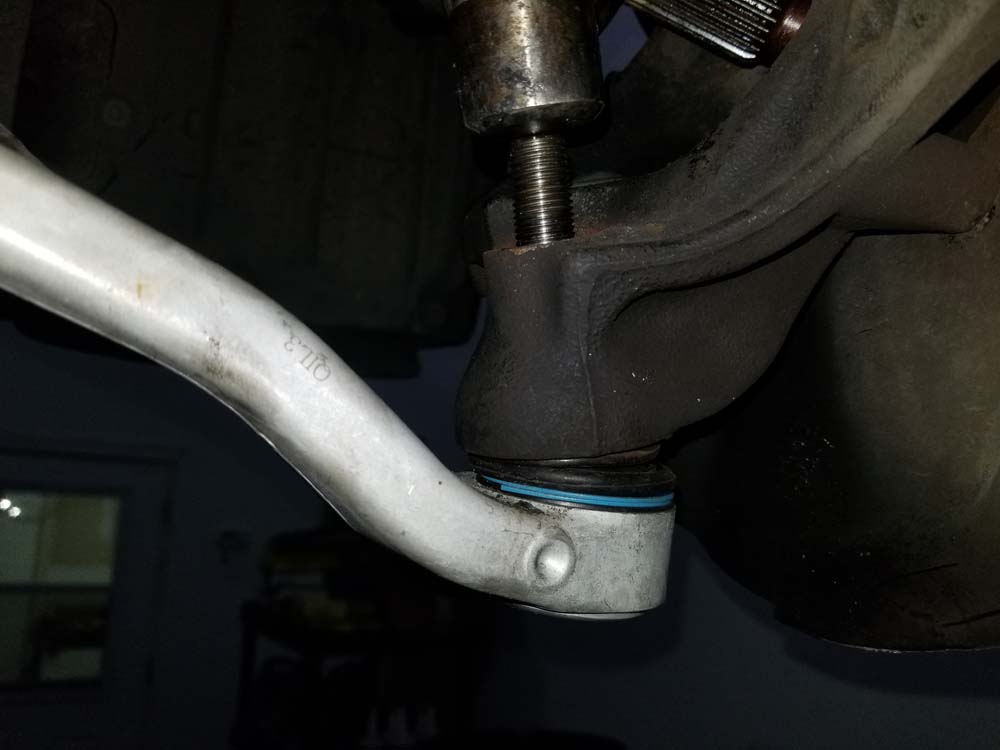
- Install the tie rod back on the steering arm and torque the ball joint nut to 165 Nm (122 ft-lb).
- Reinstall the sway bar link on the steering knuckle and torque its mounting bolt to 65 Nm (48 ft-lb).
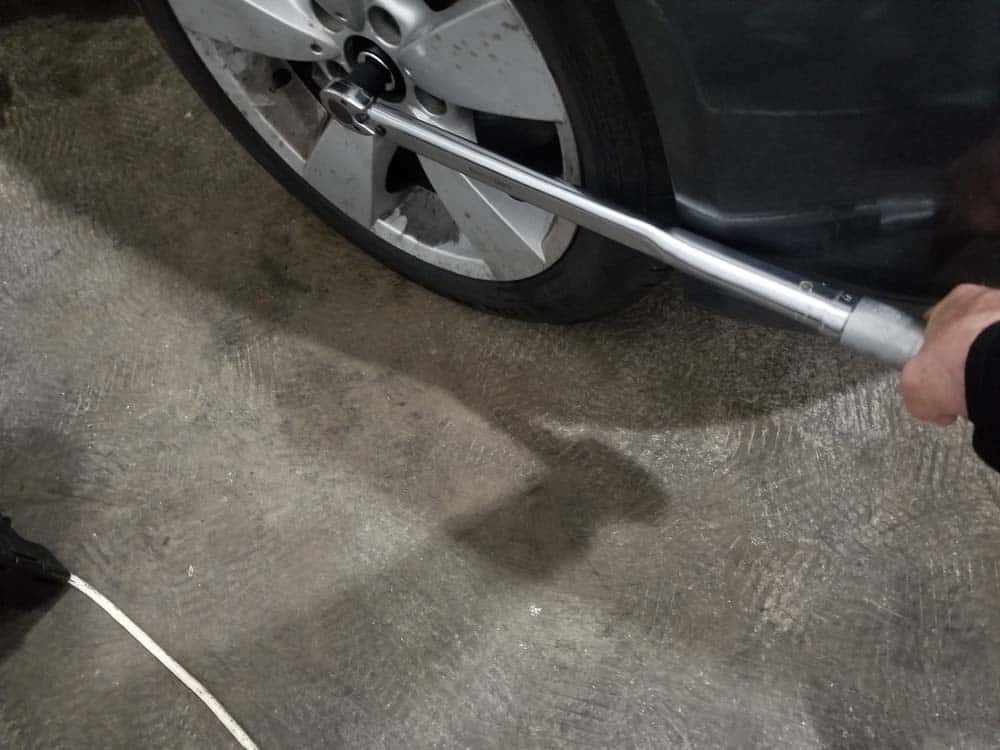
- Put the wheel back on the car and torque the lug nuts to 120 Nm (90 ft-lb).
- If you have a torque wrench with a capacity of over 300 ft-lb, torque the axle nut to 420 Nm (310 ft-lb). Since most "reasonably priced" torque wrenches only go to 300 ft-lb, then you may have to slightly cheat on this one; we suggest just torquing the axle nut to 300 ft-lbs and calling it a day.
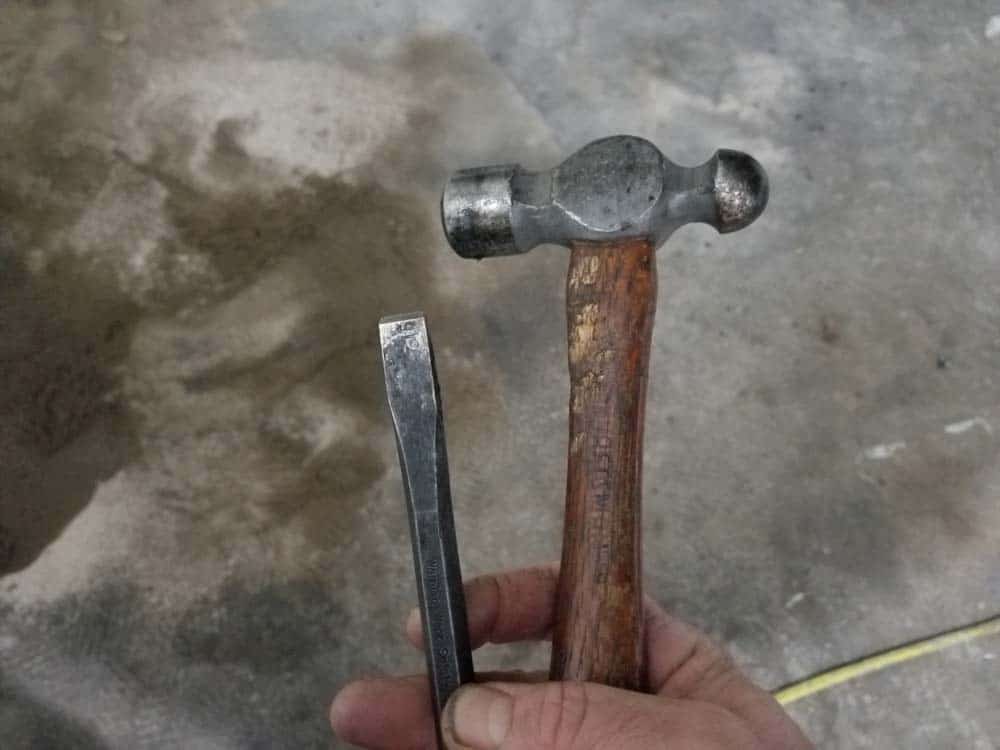
- As discussed at the beginning of this article, the new axle nuts do not have locking tabs...they must be made by the mechanic with a hammer and chisel. This is an extremely simple procedure. Using a ball peen hammer and a chisel, simply bend the locking ring collar in at the slots in the axle shaft. This will prevent the axle nut from ever loosening on the drive shaft.
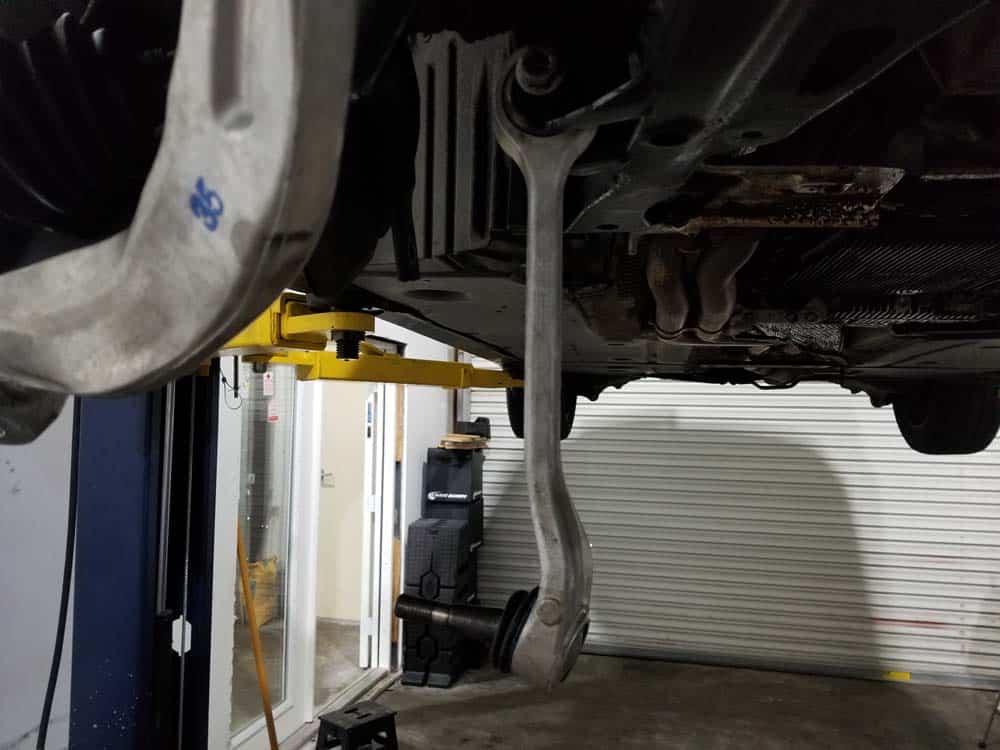
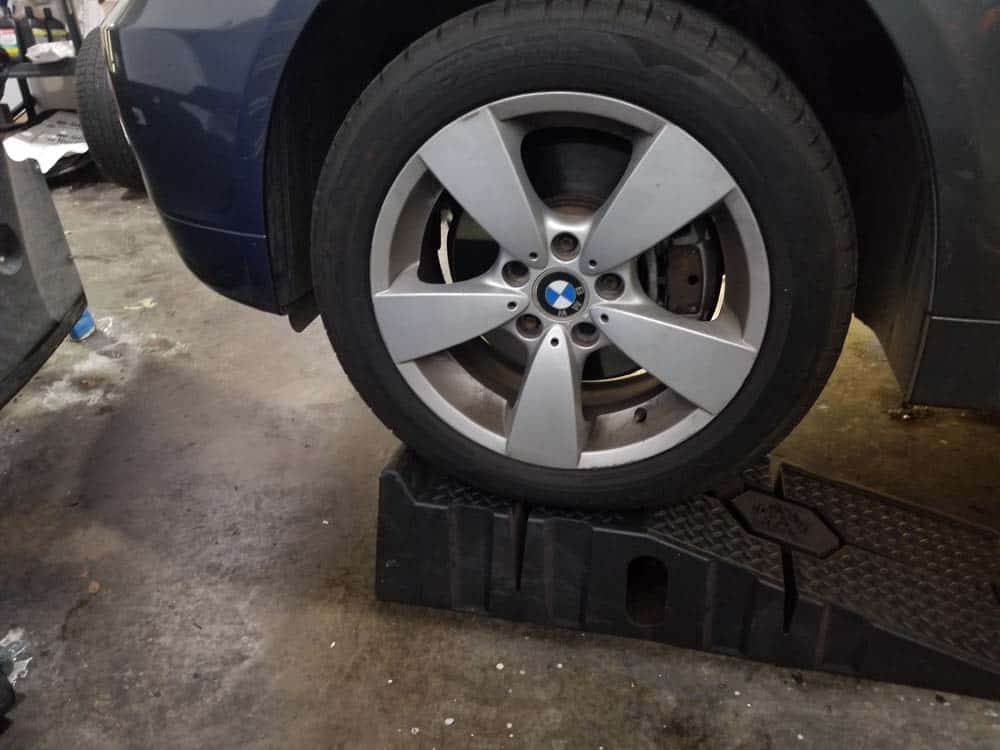
- In order to torque the control arm bushing bolts, you must "load" the front end of the vehicle. This simply means the full weight of the car must be on the wheels before you torque the bolts. Use wheel ramps under the front tires (or jack stands under the steering knuckles if car is on a lift) so you have enough room to safely get under the car. Torque both upper and lower control arm bushing bolts to 100 Nm (74 ft-lb) + 90 degree turn.
- Replace the 8mm bolt and the six M10 bolts securing the skid plate to the bottom of the vehicle. Torque to six M10 bolts to 66 Nm (48 ft-lb).
- Replace the front and rear belly pans.
BMW E60 Front Axle Shaft Repair Finished