
Affiliate link disclosure – The BMW Repair Guide uses affiliate links in their site. For more information on affiliate links, please click here.
Repair Summary
The following article gives detailed instructions on replacing the air conditioning blower motor on a BMW E60 5 series car. Even though we have used a 2010 BMW 528i to perform this repair, this article can be applied to any BMW E60 5 series vehicle with minor modifications.
See all vehicles this article applies to
E60 5 Series M5
E60 5 Series 523Li
E60 5 Series 550i
E60 5 Series 545i
E60 5 Series 540i
E60 5 Series 535d
E60 5 Series 530xi
E60 5 Series 530xd
E60 5 Series 530Li
E60 5 Series 530i
E60 5 Series 530d
E60 5 Series 525i
E60 5 Series 525xi
E60 5 Series 525Li
E60 5 Series 525d
E60 5 Series 523i
E60 5 Series 520i
E60 5 Series 520d
E60N 5 Series 550i
E60N 5 Series 525xi
E60N 5 Series 540i
E60N 5 Series 535xi
E60N 5 Series 535i
E60N 5 Series 535d
E60N 5 Series 530xi
E60N 5 Series 530xd
E60N 5 Series 530Li
E60N 5 Series 530i
E60N 5 Series 528xi
E60N 5 Series 530d
E60N 5 Series 528i
E60N 5 Series 525Li
E60N 5 Series 525xd
E60N 5 Series 525i
E60N 5 Series 525d
E60N 5 Series 523Li
E60N 5 Series 523i
E60N 5 Series 520Li
E60N 5 Series 520d
E60N 5 Series 520i
E61 5 Series 550i
E61 5 Series 530d
E61 5 Series 545i
E61 5 Series 535d
E61 5 Series 530xi
E61 5 Series 530xd
E61 5 Series 525i
E61 5 Series 530i
E61 5 Series 525xi
E61 5 Series 525d
E61 5 Series 523i
E61 5 Series 520d
A BMW E60 blower motor replacement is a very common repair on the 2004-2010 5 series and is most likely needed when the air has stopped blowing out of your interior vents.
Sometimes there is that one car repair that leaves you qualified to become a yoga instructor. Ok, so doing a blower motor replacement on your BMW E60 may not enable you to execute an "upward facing two-foot staff" (click the link...you know you want to), but it will give you a few nice full body twists and teach you the art of patience and gratitude when the car's shifter plants itself in your rib cage. The blower motor on the BMW E60 is wonderfully located deep behind the center of the dash and replacing it gives you a fantastic journey through the hidden world of BMW engineering rarely seen by most laymen.
My blower motor first started acting upon an unseasonably hot and humid South Florida day in February. I had just clicked 96,500 miles on the odometer of my 2010 BMW 528i when my nice cold air stopped blowing through the vents while driving to work. The air conditioning continued to start and stop blowing for about a week until it finally gave out altogether leaving me with no other option but to drive with the windows down. After studying many articles and forums, I felt it was best to go ahead and replace both the motor and the regulator (also known as the "final stage" or the "blower resistor"). It didn't make sense to just replace one or the other since it was going to be a chore getting to the unit. Fortunately, a blower motor replacement is not as difficult as many people make it out to be. There is a little bit of twisting and some awkward positions, but the good news is you do not need to be a BMW technician to complete this repair and very few tools are needed.
The blower motor on the BMW E60 is part of the car's climate control, and it regulates airflow to the cabin by spinning an electric motor with two "cage-style" fan blades on either end. The speed of the blower motor is controlled by turning the fan speed knob on your dashboard, which in turn sends a signal to the blower regulator mounted to the side of the motor. When your car stops blowing air through the vents, most likely either the blower regulator or the blower motor has gone bad. It is best practice to go ahead and replace them both.
Please be aware there are posts and other articles out there that say you need to remove the entire center console and disassemble both under dash trims to perform a blower motor replacement on an E60 BMW. This is not necessary for a blower motor replacement, and doing so is a waste of time. We will show you the quickest way to get the job done without taking unnecessary steps.


View the detailed parts diagram for this repair.
Includes detailed part diagrams, part numbers and links to purchase all of the required components needed to complete this repair.

Before starting this repair, you must have the following required parts.
All BMW E60 and E61 vehicles
Replacement blower motor units from the dealership can cost a fortune. Get your blower working again and the a/c and heat moving with this high quality OEM replacement.
All BMW E60 and E61 vehicles
Also known as the "final stage", the blower regulator controls the fan speed of the blower motor. It is strongly recommended to always replace the regulator when doing a blower motor repair!
Section 1 - Disassemble Dashboard
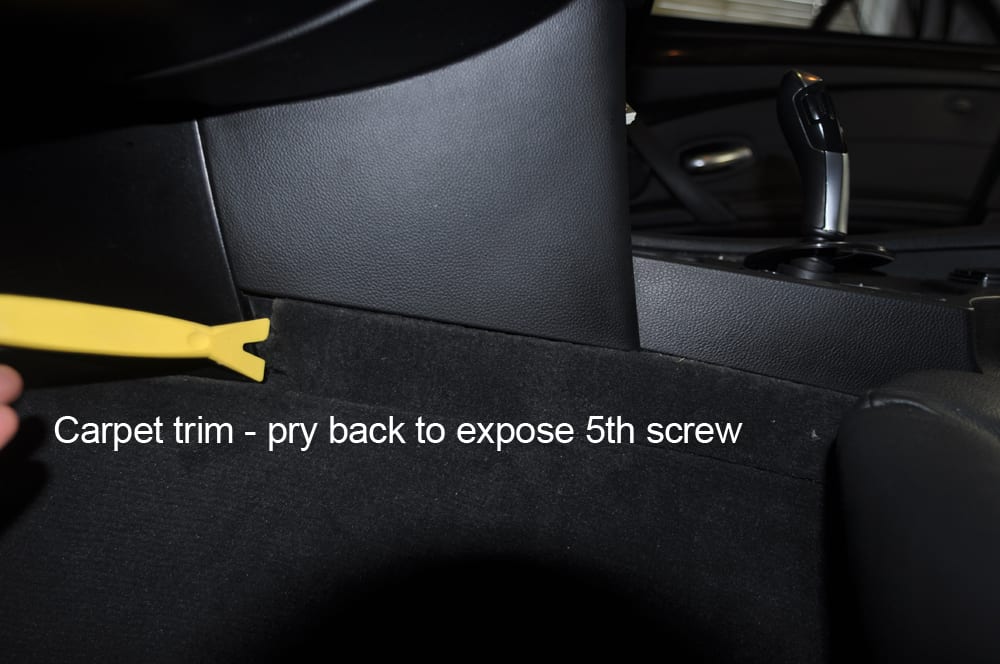
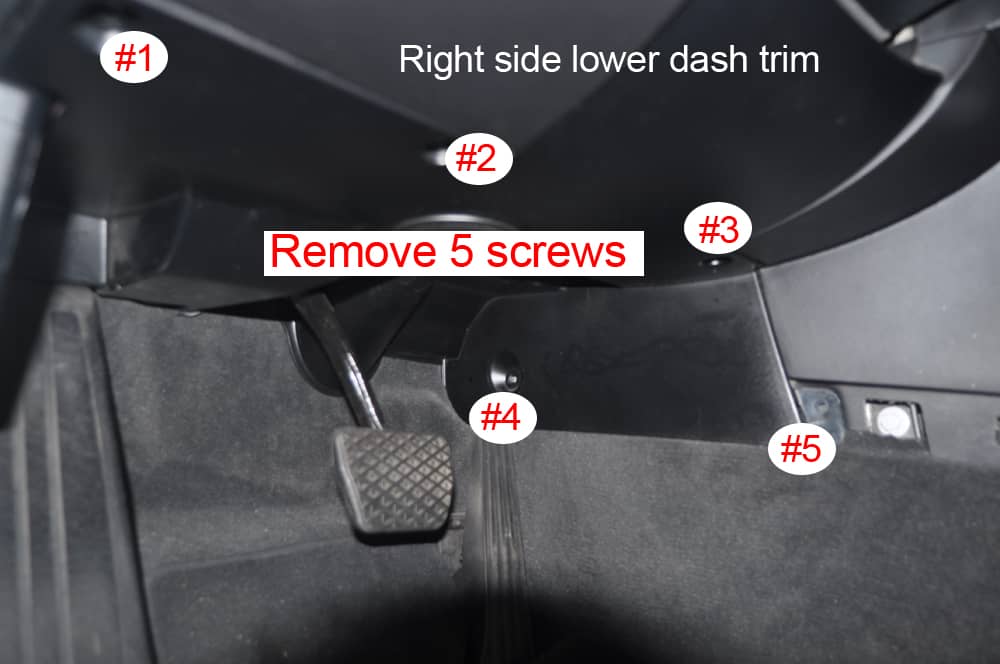
- Loosen the left (driver’s) side lower dashboard trim by removing the (5) trim screws. Four of the screws are visible underneath (figure 1), the fifth screw is behind a piece of removable carpet trim on the side of the center console (figure 2). To access the fifth screw, simply pry back with a plastic trim tool. The carpet trim slides towards the rear of the car and will expose the 5th screw.
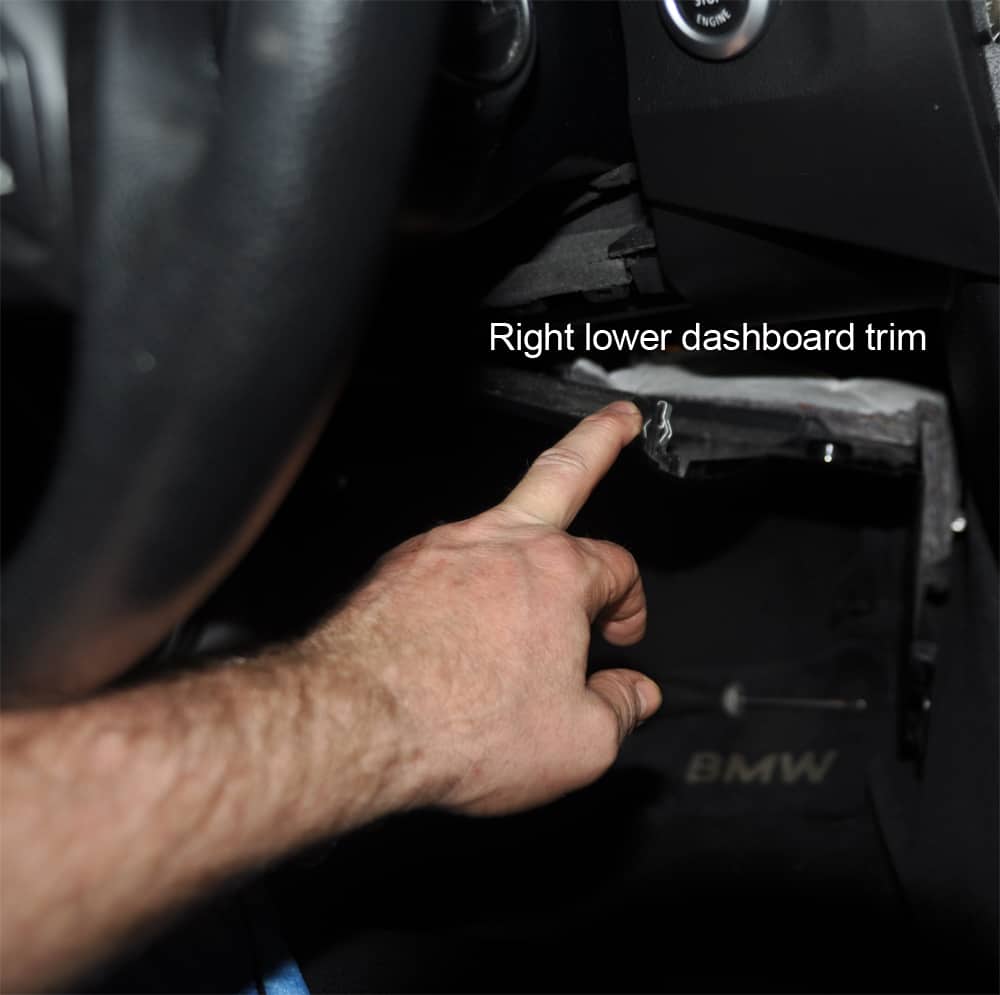
- Using your hand, gently pull down on the right side of the lower dash trim so you can access the air duct. You DO NOT need to remove the whole piece of trim...you just need to pull it loose like in the following photo.
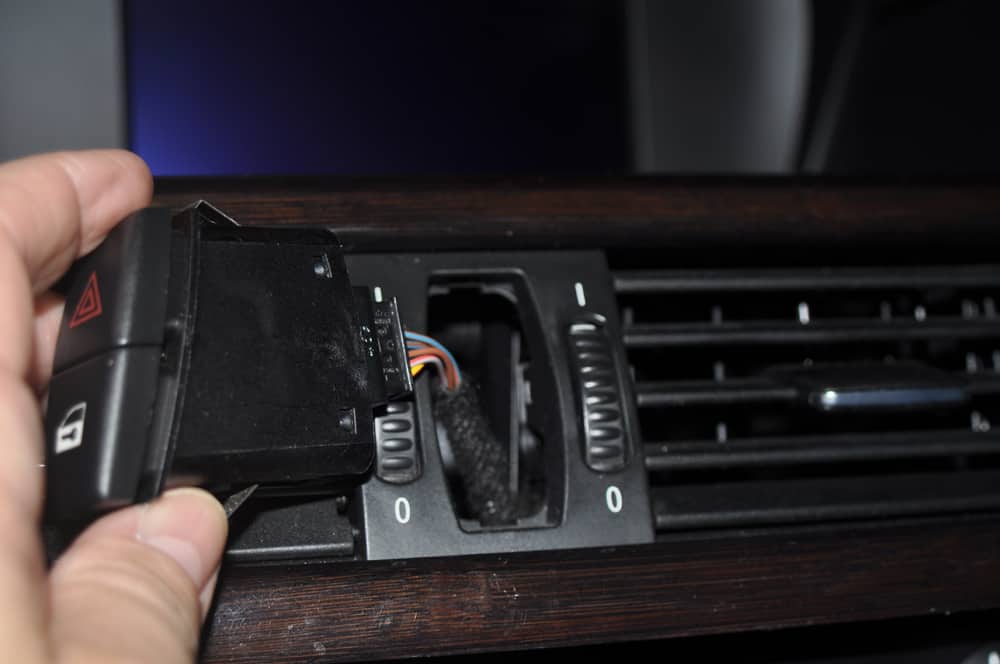
- Use a plastic trim tool to remove central lock/hazard light switch. Disconnect wire from back of switch.
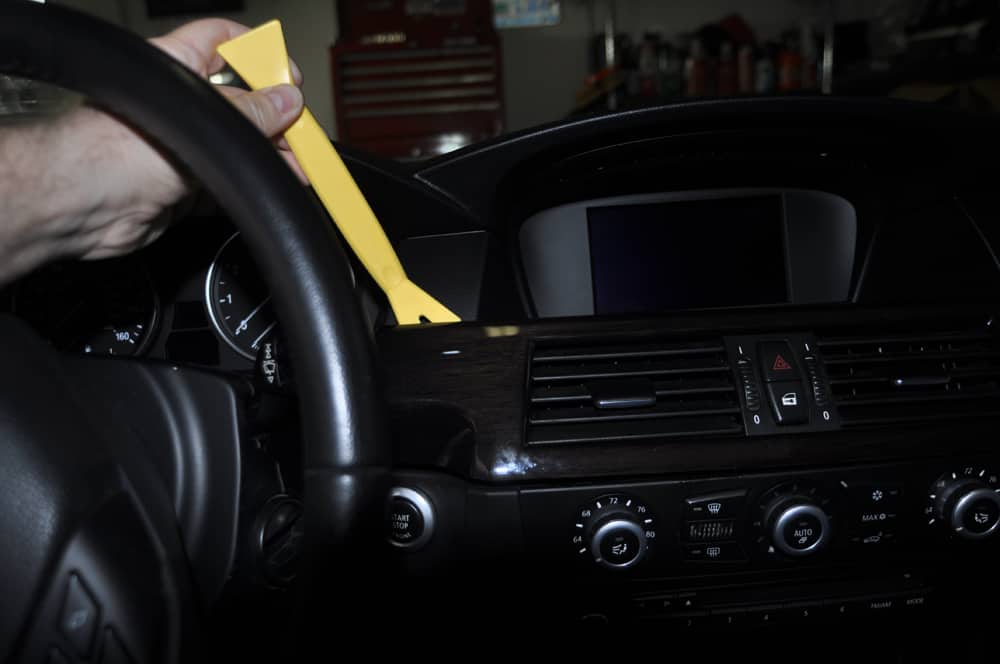
- Use a trim tool to remove the center dashboard trim, starting on one side and slowly moving your way towards the other.
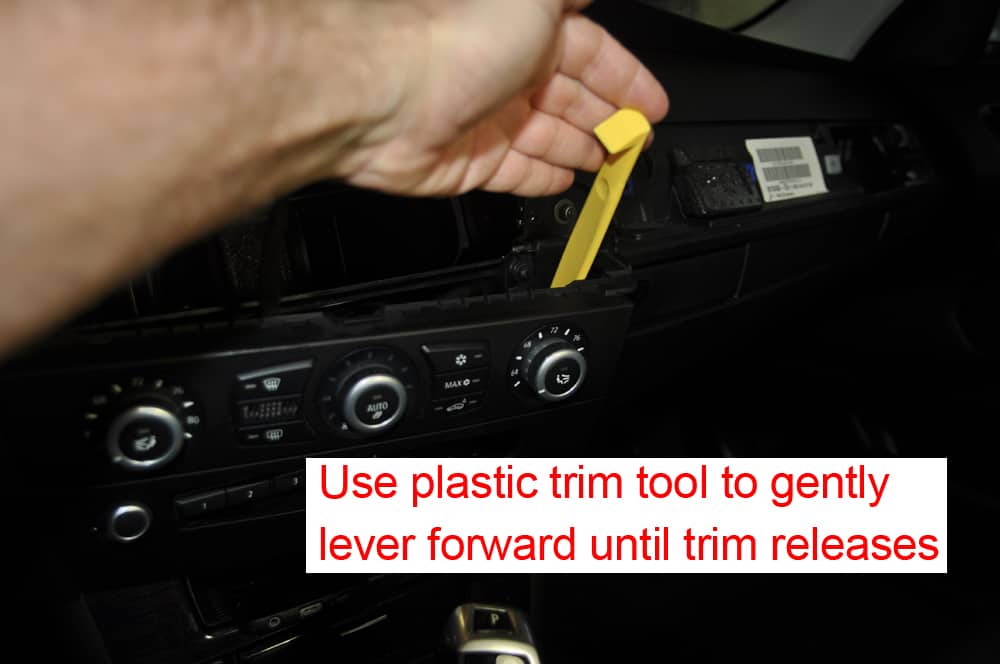
- Remove the two phillips screws from top of IHKA control trim panel. Using your hands, gently pull the top of the control unit away from the dash. This should give you enough room to get a plastic trim tool behind the unit. Slowly lever forward with the tool until the trim clips on the unit release. Once the unit is free of the dash, disconnect the three wiring harnesses (a flat blade screwdriver comes in handy).
- Using a plastic trim tool, remove the lower dashboard trim. Disconnect any switches contained in the trim (DSC, trunk release, etc).
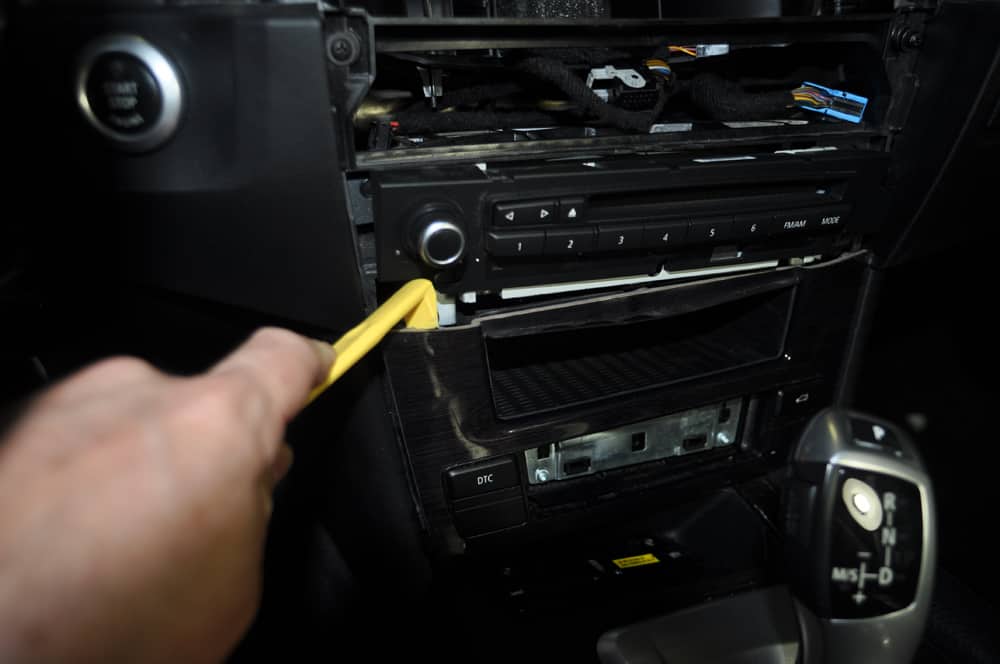
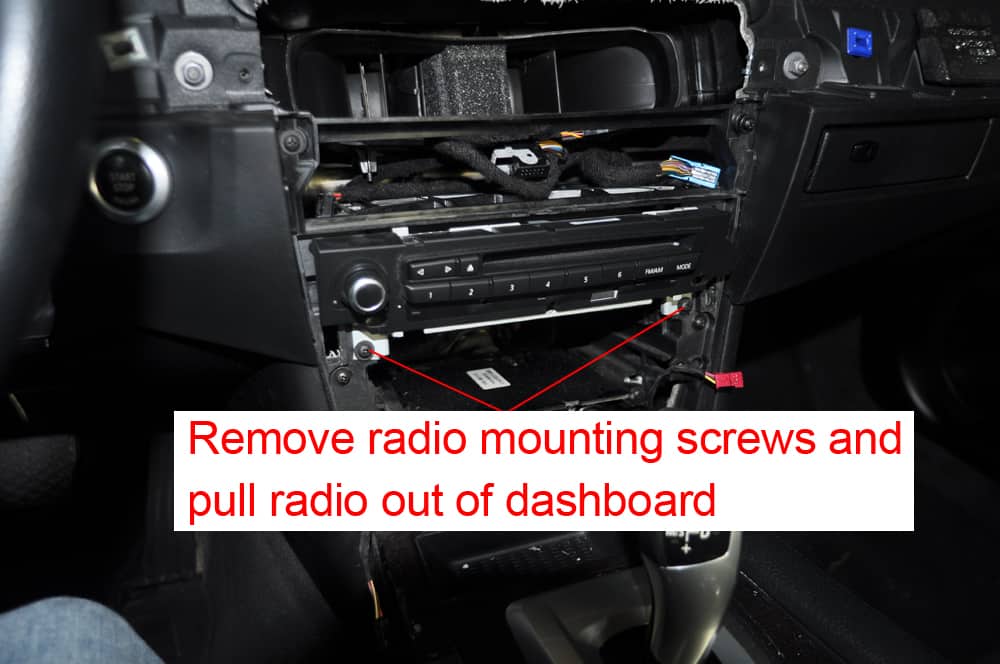
- Remove the two phillips screws holding the radio in place. Pull radio out of dash and disconnect wiring connections in back.
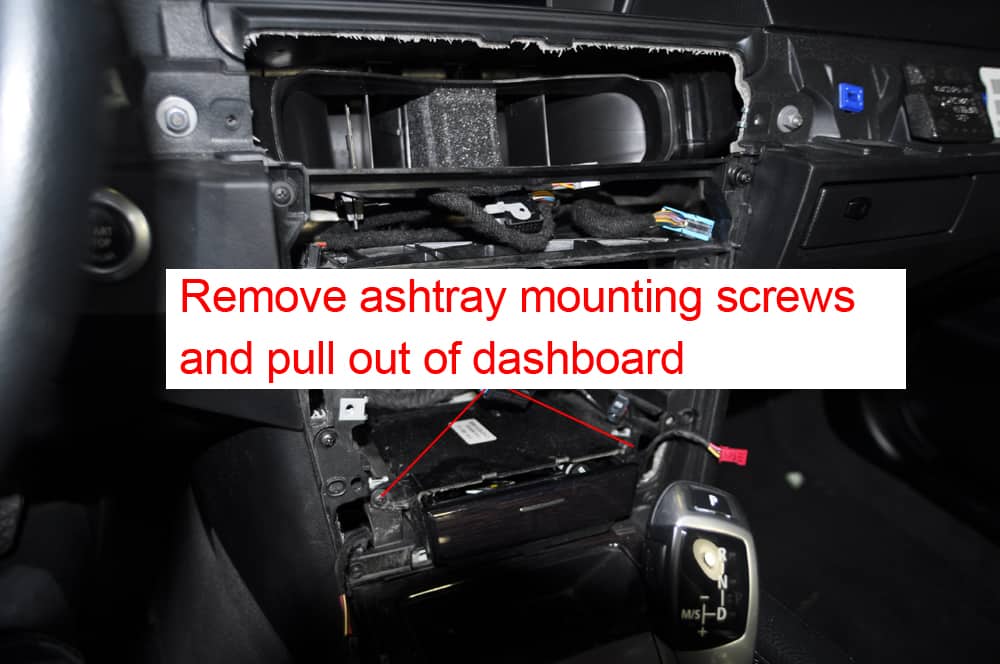
- Remove two phillips screws holding ashtray in place. Pull out ashtray and disconnect wiring connection in back.
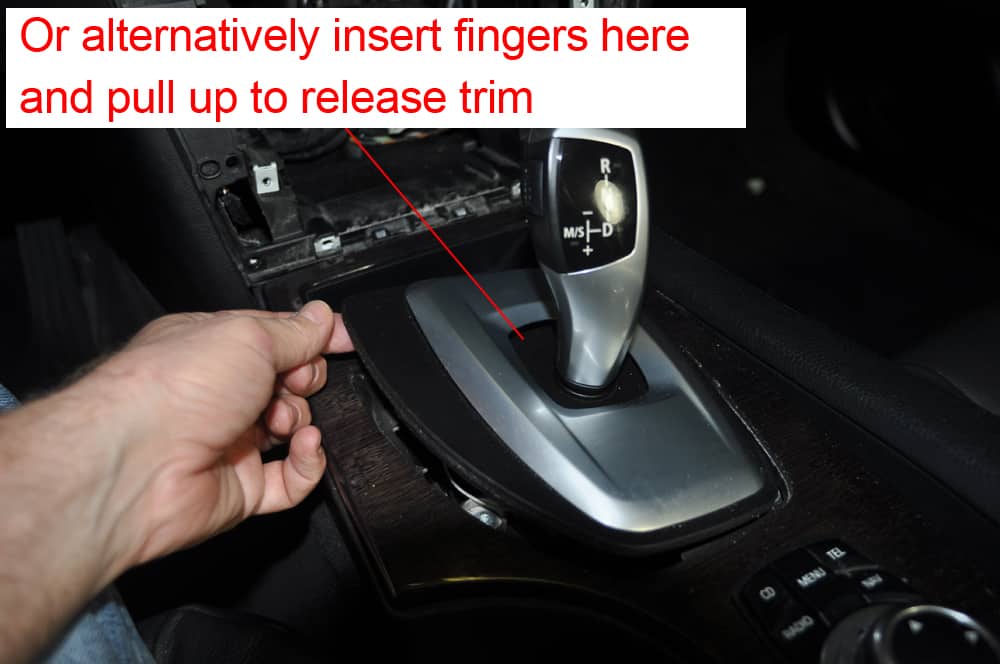
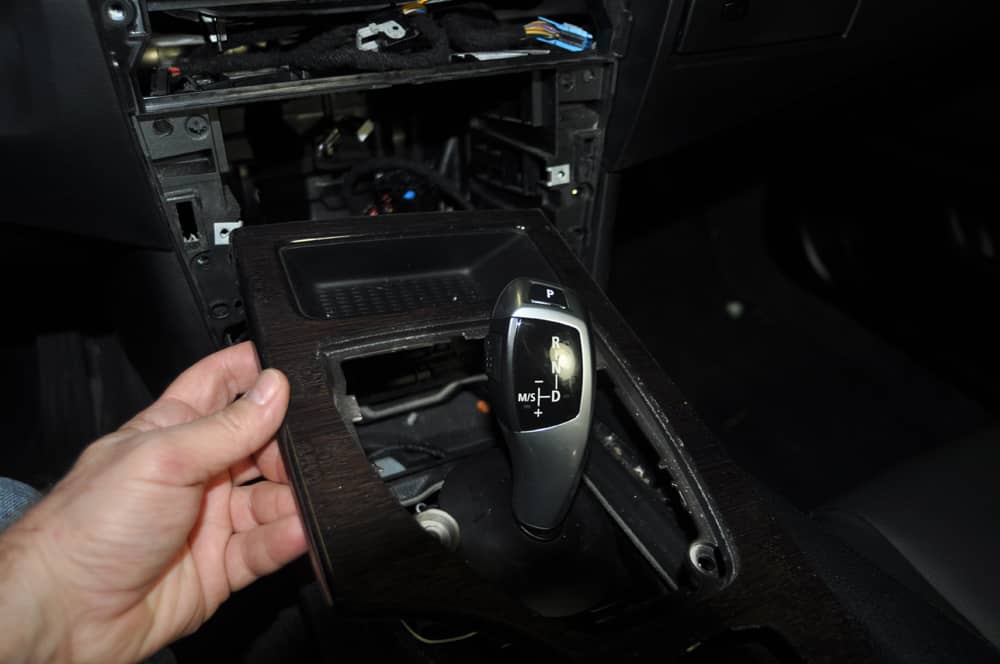
- Using a pick or other small trim tool (I just use my fingernails), remove the plastic shifter bezel trim. It pops out very easily once you get under the edge of it. You can also try slipping your fingers under the trim by the shift knob and pulling up on it to release.
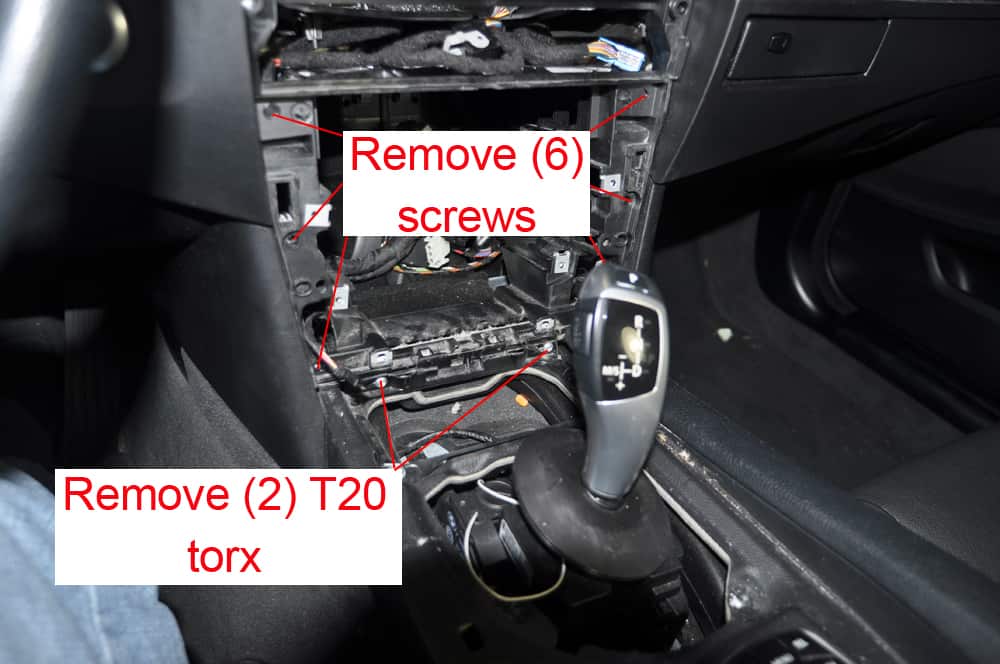
- Remove the three T20 torx screws holding the center console trim in place. Using your hands, gently pull until the trim releases and remove.
- Remove the 6 phillips screws and 2 T20 torx screws holding the component mounting bracket in place. To remove the bracket from the dash, you will need to use a plastic trim tool to apply leverage to the bottom of the bracket until it releases from the center console.

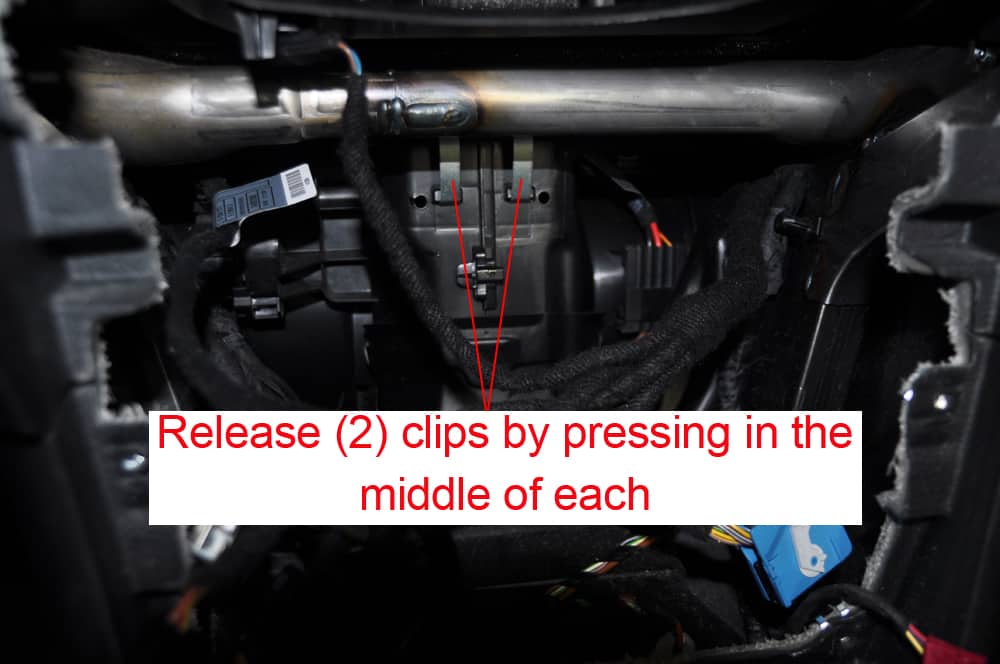
- Moving to behind the dashboard, release the two retaining clips holding the main duct in place by pushing on the center of the clip. A flat blade screwdriver helps unsnap the bottom of the clip.
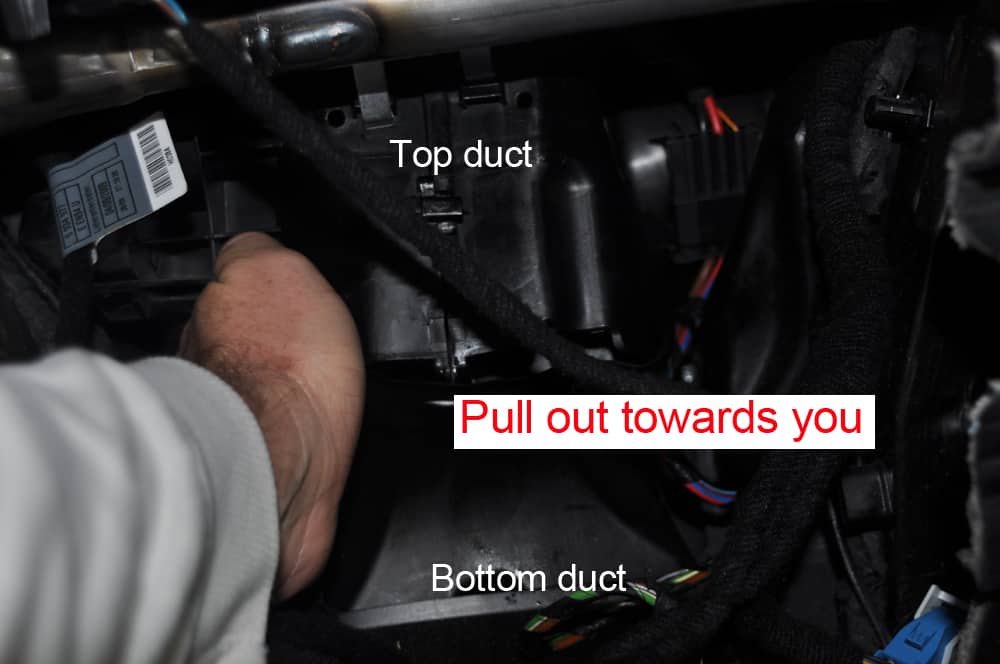
- The next step requires removing the center duct from the car. The duct is actually in two pieces; the upper piece that you just removed the clips off of, and a lower 90 degree fitting that feeds the center console. The best method I have come up with for removal is: grab the duct with your hand where the upper and lower pieces meet and slowly pull out towards you. The bottom of the upper duct will “pop out” of the top of the lower duct. You can then disconnect the stepper motor electrical connection and remove both of the ducts from the dashboard.
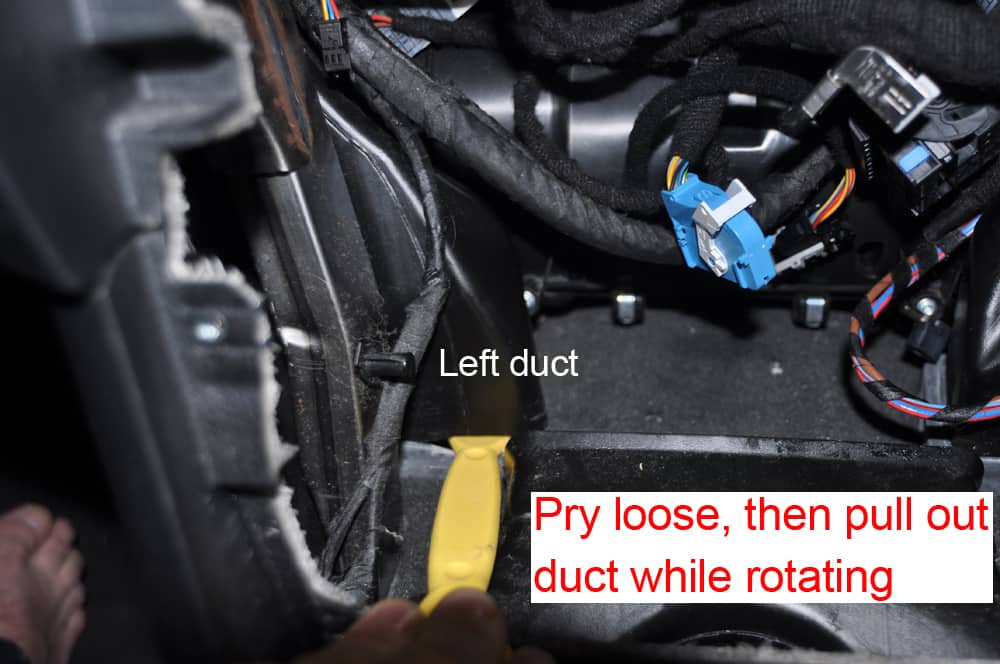
- Remove the left side air duct by gently prying up with a plastic trim tool. Then pull the duct straight out while rotating the duct counterclockwise to release it from under the dash. You DO NOT need to remove the right side duct. When reinstalling this duct, you will need to stick one hand under the left side of the dashboard that you loosened in Step 2 to guide it back into place.
Section 2 - Removing the BMW E60 Blower Motor
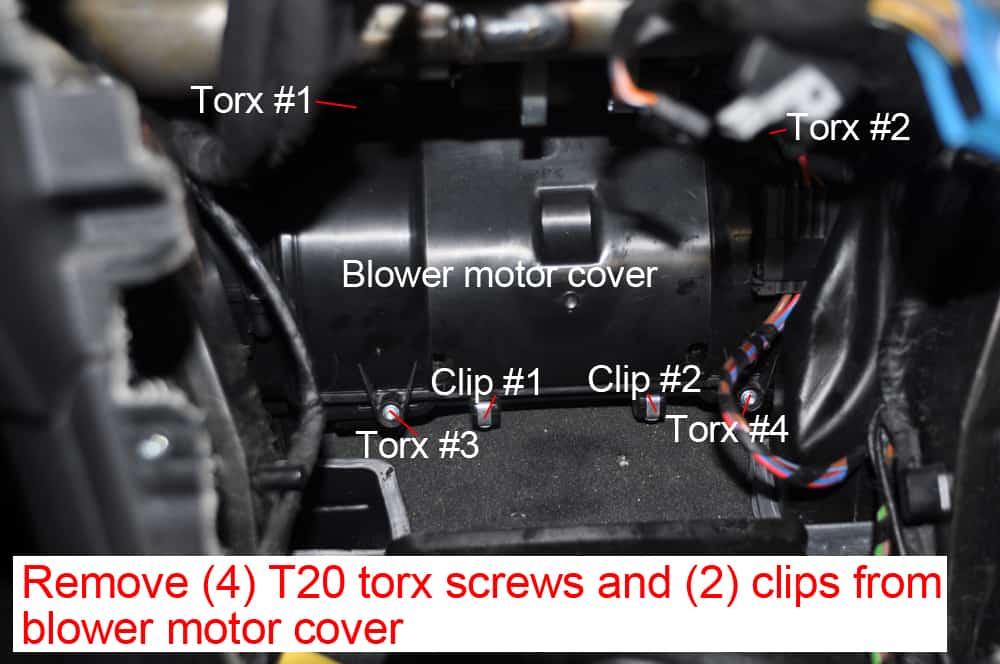
- Remove the (4) T20 torx screws from the front of the blower cover. Using a metal pick, remove the two clips on the bottom of the cover (be careful...these can fly off).
- Disconnect the blower power supply on the front of the cover. Half of the connection is attached to the front of the cover and will need to be removed by grasping it and pushing up. The connection slides on plastic rails attached to the cover and will slide right off with a little effort.
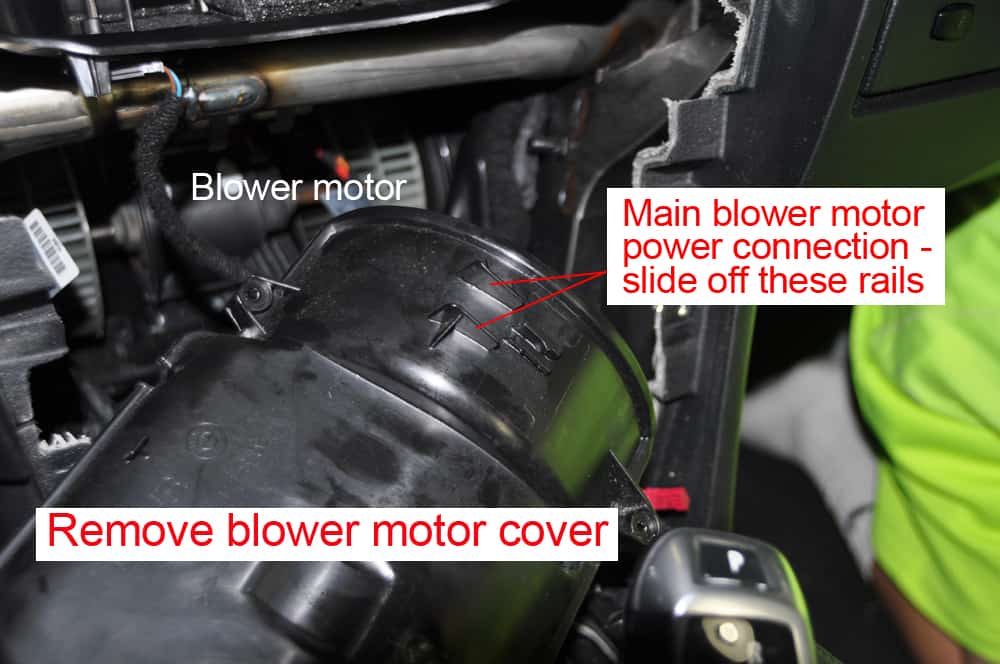
- Remove the blower cover from the dashboard compartment exposing the blower motor.
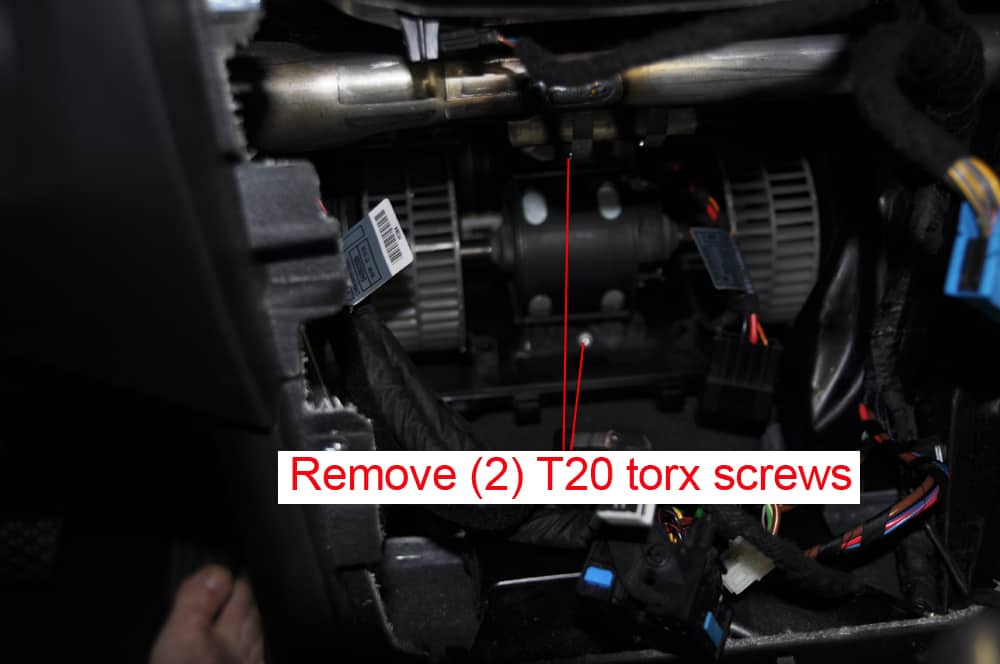
- Remove the (2) T20 torx screws from the blower motor mounts. Remove the blower motor.
Section 3 - Preparing New Motor for BMW E60 Blower Motor Installation
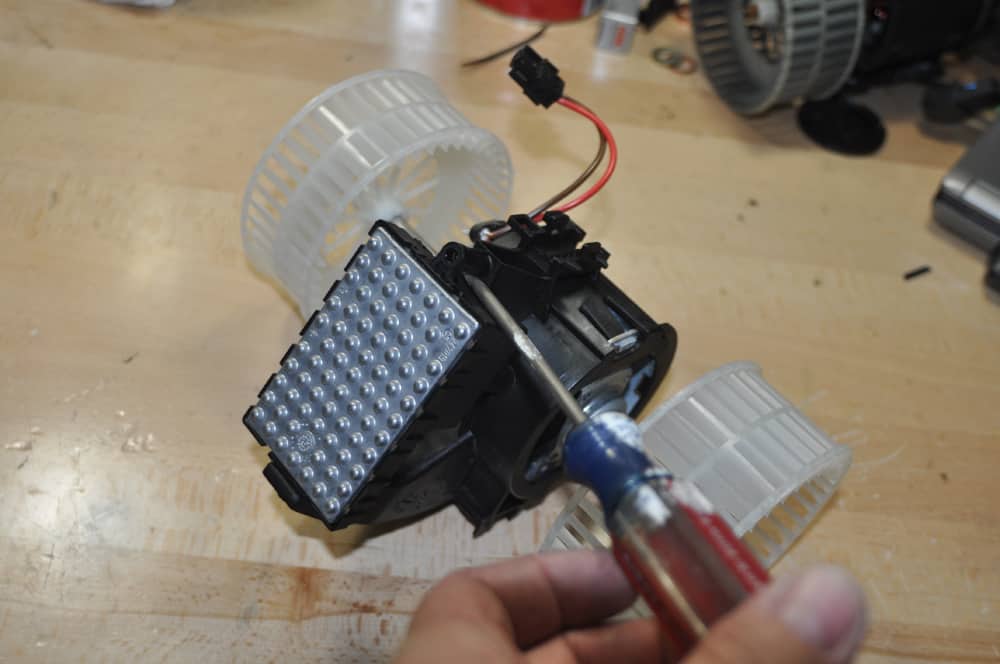
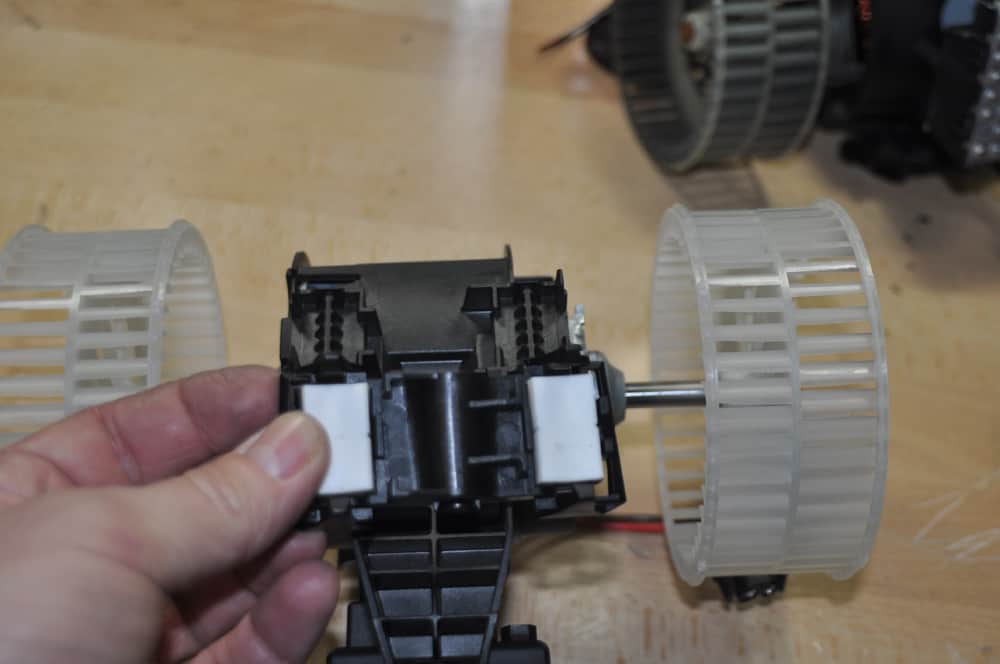
- On a bench, attach the new a/c regulator (also known as the final stage or blower resistor) to the new blower unit. The regulator simply snaps on to the blower. Use a flat blade screwdriver to leverage the tab so it can snap in. BE VERY CAREFUL - the blower fan cages are fragile and can break if too much pressure is put on them. Use care when working on the blower motor and when reinstalling in the car.
- Attach the wiring connector from the new blower to the new a/c regulator. Remove the wiring harness from the old a/c regulator and install it on the new a/c regulator.
- Your new blower motor should have included new plastic upper and lower mounting brackets and cushions. Snap these on to the new motor (use the old motor as a reference for where they mount).
Section 4 - Installing New Motors
- Reinstall the new blower motor, using patience and care. The fan cages are fragile so try not to apply too much pressure to them during reinstallation. Make sure the main power cable is directed through the notch in the top right corner so the cover fits correctly.
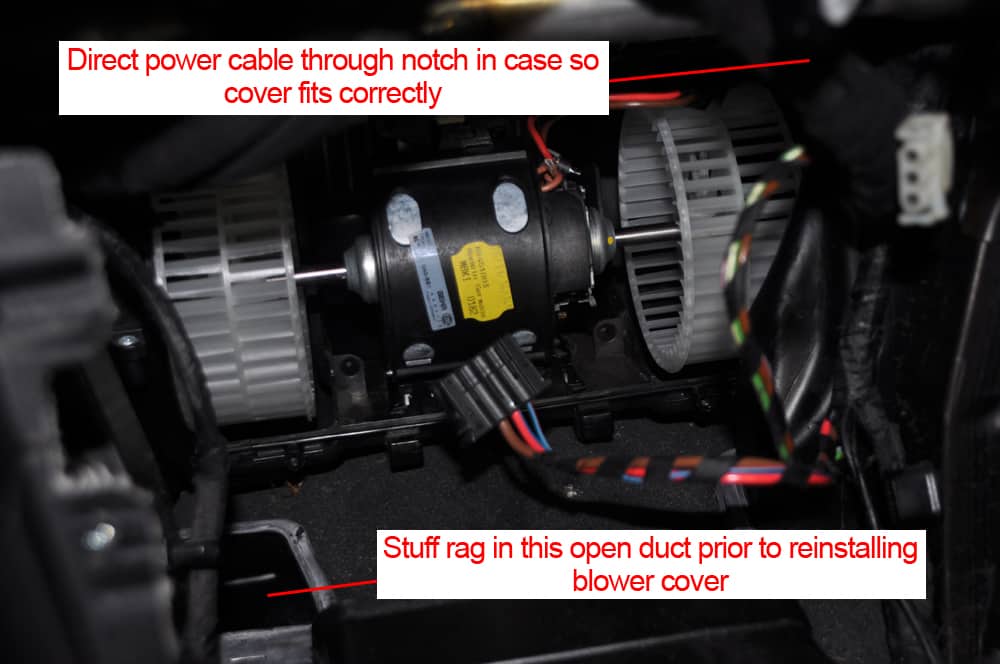
- Important Note #1 - I would highly suggest stuffing a rag in the open floor duct while reinstalling the blower cover. It can be the “black hole of death”...I dropped a socket extender with a T20 socket on it down the duct. After an hour of fishing around with magnets I still couldn’t retrieve it and had to go buy a new one.
- Important Note #2 - Be prepared, the blower motor cover can be an outright pain in the rear to reinstall. Your patience can run thin quickly since it is the end of the job. Just stick with it...my trick was to get the top two holes lined up first. You may have to slightly “twist” the bottom to get it to fit flush. Please comment on this post if you need help and/or emotional support prior to throwing a screwdriver through your window.
- Reverse these removal instructions to complete the installation and finish the repair.
BMW E60 Blower Motor Replacement Finished