
Affiliate link disclosure – The BMW Repair Guide uses affiliate links in their site. For more information on affiliate links, please click here.
Repair Summary
The following article gives detailed instructions on repairing the brakes on a BMW E36 3 series car. Even though we have used a 1996 BMW M3 to perform this repair, this article can be applied to any 1990-1998 3 series vehicle with minor modifications.
See all vehicles this article applies to
E36 3 Series 316i
E36 3 Series 318is
E36 3 Series M3
E36 3 Series 320i
E36 3 Series 325i
E36 3 Series 325is
E36 3 Series 323i
E36 3 Series 328i
E36 3 Series 318i
E36 3 Series 323i 2.4
E36 3 Series 325td
E36 3 Series 325tds
E36 3 Series 318tds
E36 3 Series 316i 1.6
E36 3 Series 323ti
E36 3 Series 318ti
E36 3 Series 316g
E36 3 Series 316i 1.9
A BMW E36 brake repair is surprisingly one of the easier jobs you can perform on your 3 series vehicle.
If you have ever taken your BMW to the repair shop for a brake pad and rotor replacement, you probably experienced a systolic blood pressure reading equal to the model number of your car when you received the bill. Brake maintenance on BMW's, much like engine oil maintenance, has become a nifty profit center for both independent and dealer service centers...especially on the BMW E36. Why? Because frankly speaking, the parts are cheap and extremely easy to install. In fact, the hardest part of the repair is jacking up the vehicle and removing the wheels.
There is a myriad of different brake pads and rotors for the BMW E36, and which type you choose really depends on your personal preferences and how you are driving your car. There are many articles and posts concerning brake pads and rotors on the internet, and a simple Google search will return you more content than you probably care to read. In a nutshell, these are the general guidelines:
Daily street use - If you are looking to keep the original braking characteristics of your BMW E36, use OEM pads and rotors. Most street drivers are looking for soft, responsive, and comfortable brakes that exhibit excellent gripping power at lower pad temperatures. If you are a BMW "purist", stick with genuine BMW pads and rotors; they are more expensive...but you are guaranteed to get the same "factory" brake pedal feel as when you drove it off the dealership lot. If you are not a purist and want to save a few bucks, there are many OEM suppliers that offer superior pads and rotors that are so close to genuine BMW that most drivers won't even recognize the subtle differences. If you are not sure which way to go, we have put together an excellent selection to choose from in the parts section below.
Performance street use - There are those owners who like to explore their BMWs performance DNA a little further...the aggressive road drivers. This type of driving requires a slightly more hawkish brake pad than OEM...we call them "performance street". These performance street pads offer a higher level of controllable gripping power with a minimal loss of OEM softness. Performance street pads are a great match with both OEM and track/racing rotors.
Track and racing - We enter a different dimension when it comes to heavy track use and racing. Track and racing pads contain ferrous materials (semi-metallic) that exhibit phenomenal gripping strength when heated up. Their drawbacks are they are more expensive than OEM parts, can often be noisy, and only reach their maximum performance at very high caliper temperatures. Track and race rotors usually are cross-drilled, slotted, or a combination of both, all of which help channel out gases that build up during heavy braking so the pads can work more effectively. As with all racing parts, it really comes down to how much you want to spend. A really good set of trackpads can cost up to $1000 for all four wheels. Slotted and drilled rotors can be found at a reasonable price if you are using stock calipers, but expect to pay thousands if you ever decide to switch to "big brake" kits like Brembo or StopTech. Once again, if you are not sure what to go with, we have hand-picked several excellent choices in the parts section below.
***Important note: It is standard procedure to change your pads and rotors together when you perform a BMW E36 brake repair.
***If you are installing track/racing brake pads, it is very important to go through the "Brake Bedding" procedure when you finish your repair. Please see the bottom section of this post for the correct method.


Section 1 - Installing the New Rotors
- Jack and support the front of your vehicle using the jack stand method as shown in our article BMW Jacking and Supporting for Repairs and Maintenance. Remove front and rear wheels.
- Start with the wheel of you choice...the procedure is the same for all of them.
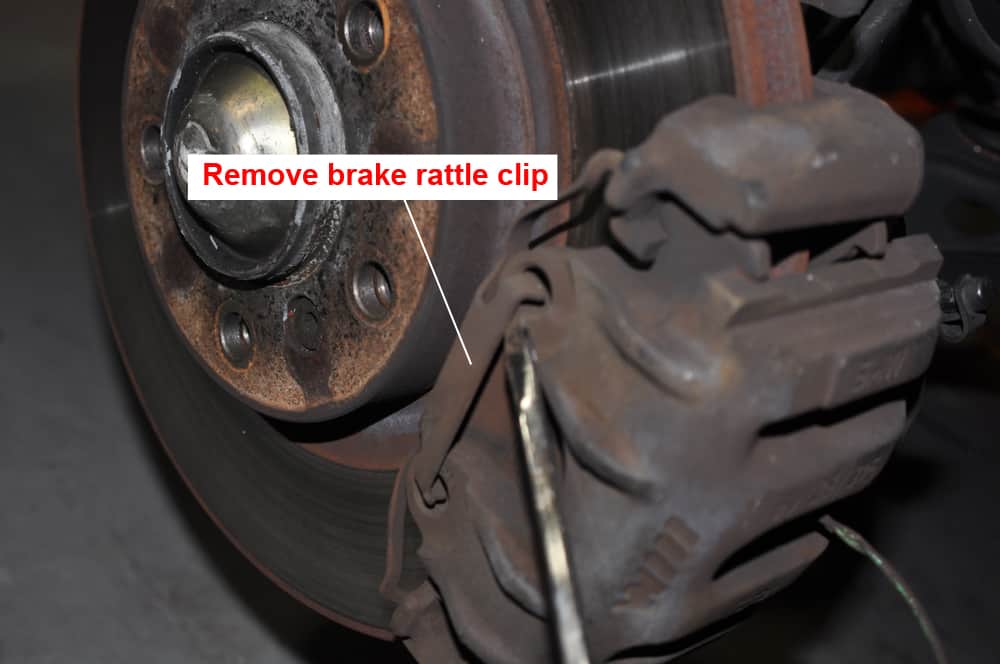
- Using a flat blade screwdriver, remove the anti-rattle clip from the brake caliper by prying one end out.
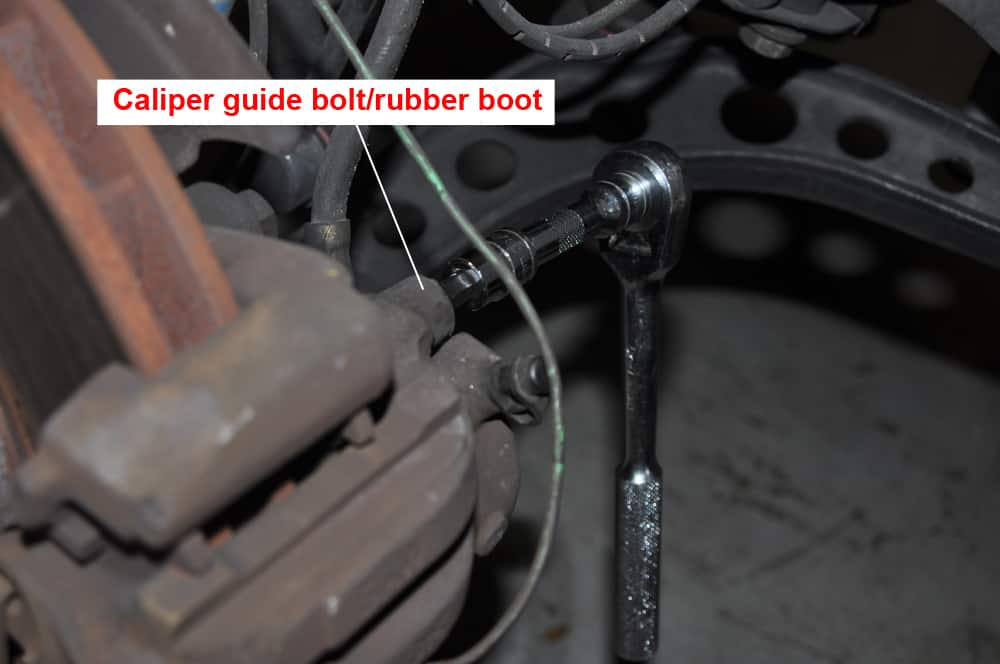
- Remove the dust caps off of the back of the caliper guide bolts. Using a 7mm hex socket, remove the two caliper guide bolts. Remove them completely from their rubber boots.
- Grab the brake caliper and slowly pull it towards the center of the car. You may have to "wiggle" it slightly to get it to slide off of the brake rotor. When you have the brake caliper free, remove the brake pads. Remove the brake pad wear sensors from the inside pad on the front left and rear right calipers. It simply clips into an indentation on the back of the pad. Firmly secure the brake caliper so it does not hang by the brake line.
- Remove the brake pad carrier mounting bolts and brake pad carrier from the back of the rotor using a 16mm socket wrench. These should be torqued tightly, so expect a bit of effort getting them loose. Use a breaker bar if necessary.

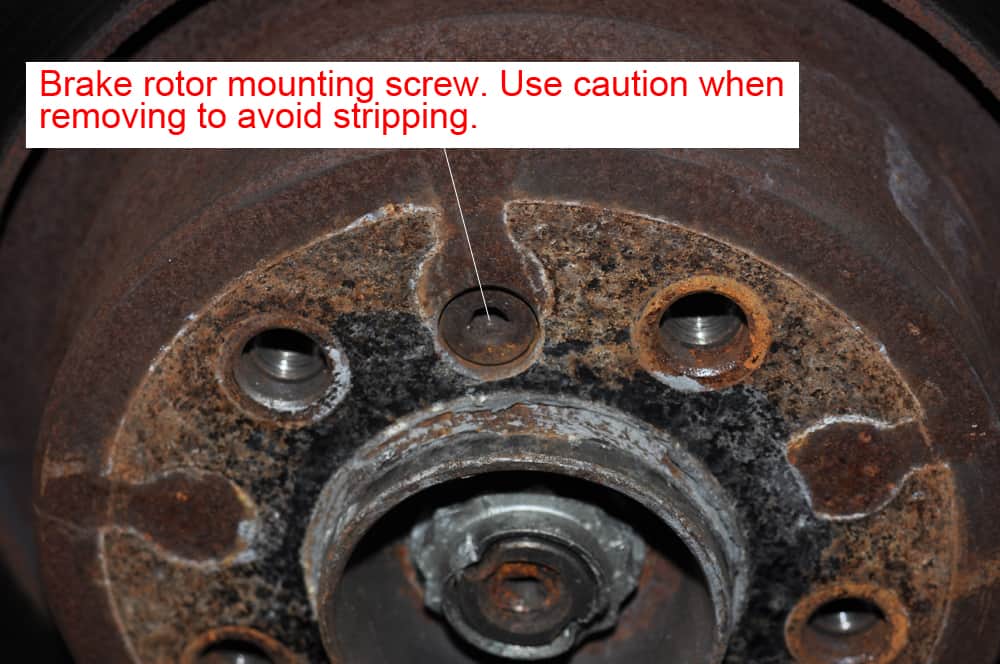
- Spray the brake rotor mounting screw with a penetrating lubricant like Blaster PB and let sit for 5 minutes. The screw is easy to strip if it the rotors have not been serviced for a while. Using a 6mm hex socket, remove the brake rotor mounting screw and remove brake rotor from hub. If the rotor does not want to free itself from the hub (usually due to corrosion), strike it with a hammer around the outside edge until it releases. **Note - the brake rotor mounting screw simply holds the rotor in place during assembly. The rotor is really held to the hub by the wheel bolts (lug nuts).
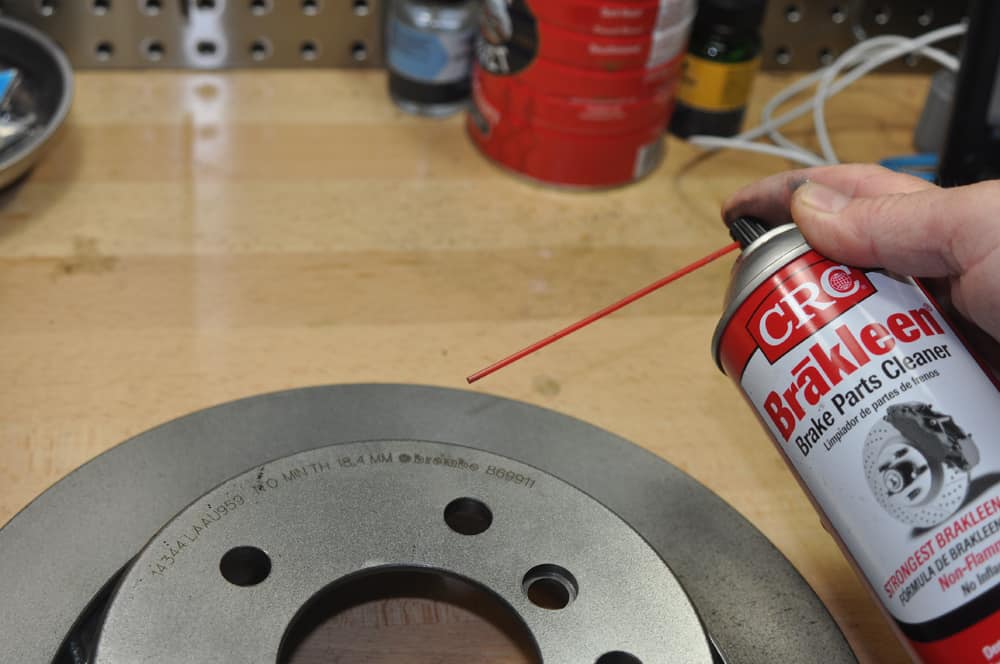
- Prepare the new rotor for installation by spraying both sides with brake cleaner and wiping thoroughly. Make sure to remove any grease or oil that may have been applied during shipping.
- Mount the new brake rotor on the hub and install the mounting bolt. Do not over tighten mounting bolt - it is simply there to hold the rotor in place until the wheel is installed. It should be torqued to a maximum value of 16 Nm (12 ft-lb).
- Reinstall the brake pad carrier and torque the mounting bolts to the following values:
Section 2 - Installing the New Pads
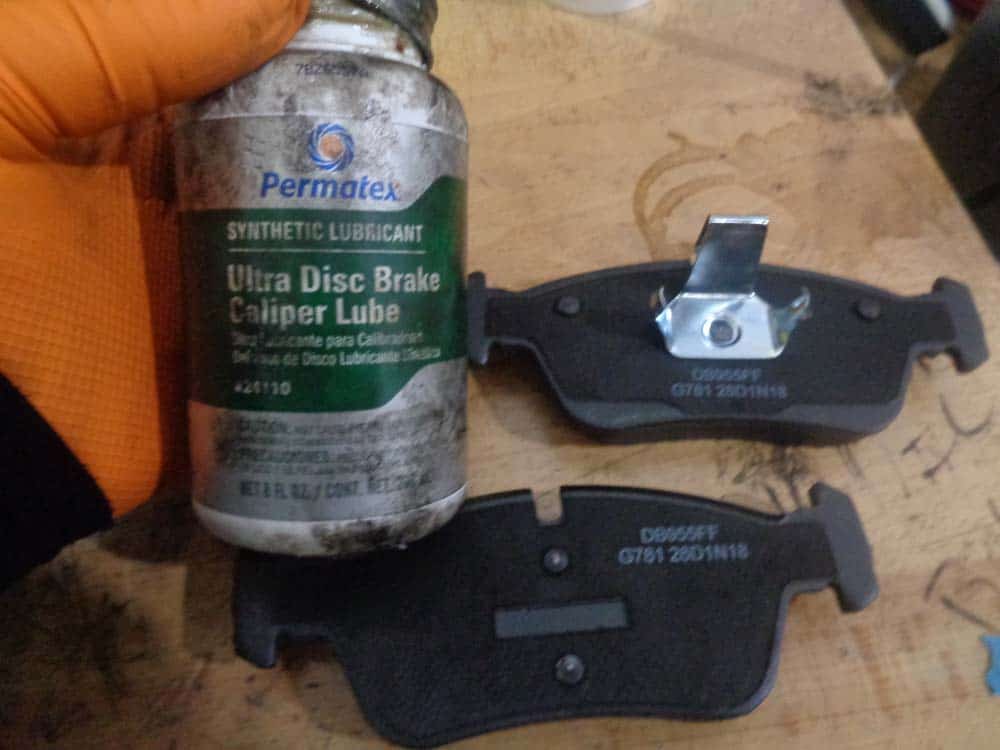
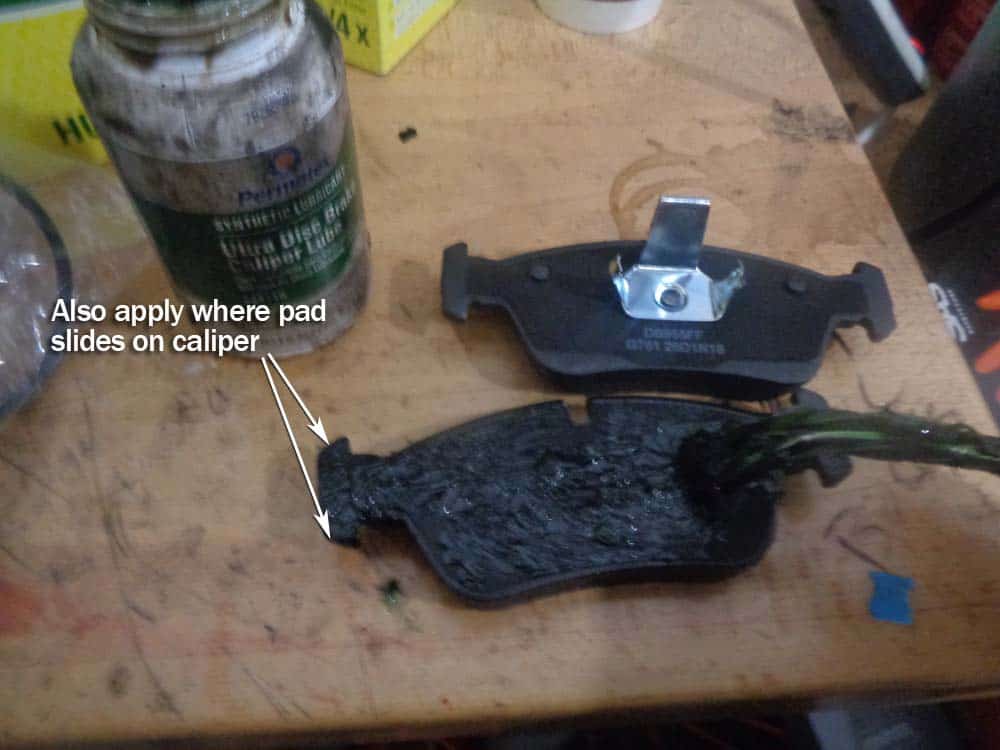
- Using a bottle of synthetic brake disk lubricant, generously apply a layer to the back of each brake pad...especially where they slide on the calipers. Wipe any excess grease off the front of the pads.
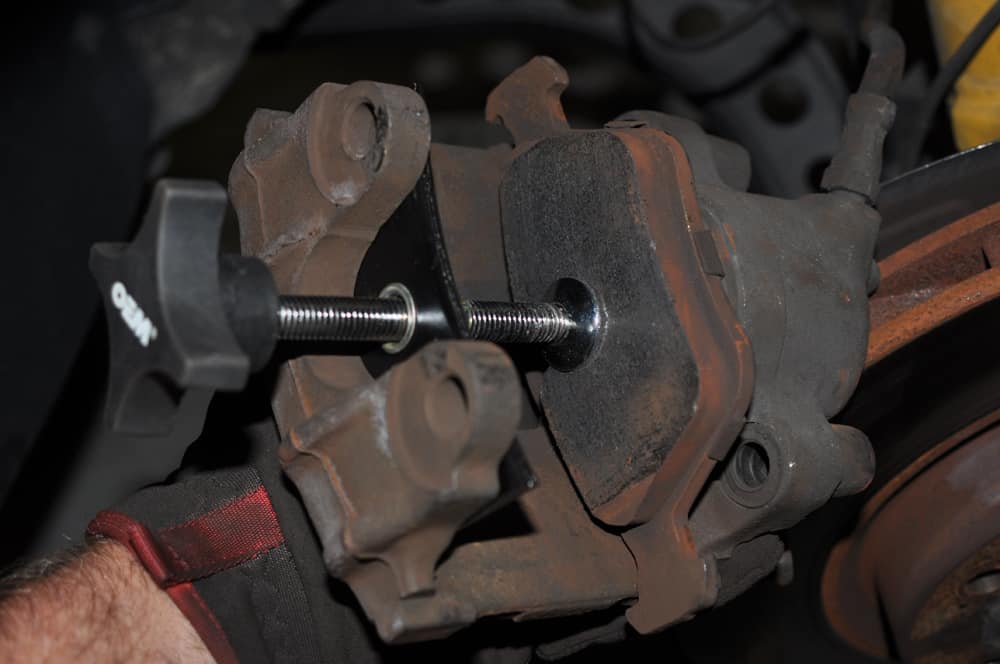
- Install the inside brake pad (pad with 3 metal prongs on back). Using the brake piston compressor, gently apply pressure to pad until caliper piston is fully compressed (do not apply to much force...when it stops turning with minimal effort, piston is fully compressed).
- Insert outside brake pad, then install caliper back on rotor. Make sure caliper is firmly seated in brake pad carrier.
- Reinstall caliper guide bolts and torque to specification. **Caution - Caliper guide bolts can be difficult to reinstall. Use patience to make sure you don't "cross thread" and strip bolts when reinstalling. If you get frustrated...walk away and try again after a break! Torque the caliper guide bolts to 30 Nm (22 ft-lb)
- Reinstall brake anti-rattle clip. This can be done easily by lining the clip up in the holes and pressing with your thumbs until in snaps back in place. It may take a little practice, but once you get it, they snap right in without using a tool or expletive language.
- Reinstall the brake pad wear sensors on the left front and right rear calipers.
- Snap dust covers back on caliper guide bolts.
- After all of the new brake components are installed, replace wheels and torque lug nuts to spec. Road wheel to hub - 110 Nm (80 ft-lb)
Section 3 - Flushing and Bleeding the Brakes
It is strongly recommended that you flush and bleed your brake system after every BMW brake repair. Read our article on flushing and bleeding your brake system for more details.Section 4 - Bedding the Brakes
If you are installing high-performance track or race pads, it is important to go through the brake bedding procedure. Bedding in the pads helps add an even layer of new pad material to the rotor. This layer will maximize the performance of the new brake pads and avoid and issues with brake "shutter" (vibration when brakes are applied) and/or excessive noise. Brake bedding procedures differ among manufacturers, and there will be instructions included with your performance pads on which brake bedding technique is recommended for your brand. If there are no instructions in the box, use ours below. Every pad manufacturer has readily available instructions on bedding procedures and you should follow them exactly. The following is the bedding procedure for the Hawk DTC-70 pads we installed. Most performance brake pad manufacturers follow this procedure. Brake Pad Burnishing/Bedding-In Instructions Hawk DTC-70:- After reaching medium speed engage the brake pedal to slow the car without coming to a complete stop. Release pedal quickly and do not drag brakes. Repeat four or five times.
- At higher speeds engage brake pedal to slow car without coming to a complete stop. Release pedal quickly and do not drag brakes. Repeat five times.
- At or near race speed engage brake pedal to slow car without coming to a complete stop. Release pedal quickly and do not drag brakes. Repeat three times. Allow a few seconds between brake engagements while the car is in motion
- Do not hold the brake pedal. Park car for approximately 20 minutes or until brake rotors is completely cool to the touch. 5. If during the above steps the brake pedal becomes soft or brake fade is noticed, park the car immediately for approximately 20 minutes. Do not hold the brake pedal.
BMW E36 brake repair Finished