
 valve on your BMW E36 today. We show you how.)
Affiliate link disclosure – The BMW Repair Guide uses affiliate links in their site. For more information on affiliate links, please click here.
- Repair Summary
- Repair Difficulty and Cost
- Repair Video
- Parts Diagram
- Required Parts List
- Repair Steps
Repair Summary
The following article gives detailed instructions on replacing the oil separator valve on a BMW E36 3 series car. Even though we have used a 1996 BMW M3 to perform this installation, this article can be applied to any 1990-1998 3 series vehicle with minor modifications.
See all vehicles this article applies to
E36 3 Series 316i
E36 3 Series 318is
E36 3 Series M3
E36 3 Series 320i
E36 3 Series 325i
E36 3 Series 325is
E36 3 Series 323i
E36 3 Series 328i
E36 3 Series 318i
E36 3 Series 323i 2.4
E36 3 Series 325td
E36 3 Series 325tds
E36 3 Series 318tds
E36 3 Series 316i 1.6
E36 3 Series 323ti
E36 3 Series 318ti
E36 3 Series 316g
E36 3 Series 316i 1.9
A BMW E36 oil separator valve replacement may help cure a rough idling engine, white tail pipe smoke, "burnt" oil fume smells and overall better engine performance.
The BMW E36 oil separator valve, also known as the positive crankcase ventilation (PCV) valve, is a common cause of poorly performing engines in 1990-1998 3 series cars. Its sole purpose is to relieve the pressure that builds up inside your engine's crankcase by sucking out the gas, oil, and water condensation produced during engine operation. The PCV valve's job is to separate these combustion byproducts; it channels fumes and vapors back into the intake manifold for further combustion and oil back to the lubrication system via the dipstick tube.
Other side effects from a failing or clogged BMW E36 oil separator valve are rough idling, the smell of burnt oil emanating from the engine compartment, and white tailpipe smoke.
A BMW E36 oil separator valve replacement is a very straightforward repair and can be easily performed by the home mechanic. Contrary to other repair articles, you do not need to remove the intake manifold on the BMW E36 engine to extract the oil separator valve from underneath it. We have a video in the steps below that shows you how to easily maneuver the valve out without taking unnecessary steps.
The BMW Repair Guide strongly recommends replacing the crankcase breather and oil dipstick hose when performing this repair. The repair kit we offer below in the parts section includes everything you need so you don't have to purchase everything separately.


If the video does not appear below, please click here to view
View the video version of this repair.
View the detailed parts diagram for this repair.
Includes detailed part diagrams, part numbers and links to purchase all of the required components needed to complete this repair.

Before starting this repair, you must have the following required parts.
Fits all E36 six cylinder engines except 325i.
Over the years, the engine heat and weather can take their toll and either weaken or cause breaks in these hoses. Your engine begins to run much worse due to massive vacuum leaks. Common symptoms are a howling noise followed by oil leaks. This kit addresses these issues by providing new components and hardware.
BMW E36 323i, 325i, 328i and M3
Air filters should be inspected and replaced at least once a year, more often if the vehicle is driven in heavily polluted or dusty conditions. Air filter service at recommended intervals protects an engine from costly damage.
Section 1 - Removing the BMW E36 Oil Seperator Valve (PCV Valve)
- Remove the air box assembly using a 3/8" ratchet and 10mm socket. Disconnect the cruise control and lay to the side so it is not in the way.
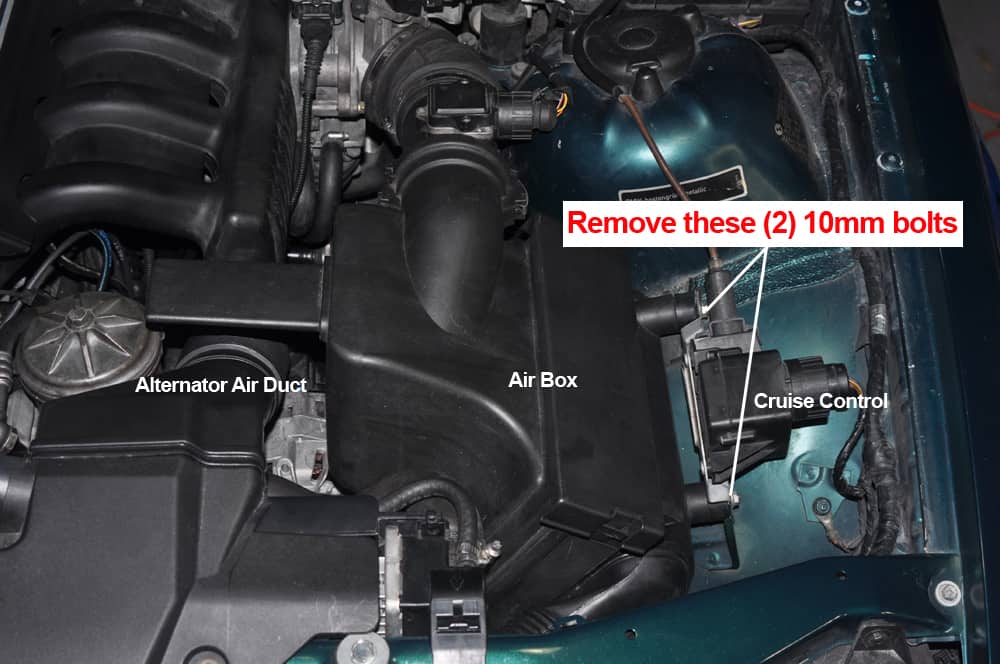
- Remove the alternator air duct boot with flat blade screwdriver (see image above).
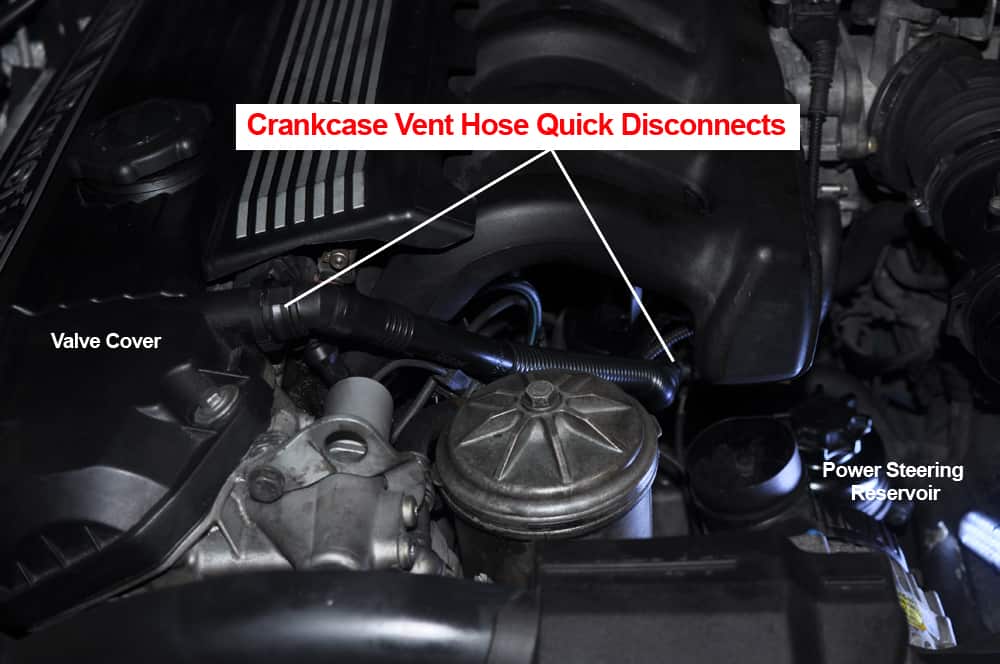
- Remove the crankcase vent hose from the valve cover by squeezing the quick disconnect and pulling off. Use the same procedure to disconnect vent hose from the oil separator valve. Remove the dipstick vent hose from the dipstick fitting by reaching down between the coolant hoses under the throttle assembly. It is easier to first visually follow the hose with a flashlight from where it exits the oil separator valve before reaching down and disconnecting it. Loosen hose clamp (if there is one present).
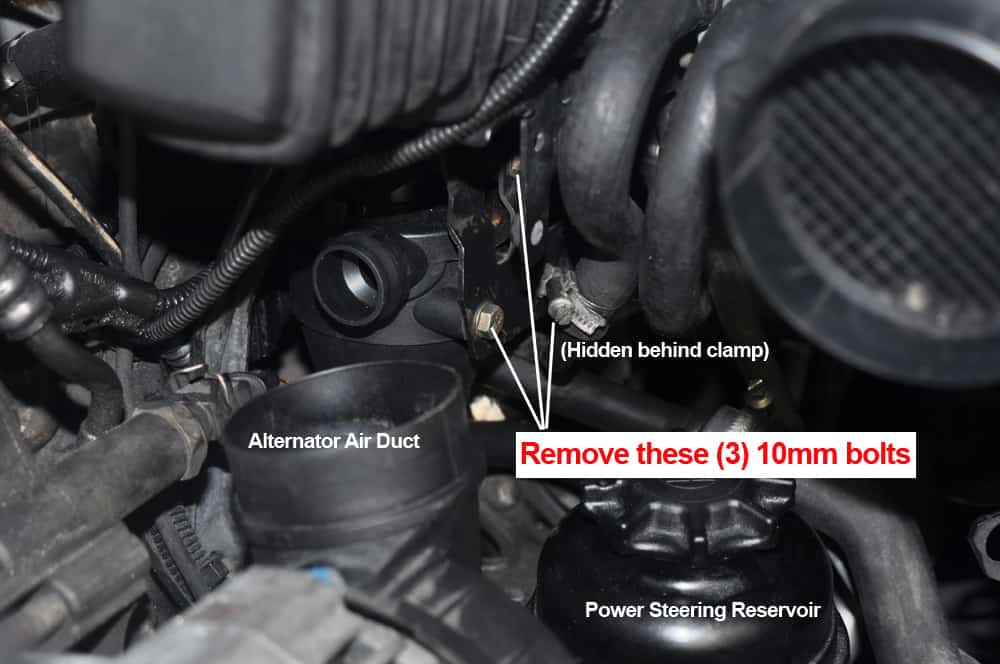
- Remove three mounting bolts anchoring the BMW E36 oil separator valve to its mounting bracket.
- Using extreme patience, remove BMW E36 oil separator from engine compartment. You may have to slightly bend the mounting bracket forward and remove the power steering reservoir cap to gain enough clearance to get it out.
- Use the reverse procedure to reinstall new BMW E36 oil separator assembly. Do not forget to attach the crankcase vent hose back on to the valve cover.
BMW E36 Oil Separator Valve Replacement Finished