
Affiliate link disclosure – The BMW Repair Guide uses affiliate links in their site. For more information on affiliate links, please click here.
Repair Summary
The following article shows how to perform a coolant system repair on a BMW E31 8 series vehicle with the M60 8 cylinder engine. The procedure can also be used on any other vehicles with the M60 engine, including the BMW E34 5 series, and E32 7 series with minor modifications.
See all vehicles this article applies to
E31 8 Series 850CSi
E31 8 Series 850Ci
E31 8 Series 840i
E31 8 Series 840Ci
A BMW E31 coolant system repair on the M60 8 cylinder engine is not technically difficult, but it does have its challenges. Depending on the age of the vehicle and it's prior service records, certain steps of the repair can produce scratched forearms and creative expletives.
Let's face it, the cooling systems on all vehicles wear out over time. And when you start dealing with older model cars, like the M60 coolant system in BMW E31/E32/E34 and E38 vehicles, parts begin to deteriorate at what seems even a faster pace. Plastic fittings begin to get brittle and fall apart. Bolts and screws become corroded, especially in the radiator compartment, and are prone to seizing or stripping when trying to be removed. If you own an older model car and are trying to refurbish it, starting a process like replacing a cracked radiator or old water pump can be like " pulling a loose string on a sweater". Once you start taking things apart you realize it may make more sense just to replace the entire system.
The BMW Repair Guide's E31 840Ci, which contains the M60 8 cylinder engine, sprung a radiator leak just below the drivers side water hose fitting...a typical spot for leakage on these models. As we started to investigate further, we noticed the cooling system had never been serviced, at least as far as we could see. The fan blades were old and chipped, the backup electric cooling fan was foul looking, and we had already replaced the heater valves that sprung a leak because the plastic intakes had literally fallen off. We were faced with the decision of rolling the dice and just replacing the radiator or sucking it up and replacing the whole coolant system. For peace of mind, we decided to do the latter and replace everything. We feel this was the right decision and have written this article assuming most other BMW M60 engine owners will agree.
Quick Note on BMW Fan Blade Removal
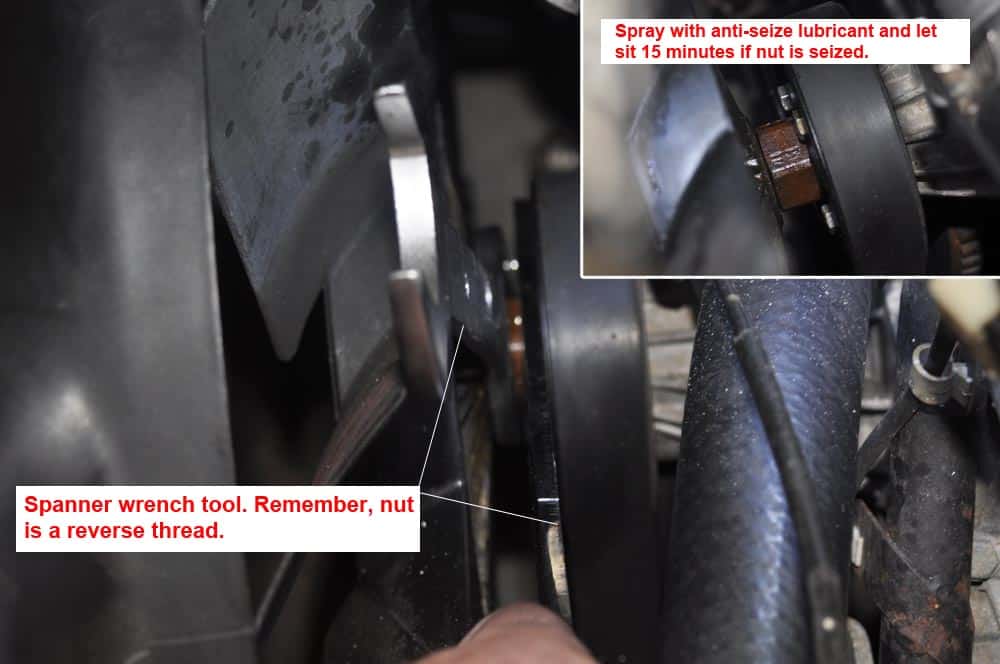
Before we get into the step-by-step procedure of a BMW E31 coolant system repair, we would like to stand on our pulpit and recite our gospel on why we think there is so much bad advice on the internet concerning the removal of the fan blade on older model BMW's. First of all, if the nut that holds the fan blade to the water pump is seized up like it is in most older, high mileage, service neglected BMW's, you will not be able to get it off. The spanner wrench is worthless, and you can spray it with PB Blaster and smack it with a rubber mallet until the cows come home, but trust us...IT won't COME OFF.
We have snapped screwdrivers, bent pulley screws, and broken pieces of the car when we missed with the rubber mallet. We spent a week trying to loosen the nut on a 200,000 mile E36 M3, even fabricating our own tools to try and make it work. IT won't COME OFF. Save yourself a lot of time and stress...and follow our procedure below for removing a seized fan nut. If your intentions are replacing the water pump and the fan assembly during your repair, which we highly recommend for a full BMW E31 coolant system repair (or any other BMW model), don't waste your time trying to free a seized fan blade nut.
If you are not planning on replacing the entire coolant system in your BMW M60 engine, you can skip or modify the steps in this article as necessary to complete your job. We have put this repair in a logical sequence so partial repairs can be easily accomplished.


View the detailed parts diagram for this repair.
Includes detailed part diagrams, part numbers and links to purchase all of the required components needed to complete this repair.
Section 1 - BMW E31 Coolant System Repair: Fan Blade Removal
Removing the fan blade should always be the first step (attempted) in a BMW E31 coolant system repair. Due to the age of these engines, the fan blades often seize on the water pump shaft and can't be removed. It is always good to find this out at the beginning of the repair and not halfway into it.- Using a fan clutch removal tool (spanner wrench), turn the fan blade nut clockwise to loosen. This is a reverse nut, so it should be turned to the right when facing the front of the car. If the nut will not loosen using the spanner wrench, spray the nut with PB Blaster or another anti-seize lubricant. Let it sit for about 15 minutes, and try again. If the nut still will not loosen, use a rubber mallet and continually strike the wrench with powerful short blows. Making a mark on the fan nut with a sharpie is a good way to see if you are making any progress. If the nut still will not loosen, spray again with anti-seize lubricant, let sit another 15 minutes, and try again with the rubber mallet. If after 3 or 4 tries the nut will not loosen, you, unfortunately, have a seized fan nut.
- If you cannot loosen the fan blade nut, then you will have to replace the pulley (whether you intended to or not). There is no way to separate the old pulley from a seized fan blade nut. The fan blade will be removed in Section 2 below.
Section 2 - Radiator Removal
- Position your 5-gallon drain pan under the front of the car. Disconnect and remove the lower radiator coolant hose (runs from lower radiator to water pump) and the expansion tank coolant hose. Disconnect and remove the upper radiator coolant hose and expansion tank coolant hose (if the clamp is crimped on, you can just cut off with a pair of pliers and replace it with a regular hose clamp during re-assembly). Remove the drain plug from the left side bottom of the radiator (use a large flat blade screwdriver). Allow the system to drain for about 20 minutes. Have plenty of Pig Mats on hand….even with a 5-gallon drain pan, you will not catch all the fluid as it sprays out and hits the engine.
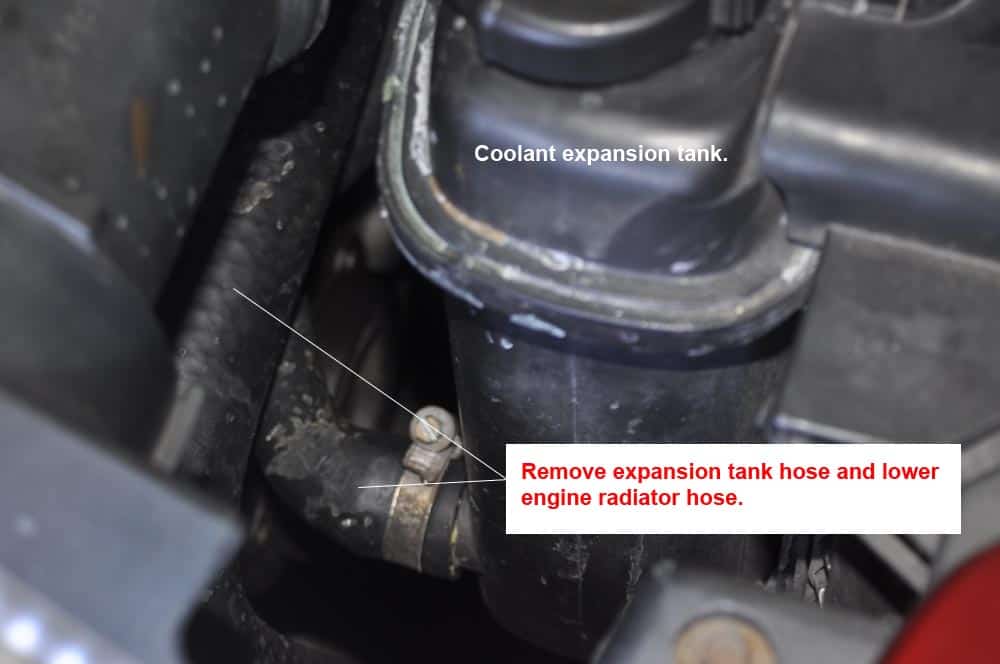

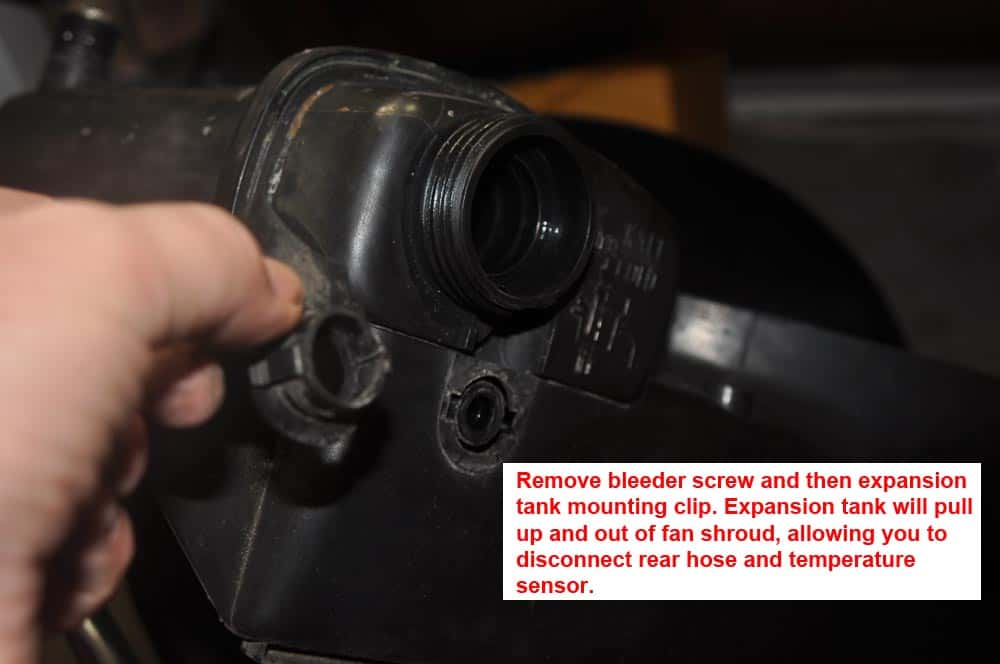
- Remove the expansion tank bleeder screw, then unsnap and remove the expansion tank mounting clip. The mounting clip unsnaps by squeezing the two clips inward (don't force off with a screwdriver or you will break it). Pull the expansion tank up and out of the fan shroud and disconnect the expansion tank hose attached to the back of it. Disconnect the water temperature sensor and remove the expansion tank.
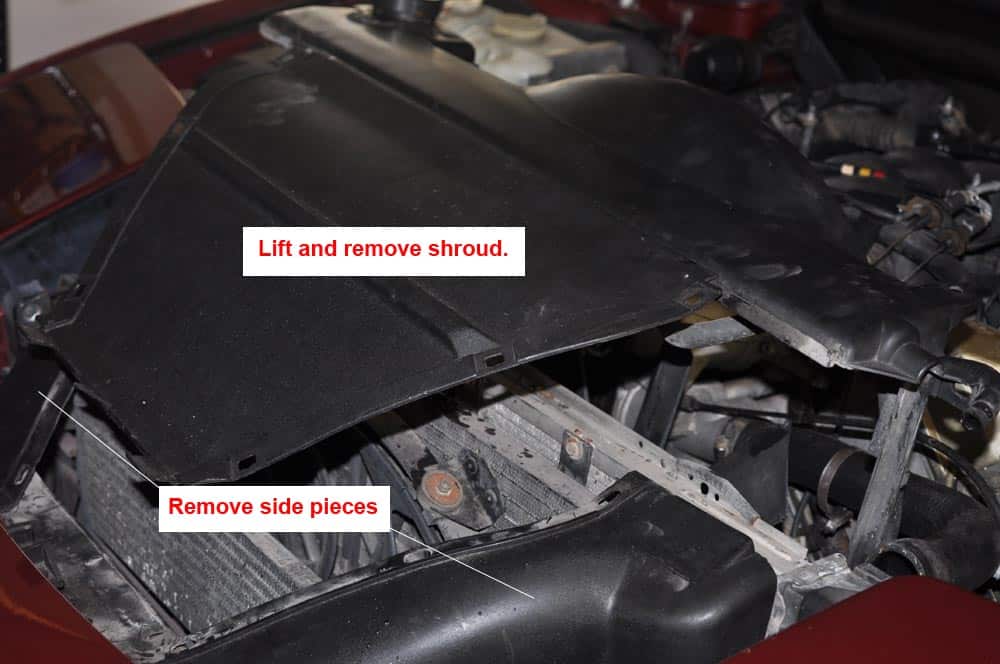
- Remove the six snap rivets from the auxiliary fan cover, and the two snap rivets on either side of the radiator fan shroud. The two rivets on the radiator shroud are a bit nasty to get out and will require some prying with a body trim tool.

- Using an 8mm socket, remove the two plastic radiator mounts from the left and right sides of the radiator.
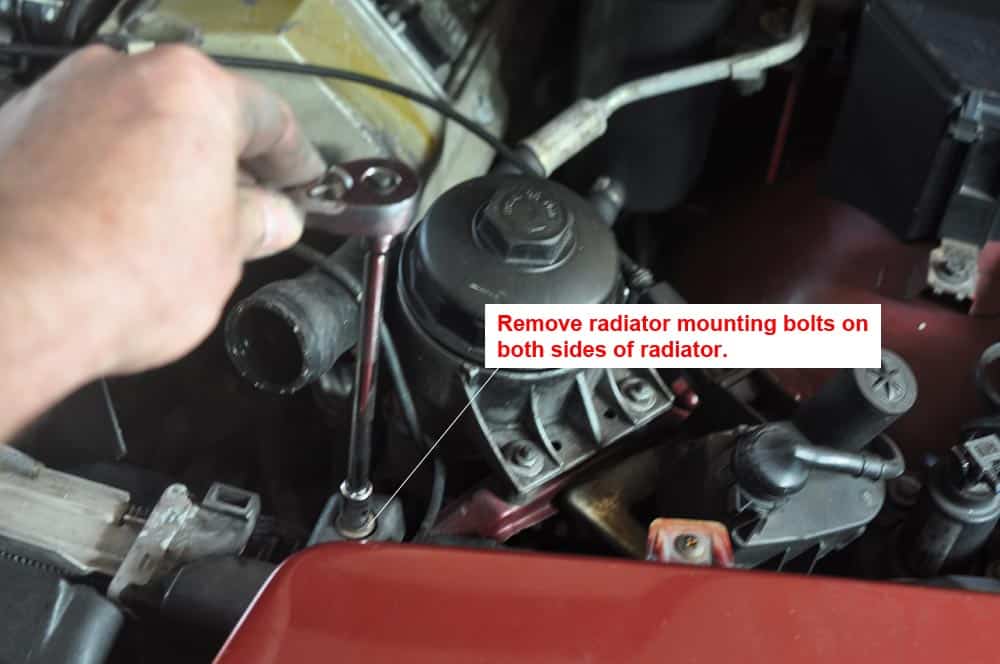
- Using the same 8mm socket, remove the two top mounting bolts holding the power steering fluid cooler to the front of the radiator.
- If you were unable to remove the fan blade in section 1 because the nut is seized, proceed to the next step. If you were able to remove the fan blade using a spanner wrench in section 1 of this article, proceed to step 8.
- You will now have to remove the cooling fan blades from the clutch hub to create room for removing the radiator. Remove the four hex bolts holding the blades on with a 5mm hex socket. The following image shows the hub after the blades are removed. Please note the image was taken with the radiator removed for better clarification of the clutch hub assembly. [caption id="attachment_1506" align="alignnone" width="664"]
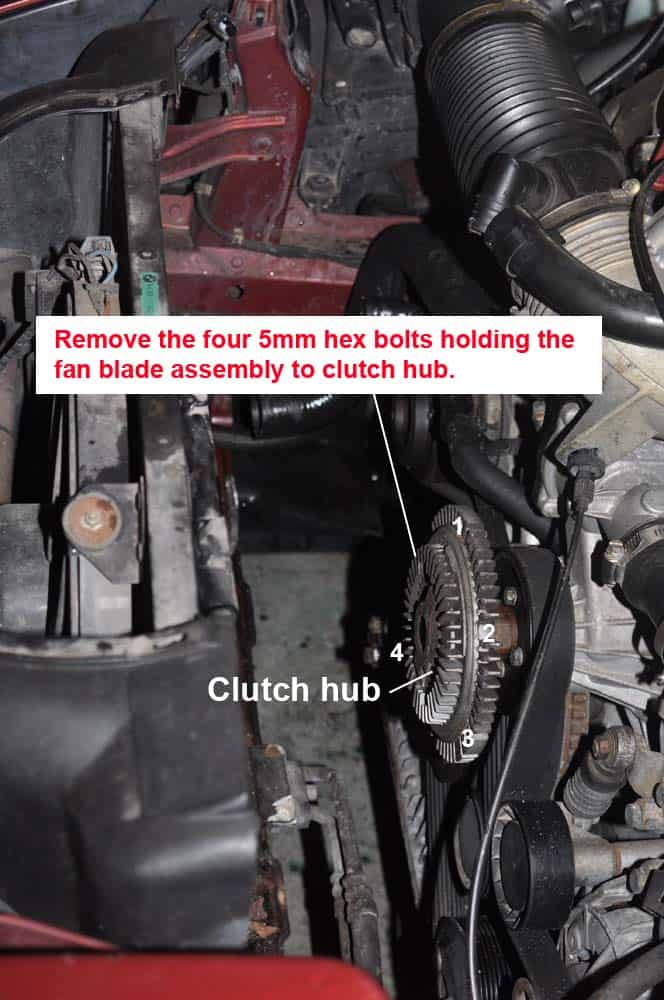 Photo shown with radiator removed for better clarification.[/caption]
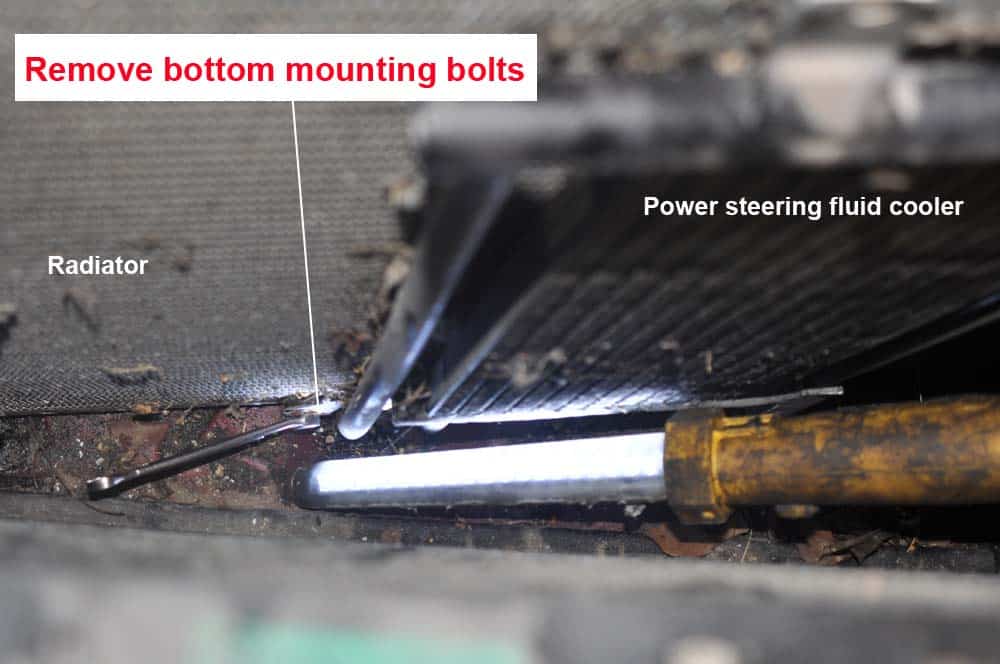
 - The next step is slightly difficult, so patience is required. Pull the radiator up and tilt back (towards the engine) until you can access the two 8mm bolts holding the power steering fluid cooler to the bottom of the radiator. We suggest using an 8mm open-end wrench to loosen them, then finish the job with an 8mm socket.
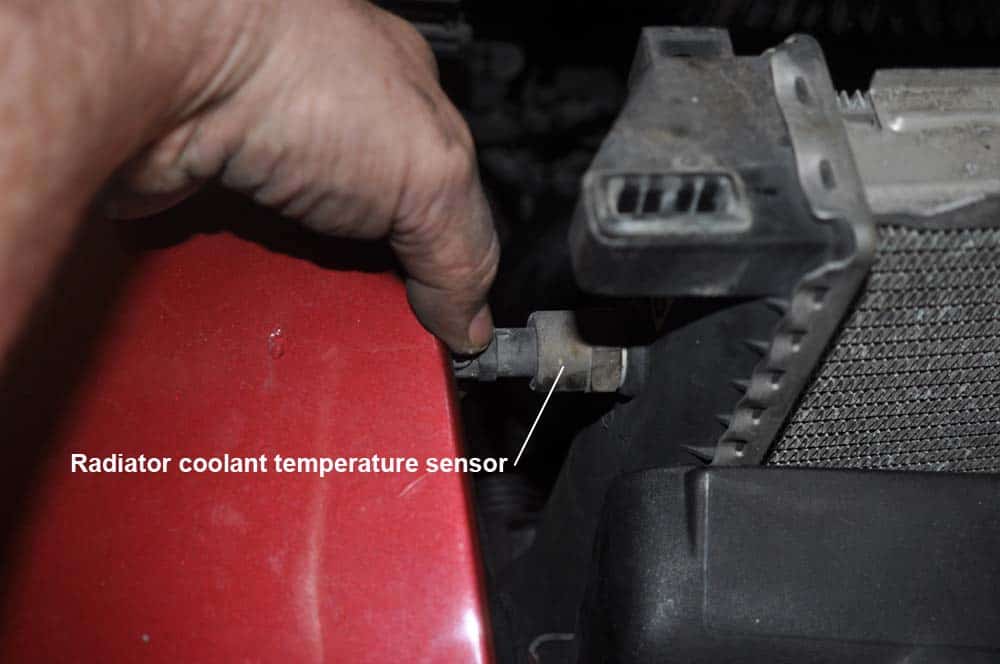
- Unclip and remove the radiator fan switch (temperature sensor) from the passenger side of the radiator.
Section 3 - Auxillary Cooling Fan Removal
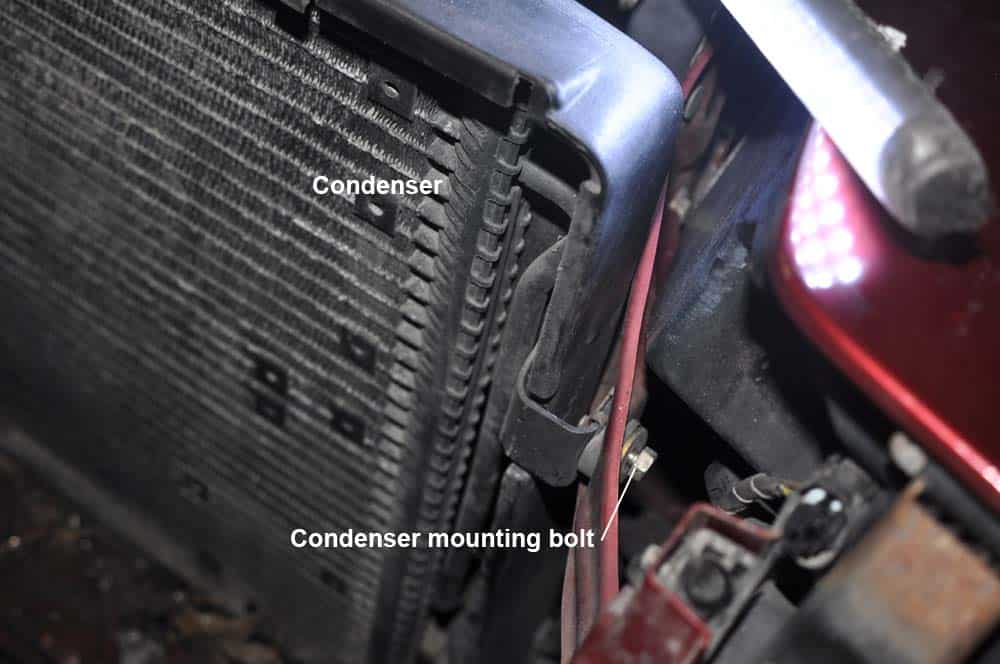
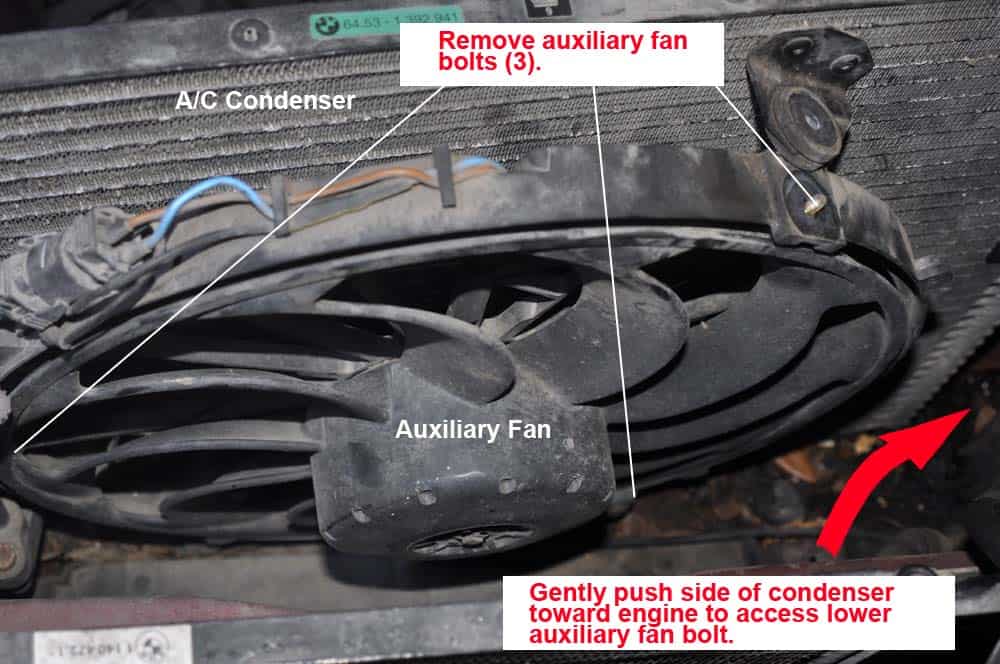
- To remove the auxiliary fan, you must remove the a/c condenser (often called the "2nd radiator") brackets. There are two of them on both the right and left sides of the condenser. Use a 10mm socket to remove the bolt. The left side bolt is a bit tricky to get to so have patience.
- Once the condenser is loose, GENTLY nudge the left side of the condenser back towards the engine. You just want to give yourself enough room to gain access to the three 10mm bolts holding the auxiliary fan in place.
- Remove the three 10mm mounting bolts on the auxiliary fan using a 10mm socket or open-end wrench.
- Unsnap the power supply on the right side of the fan and remove it from the engine compartment.
- Using a WetVac and compressed air, clean all of the dirt, leaves, bugs, and grime off of the ac condenser, the radiator housing, and the surrounding areas.
Section 4 - Water Pump/Thermostat Removal
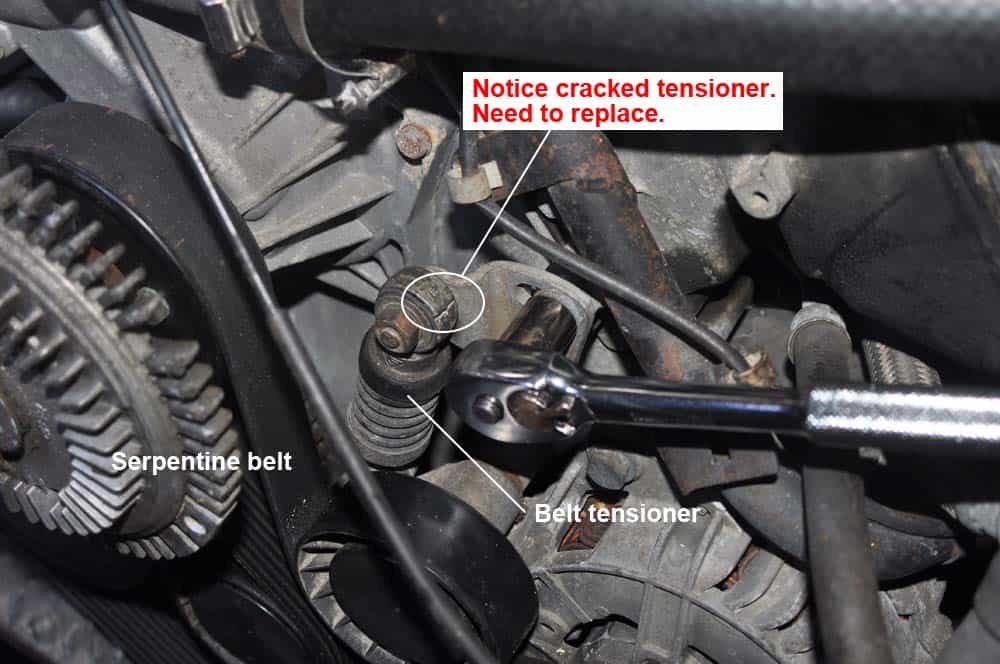
- Using a piece of paper and pen, mark the direction of the serpentine belt as it makes its way through the pulleys. We have also included a diagram for your convenience.
- Using both a 10mm and 13mm socket wrench, loosen the bolts on the serpentine belt tensioner. The belt should easily slip off of the pulleys. Notice our belt tensioner is cracked and will have to be replaced. We will go ahead and also replace the A/C belt tensioner since it probably is on its way as well (this is the joy of working on an older car...you never know what other issues you may uncover while doing a repair).
- Loosen the A/C belt tensioner by also using a 10mm and 13mm socket wrench and remove the A/C belt. Swing tension pulley down so it is clear of the harmonic balancer.
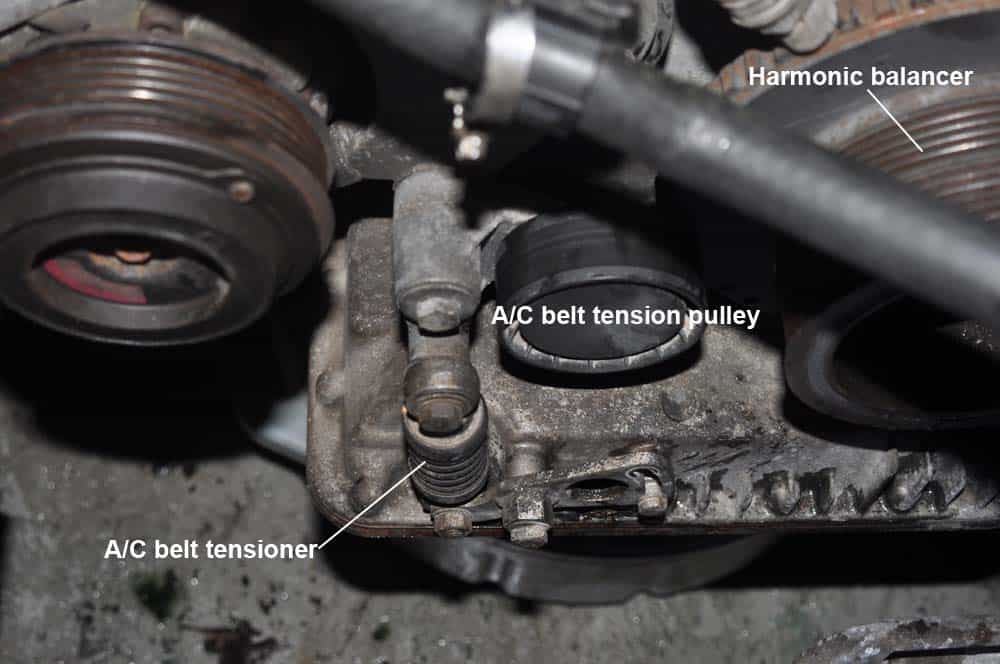
- The harmonic balancer must be removed to gain access to one of the water pump bolts. Remove the eight harmonic dampener bolts with a 13mm socket. When the bolts are removed, give it a gentle whack with a rubber mallet and it will pop right off.
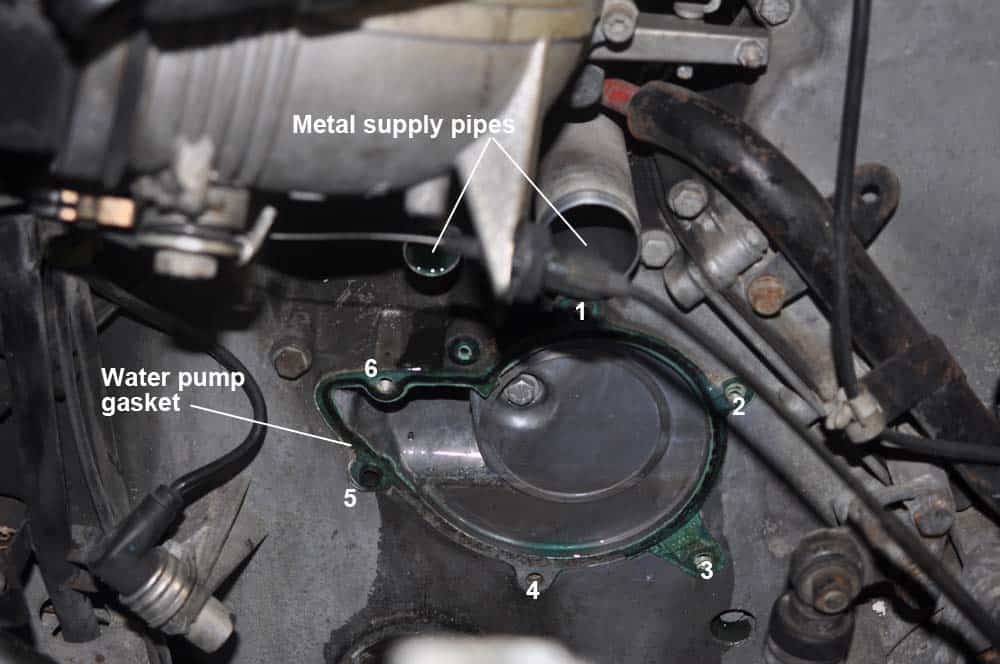
- Remove all six water pump bolts using a 10mm socket. Grab the water pump and pull it towards you, gently rocking back and forth until it releases from the two metal engine supply pipes that attach to the top. These two pipes are held into the back of the pump by friction and will disconnect with patience.
Section 5 - Prepping the New Water Pump for Installation
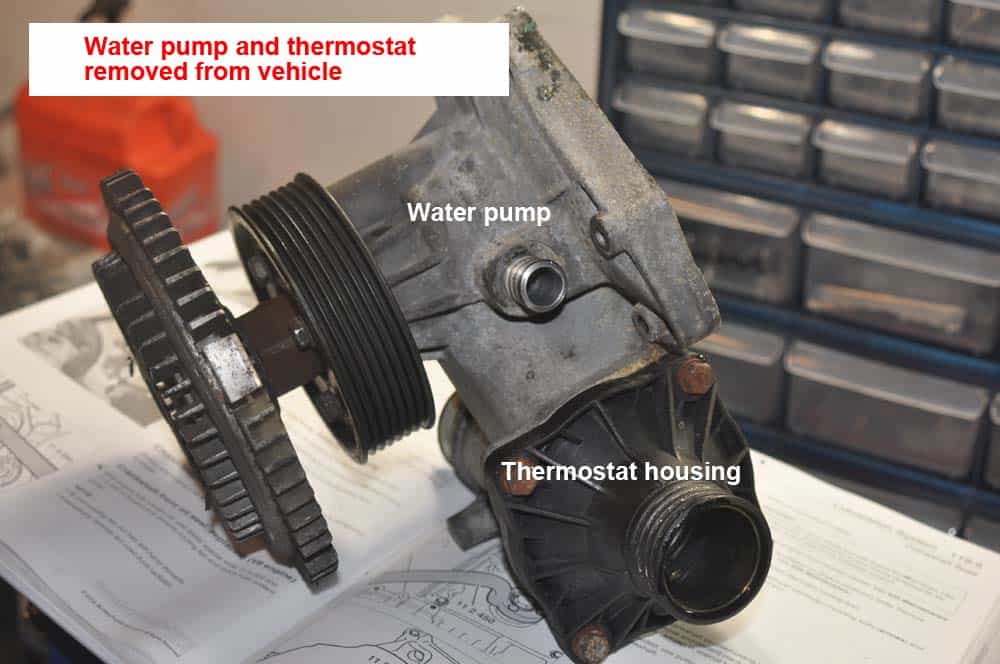
The new water pump is prepped for installation by installing the new thermostat and thermostat housing.- Remove the four 10mm bolts in the old thermostat housing...you will need these to install new housing (unless you purchased new ones separately).
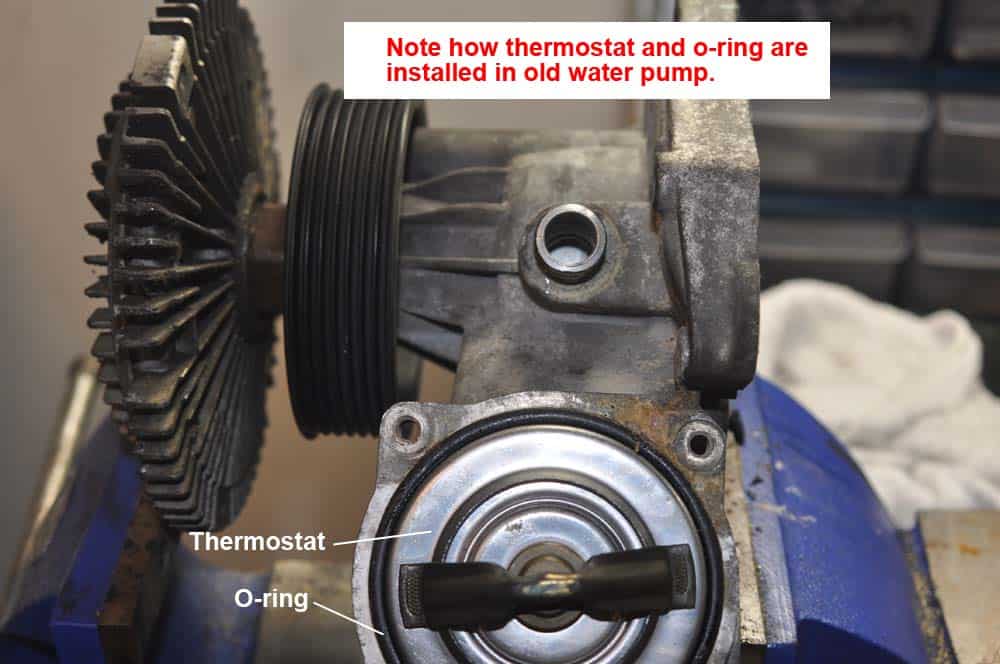 3. Install the new thermostat and o-ring in the new water pump. Once again, the thermostat is placed inside the round groove and the o-ring is installed on top of the thermostat. 4. Lubricate the o-ring with a small amount of engine coolant, then install the new thermostat housing and torque bolts to 10 Nm (7.5 ft-lb). 5. Remove any old water pump gasket still attached to the engine block. Spray the surface with CRC Brakleen and let sit for a minute. You should be able to now remove most of the gasket off with a plastic scraper. If the old gasket is especially stubborn, use a single razor blade to gently remove it, being careful not to scratch the surface. Under no circumstances should you use a screwdriver, metal scraper, or any other metal tool that can scratch, pit, or chip the surface. When all of the old gaskets are removed, wipe thoroughly with CRC Brakleen and a rag until the surface is completely clean.
 Section 6 - Reassembling the Coolant System
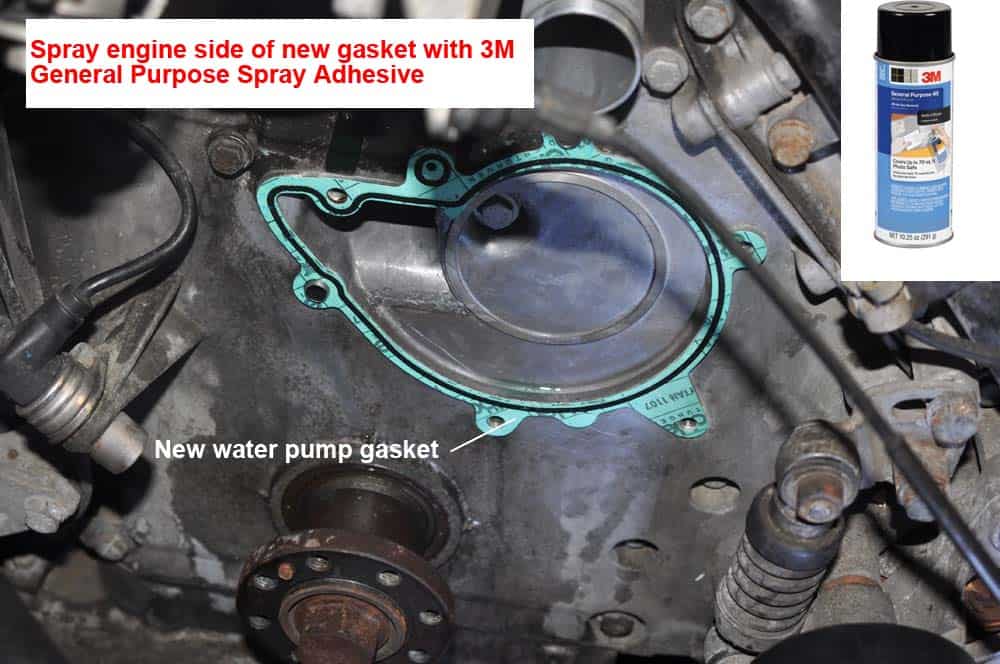
- Set the water pump gasket in place on the timing chain cover as shown in the following photo. There are two dowels on the timing chain cover that line up with two holes on the gasket. Spray the engine side of the gasket with a little 3M General Purpose Spray Adhesive...this will hold the gasket perfectly in place while you install the water pump.
- Lubricate the two metal engine cooling pipes o-rings on the back of the water pump with some engine coolant, then mount the pump on the timing cover. Make sure the gasket and metal pipes are correctly lined up as you mount the pump. Reinstall the six water pump bolts and torque to 10 Nm (89 in-lb).
- Reinstall the harmonic balancer, making sure the dowel on the hub correctly lines up with its corresponding hole in the balancer. Torque the 8 bolts to 22 Nm (16 ft-lb).
- Install the water pump pulley and torque all 4 bolts to 10 Nm (89 in-lb).
- Install the new a/c and serpentine belts, paying particular attention to making sure the belt lines up properly in the pulley grooves. Tension the belts so they have no more than 1/2" of deflection when force is applied by your fingertip. See the following diagram for the correct routing of the belts on the pulleys.
- Next, it’s time to install the new auxiliary fan. It can be a little tricky, so be patient - if you follow these steps you shouldn’t have any trouble:
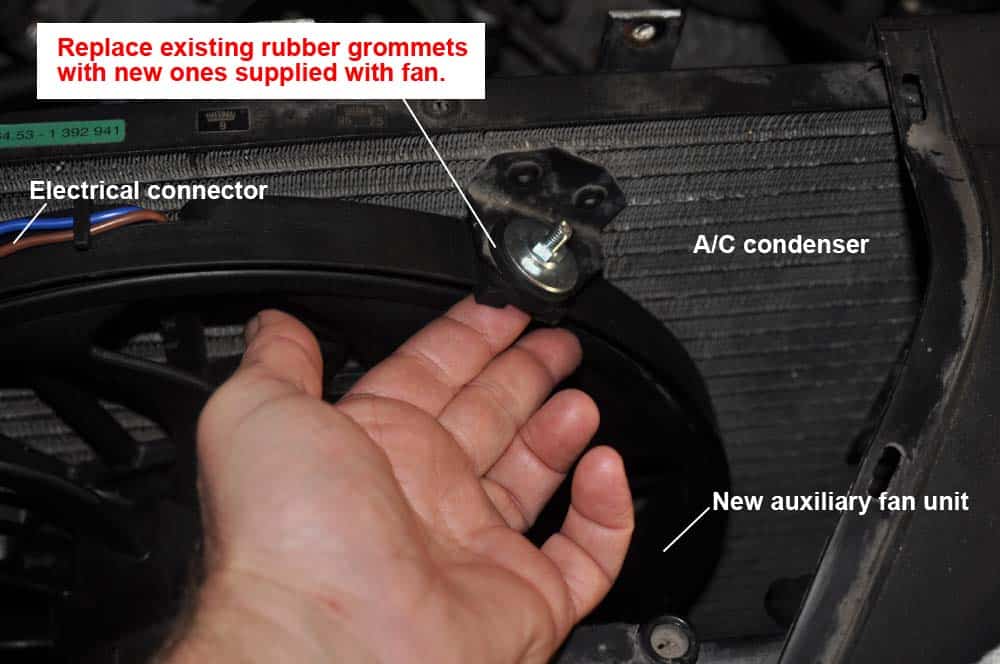 d) When you get the bolt through the grommet, install the washer and nut and tighten with a 10mm socket. e) Repeat this procedure with the other two fan mounts, starting with the mount on the left and finishing with the top mount. f) Reattach the power supply and gently pull the condenser and fan into position. Reinstall the two 10mm condenser bracket bolts. 7. Install the new fan switch into the new radiator with an adjustable wrench. DO NOT use any type of thread sealer or Teflon tape when installing in new radiator.
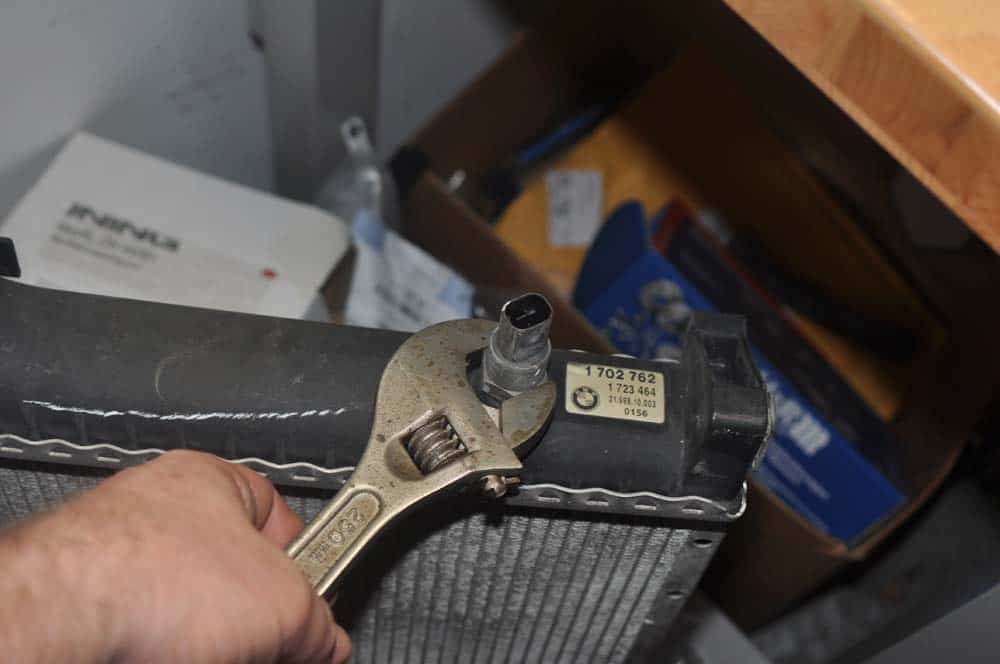 8. Make sure your new radiator comes with a drain pug installed in the bottom (most of them do). If it doesn't have one, then you will need to order one before installing it (using your old one is not recommended). Order a replacement drain plug by clicking here. Install new radiator rubber mounts. Be careful...they have a knack of falling off when reinstalling the radiator, and are literally impossible to find if they bounce inside the engine compartment.
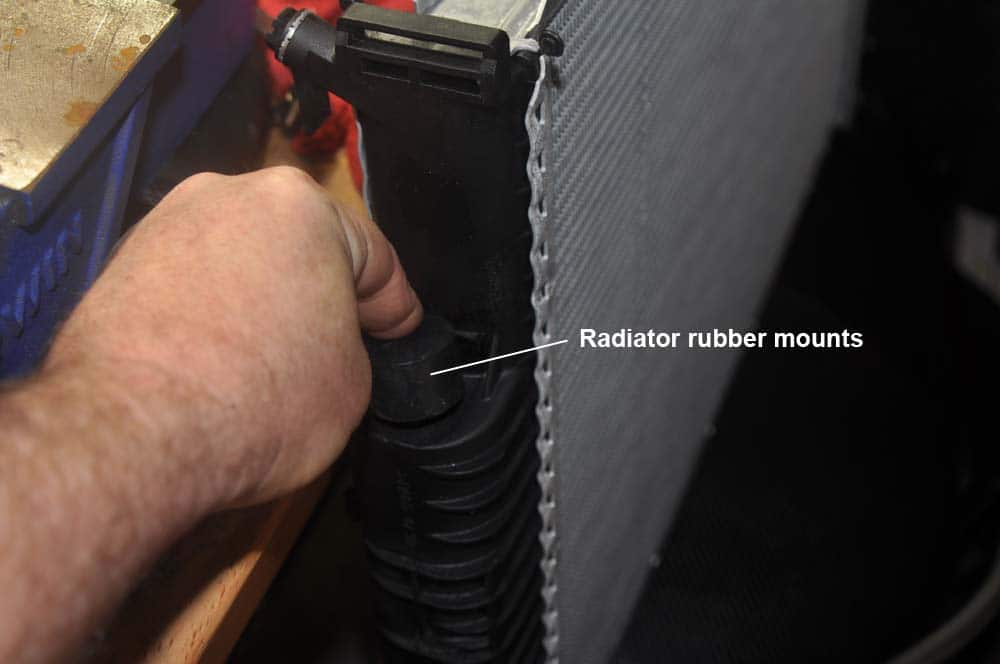 9. Install the new plastic radiator shroud brackets. Make sure they snap in and are seated correctly.
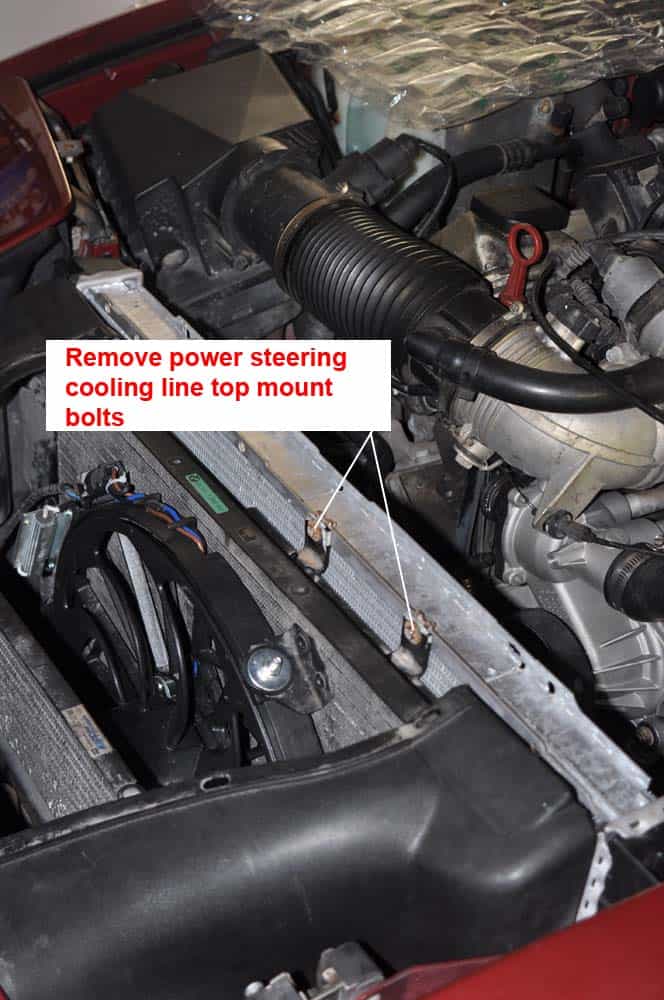
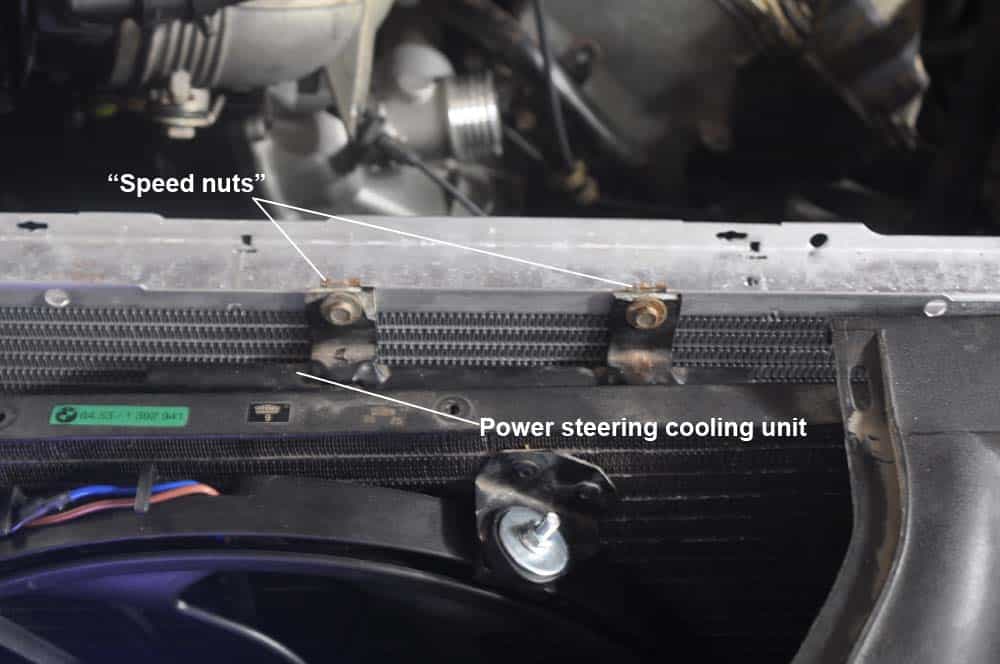
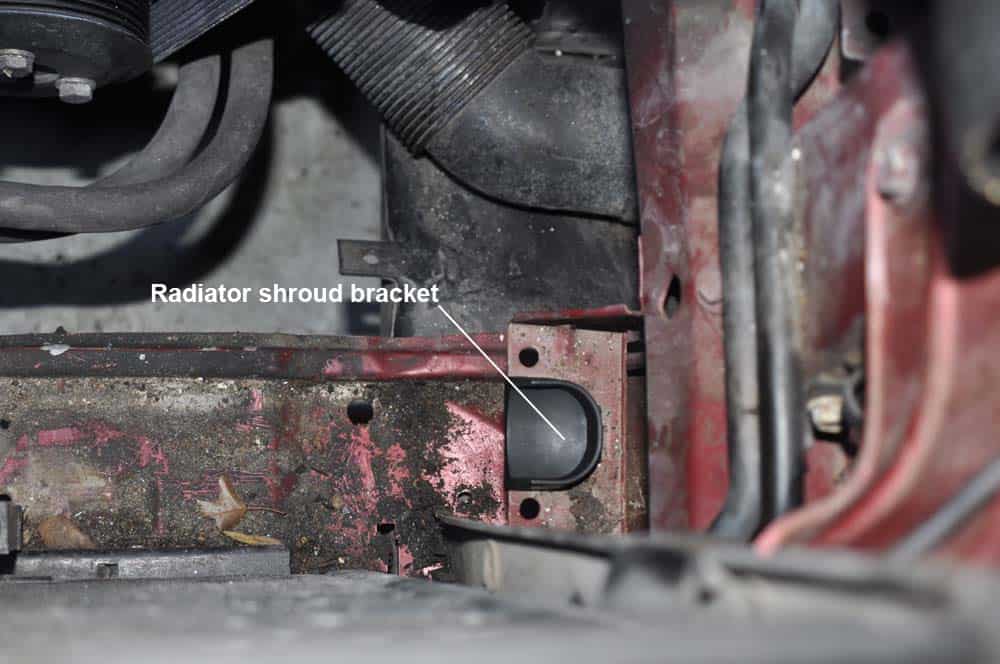 10. The next step takes patience, so move slowly. Pick up the radiator and place it SLOWLY back into the car. Be careful not to knock the rubber mounts off when installing...they bounce like a superball and are impossible to find because they are black. When the rubber mounts are seated correctly in the radiator shroud brackets, plug in the fan switch power supply on the right side of the radiator...you won’t be able to get to it after the radiator is mounted. 11. Reinstall the old power steering cooling mounting clips (speed nuts) on the top of the radiator. Be careful when you remove them from the old radiator...they are brittle and can break if you use too much force. We would suggest deleting the bottom ones...we have found they are not necessary and you can wreak more havoc trying to get them back in. Also, you will be very lucky if all four holes on your new radiator match the pattern on the power steering cooling bracket, so once again we suggest just installing the top ones.
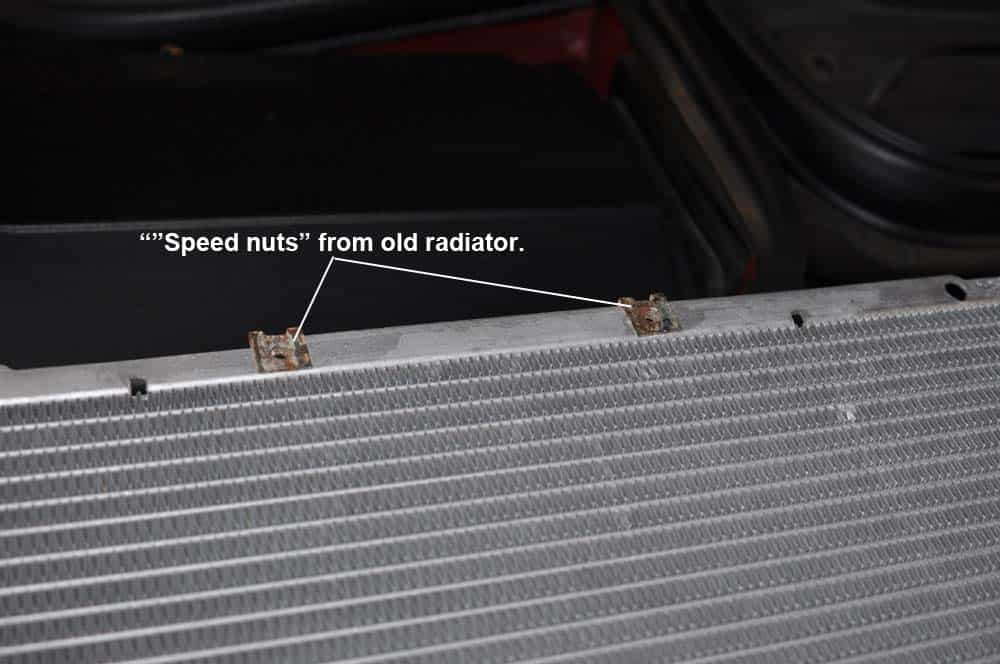
 12. Reinstall the upper radiator rubber mounts and the plastic radiator mounting brackets on each side of the radiator. 13. Reinstall the plastic fan shroud, keeping in mind it is not one of BMW’s finest engineered pieces. You will need to fiddle it back and forth until it is seated correctly and snug.
 14. Install the new upper, lower, and fluid reservoir radiator hoses using the following diagram. Note that the fluid reservoir hose will only be attached to the engine block...it will be attached to the expansion tank in step 15. Make sure to use new hose clamps.
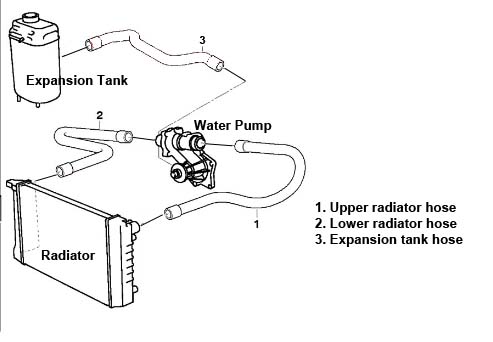 15. Connect the small existing expansion tank hose (it runs underneath the fan shroud) to the back of the new expansion tank, then attach the other end to the fitting on the top of the radiator on the left side of the car (see photo below for more detail). Don't forget the new hose clamps.
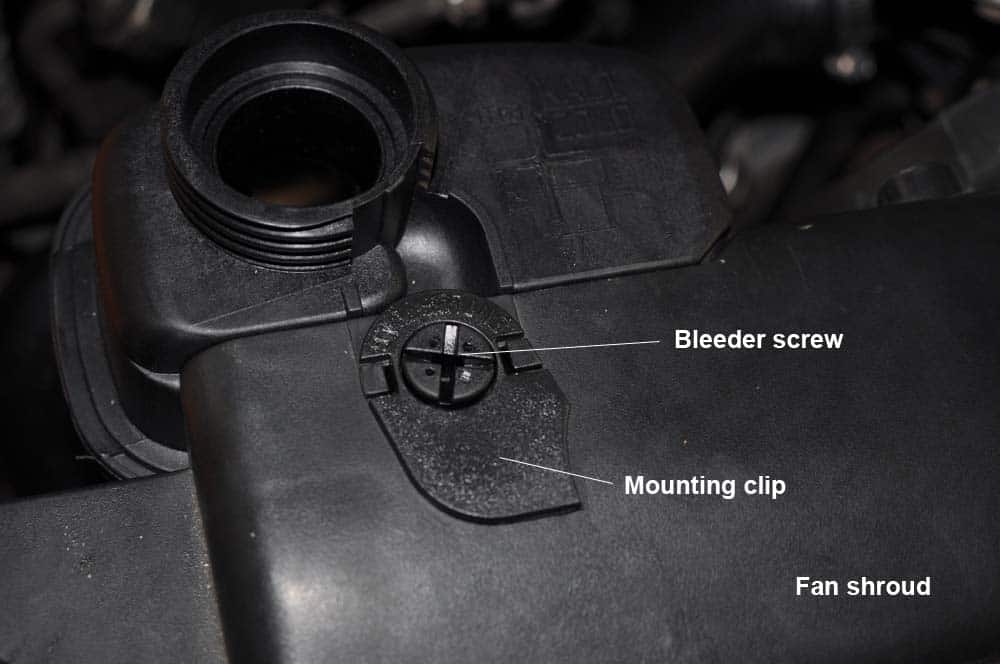
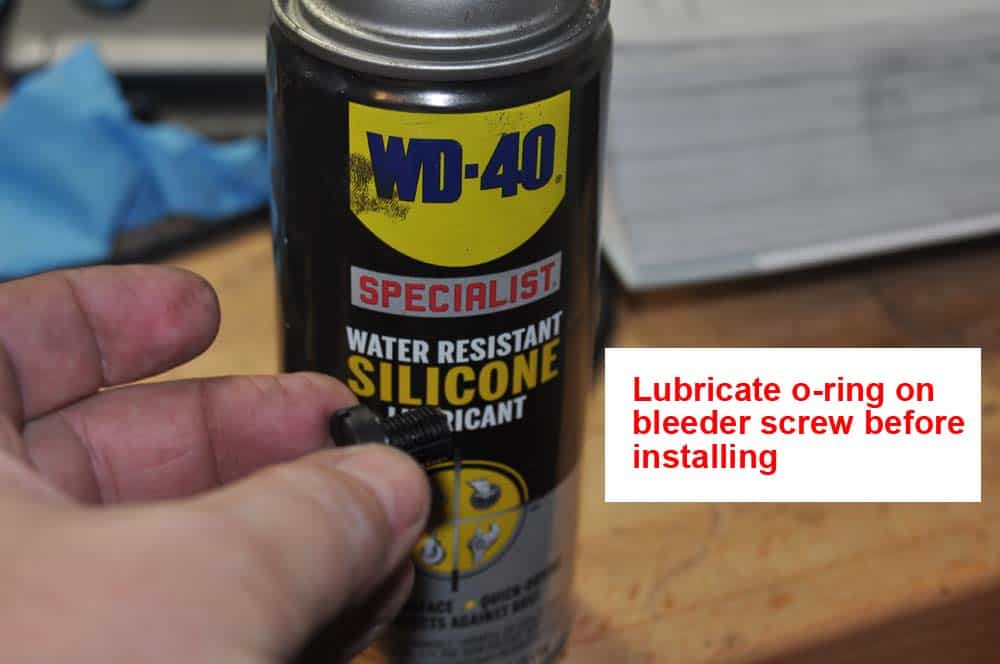
16. Install the new expansion tank into the fan shroud...it has two plastic fittings on the bottom that fit into the shroud...then install the expansion tank mounting clip, new cap, and new bleeder screw. Be sure to put a little silicone grease around the O-ring on the bleeder screw. Note - You may want to remove the cover on the air cleaner to gain extra room for the installation of the expansion tank.
15. Connect the small existing expansion tank hose (it runs underneath the fan shroud) to the back of the new expansion tank, then attach the other end to the fitting on the top of the radiator on the left side of the car (see photo below for more detail). Don't forget the new hose clamps.
16. Install the new expansion tank into the fan shroud...it has two plastic fittings on the bottom that fit into the shroud...then install the expansion tank mounting clip, new cap, and new bleeder screw. Be sure to put a little silicone grease around the O-ring on the bleeder screw. Note - You may want to remove the cover on the air cleaner to gain extra room for the installation of the expansion tank.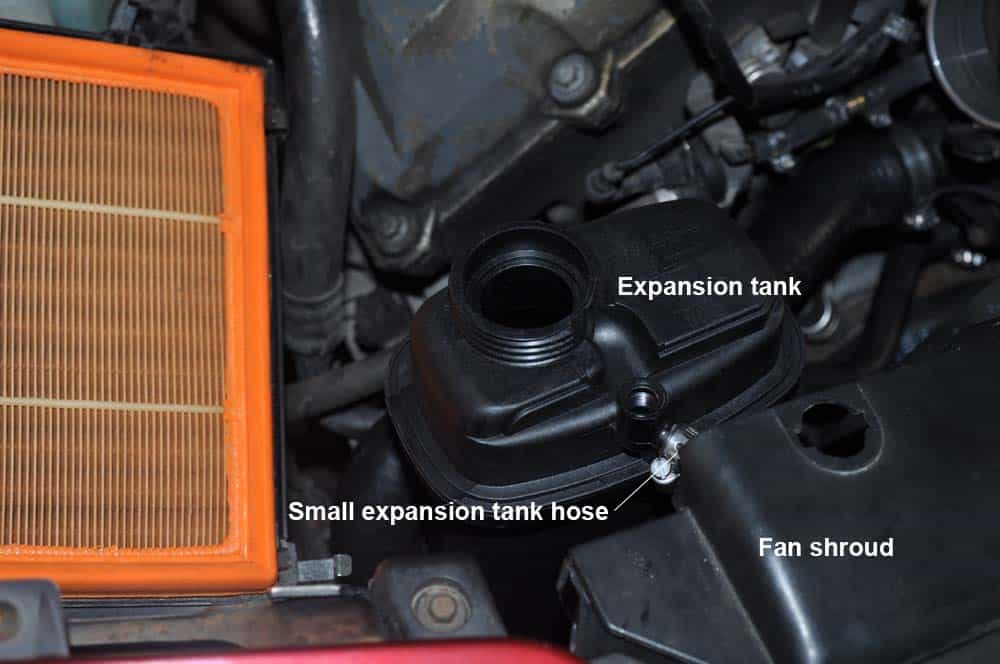
 17. Attach the bottom expansion tank hose (that was mounted to the engine block earlier in step 12) to the expansion tank. Always use new hose clamps.
Section 7 - Fan Blade Installation
- If you were able to remove the fan blade in step 1 of this repair, reinstall it on the water pump. Liberally apply some general automotive grease (marine grease also works great) on the threads when reinstalling so future removal will be easy. Remember the fan nut has reverse threads...turn to the left to tighten (while standing in front of the car). The nut only has to be snug (it is self-tightening when the fan blades spin)...you DO NOT have to torque down on it. Proceed to "Filling and bleeding the cooling system" below.
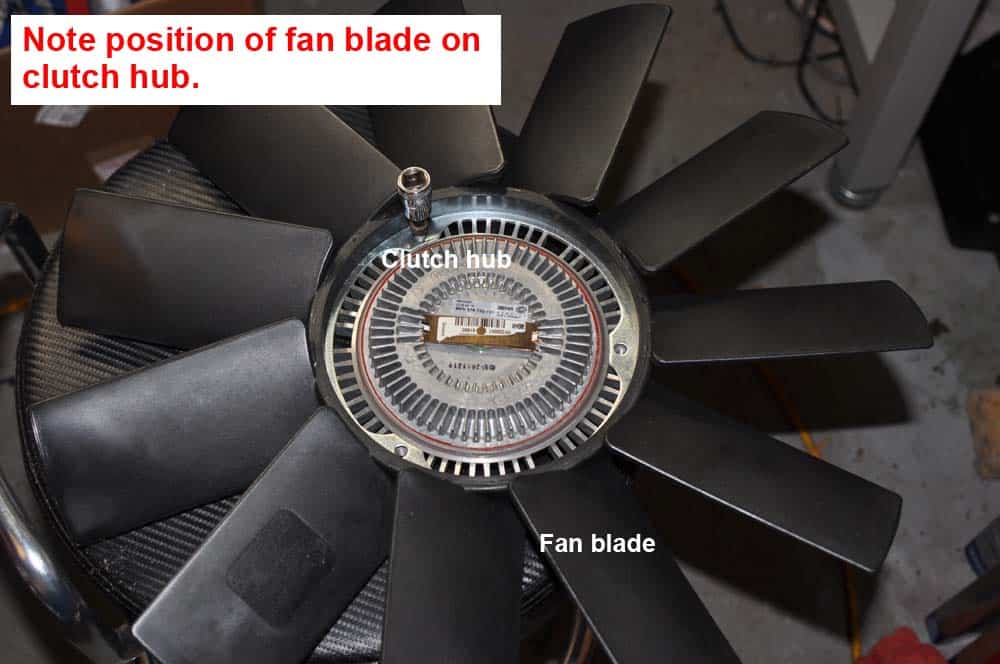
- If you were not able to remove the fan blade in step 1, attach the new fan blade to the new clutch hub with the four 5mm hex bolts. Pay particular attention as to which side of the fan is facing the hub (or else you will be blowing air out of the car). The following photo shows the correct installation position. Install the new fan blade on the water pump. Use plenty of grease on the threads when reinstalling so it will be easy to remove if necessary in the future. Remember the fan nut has reverse threads...turn to the left to tighten (while standing in front of the car). The nut only has to be snug (it is self-tightening when the fan blades spin)...you DO NOT have to torque down on it.

Section 8 - Filling and Bleeding the M60 Cylinder Coolant System
***Coolant should only be original BMW brand Antifreeze/Coolant mixed in a 50/50 ratio with distilled water. It is not recommended that any other coolant brand is used. DO NOT use tap water. Tap water can leave mineral deposits in the cooling system causing system failure after an extended amount of time. Filling the BMW E31 coolant system:- Mix up 3 gallons of a 50/50 mix of coolant and distilled water. The system is going to end up taking a little over 2 ½ gallons, but it’s good to keep extra ready at hand.
- Remove the tank cap and loosen the bleeder screw a couple turns. Start slowly filling the expansion tank with the new coolant.
- Continue slowly filling until the expansion tank until you can’t get any more in..this should happen slightly before you hit 2 ½ gallons of coolant.
- Replace the cap and tighten the bleeder screw.
- Turn on the ignition to position 2 (do not start the car). Turn the driver’s side temperature control all the way up (as hot as it will go) and set the fan speed to its lowest position. This will cause the auxiliary water pump and auxiliary fan to kick on. You should be able to hear the auxiliary pump humming...it is located next to the firewall on the driver’s side of the car. Keep the ignition on until you complete step 4.
- Grasp the top radiator hose (driver's side, radiator to water pump) and squeeze it 5 or 6 times to force coolant into the auxiliary pump.
- Remove the coolant reservoir cap and open the bleeder screw 2 turns. You will notice the coolant level will have dropped to the bottom of the reservoir. Fill the reservoir back up, replace the cap and tighten the bleeder screw.
- Repeat steps 2 and 3 until the coolant level no longer drops in the reservoir (usually after 4 or 5 tries).
- When the coolant no longer drops in the reservoir, replace the cap and tighten the bleeder screw and turn off the ignition.
- Start the car. Open the bleeder screw 2 turns (no not remove the expansion tank cap).
- You will notice air and a small amount of coolant bubbling out. Continue to let engine run until a steady stream of coolant comes out of the bleeder screw. This procedure usually takes about 30 seconds to a minute...but you will know when all the air has been removed from the system. The coolant will run steadily out of the bleeder screw with no bubbling.
- Tighten the bleeder screw.
- Leave engine on.
- With the engine on, use a flashlight and check all of your connections to make sure there are no leaks. Make sure to inspect the water pump and thermostat, and all of the radiator fittings. If everything looks tight and secure, take the car for a drive and get it up to operating temperature. Keep a keen eye on the engine temperature gauge to make sure the car is cooling correctly (isn’t overheating). If everything looks normal, park the vehicle, inspect again for leaks, and then let the motor cool down. Recheck the coolant level and top off if necessary.
BMW E31 Coolant System Repair Finished