
Affiliate link disclosure – The BMW Repair Guide uses affiliate links in their site. For more information on affiliate links, please click here.
Repair Summary
The following article gives detailed instructions on replacing the transmission solenoids in a ZF 5HP19 five speed automatic transmission. Even though we have used a 2003 BMW 325ci to perform this repair, this article can be applied to any vehicle with the ZF 5HP19 five speed automatic transmission with minor modifications.
See all vehicles this article applies to
E39 5 Series 540i
E39 5 Series M5
E39 5 Series 540iP
E39 5 Series 535i
E39 5 Series 530i
E39 5 Series 530d
E39 5 Series 528i
E39 5 Series 525tds
E39 5 Series 525td
E39 5 Series 525i
E39 5 Series 525d
E39 5 Series 523i 2.4
E39 5 Series 523i
E39 5 Series 520d
E39 5 Series 520i
E46 3 Series 325ti
E46 3 Series 318td
E46 3 Series 320td
E46 3 Series 318ti
E46 3 Series 330xi
E46 3 Series 330i
E46 3 Series 330xd
E46 3 Series 330d
E46 3 Series 316ti
E46 3 Series 328i
E46 3 Series 325xi
E46 3 Series 325i
E46 3 Series 320i
E46 3 Series 323i
E46 3 Series 320d
E46 3 Series 318i
E46 3 Series 318d
E46 3 Series 316i
E46 3 Series M3 CSL
E46 3 Series M3
E46 3 Series 330Ci
E46 3 Series 330Cd
E46 3 Series 325Ci
E46 3 Series 323Ci
E46 3 Series 320Ci
E46 3 Series 320Cd
E46 3 Series 318Ci
E46 3 Series 328Ci
E46 3 Series 316Ci
E46 3 Series 323i 2.4
E46 3 Series 316i 1.9
E46 3 Series 316i 1.6
A BMW 5HP19 solenoid replacement can cure erratic shifting and the infamous transmission "thump" when decelerating or putting the vehicle in reverse.
The ZF 5HP19 five-speed transmission was another workhorse gearbox that was used by many automobile manufacturers, including Audi, Porsche, VW, Jaguar and Range Rover. The 5HP19 is best known among BMW enthusiasts as the iconic transmission of the early 2000s that was found in just about every E46 325i/ci and E39 525i manufactured. A large portion of these transmissions are still powering vehicles on the road today.
Like all mechanical parts in our beloved bimmers, age is starting to take its toll on the ZF 5HP19 transmission. Even well-maintained, modestly driven specimens are starting to show the early signs of gear slippage and erratic shifting. The major cause of this declining performance is usually due to dirty or failing transmission solenoids.
The BMW 5HP19 solenoids are attached to the top and rear of the valve body inside the transmission oil pan. The solenoids are electro-hydraulic valves that control the flow of pressurized fluid through the network of channels in the valve body. As the solenoids open and close the pressurized fluid engages the transmission's clutches, smoothly shifting the gears. Over time the solenoids can become clogged with dirt from old transmission fluid, causing them to stick in the open or closed position. Their internal electronic components can also fail over time, making them inoperable. Either condition can wreak havoc on the performance of the ZF 5HP19 transmission.
The most common symptom of a failed BMW 5HP19 solenoid is gear change slippage at higher RPMs. Other symptoms may also include erratic, delayed, or rough shifting and the infamous transmission "thump" that occurs when shifting into reverse or while decelerating during driving.
A BMW 5HP19 solenoid replacement requires draining and removing the transmission oil pan. Since one of the 5HP19 solenoids is located on the top of the valve body, it also has to be removed. It is a straightforward procedure that requires a lot of time under the vehicle...if you are a home mechanic, make sure you are okay with that before starting. The good news is you can save a small fortune doing the repair yourself. We give you comprehensive instructions below, along with a complete parts list for your convenience.
It is strongly recommended that the o-rings on the plastic valve body lubrication pipes are replaced during this repair. Worn lubrication pipe o-rings can cause a pressure loss in the valve body affecting your transmission's performance. Please see section-4 below for more details.


View the detailed parts diagram for this repair.
Includes detailed part diagrams, part numbers and links to purchase all of the required components needed to complete this repair.

Before starting this repair, you must have the following required parts.
For BMW vehicles with the ZF 5HP19 (A5S325Z) transmission
Over time and miles the solenoids that control the transmission fluid flow can become worn out or clogged causing sluggish shifting, or the lose of a gear. By installing a new solenoid you will bring back the smoothness of the shift you have known and also could restore a lost gear.
For BMW vehicles with the ZF 5HP19 (A5S325Z) transmission
With age, gaskets begin breaking down, leaving you with small leaks that can compound into a disaster if not replaced.
For the 5HP19 (A5S325Z) transmission
The heads on the ZF 5HP19 transmission's oil pan bolts are notorious for stripping when being removed. If you are servicing an older transmission that has its original bolts, it is suggested that all of them are replaced to avoid future issues when servicing.
ZF 5HP19 (A5S325Z) 5 speed transmission
This is the same factory drain plug that would be installed at the BMW dealership.
Commonly used in many different models.
This is the same factory part installed at the BMW dealership. Includes rubber sealing o-ring.
Section 1 - Draining the Transmission and Removing the Oil Pan
Since the BMW 5HP19 solenoids are attached to the transmission's valve body, the oil pan must be drained and removed.- Jack and support both ends of your vehicle. Please click here to learn how to properly jack and support your vehicle for this repair.
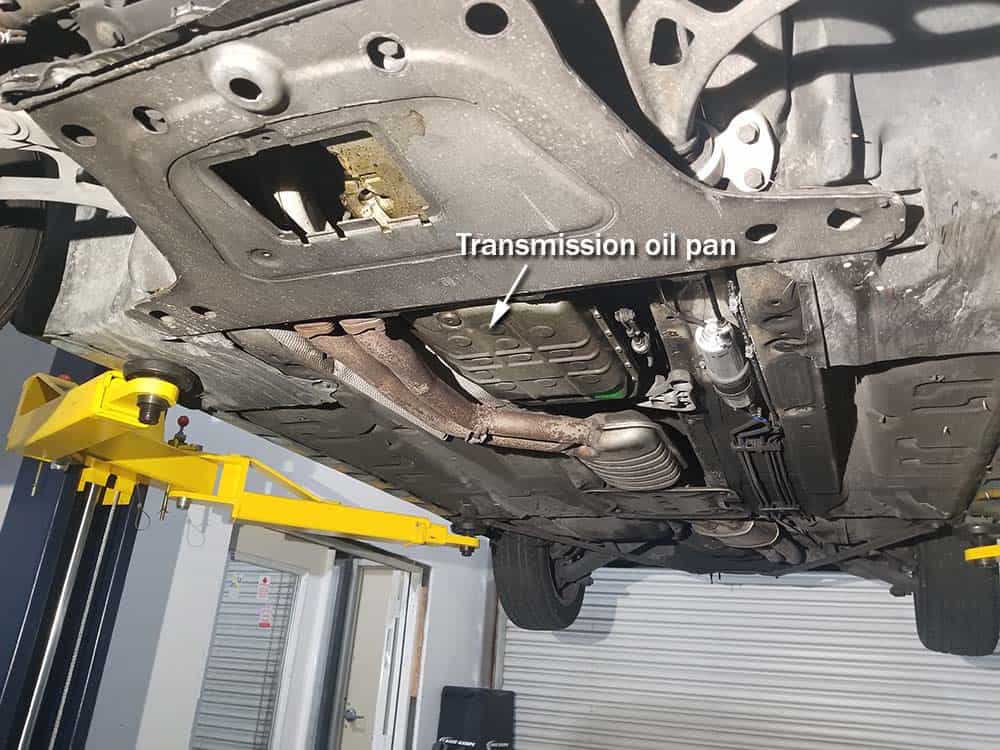
- Locate the transmission oil pan. It is located behind the engine underneath the vehicle.
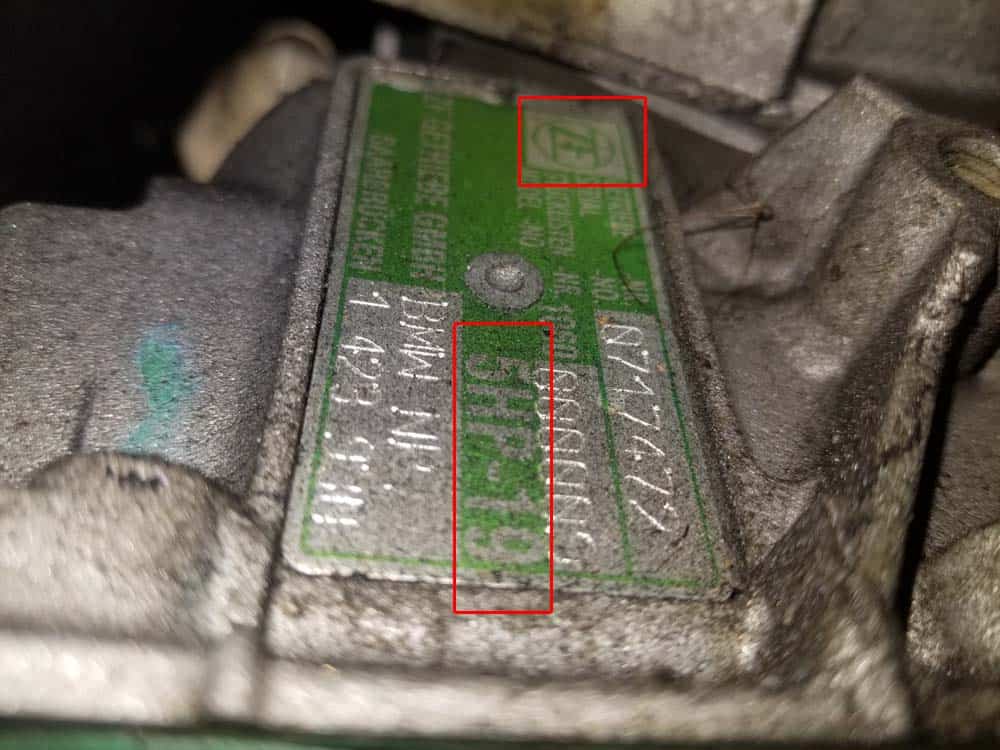
- Before starting this repair, verify your transmission's make and model number on the serial number plate located on the upper left hand side of the case. This repair is specifically for the ZF 5HP19 five speed transmission.
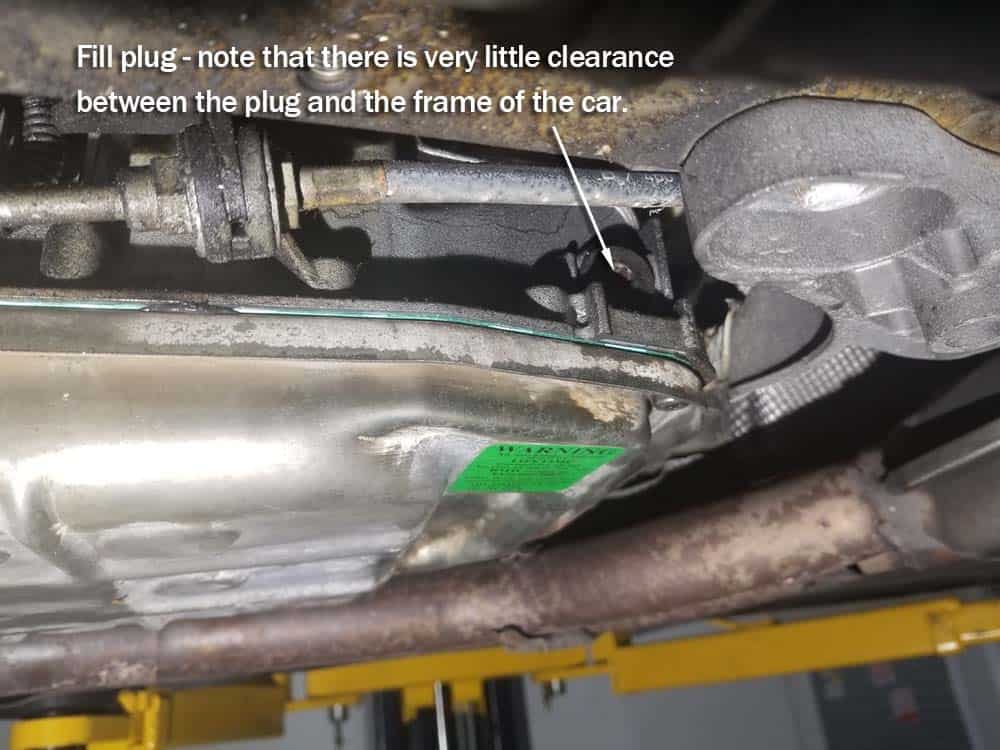
- Before draining the oil pan, always remove the fill plug first. You do not want to find out after the transmission is serviced that the fill plug is stuck and fluid can't be added.
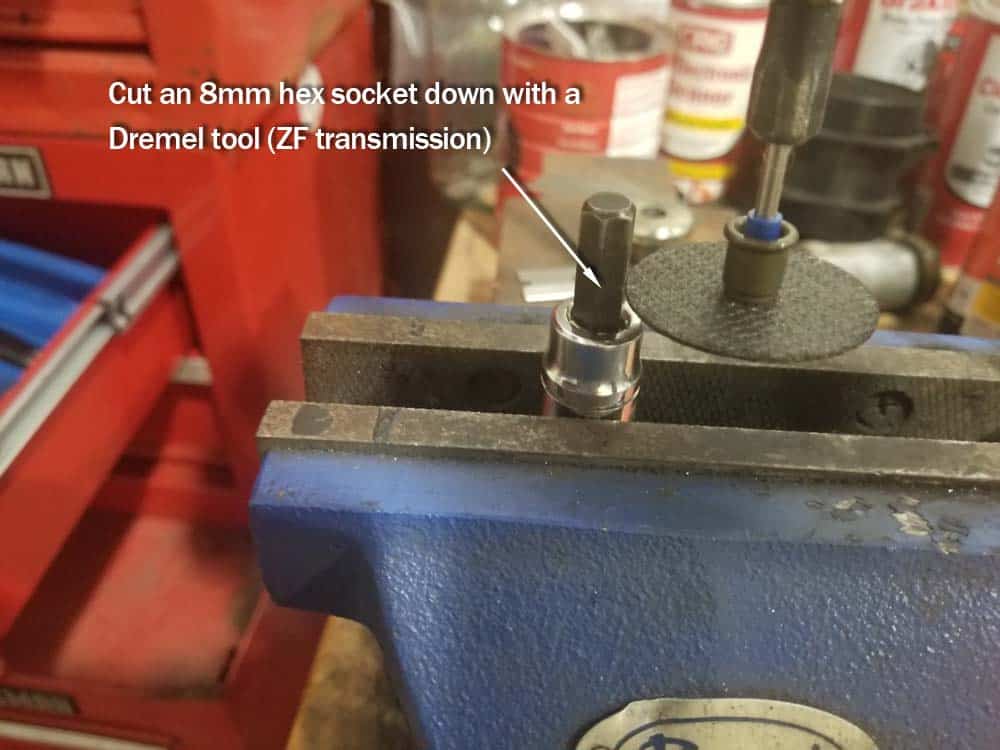
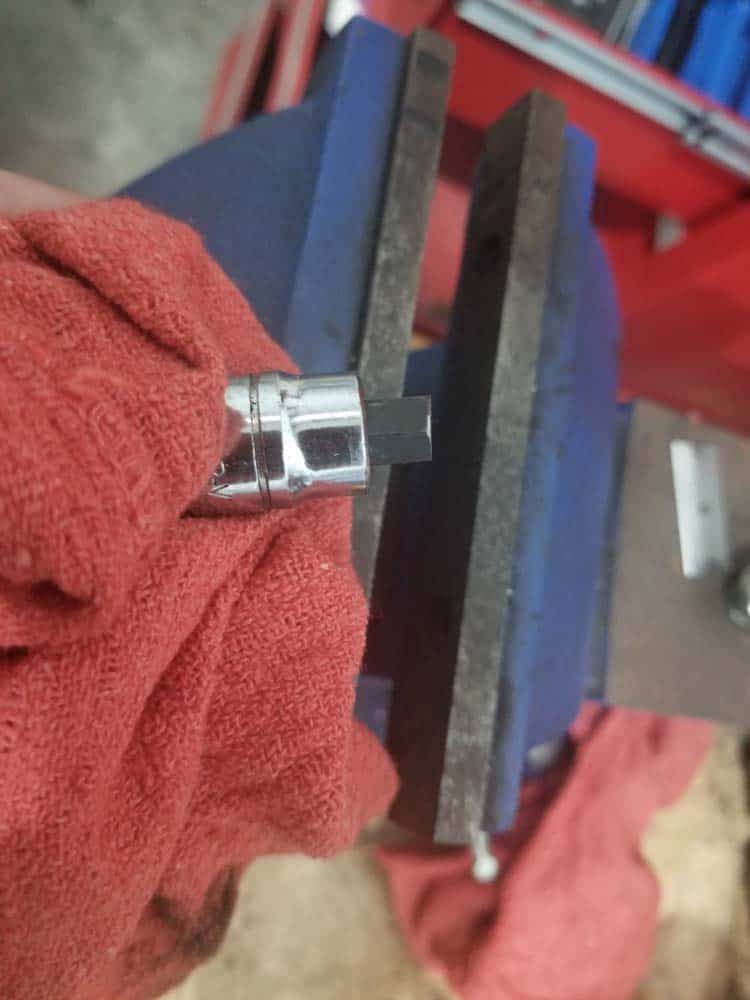
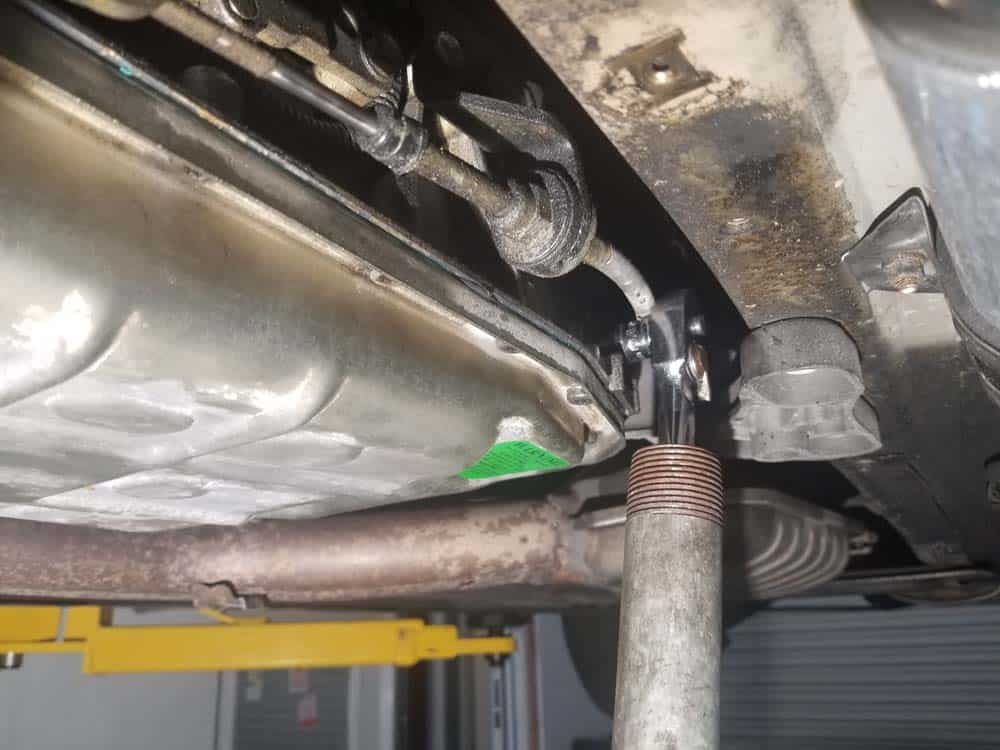
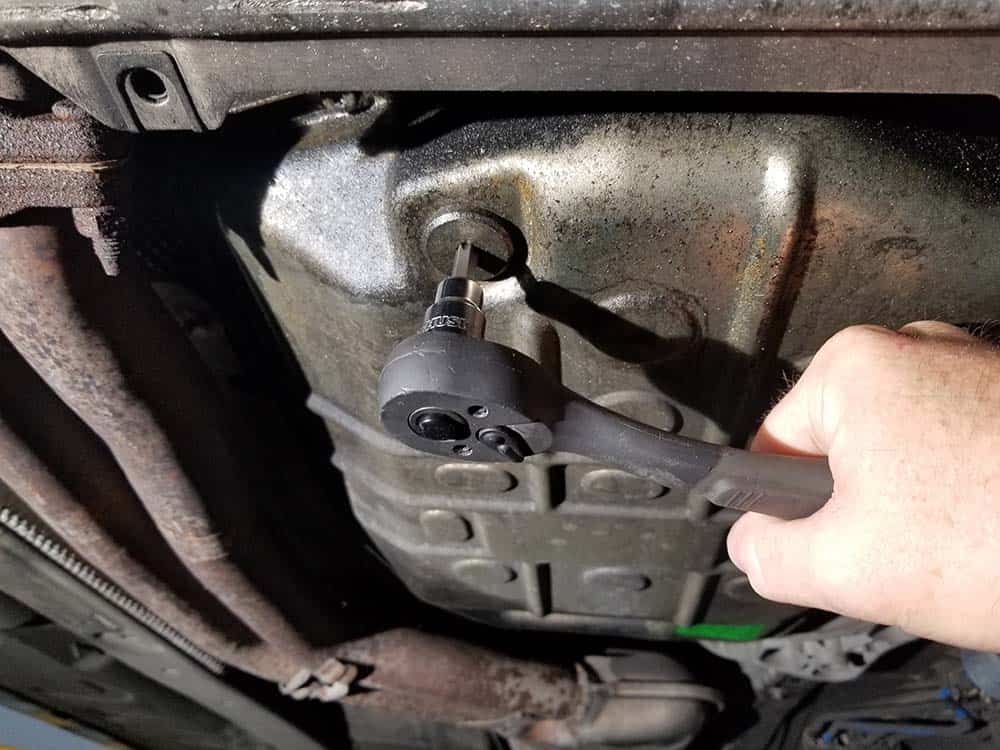
- Start by locating the transmission fill plug on rear left side of transmission. You will notice that there is very little clearance between the plug and the frame of the vehicle - it is impossible to get a regular length 8mm hex socket and wrench in the fill plug. The solution is to simply cut an inexpensive 3/8" drive 8mm hex socket down with a Dremel tool as shown below. This will give you a custom low profile 8mm hex socket that will work with both a regular 3/8" drive socket and torque wrench. ***Do not use a 1/2" drive hex socket...it will be too large even after modifying it.
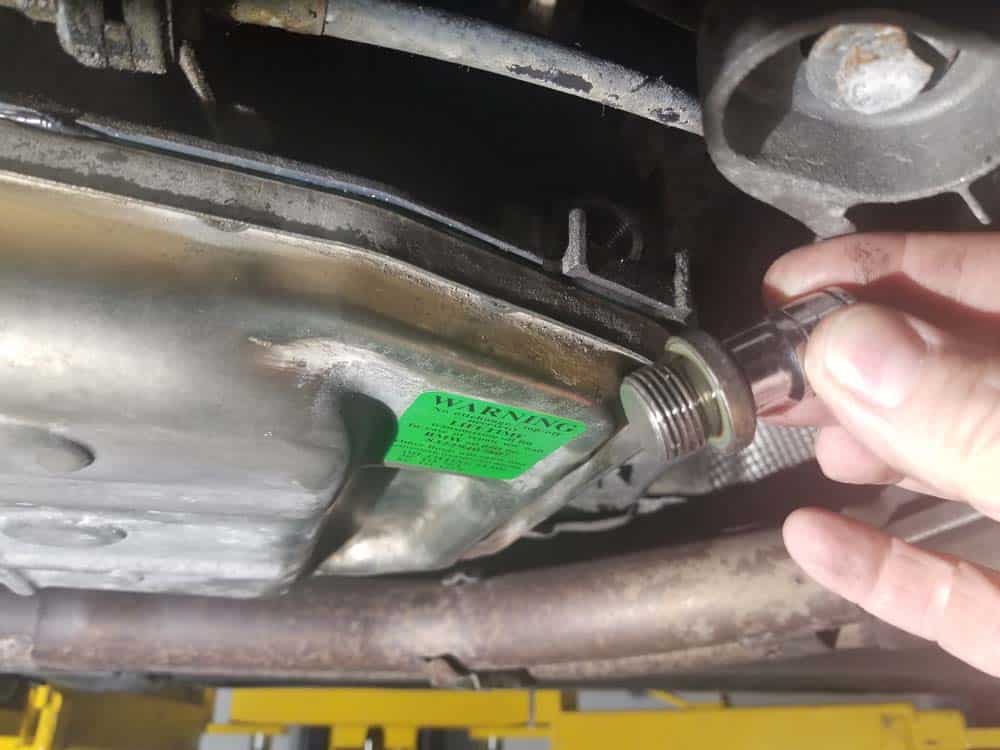
- Using the modified 8mm hex socket, remove the fill plug from the top of the transmission. You will most likely need a breaker bar to initially loosen the plug.
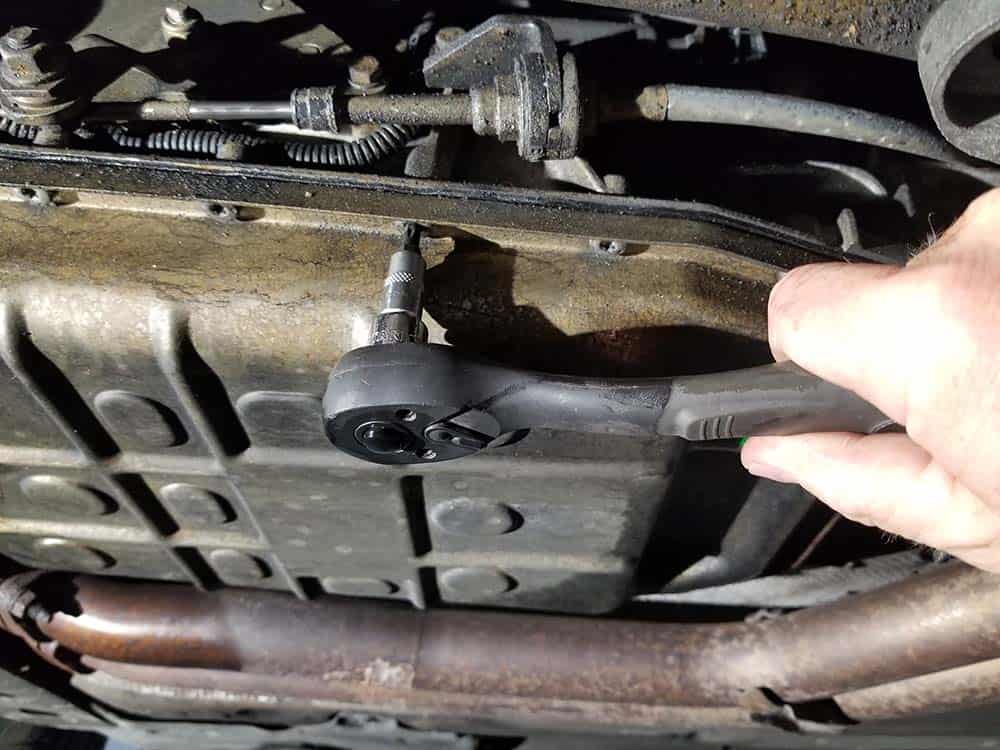
- You will now need to drain the transmission. Position a 5 gallon drain pan under the transmission drain plug, located at front of transmission oil pan.
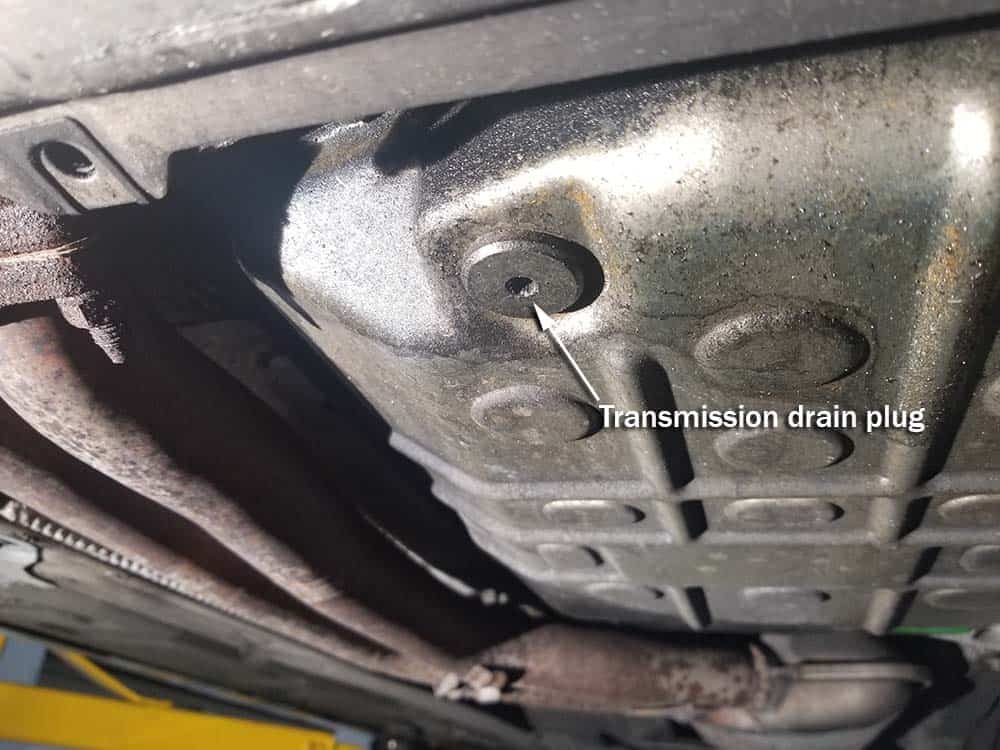
- Using a T40 torx bit, remove the drain plug from the transmission and let the pan thoroughly empty out. It is very common on the BMW 5HP19 (A5S325Z) transmission for the drain plug's torx head to strip. The plug is torqued too tight for the small torx bit size it was manufactured with, causing most mechanics to strip it during removal. If you strip drain plug during removal, proceed to step 8 for more instructions. If you were able to remove it with a socket wrench, proceed to step 9.
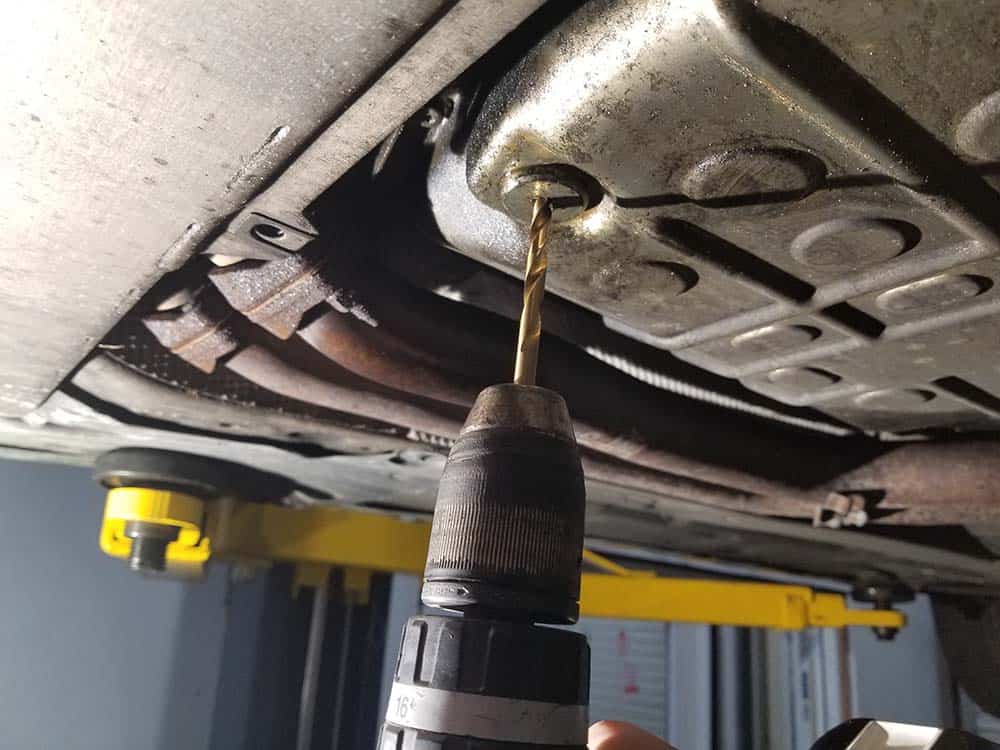
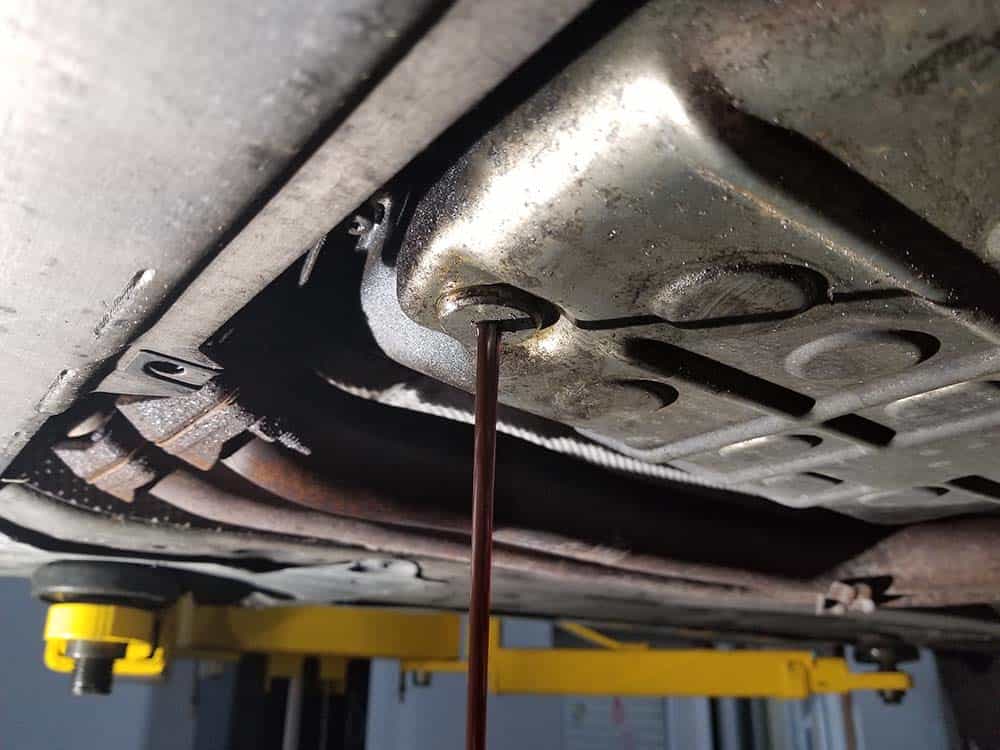
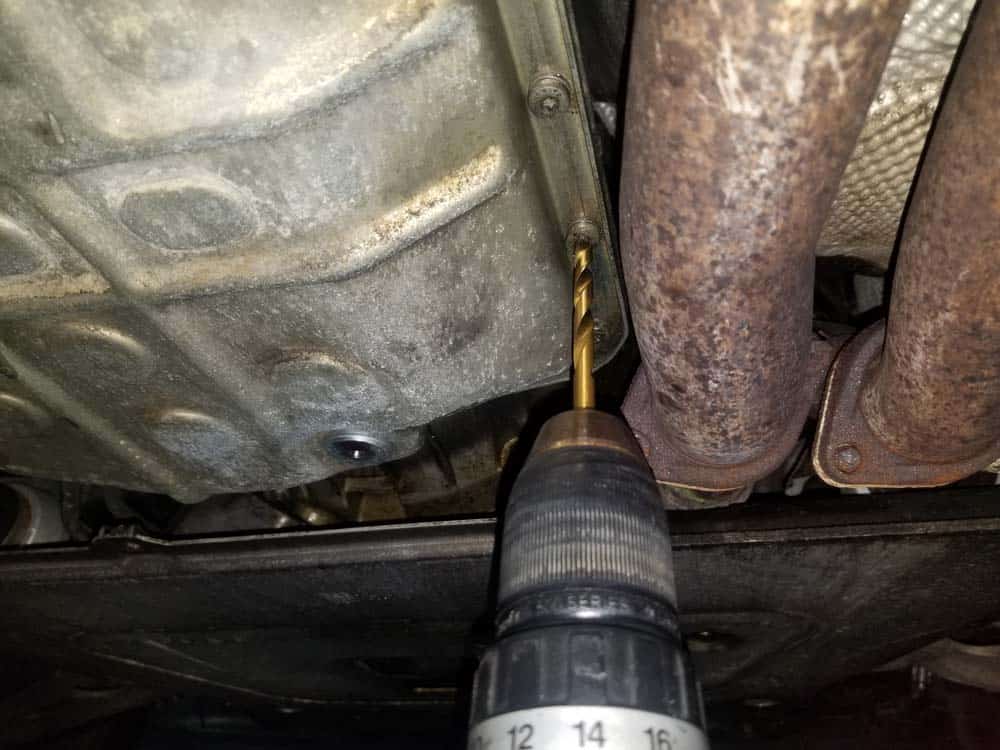
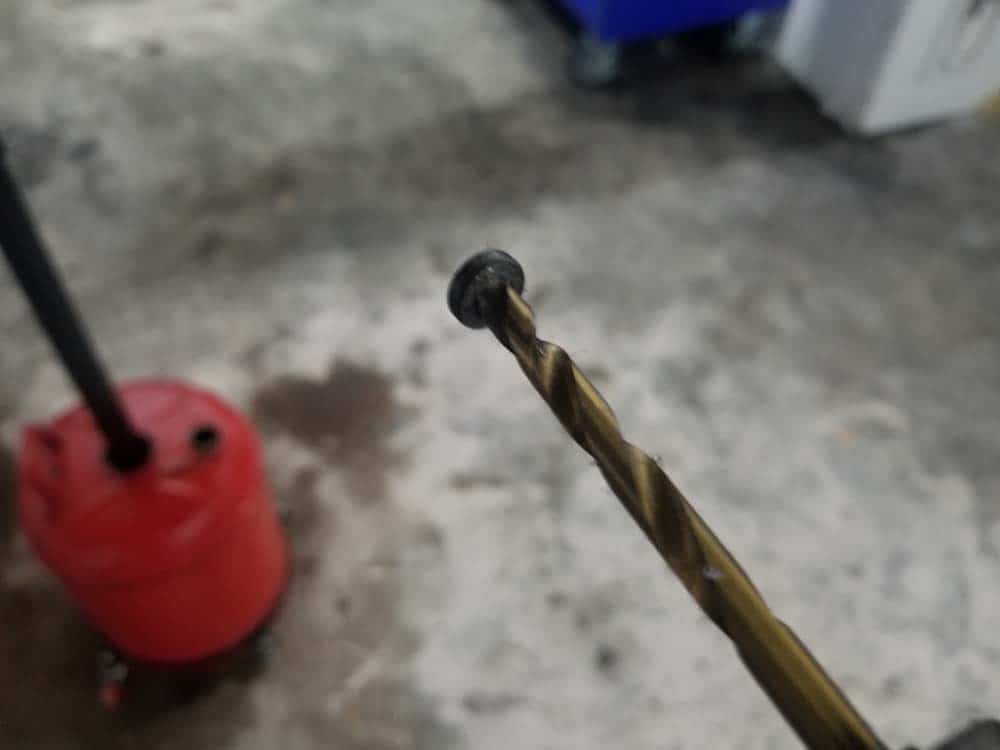
- If you strip the torx drain plug while trying to remove it, you will have to drill and extract it out. Don’t feel bad, we stripped ours too while making this article. Use a 5/16” titanium drill bit to drill through the center of the plug into the pan. Make sure to have your drain pan ready...as soon as you drill through the plug the pan will start draining.
- Spray the transmission oil pan bolts down with PB Blaster and allow to soak for about 10 minutes. These bolts are usually very corroded and also have a tendency to strip during removal.
- Use a T27 torx bit to remove the oil pan bolts. The oil pan bolt heads have a tendency to strip on the 5HP19. If you strip one, don’t get frustrated...just move on. The stripped bolt heads can be very easily snapped off with a drill. If you strip a torx bolt during removal, proceed to step 11 for instructions on removing it. If you were able to get all of the oil pan bolt out successfully, proceed to step 12.
- If you strip an oil pan mounting bolt (which is a normal occurrence), use a ¼” drill bit to quickly remove its head. Simply start drilling into the center of the bolt as shown below and the head will quickly twist off. You can easily extract the rest of the bolt with your fingers after the pan is removed.
- Remove the oil pan from the bottom of the transmission. Remove the old gasket.
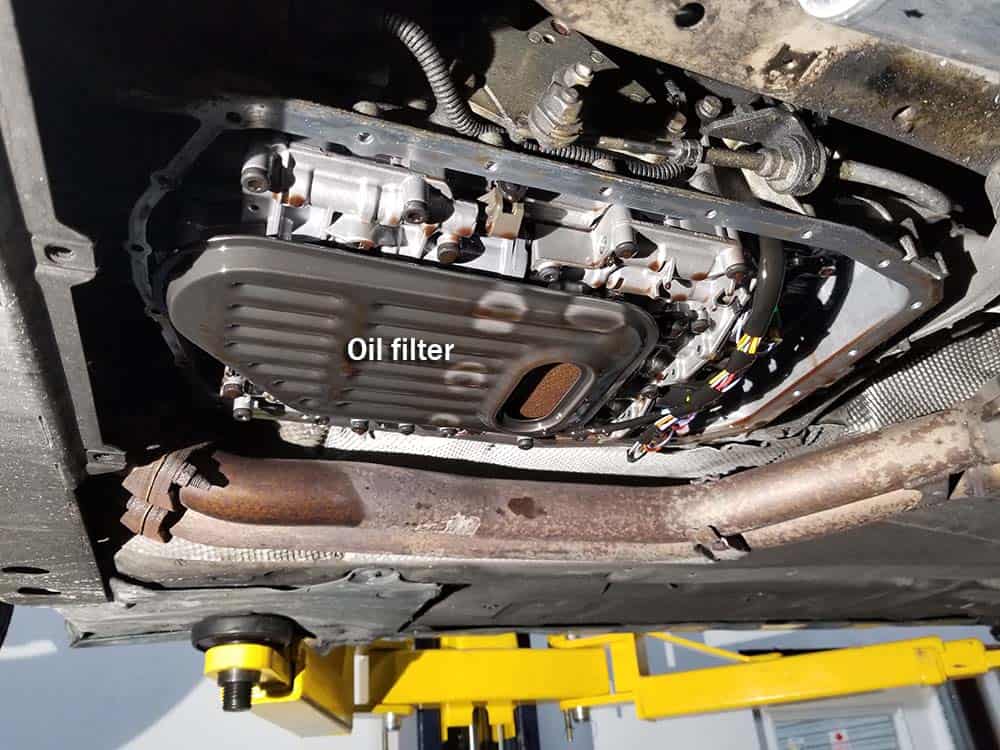
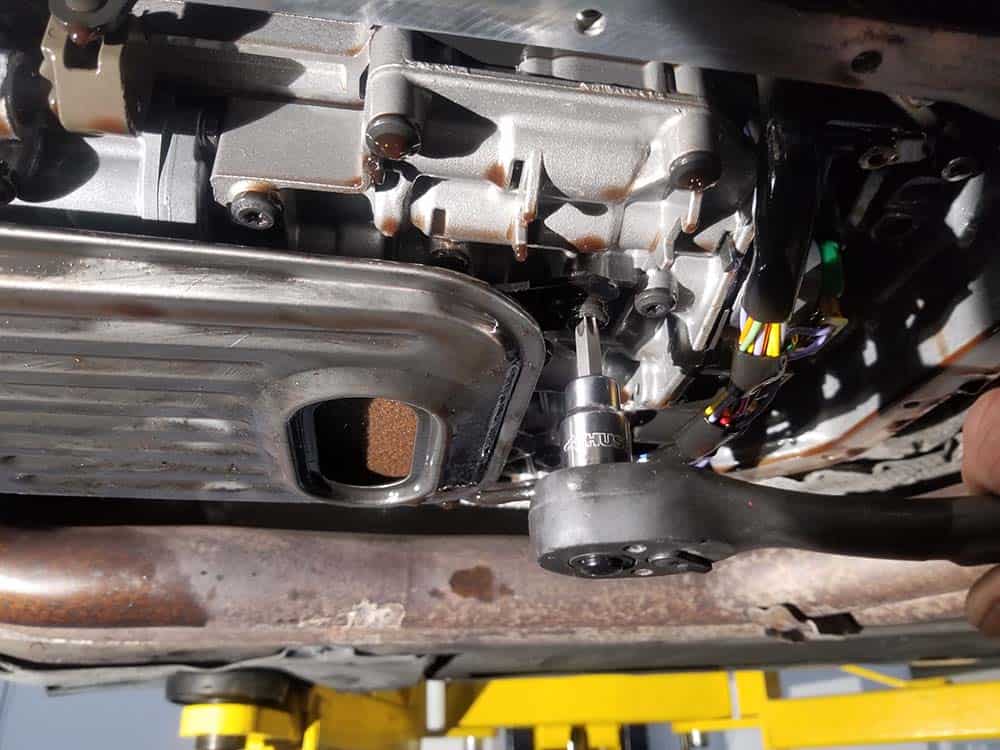
- Use a T40 torx bit to remove the two bolts (front and back) anchoring the transmission oil filter. Remove the filter from the transmission.
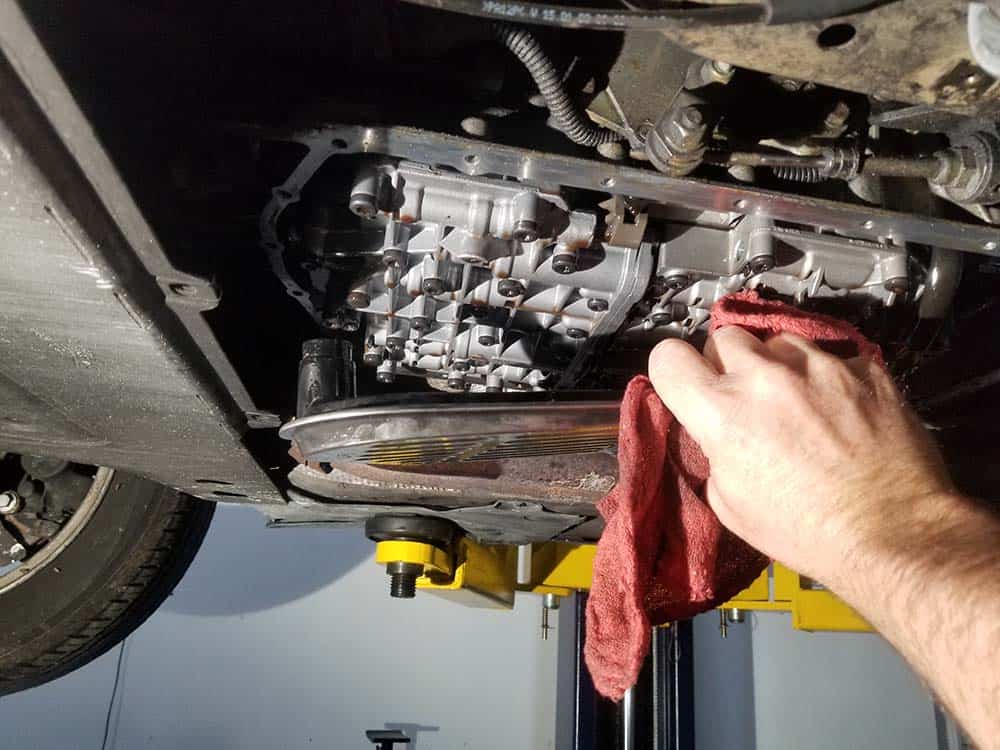
Section 2 - Removing the Valve Body
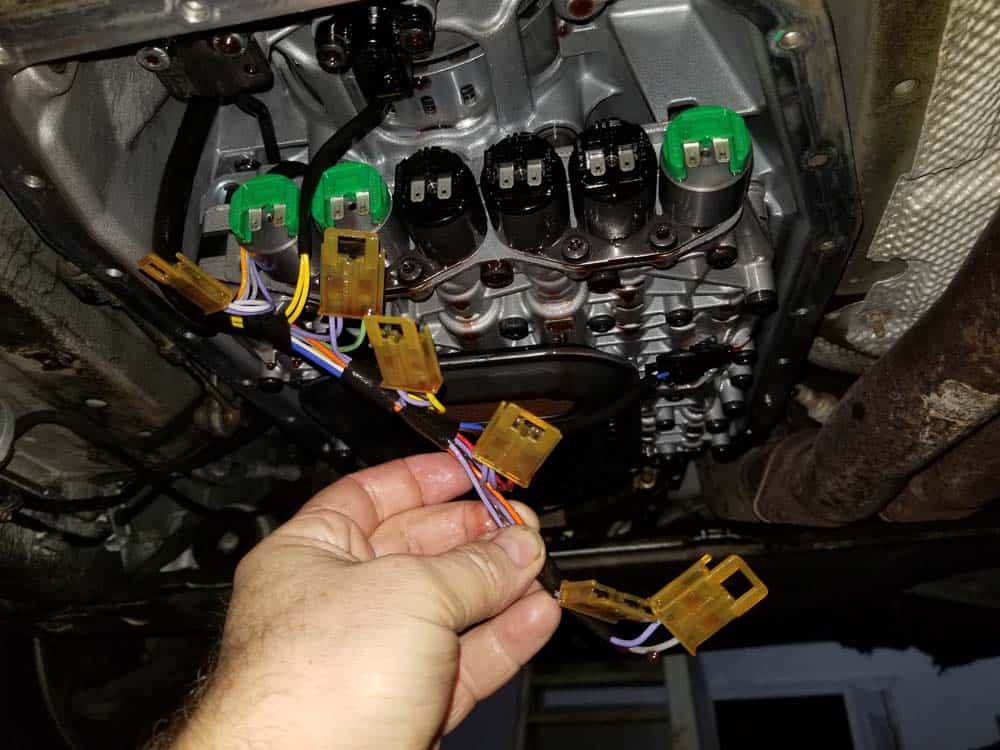
The BMW HP519 five-speed transmission has seven solenoids, six on the back of the valve body and one on the top. Unfortunately, the top one is not accessible unless the valve body is removed from the transmission. The BMW Repair Guide recommends leaving the wiring harness in the transmission when removing the valve body. This eliminates several unnecessary (and potentially difficult) steps and speeds up the entire repair. We strongly recommend using a helper when removing the valve body from the transmission...it is difficult to hold the valve body and disconnect the top solenoid by yourself.- Before removing the valve body, its main wiring harness needs to be removed. Start by locating the six BMW 5HP19 solenoids on the back of valve body...you will start by removing their connections first.
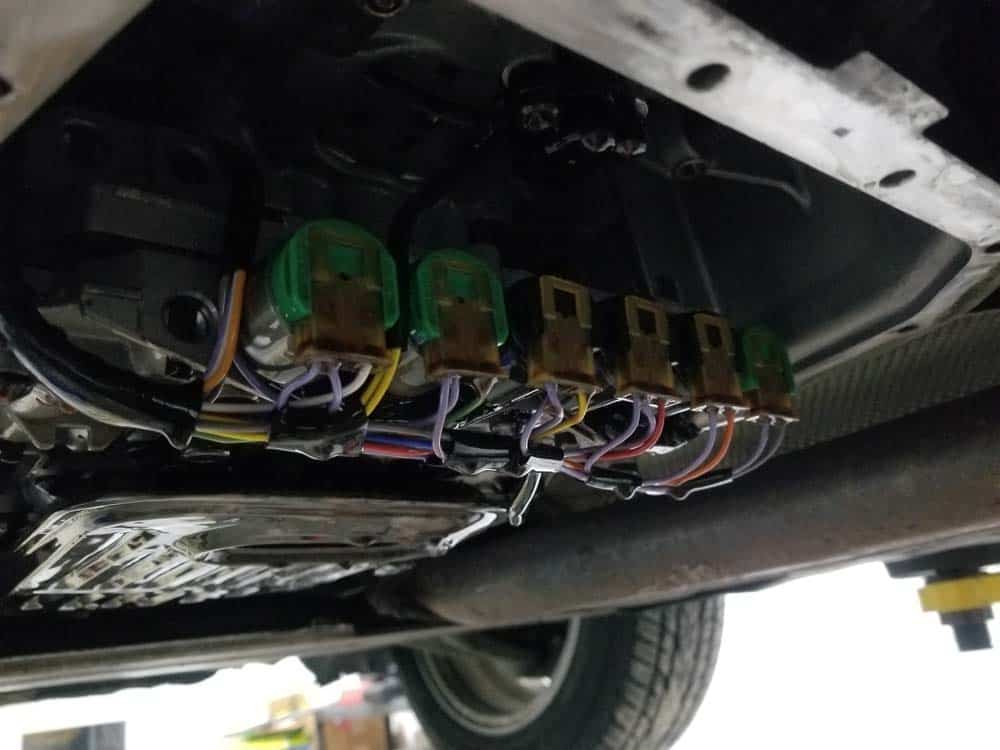
- Starting at the first solenoid, use a metal pick to carefully pull the plastic tab forward at the top of the electrical plug. While pulling the tab forward, grasp the plug with your other hand and pull it free from the solenoid. If the plug won’t pull free, try rocking it back and forth while pulling.
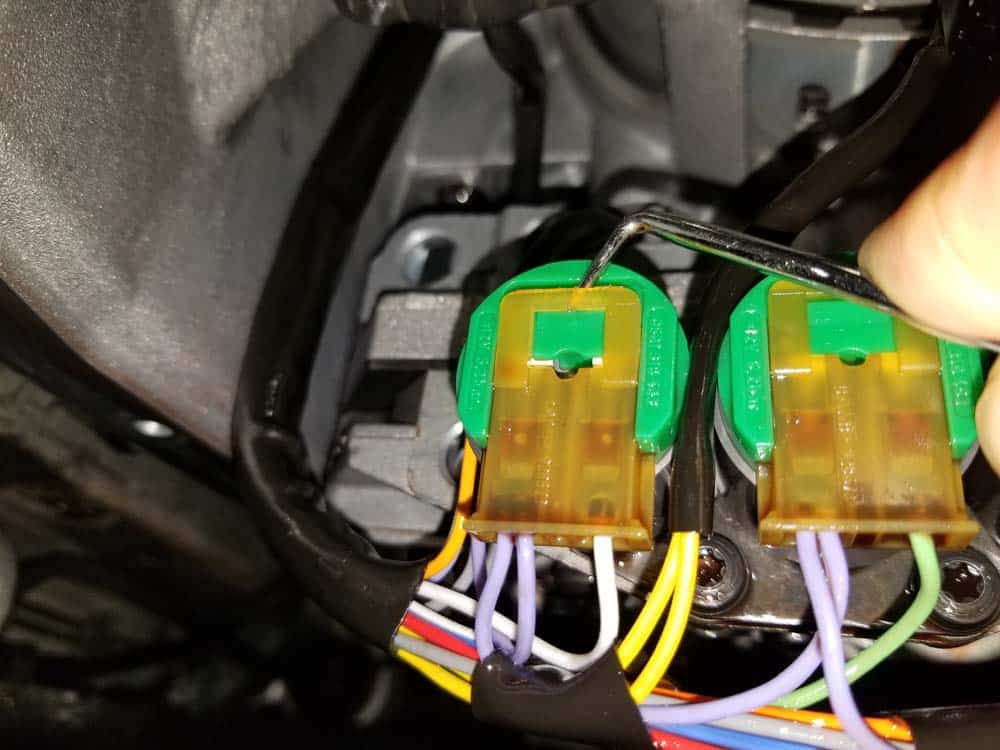
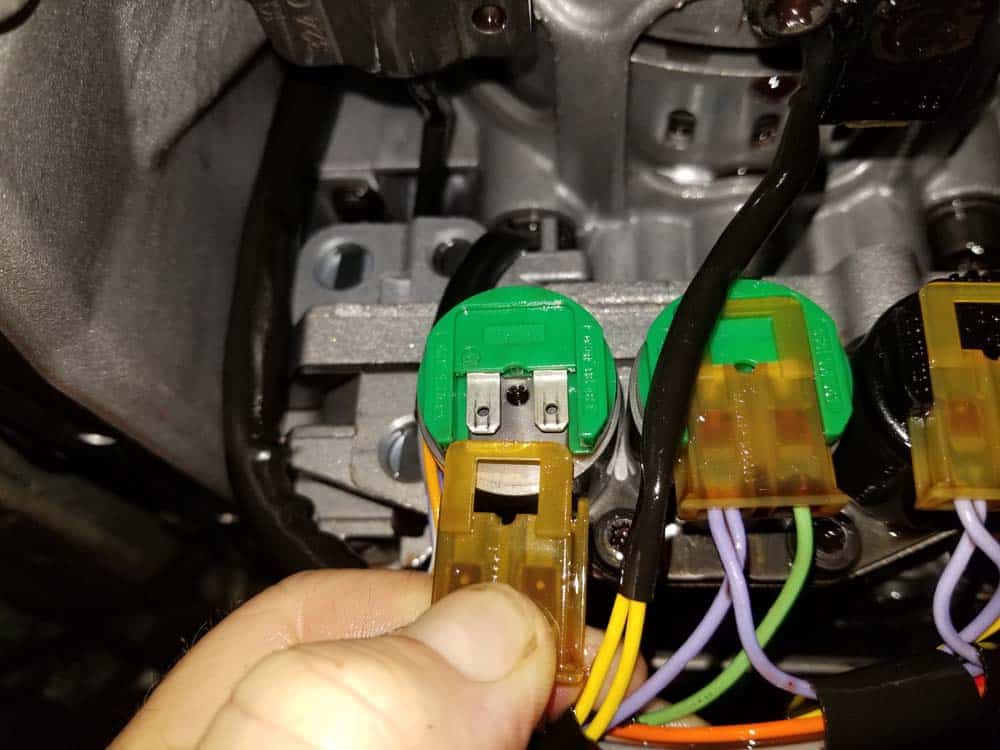
- Repeat the above step on the other five rear solenoids.
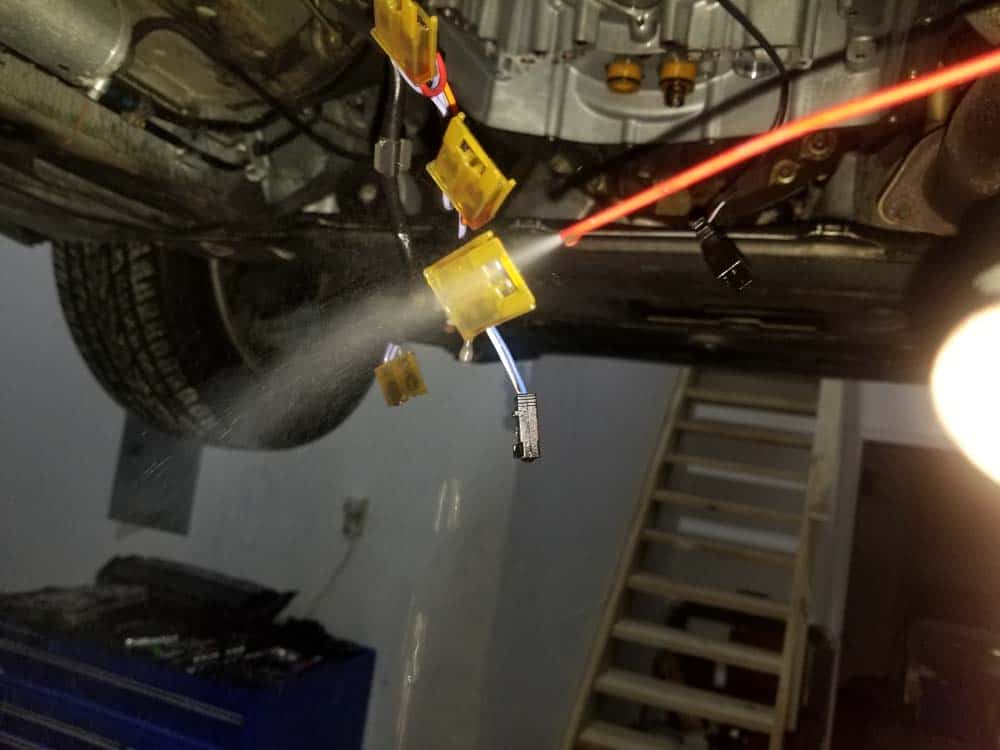
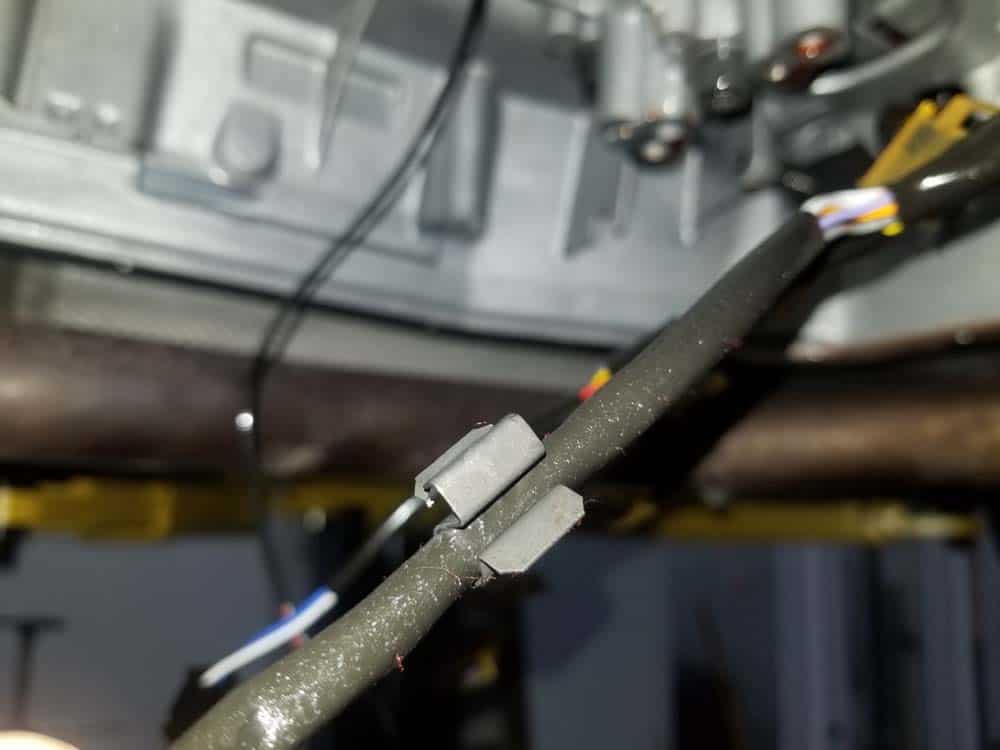
- Disconnect the speed sensor lead from the wiring harness by depressing the locking tab with a small flat blade screwdriver while pulling the connection apart (see images below).
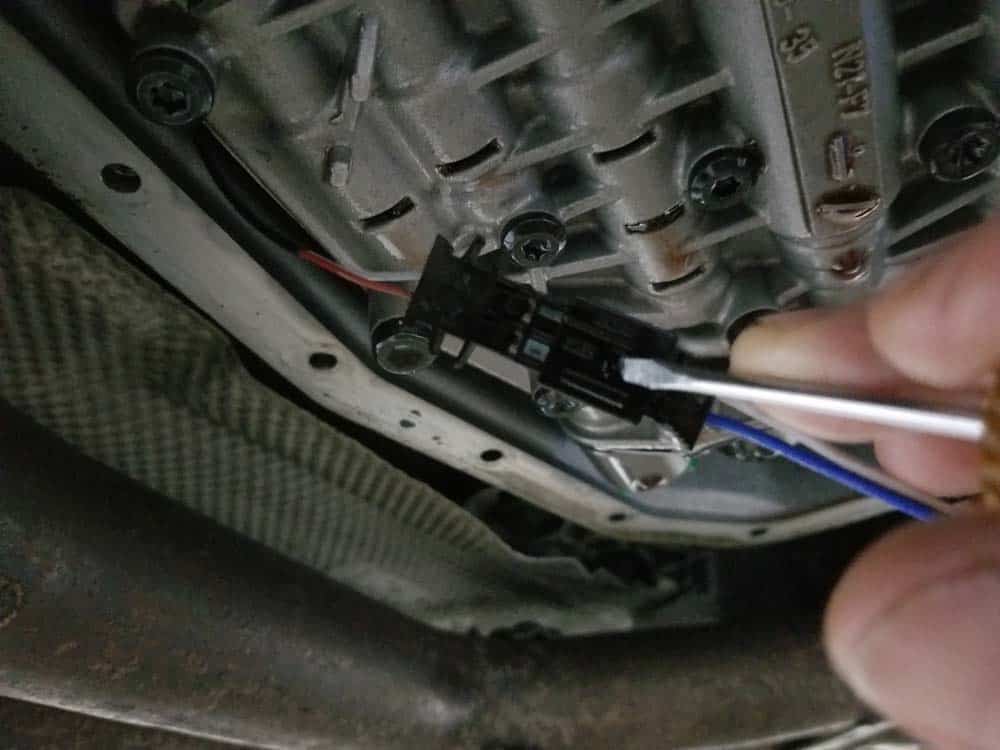
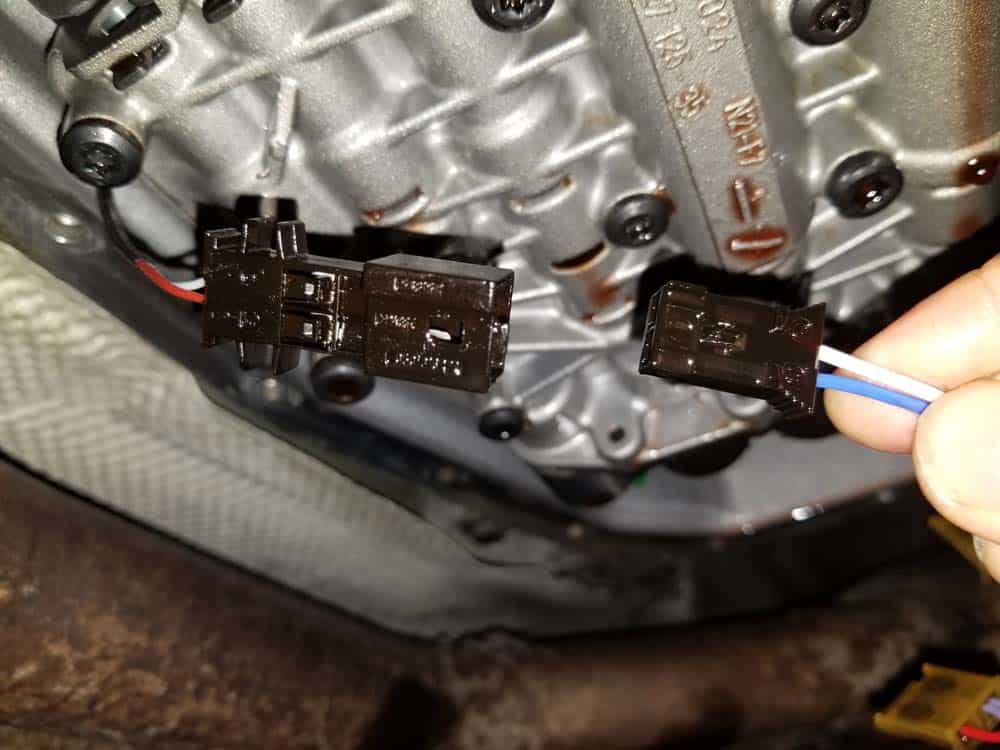
- There is one more electrical connection to the upper solenoid at the top the valve body. It cannot be disconnected until the valve body is lowered from the transmission.
- The valve body is held in place by fourteen T40 torx mounting bolts. The following image shows the location of the mounting bolts looking up at the valve body.
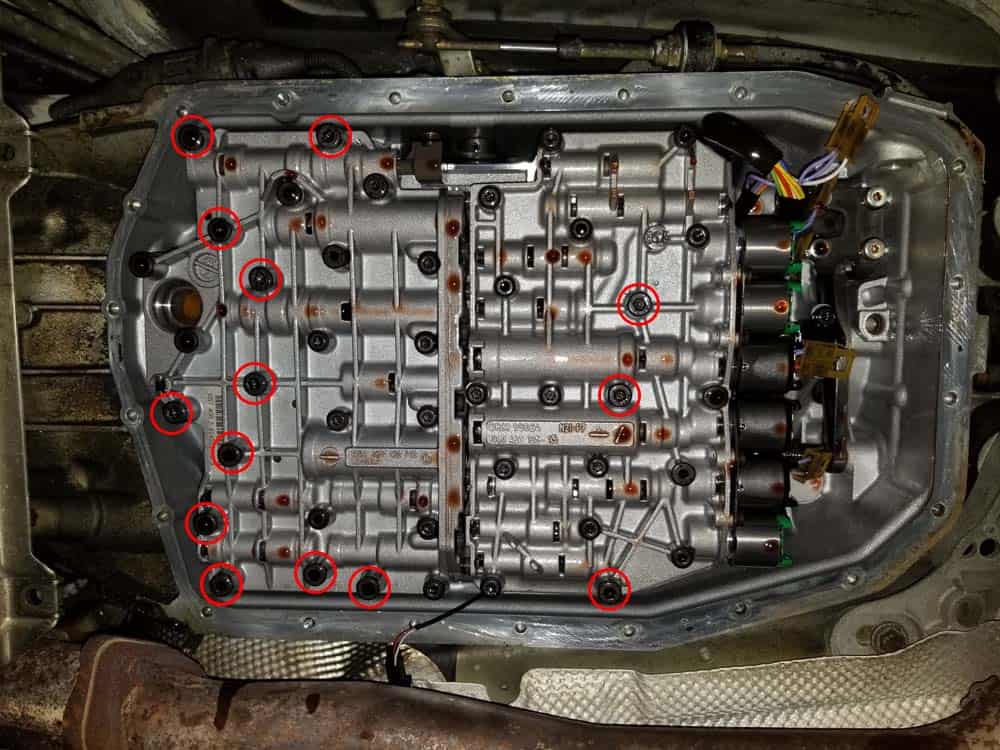
- Use a T40 torx bit to remove the fourteen mounting bolts. Be very careful not to drop the valve body when you remove the last bolt. Also be aware that the valve body still has quite a bit of fluid in it, so this step can get a bit messy. We highly recommend getting an assistant to help out.
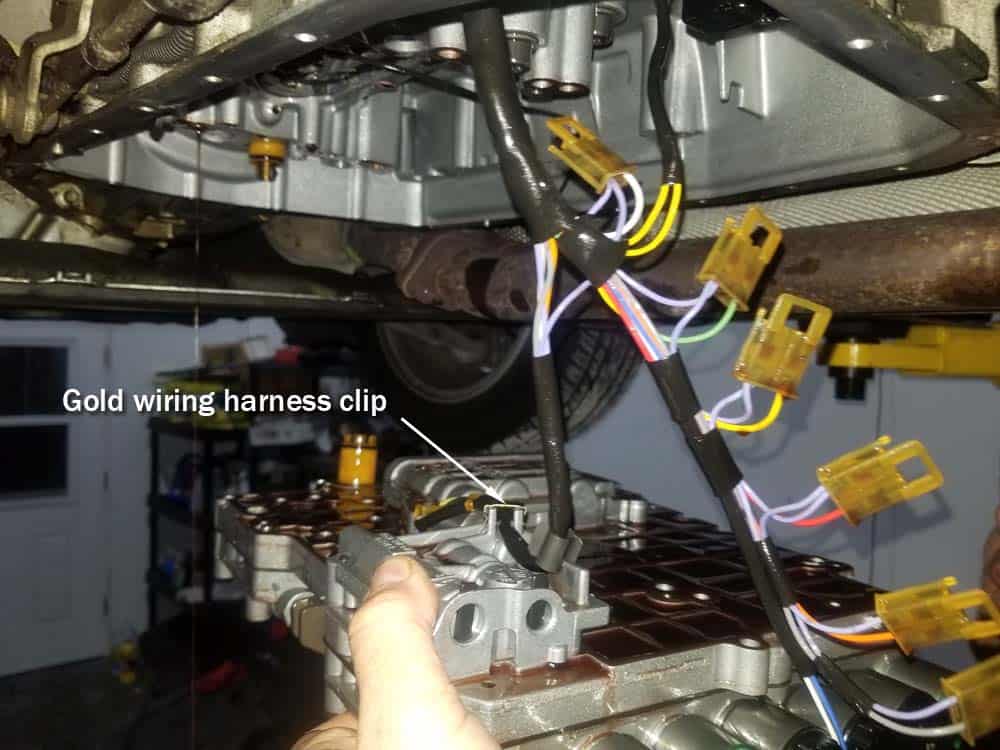
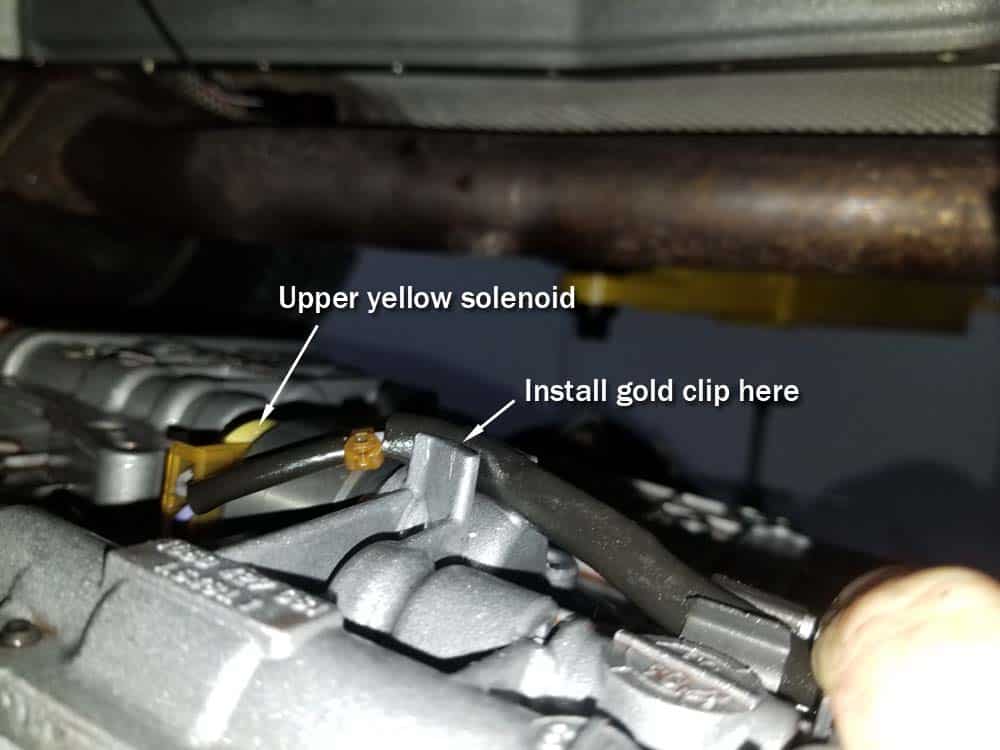
- Slowly lower the valve body out of the transmission. Keep an eye on the gold metal wiring harness clip...it has a tendency to fly off and get lost when lowering the valve body, and it is nearly impossible to replace.
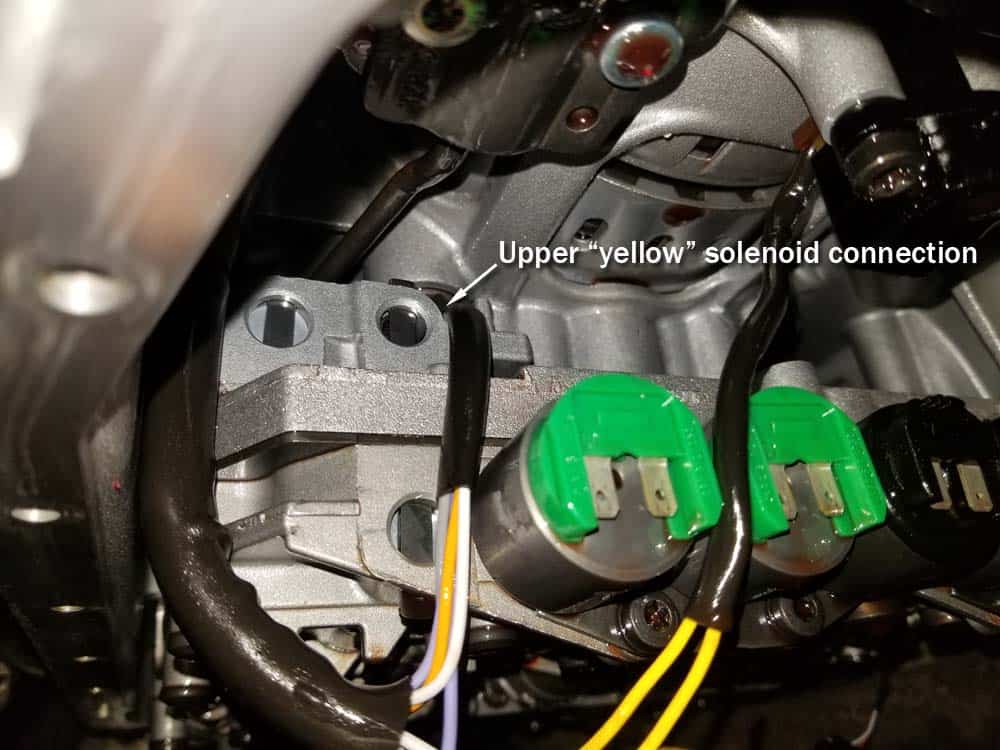
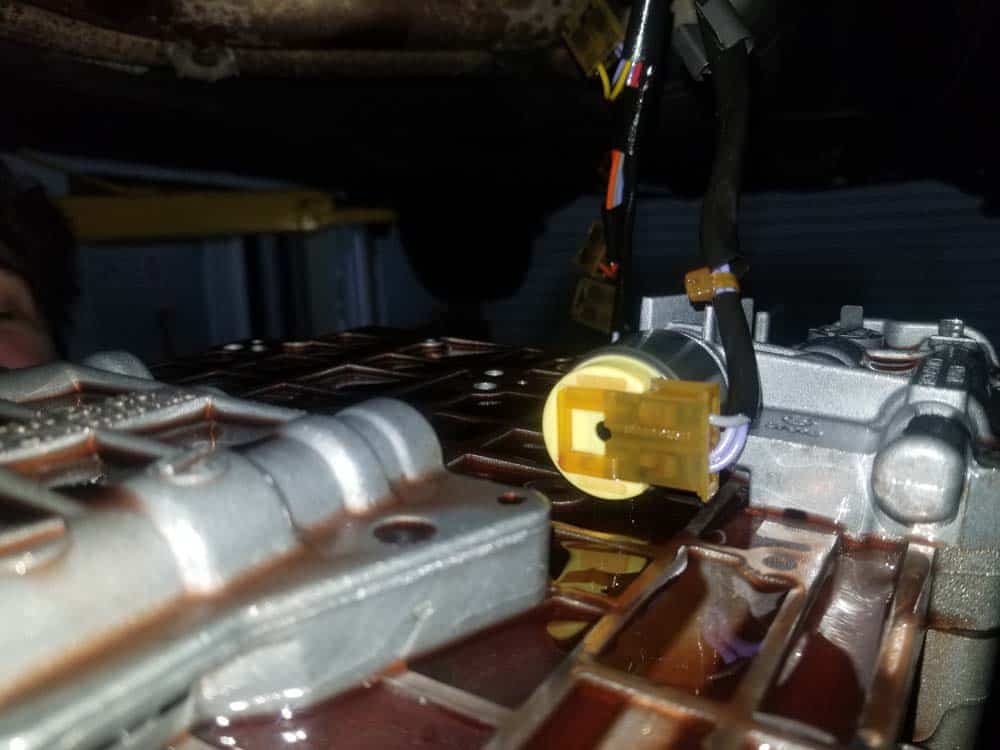
- With the valve body out of the vehicle, use a metal pick to release the upper yellow solenoid's electrical connector. Remove the connector from the solenoid.
- Remove the valve body from the vehicle and place on a clean bench.
Section 3 - Replacing the BMW 5HP19 Solenoids
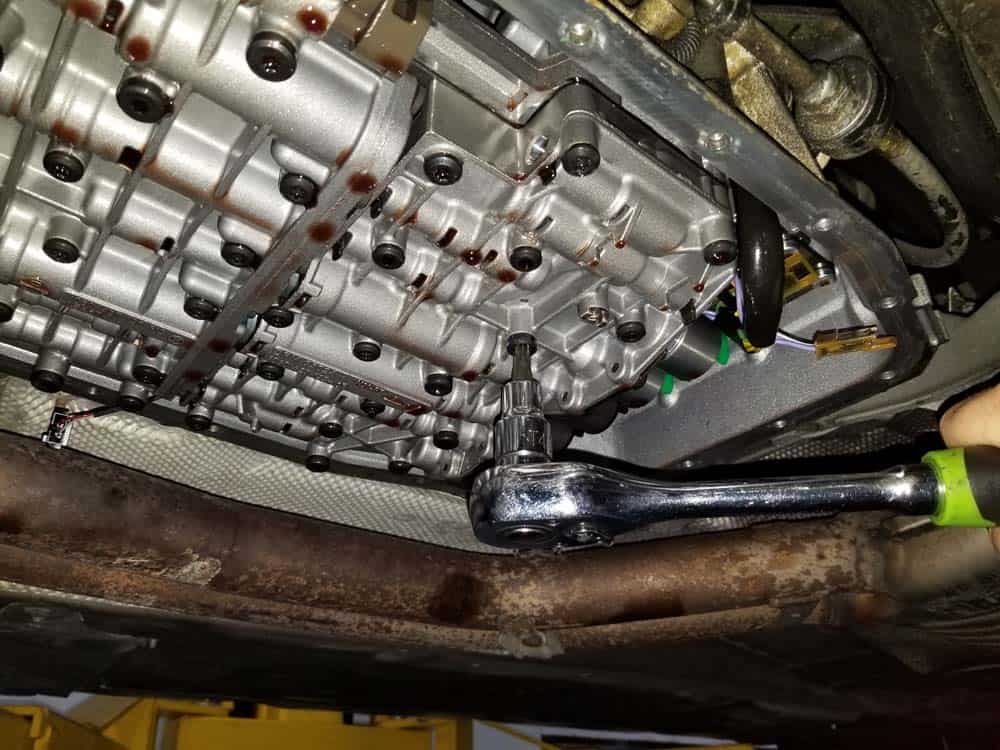
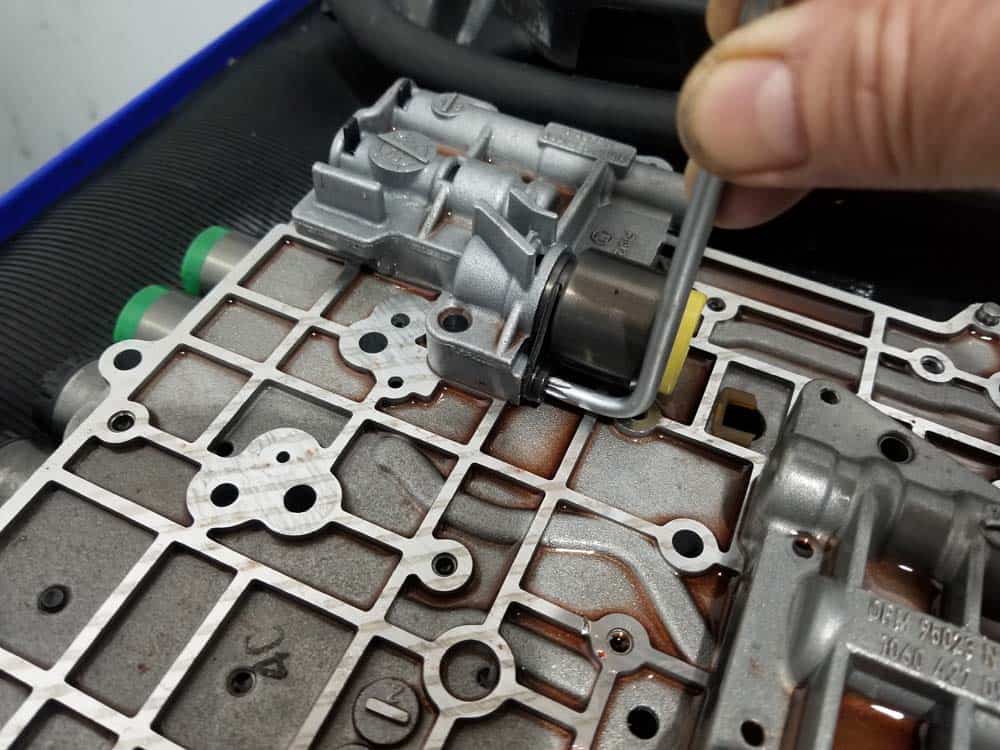
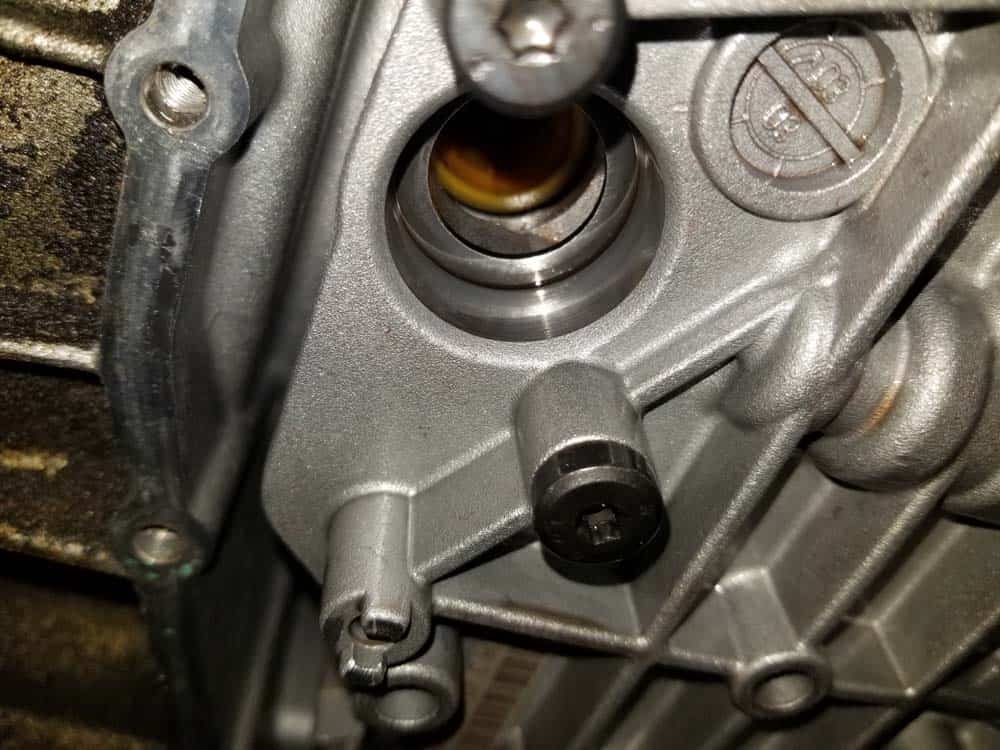
- Start with removing the top yellow solenoid. The top solenoid is held in place with a T27 torx bolt. Unfortunately there is very little clearance between the head of the torx bolt and the valve body, making it almost impossible to use a socket wrench to remove the bolt. Your only reasonable option is to use a T27 torx key wrench as shown below.
- After removing the mounting bolt, remove the metal retaining plate.
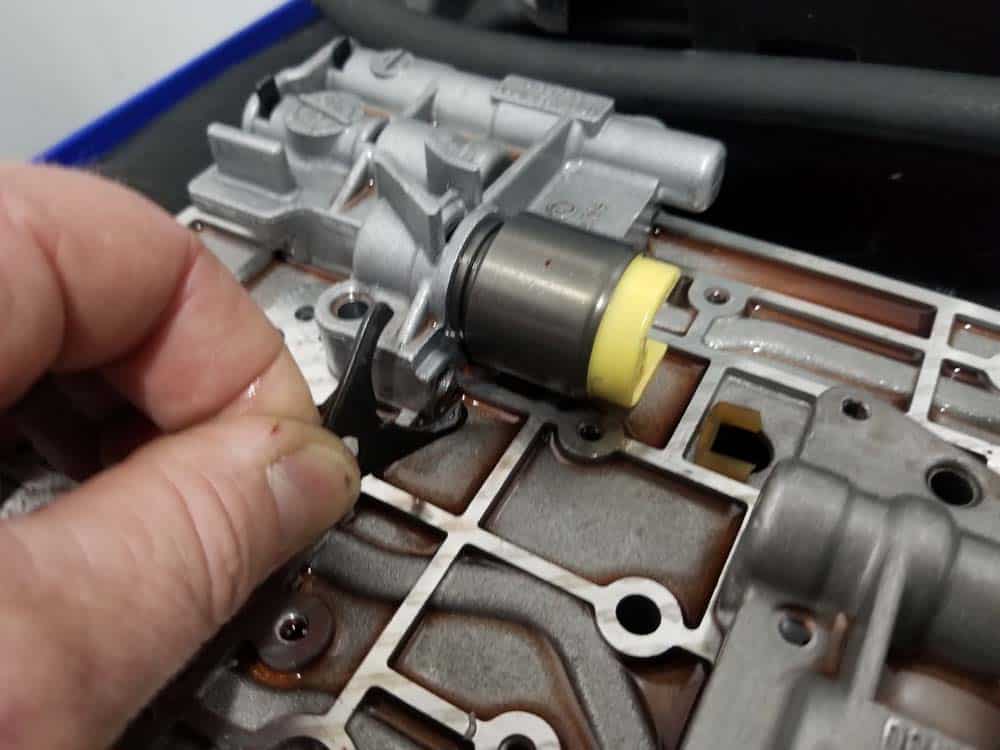
- Grasp the top yellow solenoid and pull it out of the valve body. Note the orientation of the electrical connection on the yellow solenoid. You want to make sure the new solenoid is installed exactly the same way.
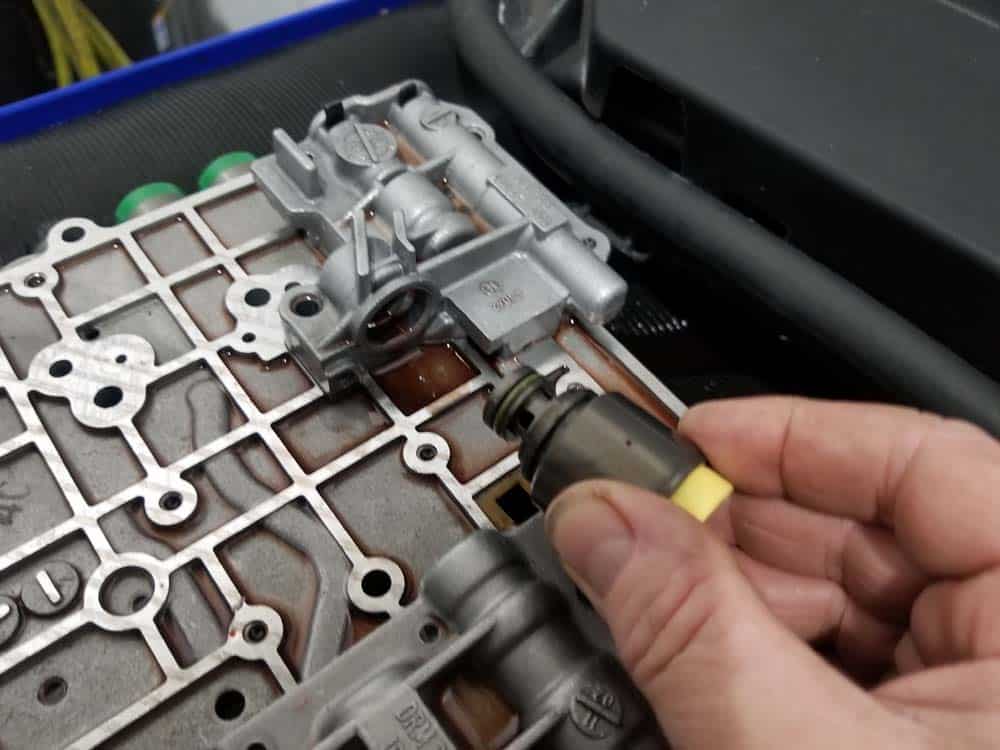
- Install the new solenoid pushing firmly on it until it clicks into the valve body.

- Reinstall the retaining plate and torx bolt. Since you won’t be able to get a torque wrench on the mounting bolt, use the torx key to tighten. The bolt should be firmly snug...but not overtightened.
- Carefully flip the valve body over so the rear solenoids can be accessed.
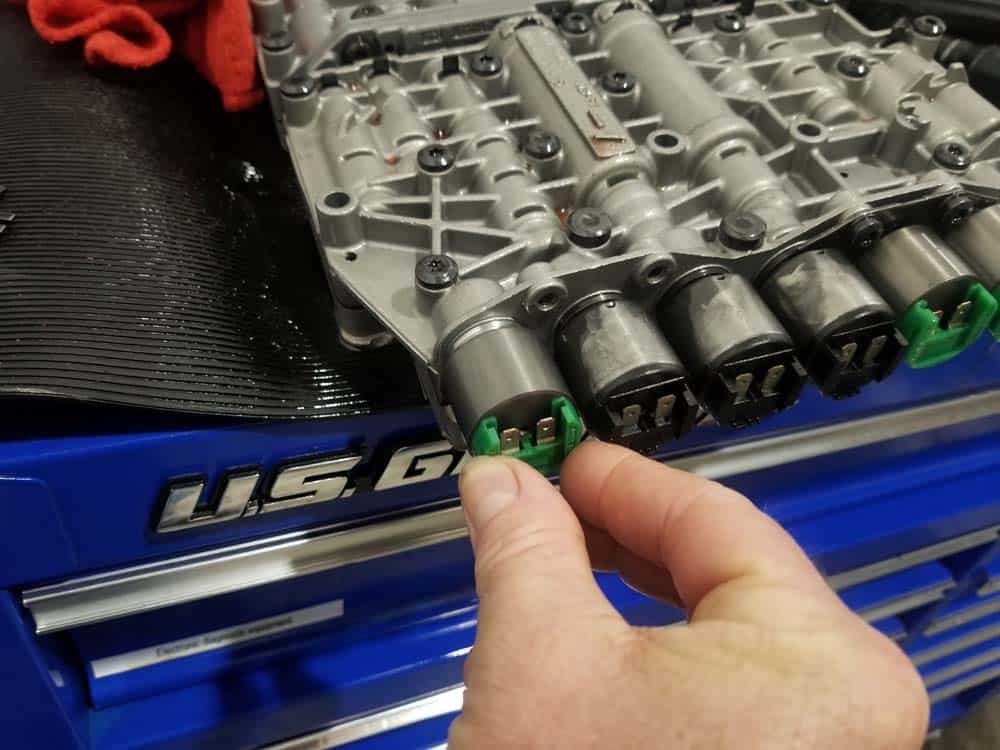
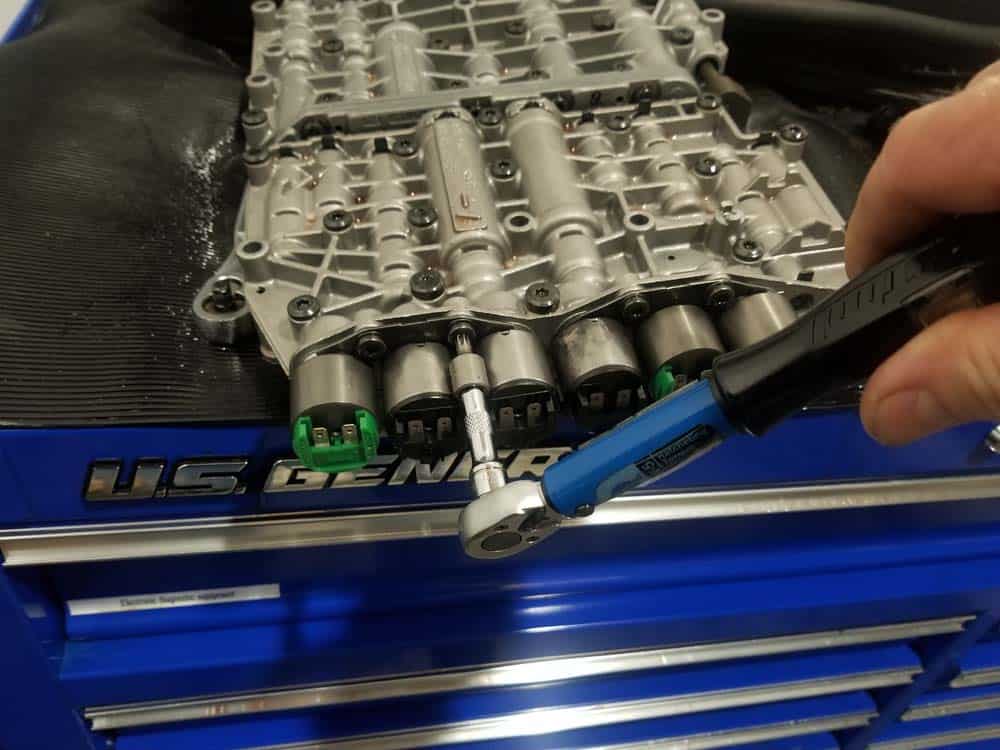
- Using a T27 torx bit, remove the two bolts securing the right solenoid retaining plate to the valve body. Remove the plate.
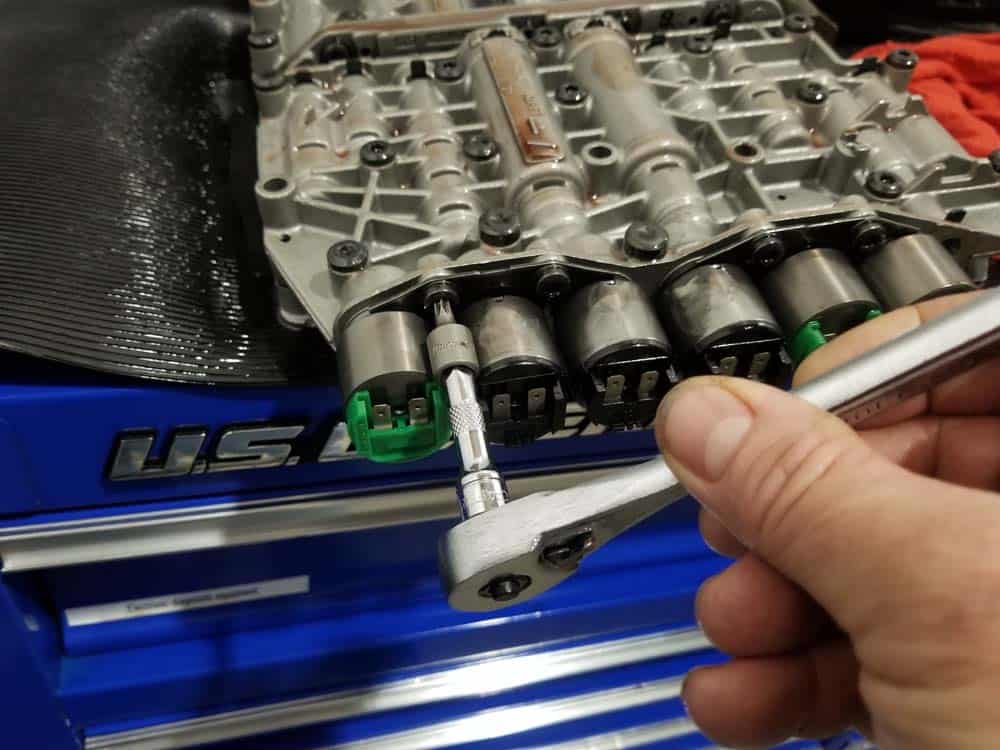
- Grasp the first green solenoid and pull it free from the valve body. The green solenoids come out very easy because they do not have o-rings. Replace with a new solenoid.
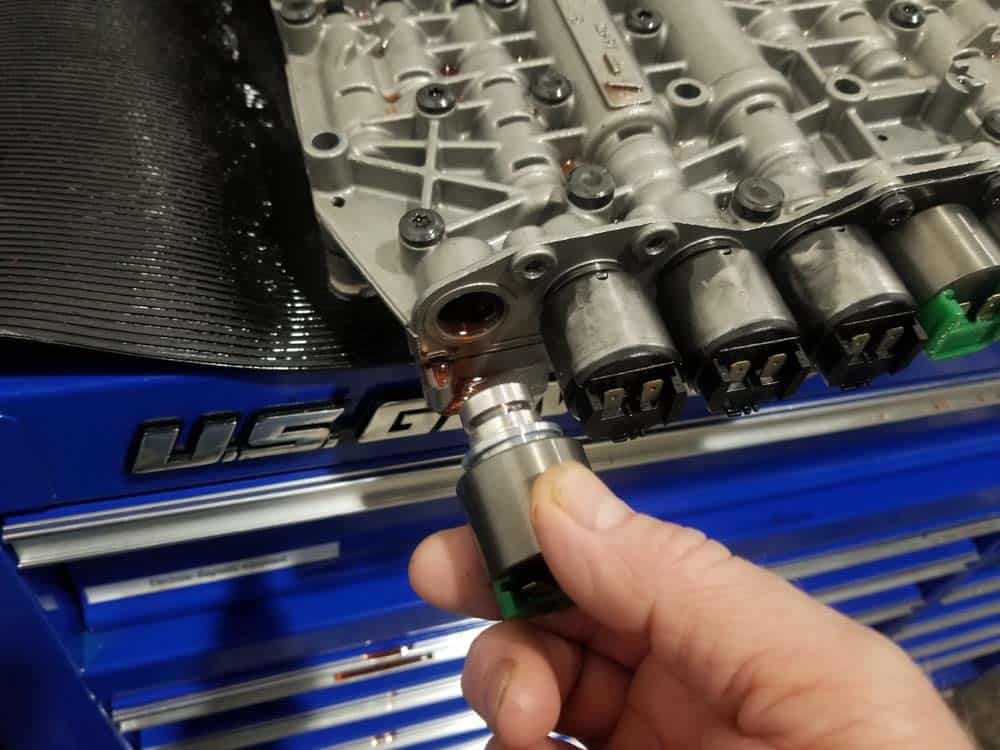
- Repeat for the other two black solenoids. Note that the black solenoids can often be difficult to get out. This is because they slightly shift at an angle and bind up. If the solenoid is straight, it will easily pop out of the valve body. NEVER try and pry the solenoid out...even with a plastic tool. Attempting to pry the solenoid out can damage the valve body.
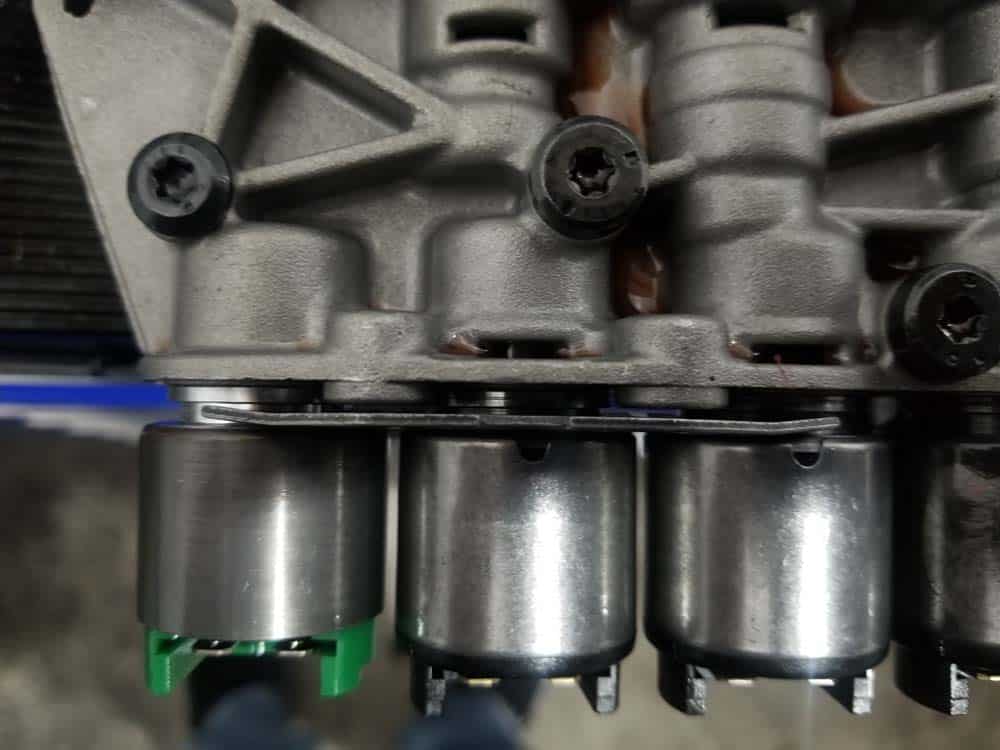
- Replace the mounting plate. Note that the mounting plate is slightly curved on the tips...the curve should be facing in as shown below. Torque the mounting bolts to 6 Nm (4 ft-lb).
- Repeat for the left three solenoids.
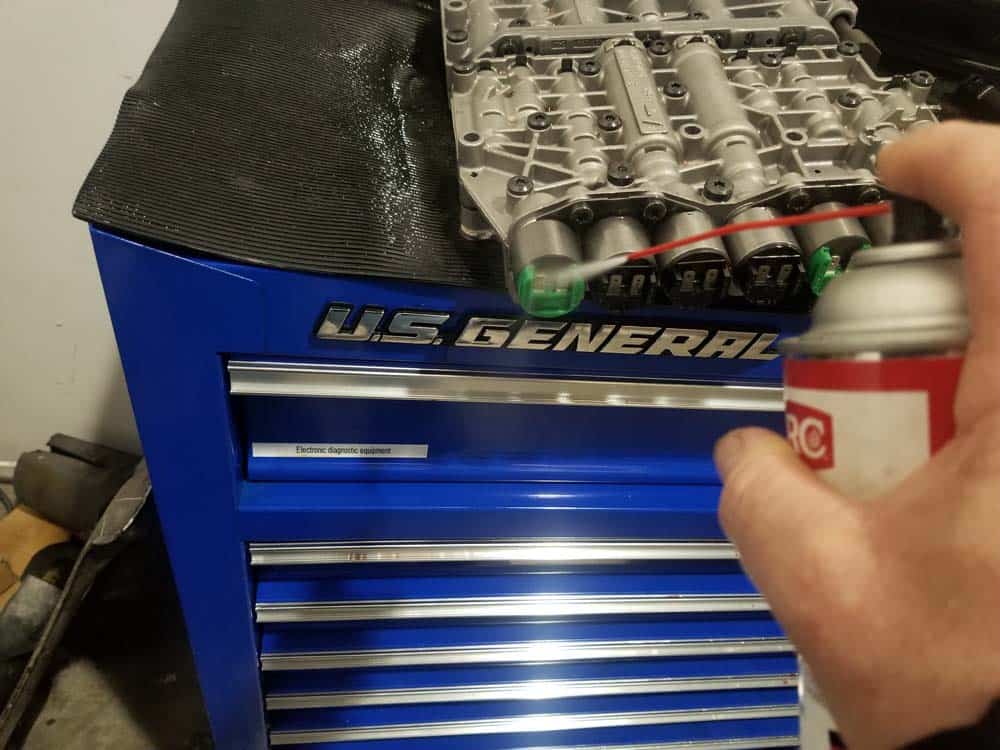
- We highly recommend using some CRC Electronic Cleaner to thoroughly spray out the solenoid electrical connections removing any dirt and oil.

Section 4 (Optional) - Replacing the Plastic Lubrication Pipe O-rings
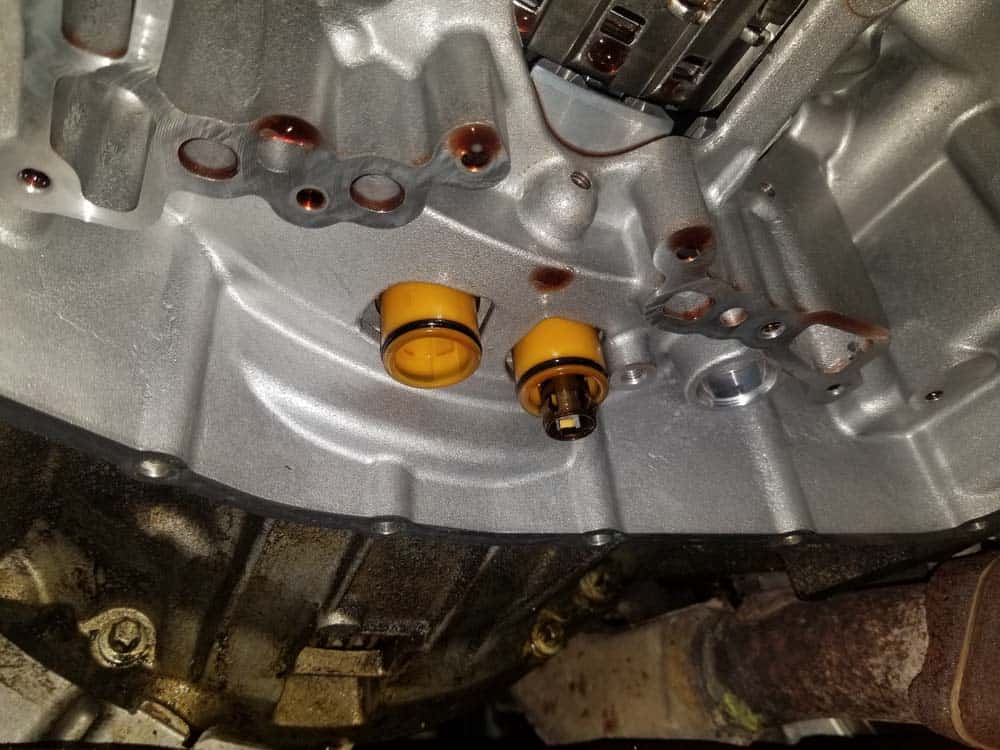
It is strongly recommended that you replace the o-rings on the plastic lubrication pipes while you have the valve body out of the vehicle. Worn o-rings can cause a drop in fluid pressure and affect the transmission's performance. If you did not order the o-rings, please see our parts list above for a link to purchase them.- Locate the two plastic lubrication pipes at the front of the transmission. Sometimes the left pipe falls out with the valve body...if it is missing, check to see if it is stuck to the top of the valve body or is on the floor.
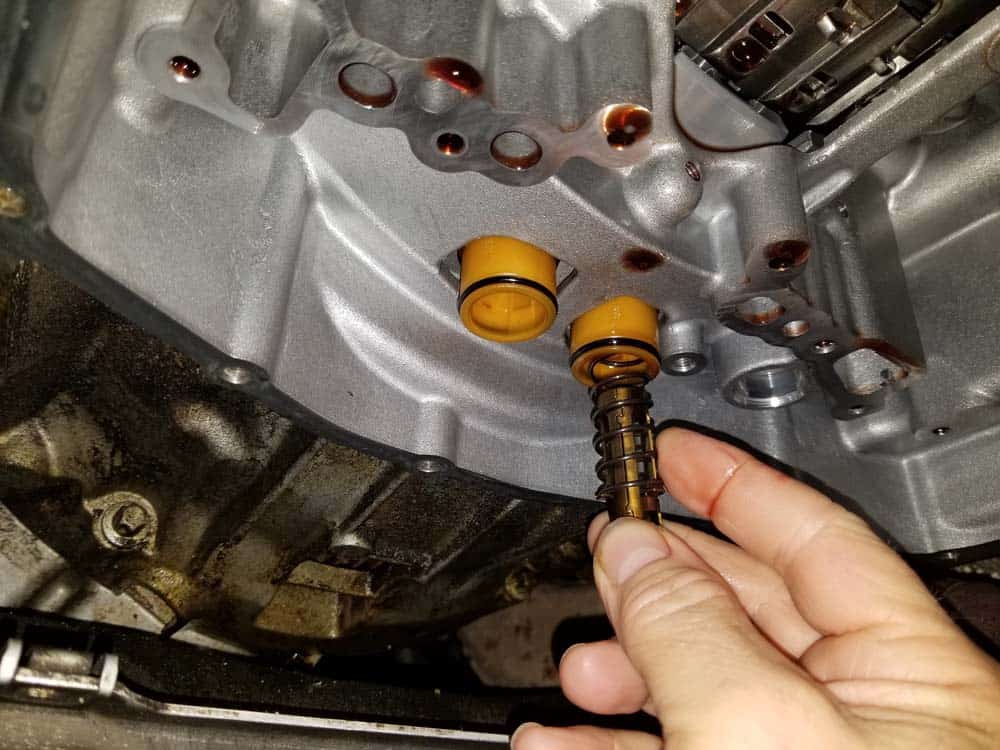
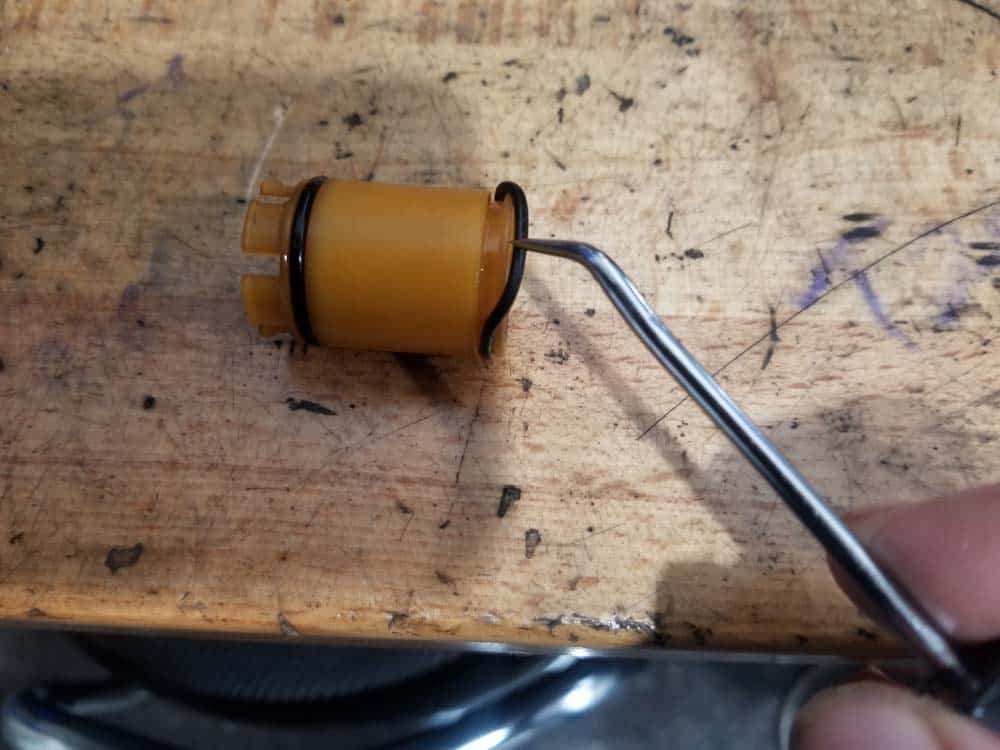
- The right plastic pipe houses the flow control valve...it is a little trickier to remove because it snaps into a recess inside the transmission. The best way to get it out without cracking it is with a pair of long nose pliers. First, begin by removing the flow control valve by pressing up on the spring with you thumb and slightly turning it.
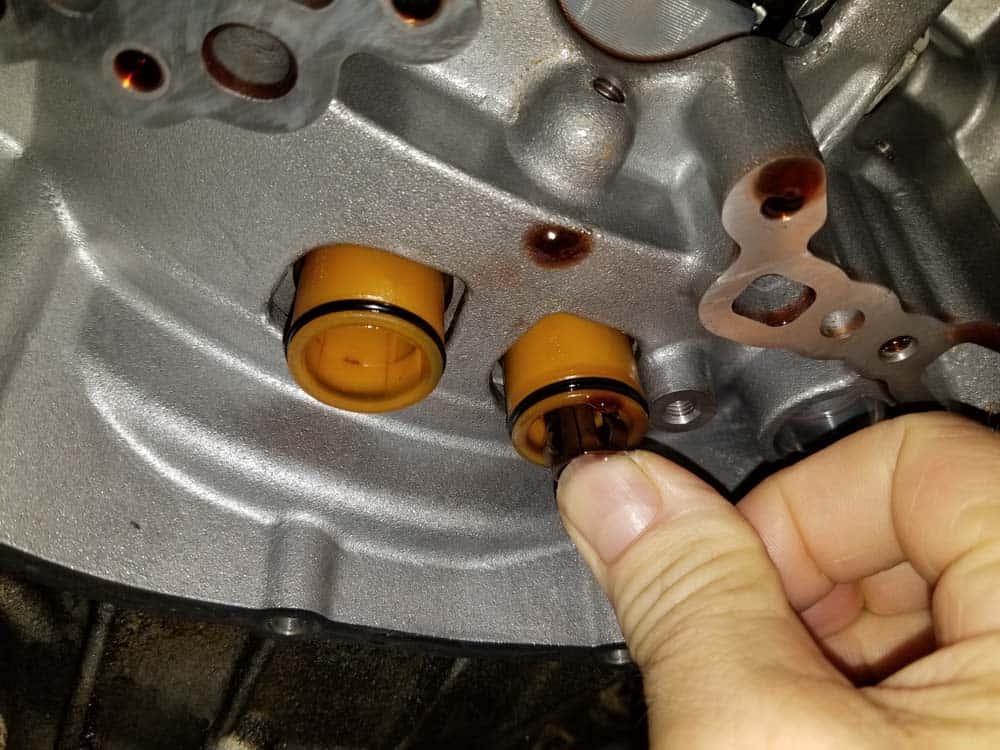
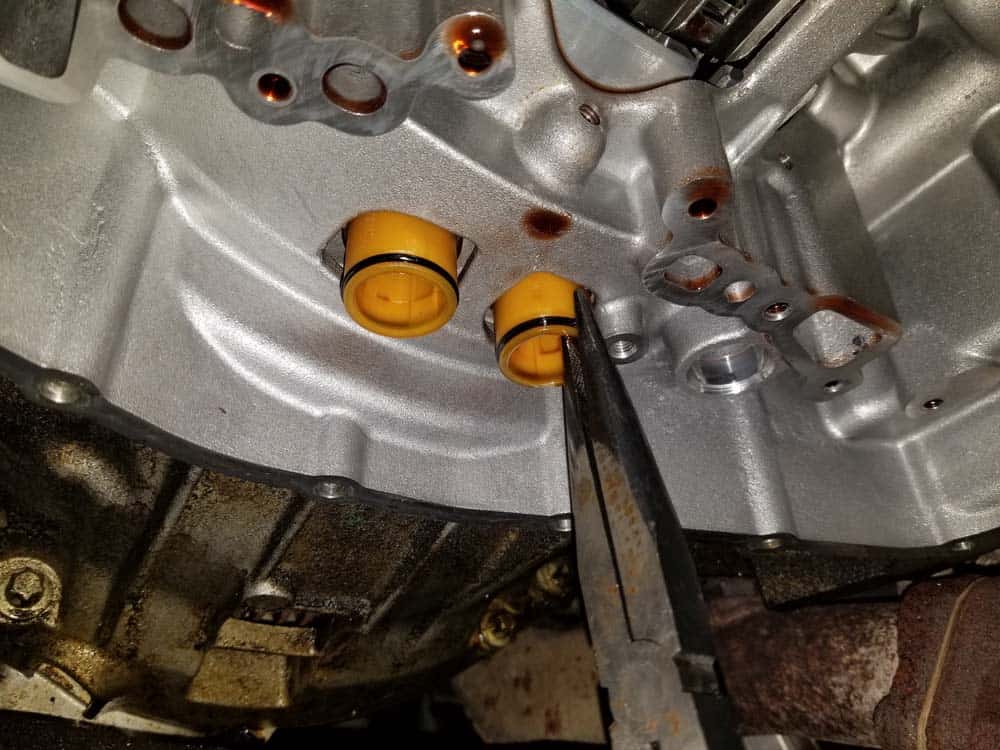
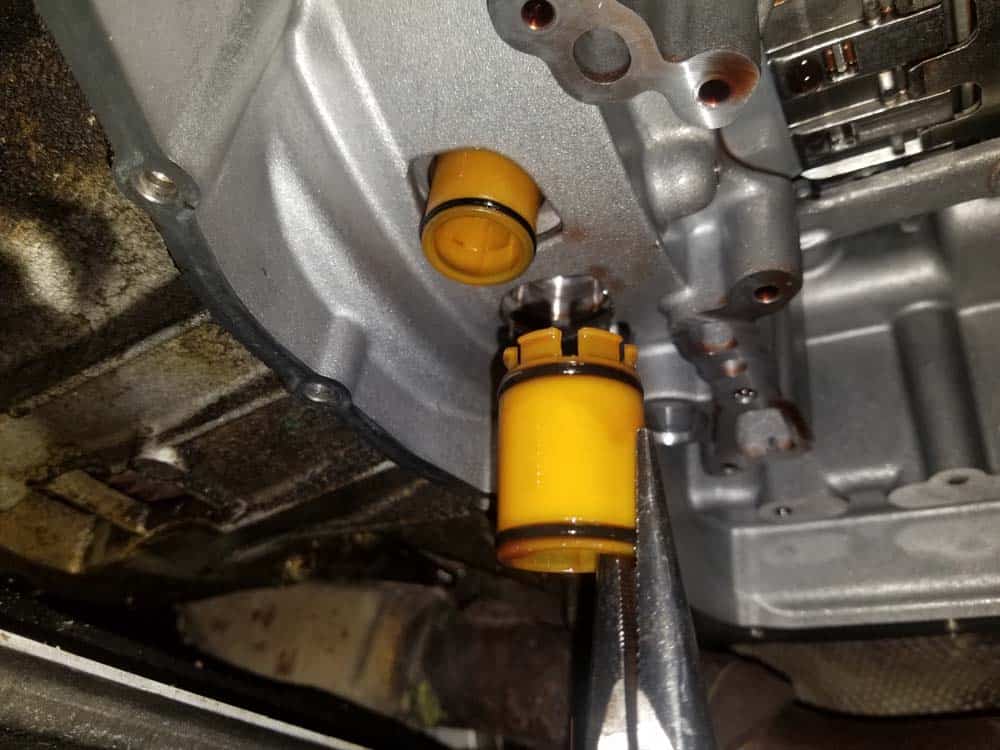
- With the flow control valve removed, grasp the plastic pipe with a pair of long nose pliers as shown below. The trick to removing the pipe is to tilt it at an angle while turning it and pulling at the same time. This will cause it to release from the recess in the transmission.
- If the left pipe is still in the transmission, grasp it and pull it out.
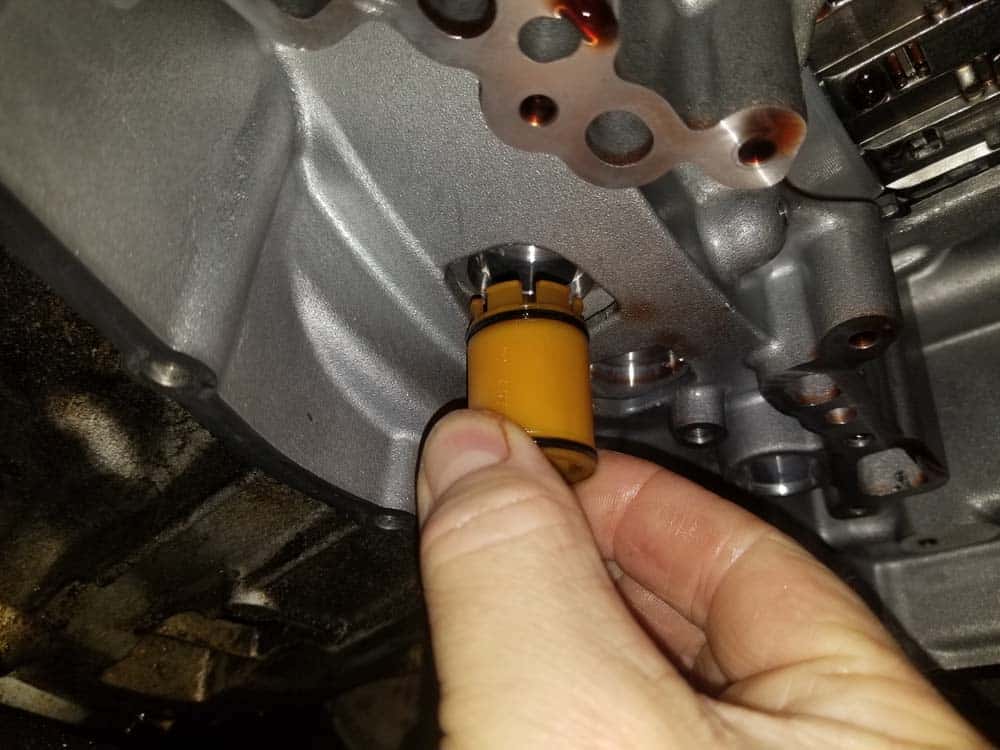
- Use a metal pick to remove the old o-rings off of the pipes. Install the new o-rings and reinstall the pipes and flow control valve back into the transmission.
Section 5 - Reassembling the Transmission
Reassembling the transmission is a very straightforward process. We strongly recommend using an assistant when installing the valve body...it is challenging for one person to do it on their own. It is very difficult to hold the valve body with one hand while making the electrical connections and installing the first few mounting bolts with the other.- Remove the rear wiring harness mounting clip that was left on the upper solenoid lead and install it in the top of the valve body as shown.
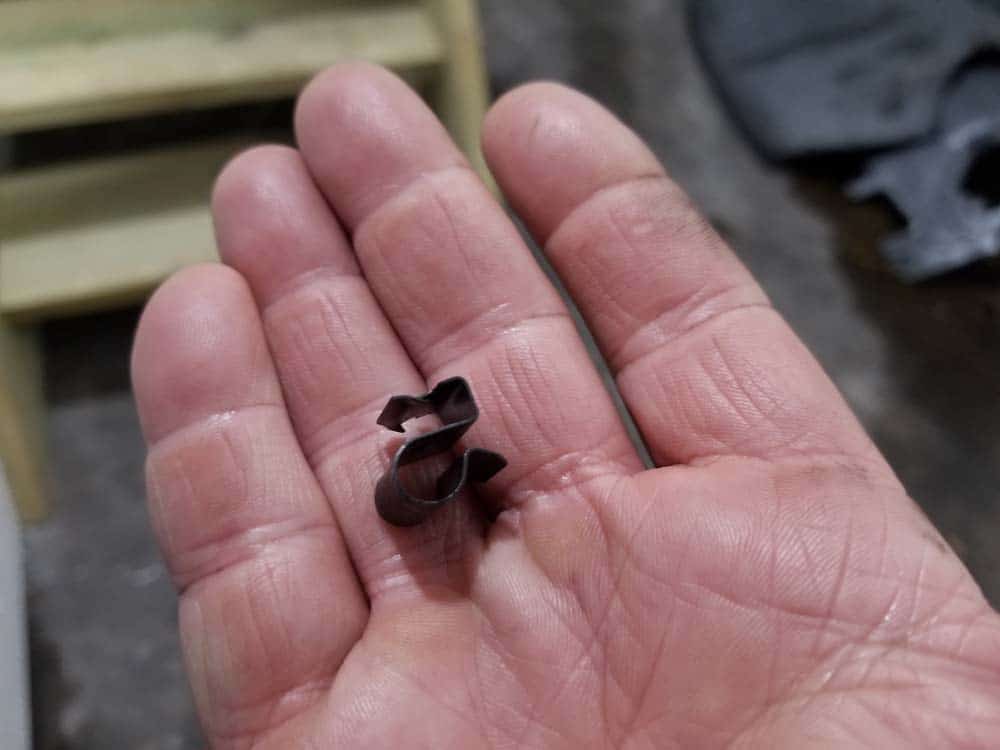

- There is one more "gold" clip that attaches to the top, securing the wiring harness to the valve body. It will be installed as the valve body is lifted into the bottom of the transmission. If you have lost it (or it wasn't installed when you removed the valve body) just disregard it. They are nearly impossible to reorder and it will not affect the transmission's function if it is missing.
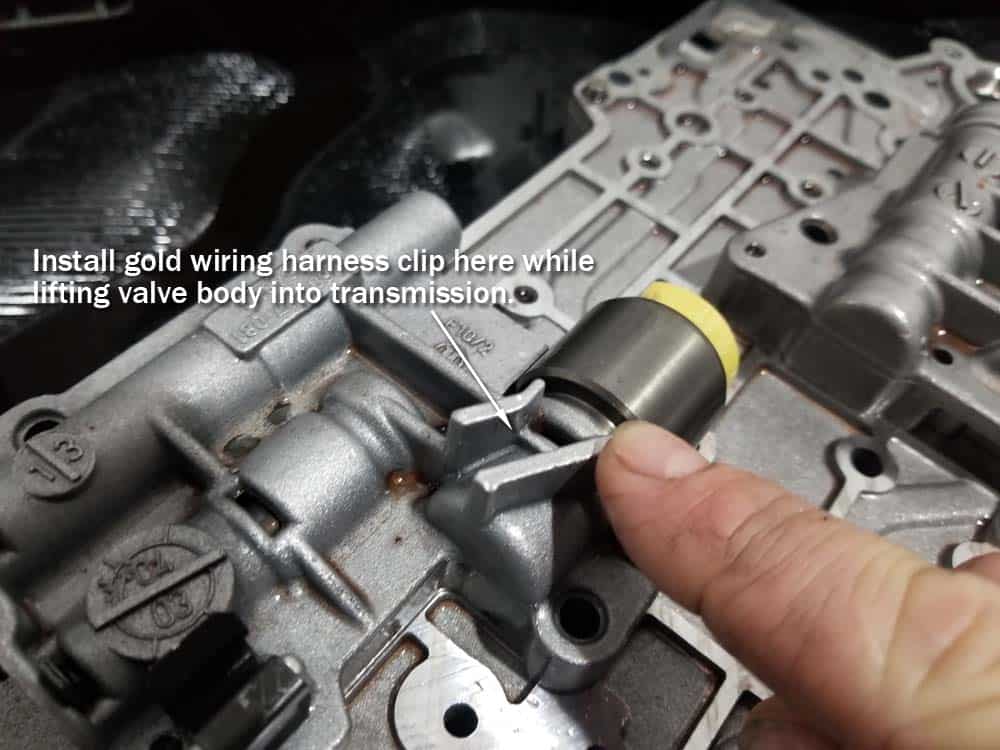
- With the aid of a helper, carefully raise the valve body back up into the transmission. Connect the upper yellow solenoid to the wiring harness, then route the wiring harness through the top of the valve body. Insert the wiring harness into the rear wiring harness mounting clip. Install the gold wiring harness clip (if you still have it).
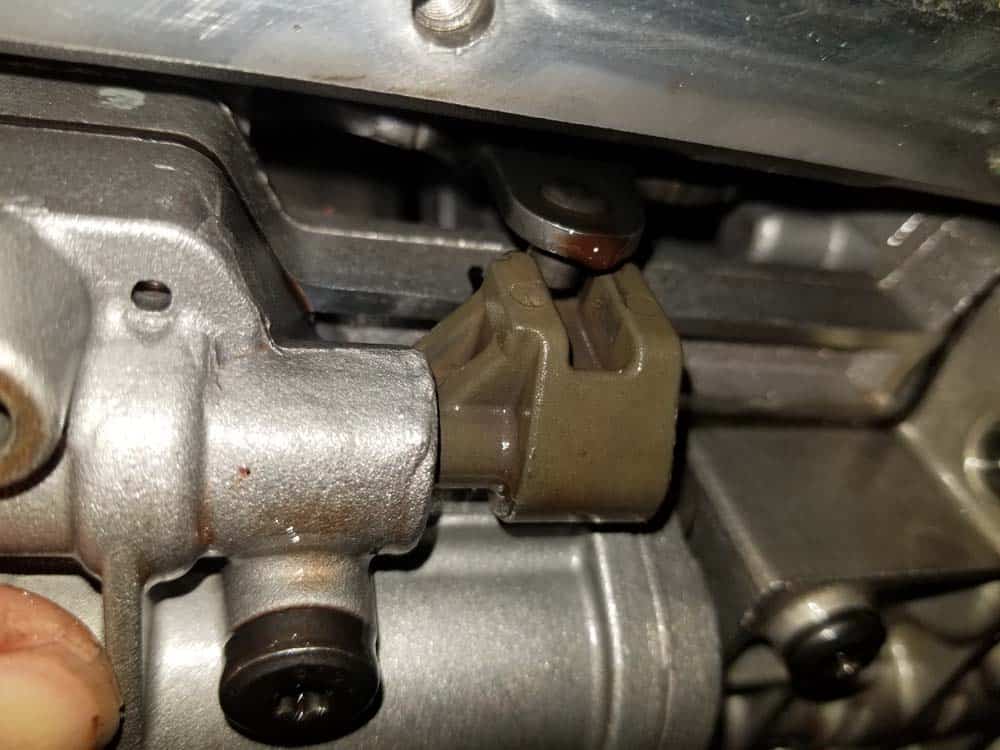
- Finish raising the valve body back into the transmission. Make sure the pin on the shift bracket lines up with the piston on the left side of the valve body.
- Quickly check to make sure the plastic lubrication pipes are properly seated in the valve body.
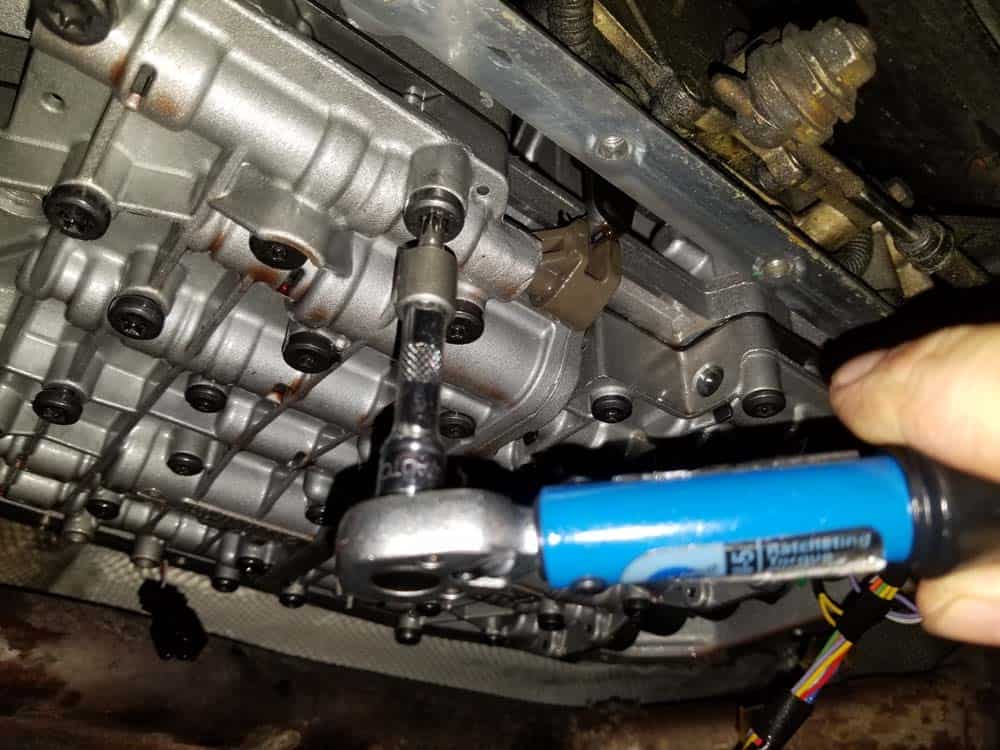
- If every thing looks good, install the fourteen mounting bolts and hand tighten.
- Using a low end torque wrench, tighten the fourteen mounting bolts to 8 Nm (6 ft-lb).
- Reconnect the speed sensor lead.
- Reconnect the rear six BMW 5HP19 solenoids.
Section 6 - Reinstalling the Oil Pans
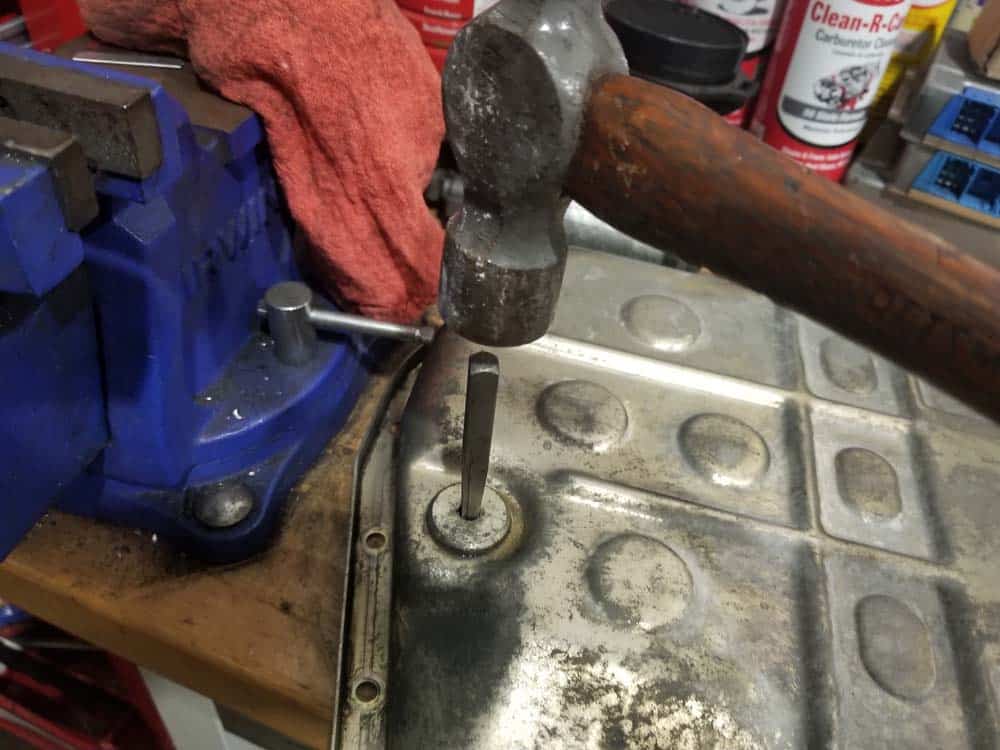
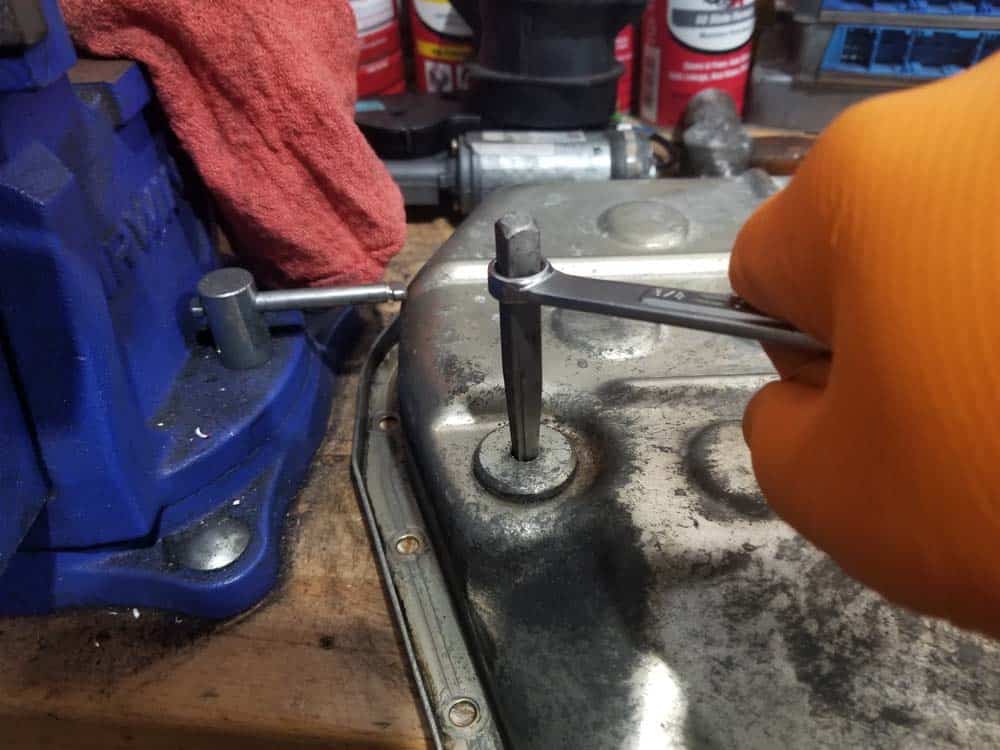
- If you had to drill out the torx drain plug in section 1, you will now need to extract the old one out of the pan (if you didn’t proceed to step 2). Soak the plug inside and out with PB Blaster and let sit for 5 to 10 minutes. Next, hammer a bolt extractor into the hole that was drilled into the plug and turn with an open ended wrench to extract.
- Reinstall the transmission oil filter. Torque the two filter mounting bolts to 9 Nm (6.5 ft-lb).
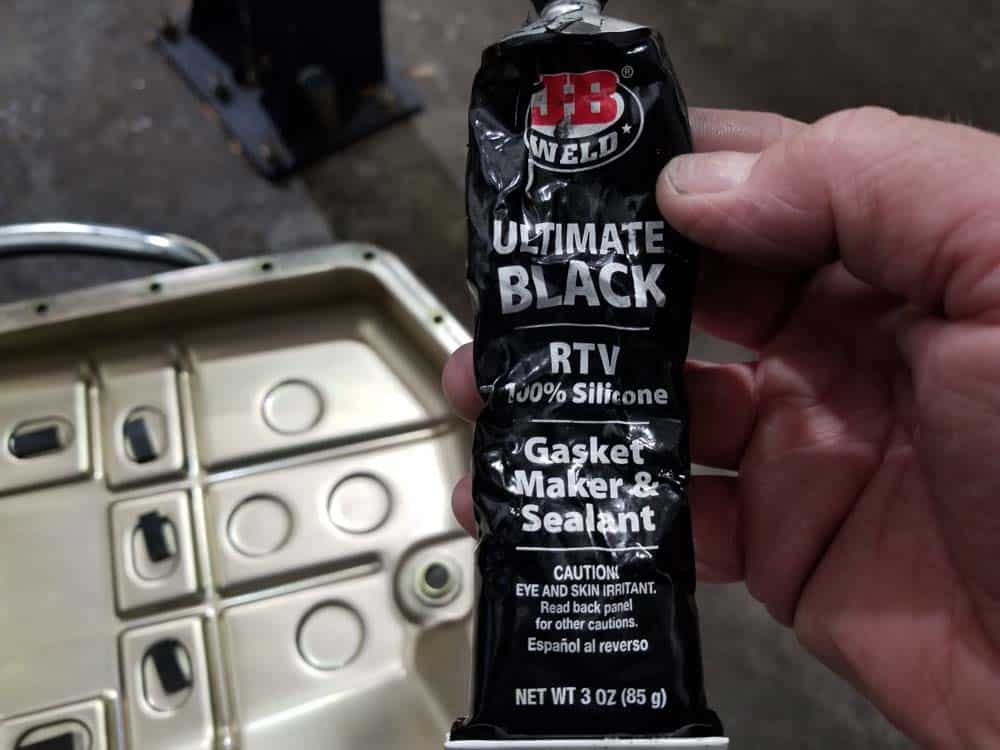
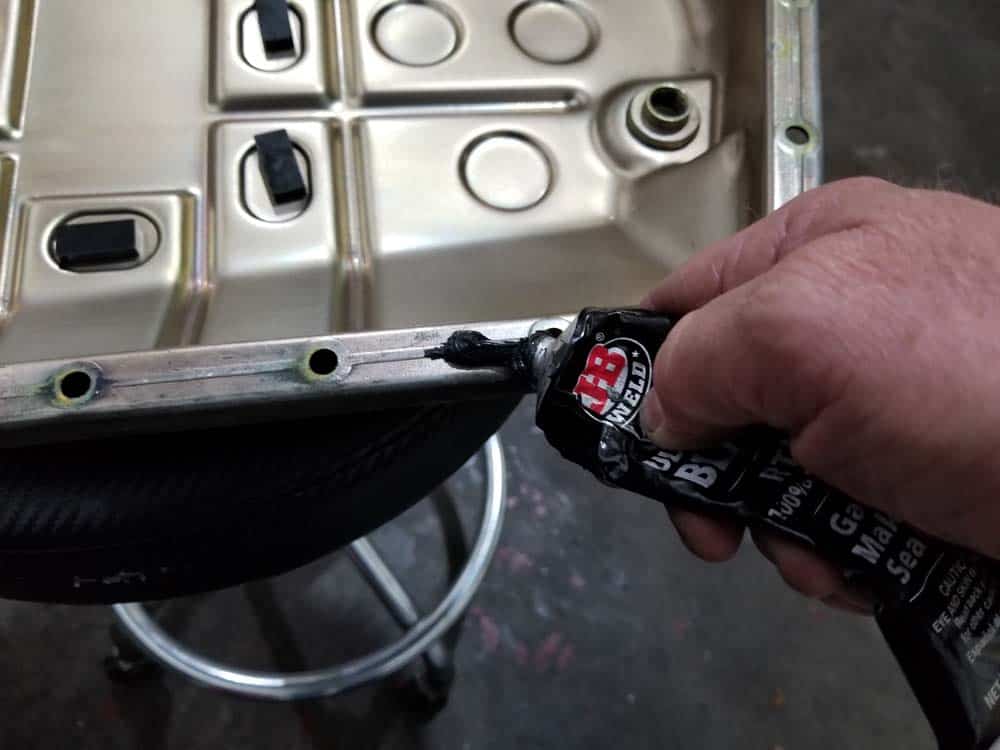
- Using a high quality RTV silicone gasket sealant, squeeze out six small spots around the perimeter of the oil pan as shown below. These are simply to help hold the new gasket in place during installation, so do not over apply it. Lay the new gasket on top of the spots of sealant and let dry for about 10-15 minutes. Put the magnets back in the pan.

- Reinstall the oil pan on the bottom of the transmission using new oil pan bolts. Don't forget to put the magnets back in the pan. Torque the pan bolts in sequential order (you do not need to use a cross pattern). Torque the pan bolts to 6 Nm (4 ft-lb).
- Install the drain plug and torque to 35 Nm (26 ft-lb).
Section 7 - Refilling the BMW 5HP19 transmission with fluid
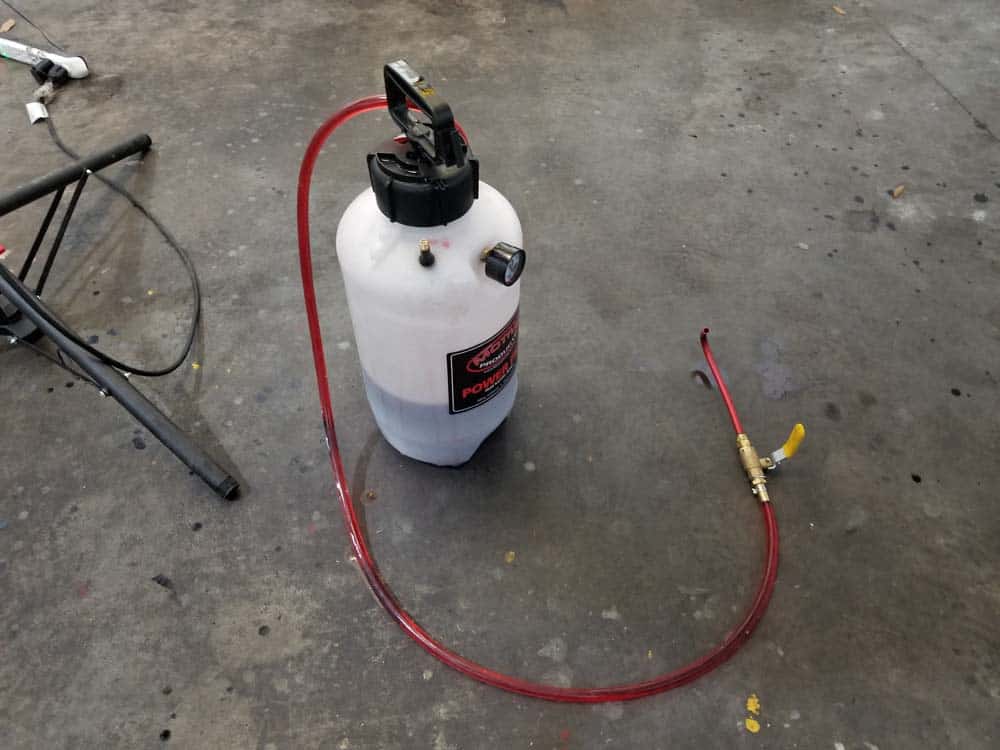
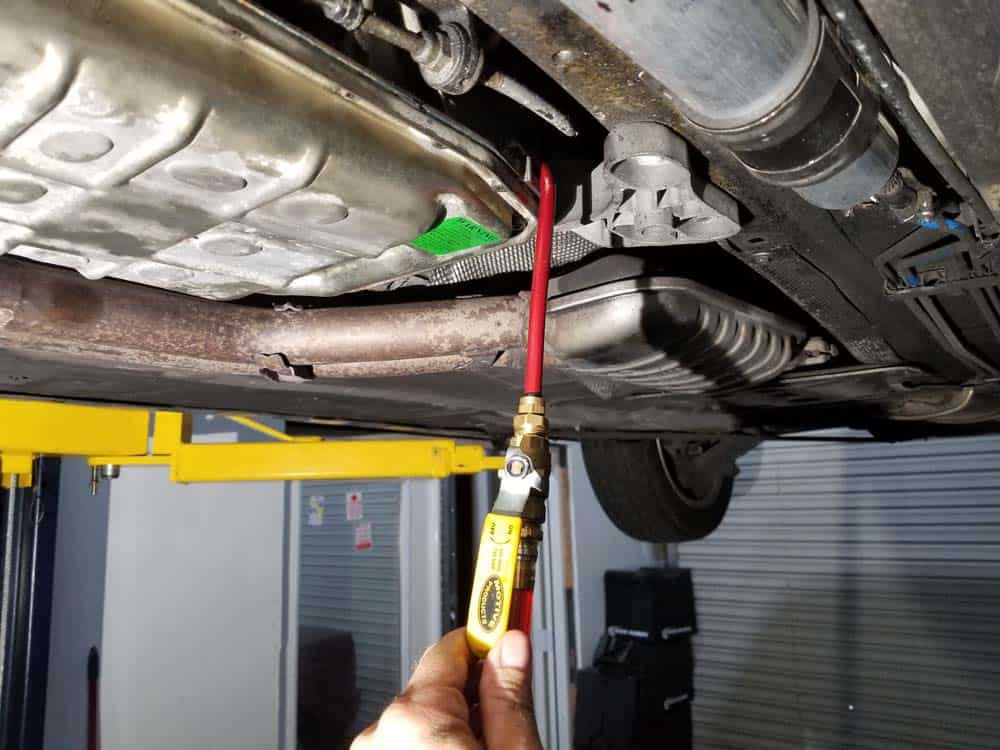
Refilling the BMW 5HP19 five speed transmission is a two step process. First the transmission oil pan must be initially filled. After the initial fill, the transmission must be warmed up to its final fill temperature (100F) before topping off with fluid. Per the manufacturer (ZF) specifications, the vehicle must be running and the transmission in park while topping off the transmission - topping of the transmission with the engine off could cause an under filled transmission. - Fill your fluid transfer pump with 6 quarts of approved transmission fluid. Pump the oil pan completely full of transmission fluid until it begins to pour back out through the fill hole.
- Install the new fill plug hand tight. DO NOT torque it yet. You will need to remove it to top off the fluid after bringing it to the final fill temperature (100F).
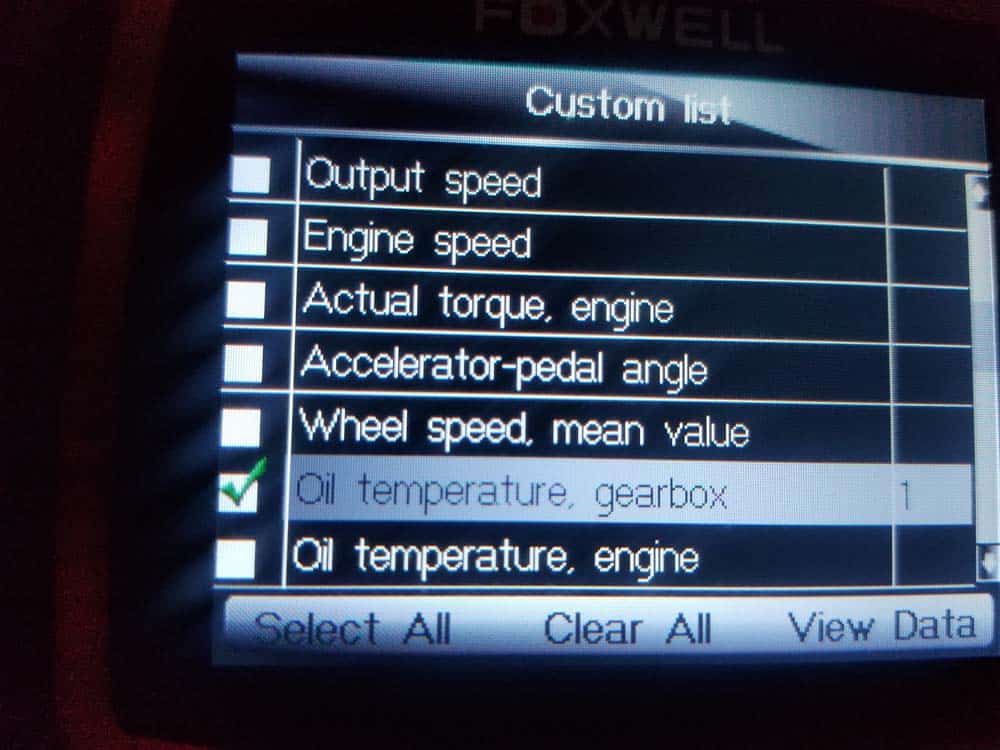
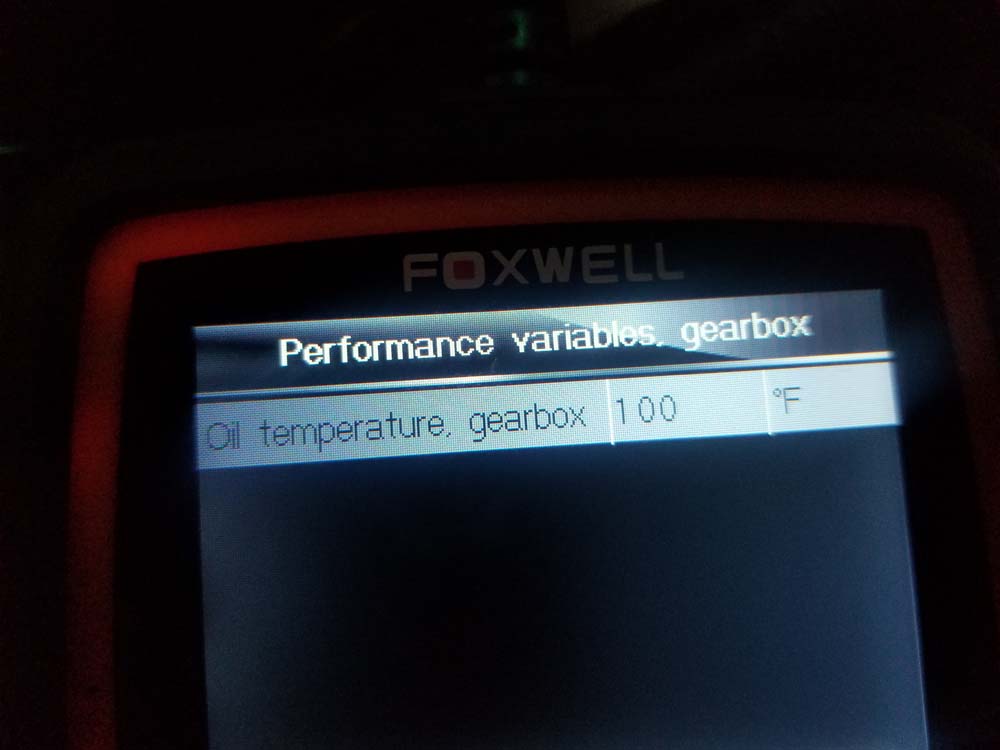
- Start the car to warm up the transmission. Using a BMW diagnostic scanner, hook up to the OBDII port and get to the correct screen that displays the gear box temperature.
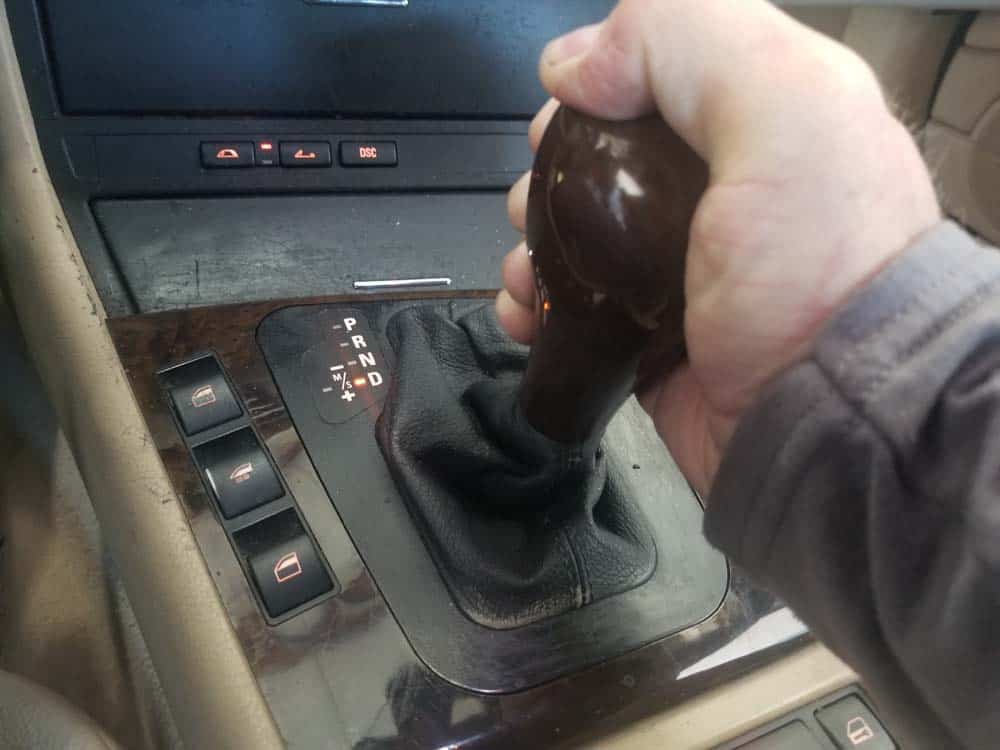
- With your foot on the brake, slowly shift through the gears, pausing 3 seconds between gear changes. Repeat this process about six times. This will circulate the transmission fluid through the valve body and other transmission components.
- When the transmission reaches 100F, leave the vehicle running and in park and proceed directly back to the transmission fill hole.
- Remove the fill plug and finish pumping fluid into the transmission until it starts to flow out of the hole. Your transmission is now properly filled.
- Replace the new fill plug and torque to 30 Nm (22 ft-lb).
- With the engine still running, check for any visual leaks around the gasket.
- You can now turn the engine off.
BMW 5HP19 Solenoid Replacement Finished